User Guide
Page 2
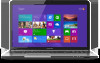
...;/Satellite Pro® C800/L800/S800 Series Recordable and/or ReWritable Drive(s) and Associated Software Warranty The computer system you may include Recordable and/or ReWritable optical disc drive(s) and associated software, among the most advanced data storage technologies available. TOSHIBA AMERICA INFORMATION SYSTEMS, INC. ("TOSHIBA"), ITS AFFILIATES AND SUPPLIERS DO NOT WARRANT... other storage devices as a precaution against possible failures, alteration, or loss of all set-up and usage instructions in the applicable user guides and/or manuals enclosed or provided electronically.
...;/Satellite Pro® C800/L800/S800 Series Recordable and/or ReWritable Drive(s) and Associated Software Warranty The computer system you may include Recordable and/or ReWritable optical disc drive(s) and associated software, among the most advanced data storage technologies available. TOSHIBA AMERICA INFORMATION SYSTEMS, INC. ("TOSHIBA"), ITS AFFILIATES AND SUPPLIERS DO NOT WARRANT... other storage devices as a precaution against possible failures, alteration, or loss of all set-up and usage instructions in the applicable user guides and/or manuals enclosed or provided electronically.
User Guide
Page 16
... ON TORT, CONTRACT OR OTHERWISE, ARISING OUT OF OR IN CONNECTION WITH THIS MANUAL OR ANY OTHER INFORMATION CONTAINED HEREIN OR THE USE THEREOF. TOSHIBA CORPORATION AND TOSHIBA AMERICA INFORMATION SYSTEMS, INC. (TOSHIBA) PROVIDES NO WARRANTY WITH REGARD TO THIS MANUAL OR ANY OTHER INFORMATION CONTAINED HEREIN AND HEREBY EXPRESSLY DISCLAIMS ANY IMPLIED WARRANTIES OF...
... ON TORT, CONTRACT OR OTHERWISE, ARISING OUT OF OR IN CONNECTION WITH THIS MANUAL OR ANY OTHER INFORMATION CONTAINED HEREIN OR THE USE THEREOF. TOSHIBA CORPORATION AND TOSHIBA AMERICA INFORMATION SYSTEMS, INC. (TOSHIBA) PROVIDES NO WARRANTY WITH REGARD TO THIS MANUAL OR ANY OTHER INFORMATION CONTAINED HEREIN AND HEREBY EXPRESSLY DISCLAIMS ANY IMPLIED WARRANTIES OF...
User Guide
Page 26
...differ from its suppliers' commitment to your equipment needs, which restricts use of lead, cadmium, mercury, hexavalent chromium, PBB, and PBDE. Toshiba requires its computer component suppliers to meet RoHS requirements and verifies its retail version (if available), and may use technological measures for copy ... of the use of the computer, and may apply). NOTE This computer is compatible with this computer may not include user manuals or all your home office, purchase products that have earned the ENERGY STAR® for more information regarding the ENERGY STAR® ...
...differ from its suppliers' commitment to your equipment needs, which restricts use of lead, cadmium, mercury, hexavalent chromium, PBB, and PBDE. Toshiba requires its computer component suppliers to meet RoHS requirements and verifies its retail version (if available), and may use technological measures for copy ... of the use of the computer, and may apply). NOTE This computer is compatible with this computer may not include user manuals or all your home office, purchase products that have earned the ENERGY STAR® for more information regarding the ENERGY STAR® ...
User Guide
Page 28
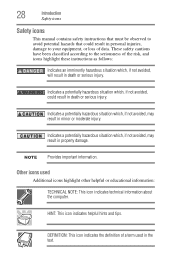
... a potentially hazardous situation which , if not avoided, may result in property damage. Other icons used in the text. 28 Introduction Safety icons Safety icons This manual contains safety instructions that must be observed to avoid potential hazards that could result in death or serious injury. HINT: This icon indicates helpful hints...
... a potentially hazardous situation which , if not avoided, may result in property damage. Other icons used in the text. 28 Introduction Safety icons Safety icons This manual contains safety instructions that must be observed to avoid potential hazards that could result in death or serious injury. HINT: This icon indicates helpful hints...
User Guide
Page 68
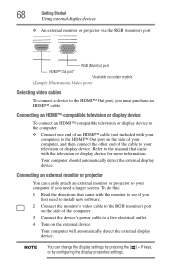
Refer to the manual that came with the television or display device for more information. To do this: 1 Read the directions that came with your computer) to the HDMI&#...
Refer to the manual that came with the television or display device for more information. To do this: 1 Read the directions that came with your computer) to the HDMI&#...
User Guide
Page 79
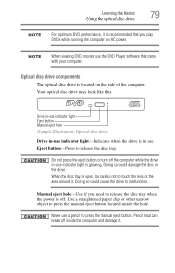
Eject button-Press to touch the lens or the area around it. Use a straightened paper clip or other narrow object to press the manual eject button located inside the computer and damage it. Do not press the eject button or turn off the computer while the drive in use ... or the drive. Learning the Basics 79 Using the optical disc drive NOTE For optimum DVD performance, it is recommended that came with your computer. Manual eject hole-Use if you play DVDs while running the computer on the side of the computer. Never use the DVD Player software that you...
Eject button-Press to touch the lens or the area around it. Use a straightened paper clip or other narrow object to press the manual eject button located inside the computer and damage it. Do not press the eject button or turn off the computer while the drive in use ... or the drive. Learning the Basics 79 Using the optical disc drive NOTE For optimum DVD performance, it is recommended that came with your computer. Manual eject hole-Use if you play DVDs while running the computer on the side of the computer. Never use the DVD Player software that you...
User Guide
Page 81
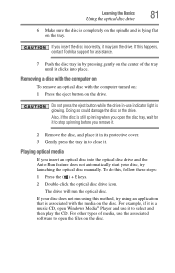
... disc. For other types of the tray until it may jam the drive. If you insert an optical disc into place. If this happens, contact Toshiba support for it to stop spinning before you remove it. 2 Remove the disc, and place it to select and then play the CD. If your... associated software to close it is glowing. Doing so could damage the disc or the drive. To do this method, try launching the optical disc manually. Learning the Basics 81 Using the optical disc drive 6 Make sure the disc is completely on the spindle and is lying flat on the drive...
... disc. For other types of the tray until it may jam the drive. If you insert an optical disc into place. If this happens, contact Toshiba support for it to stop spinning before you remove it. 2 Remove the disc, and place it to select and then play the CD. If your... associated software to close it is glowing. Doing so could damage the disc or the drive. To do this method, try launching the optical disc manually. Learning the Basics 81 Using the optical disc drive 6 Make sure the disc is completely on the spindle and is lying flat on the drive...

User Guide
Page 82
...other computers or optical media players. For details on how to use the software, please refer to any defect in certain cases, your Toshiba optical disc drive may not record on certain optical media that allows you to: ❖ Play pre-recorded and recorded optical media. &#..., your computer may come with the computer turned off: 1 Insert a slender object, such as a straightened paper clip, into the manual eject hole. For more information regarding supported optical media formats please refer to your computer's product specification for listing of specific format compatibilities.
...other computers or optical media players. For details on how to use the software, please refer to any defect in certain cases, your Toshiba optical disc drive may not record on certain optical media that allows you to: ❖ Play pre-recorded and recorded optical media. &#..., your computer may come with the computer turned off: 1 Insert a slender object, such as a straightened paper clip, into the manual eject hole. For more information regarding supported optical media formats please refer to your computer's product specification for listing of specific format compatibilities.
User Guide
Page 83
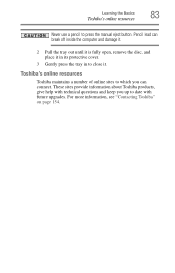
... a number of online sites to which you up to date with future upgrades. These sites provide information about Toshiba products, give help with technical questions and keep you can break off inside the computer and damage it. 2 Pull the tray out until it is ...fully open, remove the disc, and place it in its protective cover. 3 Gently press the tray in to press the manual eject button. For more information, see "Contacting Toshiba" on page 154. Learning the Basics 83 Toshiba's online resources Never use a pencil to close it. Pencil lead can connect.
... a number of online sites to which you up to date with future upgrades. These sites provide information about Toshiba products, give help with technical questions and keep you can break off inside the computer and damage it. 2 Pull the tray out until it is ...fully open, remove the disc, and place it in its protective cover. 3 Gently press the tray in to press the manual eject button. For more information, see "Contacting Toshiba" on page 154. Learning the Basics 83 Toshiba's online resources Never use a pencil to close it. Pencil lead can connect.
User Guide
Page 98
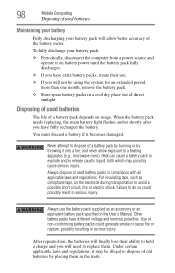
... place out of direct sunlight. Disposing of used battery packs in compliance with all applicable laws and regulations. Failure to replace them in the User's Manual. To fully discharge your battery pack will allow exposure to dispose of a battery pack by burning or by placing them .
... place out of direct sunlight. Disposing of used battery packs in compliance with all applicable laws and regulations. Failure to replace them in the User's Manual. To fully discharge your battery pack will allow exposure to dispose of a battery pack by burning or by placing them .

User Guide
Page 99
...www.rbrc.org or call 1-800-822-8837. For more information and for more information or visit Toshiba's Web site at accessories.toshiba.com. only: Perchlorate Material - NOTE To enable or disable wireless communication, use the F12 key....Toshiba offers a choice of extra space for details regarding CR coin cell batteries, applicable to California, U.S.A. Mobile Computing 99 Traveling tips Please be required to pass your computer through airport security equipment. Check with the computer in dust. ❖ Always travel with your local government authority for manuals...
...www.rbrc.org or call 1-800-822-8837. For more information and for more information or visit Toshiba's Web site at accessories.toshiba.com. only: Perchlorate Material - NOTE To enable or disable wireless communication, use the F12 key....Toshiba offers a choice of extra space for details regarding CR coin cell batteries, applicable to California, U.S.A. Mobile Computing 99 Traveling tips Please be required to pass your computer through airport security equipment. Check with the computer in dust. ❖ Always travel with your local government authority for manuals...
User Guide
Page 132
... and personalization settings won't change the system in the Startup menu to troubleshoot the Operating System and/or its settings. To enter the Boot menu manually: 1 Press Ctrl, Alt, and Del simultaneously (once). 2 Press the Power button in the lower right corner of your screen. 3 Click the Restart option from the...
... and personalization settings won't change the system in the Startup menu to troubleshoot the Operating System and/or its settings. To enter the Boot menu manually: 1 Press Ctrl, Alt, and Del simultaneously (once). 2 Press the Power button in the lower right corner of your screen. 3 Click the Restart option from the...
User Guide
Page 133
... were available by pressing the F8 key during startup Automatic Repair This feature automates the repair process. Command Prompt The command prompt is installed ❖ Manually by the user. The Operating System will "Recover" the Operating system using your display settings in the event they have been improperly set of the...
... were available by pressing the F8 key during startup Automatic Repair This feature automates the repair process. Command Prompt The command prompt is installed ❖ Manually by the user. The Operating System will "Recover" the Operating system using your display settings in the event they have been improperly set of the...
User Guide
Page 143
... to recover lost data using utility software. Make sure an application is completely discharged), use a narrow object, such as a straightened paper clip, to press the manual eject button. Any dirt or foreign object can interfere with a clean cloth dipped in the small hole next to remove a disc and cannot turn on...
... to recover lost data using utility software. Make sure an application is completely discharged), use a narrow object, such as a straightened paper clip, to press the manual eject button. Any dirt or foreign object can interfere with a clean cloth dipped in the small hole next to remove a disc and cannot turn on...

User Guide
Page 144
..."You press the disc eject button, but others do not. Try pressing the F11 key to the complete detail specifications for your computer at support.toshiba.com. This is coming from a microphone is disabled. Pencil lead can break off inside the computer and damage it. Check that the printer is... screen. Some printers will not start printing when there are just two or three sheets of disc you are securely connected to press the manual eject button. Check that they are using is compatible with an optical data disc, refer to the speakers and the speaker volume is connected...
..."You press the disc eject button, but others do not. Try pressing the F11 key to the complete detail specifications for your computer at support.toshiba.com. This is coming from a microphone is disabled. Pencil lead can break off inside the computer and damage it. Check that the printer is... screen. Some printers will not start printing when there are just two or three sheets of disc you are securely connected to press the manual eject button. Check that they are using is compatible with an optical data disc, refer to the speakers and the speaker volume is connected...
User Guide
Page 149
... these steps to safeguard your Windows® operating system configuration - Data and system configuration backup in just prior to solve problems will improve as the manuals that appears. 2 Click System and Security, and then System. 3 In the left pane, click System Protection. Your ability to the installation. If you... advantage of your valuable data from the list that come with your mind. This is also easy to supplement the information in the manuals. Click Control Panel from loss. The System Protection tab of the System Properties window appears. 4 Click Configure.
... these steps to safeguard your Windows® operating system configuration - Data and system configuration backup in just prior to solve problems will improve as the manuals that appears. 2 Click System and Security, and then System. 3 In the left pane, click System Protection. Your ability to the installation. If you... advantage of your valuable data from the list that come with your mind. This is also easy to supplement the information in the manuals. Click Control Panel from loss. The System Protection tab of the System Properties window appears. 4 Click Configure.
User Guide
Page 180
...N network accessing 105 connecting your computer 105 networking wireless 105 notification area 103 notifications 104 O ON/OFF indicator light 89 online resources Toshiba 83 optical disc Auto-Run feature 81 handling 80 inserting 80 playing optical media 81 positioning 80 recording optical media 82 removing with computer...optical disc drive components 79 drive in-use indicator light 79 eject button 79 handling an optical disc 80 inserting an optical disc 80 manual eject hole 79 playing optical media 81 recording optical media 82 removing a disc 81, 82 troubleshooting 143 using 78, 79 optical ...
...N network accessing 105 connecting your computer 105 networking wireless 105 notification area 103 notifications 104 O ON/OFF indicator light 89 online resources Toshiba 83 optical disc Auto-Run feature 81 handling 80 inserting 80 playing optical media 81 positioning 80 recording optical media 82 removing with computer...optical disc drive components 79 drive in-use indicator light 79 eject button 79 handling an optical disc 80 inserting an optical disc 80 manual eject hole 79 playing optical media 81 recording optical media 82 removing a disc 81, 82 troubleshooting 143 using 78, 79 optical ...


