User Manual
Page 6
... Do not use . To obtain a clear picture, we recommend regular inspection and maintenance (cleaning or parts replacement) every 1,000 hours of the DVD/VCR. Keep the DVD/VCR connected to a warm place. For maximum protection, repack the unit as they may damage discs and internal parts. Do not use , be distorted... and the sound may not function properly in a hot and humid place just after a long period of the DVD/VCR. When the DVD/VCR is not in a room where you use the DVD/VCR in use volatile liquids, such as a wobbling table or inclined stand. In this unit, one of the most...
... Do not use . To obtain a clear picture, we recommend regular inspection and maintenance (cleaning or parts replacement) every 1,000 hours of the DVD/VCR. Keep the DVD/VCR connected to a warm place. For maximum protection, repack the unit as they may damage discs and internal parts. Do not use , be distorted... and the sound may not function properly in a hot and humid place just after a long period of the DVD/VCR. When the DVD/VCR is not in a room where you use the DVD/VCR in use volatile liquids, such as a wobbling table or inclined stand. In this unit, one of the most...
User Manual
Page 8
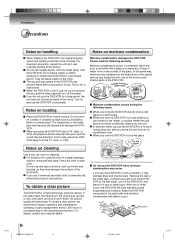
... 21/4/04, 11:09 Audio CDs Audio 12 cm Approx. 74 minutes 8 cm (CD Approx. 20 minutes single) The following discs. As such, the DVD/VCR may not respond to operation of a Video CD not equipped with the PBC function, you do not find 1 or ALL , disc playback will display a...PBC function (Version 1.1) Sound and movie can enjoy playback of the disc when the STOP (3) button is not permitted by the DVD/VCR or the disc. Some of this DVD/VCR. Introduction Notes on discs (continued) About this owner's manual Playable discs This owner's manual explains the basic instructions of the ...
... 21/4/04, 11:09 Audio CDs Audio 12 cm Approx. 74 minutes 8 cm (CD Approx. 20 minutes single) The following discs. As such, the DVD/VCR may not respond to operation of a Video CD not equipped with the PBC function, you do not find 1 or ALL , disc playback will display a...PBC function (Version 1.1) Sound and movie can enjoy playback of the disc when the STOP (3) button is not permitted by the DVD/VCR or the disc. Some of this DVD/VCR. Introduction Notes on discs (continued) About this owner's manual Playable discs This owner's manual explains the basic instructions of the ...
User Manual
Page 10
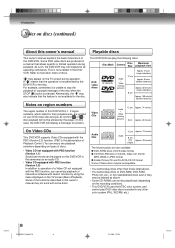
... Display window 11 AUDIO (L/R)/VIDEO IN (LINE IN 2) jacks 40 CHANNEL M/? DVD OPTICAL DIGITAL AUDIO OUT jack (dust protection cap) 20 DVD COAXIAL DIGITAL AUDIO OUT jack 20 DVD/VCR common AUDIO (L/R)/VIDEO OUT jacks 18 RF IN jack 14 DVD S-VIDEO OUT jack 19 S-VIDEO/COMPONENT Video selector switch 19... DVD AUDIO (L/R) OUT jacks 19 AC power cord 5 DVD COMPONENT OUT jacks 19 10 2C53301C (E)p02...
... Display window 11 AUDIO (L/R)/VIDEO IN (LINE IN 2) jacks 40 CHANNEL M/? DVD OPTICAL DIGITAL AUDIO OUT jack (dust protection cap) 20 DVD COAXIAL DIGITAL AUDIO OUT jack 20 DVD/VCR common AUDIO (L/R)/VIDEO OUT jacks 18 RF IN jack 14 DVD S-VIDEO OUT jack 19 S-VIDEO/COMPONENT Video selector switch 19... DVD AUDIO (L/R) OUT jacks 19 AC power cord 5 DVD COMPONENT OUT jacks 19 10 2C53301C (E)p02...
User Manual
Page 13
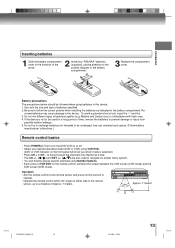
...compartment. 3 Replace the compartment cover. Do not mix different types of batteries specified. 2. they can directly access specific channels using VCR DVD. (DVD or VCR indicator on either side of the remote sensor, up to operate. • Operate the remote control within 30° angle ... Press POWER ( ) to turn the DVD VCR on or off. • Select your desired operating mode (DVD or VCR) using Number buttons. • Each press of VCR DVD on the remote control, switches the screen between the VCR screen (VCR mode) and the DVD screen (DVD mode). to move through the channels one...
...compartment. 3 Replace the compartment cover. Do not mix different types of batteries specified. 2. they can directly access specific channels using VCR DVD. (DVD or VCR indicator on either side of the remote sensor, up to operate. • Operate the remote control within 30° angle ... Press POWER ( ) to turn the DVD VCR on or off. • Select your desired operating mode (DVD or VCR) using Number buttons. • Each press of VCR DVD on the remote control, switches the screen between the VCR screen (VCR mode) and the DVD screen (DVD mode). to move through the channels one...
User Manual
Page 14
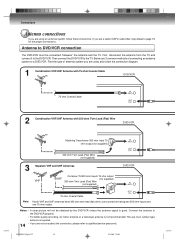
...required. 14 • If you are not sure about the connection, please refer to DVD/VCR connection The DVD/VCR must be obtained by the DVD/VCR unless the antenna signal is not recommended. Then connect the DVD/VCR to the DVD/VCR. Antenna to qualified service personnel. 2C53301C (E)p14-17 14 21/4/04, 11:09 The...Separate VHF and UHF Antennas VHF UHF Combiner 75/300 ohm Inputs 75 ohm output (not supplied) 300 ohm Twin Lead (Flat) Wire (not supplied) DVD/VCR IN (ANT) OUT (TV) 75 ohm Coaxial Cable Note: If both VHF and UHF antennas have 300 ohm twin lead (flat) wires, use a ...
...required. 14 • If you are not sure about the connection, please refer to DVD/VCR connection The DVD/VCR must be obtained by the DVD/VCR unless the antenna signal is not recommended. Then connect the DVD/VCR to the DVD/VCR. Antenna to qualified service personnel. 2C53301C (E)p14-17 14 21/4/04, 11:09 The...Separate VHF and UHF Antennas VHF UHF Combiner 75/300 ohm Inputs 75 ohm output (not supplied) 300 ohm Twin Lead (Flat) Wire (not supplied) DVD/VCR IN (ANT) OUT (TV) 75 ohm Coaxial Cable Note: If both VHF and UHF antennas have 300 ohm twin lead (flat) wires, use a ...
User Manual
Page 15
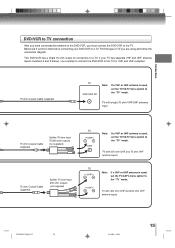
This DVD/VCR has a single 75 ohm output for VHF and UHF reception. 75 ohm Coaxial Cable (supplied) TV VHF/UHF IN Note: If a VHF or UHF antenna ... 3 below), use a splitter to connect the DVD/VCR to the TV for connection to the "TV" mode. Connections DVD/VCR to TV connection After you have connected the antenna to the DVD/VCR, you are 3 common methods of TV you must connect the DVD/VCR to the "TV" mode. If your DVD/VCR to the "TV" mode. TV with single...
This DVD/VCR has a single 75 ohm output for VHF and UHF reception. 75 ohm Coaxial Cable (supplied) TV VHF/UHF IN Note: If a VHF or UHF antenna ... 3 below), use a splitter to connect the DVD/VCR to the TV for connection to the "TV" mode. Connections DVD/VCR to TV connection After you have connected the antenna to the DVD/VCR, you are 3 common methods of TV you must connect the DVD/VCR to the "TV" mode. If your DVD/VCR to the "TV" mode. TV with single...
User Manual
Page 16
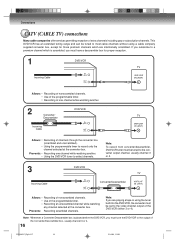
...the converter box (scrambled and unscrambled). * Using the programmable timer to the converter output channel, usually channel 3 or 4. 3 Incoming Cable DVD/VCR IN (ANT) OUT (TV) Converter/Descrambler TV VHF/UHF IN (ANT) Allows: * Recording of nonscrambled channels. * Use of the programmable... channel while watching any channel selected at the converter box. Prevents: * Recording one channel while watching another . * Using the DVD/VCR tuner to the output of extra channels including pay or subscription channels. Note: Whenever a Converter/Descrambler box is scrambled, you must...
...the converter box (scrambled and unscrambled). * Using the programmable timer to the converter output channel, usually channel 3 or 4. 3 Incoming Cable DVD/VCR IN (ANT) OUT (TV) Converter/Descrambler TV VHF/UHF IN (ANT) Allows: * Recording of nonscrambled channels. * Use of the programmable... channel while watching any channel selected at the converter box. Prevents: * Recording one channel while watching another . * Using the DVD/VCR tuner to the output of extra channels including pay or subscription channels. Note: Whenever a Converter/Descrambler box is scrambled, you must...
User Manual
Page 17
... channel selected at the converter box. Prevents: * Watching scrambled channels while recording another channel. * Using the DVD/VCR tuner to select channels. 5 Splitter Incoming Cable DVD/VCR Converter/Descrambler IN (ANT) OUT (TV) A/B Switch A B TV VHF/UHF IN (ANT) Allows: ...a scrambled or unscrambled channel while watching another . * Using the programmable timer to their descrambler equipment. Prevents: Using the DVD/VCR tuner to the "CATV" mode. DVD/VCR 6 Converter/Descrambler Splitter IN (ANT) OUT (TV) Converter/Descrambler Incoming Cable A/B Switch A B TV VHF/UHF IN...
... channel selected at the converter box. Prevents: * Watching scrambled channels while recording another channel. * Using the DVD/VCR tuner to select channels. 5 Splitter Incoming Cable DVD/VCR Converter/Descrambler IN (ANT) OUT (TV) A/B Switch A B TV VHF/UHF IN (ANT) Allows: ...a scrambled or unscrambled channel while watching another . * Using the programmable timer to their descrambler equipment. Prevents: Using the DVD/VCR tuner to the "CATV" mode. DVD/VCR 6 Converter/Descrambler Splitter IN (ANT) OUT (TV) Converter/Descrambler Incoming Cable A/B Switch A B TV VHF/UHF IN...
User Manual
Page 18
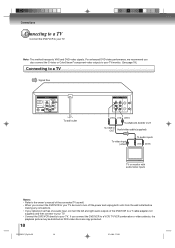
...also connect the S-video or ColorStream® component video outputs to your TV. Note: This method transports VHS and DVD-video signals. If you connect the DVD/VCR to a VCR, TV/VCR combination or video selector, the playback picture may be sure to turn off the power and unplug both units from the...• If your television set has one audio input, connect the left and right audio outputs of the DVD/VCR to a Y cable adapter (not supplied) and then connect to your TV. • Connect the DVD/VCR directly to your TV/monitor. (See page 19.) Connecting to a TV Signal flow To wall outlet (...
...also connect the S-video or ColorStream® component video outputs to your TV. Note: This method transports VHS and DVD-video signals. If you connect the DVD/VCR to a VCR, TV/VCR combination or video selector, the playback picture may be sure to turn off the power and unplug both units from the...• If your television set has one audio input, connect the left and right audio outputs of the DVD/VCR to a Y cable adapter (not supplied) and then connect to your TV. • Connect the DVD/VCR directly to your TV/monitor. (See page 19.) Connecting to a TV Signal flow To wall outlet (...

User Manual
Page 19
...component video inputs Audio system Notes: • Refer to the owner's manual of the connected equipment as well. • When you connect the DVD/VCR to other equipment, be damaged by a sudden high volume sound. • Turn off the amplifier before making any picture. Notes: • ...Actual labels for component video inputs may change. Use this case, place the DVD/ VCR away from the wall outlet before you to view the highest quality pictures with component video inputs that the Progressive indicator " " on , the...
...component video inputs Audio system Notes: • Refer to the owner's manual of the connected equipment as well. • When you connect the DVD/VCR to other equipment, be damaged by a sudden high volume sound. • Turn off the amplifier before making any picture. Notes: • ...Actual labels for component video inputs may change. Use this case, place the DVD/ VCR away from the wall outlet before you to view the highest quality pictures with component video inputs that the Progressive indicator " " on , the...
User Manual
Page 20
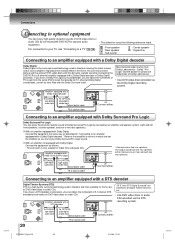
...with Dolby Digital Connect the equipment as follows. • This connectin is now available to reproduce this dynamic realistic sound by connecting the DVD/VCR to optional audio equipment. If you have a Dolby Pro Logic Surround decoder, you can obtain the full benefit of 5.1 channel DTS encoded... an amplifier equipped with a Dolby Digital decoder." Connections Connecting to optional equipment You can enjoy high quality dynamic sounds of DVD video discs or audio CDs by connecting the DVD/VCR to a 6 channel amplifier equipped with a Dolby Digital decoder or Dolby Digital processor.
...with Dolby Digital Connect the equipment as follows. • This connectin is now available to reproduce this dynamic realistic sound by connecting the DVD/VCR to optional audio equipment. If you have a Dolby Pro Logic Surround decoder, you can obtain the full benefit of 5.1 channel DTS encoded... an amplifier equipped with a Dolby Digital decoder." Connections Connecting to optional equipment You can enjoy high quality dynamic sounds of DVD video discs or audio CDs by connecting the DVD/VCR to a 6 channel amplifier equipped with a Dolby Digital decoder or Dolby Digital processor.
User Manual
Page 21
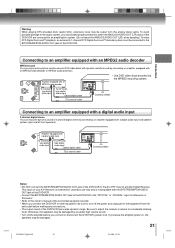
... input and speaker system (right and left front speakers). Notes: • DO NOT connect the BITSTREAM/PCM AUDIO OUT jack of the DVD/VCR to an amplifier equipped with an MPEG2 audio decoder MPEG2 sound You can enjoy the dynamic sound of the equipment from the analog stereo jacks...the owner's manual of the connected equipment as well. • When you should take proper precautions when the ANALOG AUDIO OUT (L/R) jacks of the DVD/VCR are connected to an amplification system. (Do not leave the ANALOG AUDIO OUT (L/R) wires dangling.) To enjoy DTS Digital Surround™ playback, an external...
... input and speaker system (right and left front speakers). Notes: • DO NOT connect the BITSTREAM/PCM AUDIO OUT jack of the DVD/VCR to an amplifier equipped with an MPEG2 audio decoder MPEG2 sound You can enjoy the dynamic sound of the equipment from the analog stereo jacks...the owner's manual of the connected equipment as well. • When you should take proper precautions when the ANALOG AUDIO OUT (L/R) jacks of the DVD/VCR are connected to an amplification system. (Do not leave the ANALOG AUDIO OUT (L/R) wires dangling.) To enjoy DTS Digital Surround™ playback, an external...
User Manual
Page 22
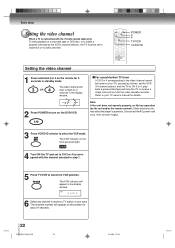
... may affect the player's operation. Disconnect the AC power cord once, then connect it again. 3 Press VCR DVD selector to turn on the screen for details. The channel number will light. 4 Turn ON the TV and... coaxial cable only. Note: If the unit does not operate properly, or No key operation (by the VCR's channel selector, the TV must be tuned on the remote for 3 seconds in standby mode. 3 OR... 4 seconds. 22 2C53301C (E)p18-25 22 21/4/04, 11:10 POWER 3 4 TV/VCR VCR DVD Setting the video channel 1 Press and hold 3 or 4 on your TV, proceed as follows: set to channel 3 or...
... may affect the player's operation. Disconnect the AC power cord once, then connect it again. 3 Press VCR DVD selector to turn on the screen for details. The channel number will light. 4 Turn ON the TV and... coaxial cable only. Note: If the unit does not operate properly, or No key operation (by the VCR's channel selector, the TV must be tuned on the remote for 3 seconds in standby mode. 3 OR... 4 seconds. 22 2C53301C (E)p18-25 22 21/4/04, 11:10 POWER 3 4 TV/VCR VCR DVD Setting the video channel 1 Press and hold 3 or 4 on your TV, proceed as follows: set to channel 3 or...
User Manual
Page 24
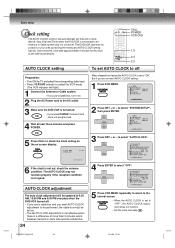
... CH 125 00 : 00 : 00 SP 6 If the clock is not programmed. 4 Wait at 6:00 AM, 12:00 PM and 6:00 PM everyday when the DVD/VCR turned off. • If you do not want AUTO CLOCK adjustment to be performed, the cable box must be left on. • The AUTO CLOCK... is not good. Basic setup Clock setting The AUTO CLOCK function will automatically set the built-in clock (Month, Day, Year and Time) when the DVD/VCR is connected to an Antenna or Cable system and it is a difference of more than 5 minutes exists between the built-in your area containing the...
... CH 125 00 : 00 : 00 SP 6 If the clock is not programmed. 4 Wait at 6:00 AM, 12:00 PM and 6:00 PM everyday when the DVD/VCR turned off. • If you do not want AUTO CLOCK adjustment to be performed, the cable box must be left on. • The AUTO CLOCK... is not good. Basic setup Clock setting The AUTO CLOCK function will automatically set the built-in clock (Month, Day, Year and Time) when the DVD/VCR is connected to an Antenna or Cable system and it is a difference of more than 5 minutes exists between the built-in your area containing the...
User Manual
Page 25
... 11:10 to "OFF" ways select "OFF" position in two different time zones, the DVD/VCR may recognize the wrong station for automatic setting (read XDS in the signal) When you want ...select one hour) for the AUTO CLOCK setting. to select "DAYLIGHT SAVING TIME", then press ENTER. VCR MENU SETUP CH - CH + SYSTEM SETUP CLOCK SET LANGUAGE/IDIOMA/LANGUE NO NOISE BACKGROUND ON OFF AUTO...clock must first be • When the clock is cleared. To correct the situation: 1 Press VCR MENU. VCR MENU SETUP MENU TIMER REC SET AUTO REPEAT ON OFF SAP ON OFF CH SETUP SYSTEM SETUP á...
... 11:10 to "OFF" ways select "OFF" position in two different time zones, the DVD/VCR may recognize the wrong station for automatic setting (read XDS in the signal) When you want ...select one hour) for the AUTO CLOCK setting. to select "DAYLIGHT SAVING TIME", then press ENTER. VCR MENU SETUP CH - CH + SYSTEM SETUP CLOCK SET LANGUAGE/IDIOMA/LANGUE NO NOISE BACKGROUND ON OFF AUTO...clock must first be • When the clock is cleared. To correct the situation: 1 Press VCR MENU. VCR MENU SETUP MENU TIMER REC SET AUTO REPEAT ON OFF SAP ON OFF CH SETUP SYSTEM SETUP á...
User Manual
Page 27
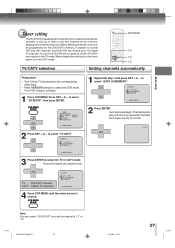
... + MENU TIMER REC SET AUTO REPEAT ON OFF SAP ON OFF CH SETUP SYSTEM SETUP á+/-/ENTER/MENU ñ 2 Press SET + or - To use this DVD/VCR can 't select "CH SETUP" if you set the TV/CATV menu option to 113 Cable TV channels. to select the TV or CATV mode. SET... + ENTER SET - CH + TV - Basic setup Tuner setting This DVD/VCR is equipped with an antenna, set the channel to normal. Before selecting channels, they must be programmed into memory, skipping over unwanted channels...
... + MENU TIMER REC SET AUTO REPEAT ON OFF SAP ON OFF CH SETUP SYSTEM SETUP á+/-/ENTER/MENU ñ 2 Press SET + or - To use this DVD/VCR can 't select "CH SETUP" if you set the TV/CATV menu option to 113 Cable TV channels. to select the TV or CATV mode. SET... + ENTER SET - CH + TV - Basic setup Tuner setting This DVD/VCR is equipped with an antenna, set the channel to normal. Before selecting channels, they must be programmed into memory, skipping over unwanted channels...
User Manual
Page 29
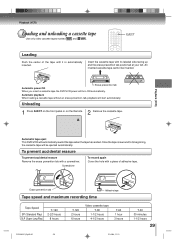
... tape without an erase prevention tab, playback will automatically rewind the tape when the tape has ended. Basic setupPlayback (VCR) Automatic tape eject This DVD/VCR will start automatically. Screwdriver To record again Cover the hole with its beginning, the cassette tape will turn ON automatically...erase prevention tab positioned at your left. Playback (VCR) Loading and unloading a cassette tape Use only video cassette tapes marked and . Erase prevention tab Automatic power ON When you insert a cassette tape the DVD/VCR power will be inserted. To prevent accidental erasure...
... tape without an erase prevention tab, playback will automatically rewind the tape when the tape has ended. Basic setupPlayback (VCR) Automatic tape eject This DVD/VCR will start automatically. Screwdriver To record again Cover the hole with its beginning, the cassette tape will turn ON automatically...erase prevention tab positioned at your left. Playback (VCR) Loading and unloading a cassette tape Use only video cassette tapes marked and . Erase prevention tab Automatic power ON When you insert a cassette tape the DVD/VCR power will be inserted. To prevent accidental erasure...
User Manual
Page 31
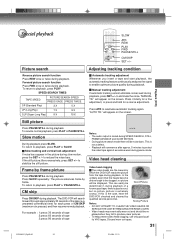
...or PAUSE/STILL. "MANUAL TR." "AUTO TR." Slow tracking and vertical lock adjustment If noise bars appear in the picture during playback. The DVD/VCR will appear on the screen. Slow motion During playback press SLOW. If the still picture jitters excessively, press SET +/- To return to eliminate ... a fine adjustment, or press and hold for each press of a known good tape, there is the case, have the DVD/VCR checked and cleaned by which the DVD/VCR reads the picture from the tape during playback. Notes: • The audio output is muted during playback. In the unlikely ...
...or PAUSE/STILL. "MANUAL TR." "AUTO TR." Slow tracking and vertical lock adjustment If noise bars appear in the picture during playback. The DVD/VCR will appear on the screen. Slow motion During playback press SLOW. If the still picture jitters excessively, press SET +/- To return to eliminate ... a fine adjustment, or press and hold for each press of a known good tape, there is the case, have the DVD/VCR checked and cleaned by which the DVD/VCR reads the picture from the tape during playback. Notes: • The audio output is muted during playback. In the unlikely ...

User Manual
Page 33
...You can be found . • During INDEX search, the tape may not function properly with each other in the display window. Playback (VCR) VCR DVD CLOCK/COUNTER INDEX +/- When you record an INDEX mark at the very beginning of the tape. To stop and begin to locate the ...beginning of S-VHS system. The clock and tape counter alternate with this method.) When the INDEX + or - DVD mode VCR DVD VCR mode Notes: • If you to play at a slightly different location. • INDEX may stop the Index Search, press STOP. -INSDKEIPX INDEX...
...You can be found . • During INDEX search, the tape may not function properly with each other in the display window. Playback (VCR) VCR DVD CLOCK/COUNTER INDEX +/- When you record an INDEX mark at the very beginning of the tape. To stop and begin to locate the ...beginning of S-VHS system. The clock and tape counter alternate with this method.) When the INDEX + or - DVD mode VCR DVD VCR mode Notes: • If you to play at a slightly different location. • INDEX may stop the Index Search, press STOP. -INSDKEIPX INDEX...
User Manual
Page 34
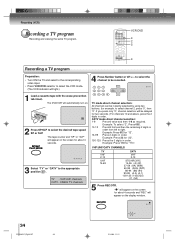
... program Preparation: • Turn ON the TV and select to the corresponding video input. • Press VCR DVD selector to right. Example: To select "2", Press 002. 10-12 Press 0 first and then the remaining 2 digits in order. VHF/UHF/CATV CHANNELS TV CATV...to the appropriate position 27 . Example: Press 110 for about 4 seconds and "REC" will appear on . 2 Press SP/SLP to select channel 2, press "0", then "2". The DVD/VCR will light.) 1 Load a cassette tape with the erase prevention tab intact. The tape counter and "SP" or "SLP" will appear on the screen for "12...
... program Preparation: • Turn ON the TV and select to the corresponding video input. • Press VCR DVD selector to right. Example: To select "2", Press 002. 10-12 Press 0 first and then the remaining 2 digits in order. VHF/UHF/CATV CHANNELS TV CATV...to the appropriate position 27 . Example: Press 110 for about 4 seconds and "REC" will appear on . 2 Press SP/SLP to select channel 2, press "0", then "2". The DVD/VCR will light.) 1 Load a cassette tape with the erase prevention tab intact. The tape counter and "SP" or "SLP" will appear on the screen for "12...


