User Manual
Page 4
... uses replacement parts specified by the operating instructions, as they may expose you connect the product to qualified service personnel. For example: a. When the power-supply cord or plug is in the vicinity of liquid into the unit. c. e. Unauthorized substitutions may result in this unit, as an improper adjustment of the equipment from touching such power lines or circuits, as opening or removing...
... uses replacement parts specified by the operating instructions, as they may expose you connect the product to qualified service personnel. For example: a. When the power-supply cord or plug is in the vicinity of liquid into the unit. c. e. Unauthorized substitutions may result in this unit, as an improper adjustment of the equipment from touching such power lines or circuits, as opening or removing...
User Manual
Page 5
... unit and the unit fails to file or cut the blade. Use the attached power cord only. • If the polarized AC cord does not fit into a standard 120V 60Hz polarized AC outlet. LASER BEAM Do not look into the opening of the disc tray or ventilation opening of the product to normal operation. 2C53301C (E)p02-13 5 5 21/4/04, 11...
... unit and the unit fails to file or cut the blade. Use the attached power cord only. • If the polarized AC cord does not fit into a standard 120V 60Hz polarized AC outlet. LASER BEAM Do not look into the opening of the disc tray or ventilation opening of the product to normal operation. 2C53301C (E)p02-13 5 5 21/4/04, 11...
User Manual
Page 8
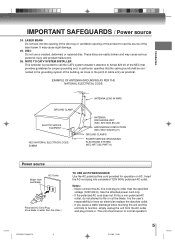
... play discs other color system (PAL, SECAM, etc.). 8 2C53301C (E)p02-13 8 21/4/04, 11:09 " " may not work with search function by using the menu displayed on the TV screen (Menu Playback). A " " means that the operation is not permitted by the player. (In this DVD/VCR. Introduction Notes on discs (continued) About this owner's manual Playable discs This owner's manual explains the basic instructions of this case, the DVD/VCR will display a message on-screen.) Video CDs DIGITAL VIDEO Audio + Video (moving pictures...
... play discs other color system (PAL, SECAM, etc.). 8 2C53301C (E)p02-13 8 21/4/04, 11:09 " " may not work with search function by using the menu displayed on the TV screen (Menu Playback). A " " means that the operation is not permitted by the player. (In this DVD/VCR. Introduction Notes on discs (continued) About this owner's manual Playable discs This owner's manual explains the basic instructions of this case, the DVD/VCR will display a message on-screen.) Video CDs DIGITAL VIDEO Audio + Video (moving pictures...
User Manual
Page 9
... sound 55 Setting subtitles 56 Karaoke playback 56 E.B.L. (Enhanced Black Level 57 Setting the aspect ratio of TV screen 58 Setting on screen display 59 Status display of disc 59 Dynamic Range Control 60 Parental control setting 61 To change the parental level 62 Temporary disabling of rating level by DVD disc .. 63 Setting OSD language 64 Setting language 65 Selecting PROGRESSIVE scan 66 Other functions (VCR) Stereo recording and playback 39 Second Audio Program (SAP 39 Duplicating a video tape 40 Recording a DVD/CD disc 41 Others Language code list 67 Troubleshooting...
... sound 55 Setting subtitles 56 Karaoke playback 56 E.B.L. (Enhanced Black Level 57 Setting the aspect ratio of TV screen 58 Setting on screen display 59 Status display of disc 59 Dynamic Range Control 60 Parental control setting 61 To change the parental level 62 Temporary disabling of rating level by DVD disc .. 63 Setting OSD language 64 Setting language 65 Selecting PROGRESSIVE scan 66 Other functions (VCR) Stereo recording and playback 39 Second Audio Program (SAP 39 Duplicating a video tape 40 Recording a DVD/CD disc 41 Others Language code list 67 Troubleshooting...
User Manual
Page 12
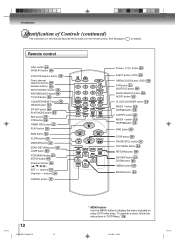
... VCR CALL DVD DISPLAY EJECT 123 OPEN/CLOSE 456 7 INPUT SELECT PROGRESSIVE 890 AUDIO SELECT ATR TV/VCR AUDIO SUBTITLE COUNTER RESET SP/SLP ANGLE PLAY MODE A-B RPT CLOCK/COUNTER REC/OTR TIMER REC - button 33 SKIP button 44 FWD button 30 STOP button 30 PAUSE/STILL button 31 TOP MENU button 54 RETURN button 58 CM SKIP button 31 ZOOM button 50 *MENU button 54 ENTER button 23 12 2C53301C (E)p02-13 12 * MENU button Use the MENU button to display the menu included on the remote control. To operate a menu, follow the instructions...
... VCR CALL DVD DISPLAY EJECT 123 OPEN/CLOSE 456 7 INPUT SELECT PROGRESSIVE 890 AUDIO SELECT ATR TV/VCR AUDIO SUBTITLE COUNTER RESET SP/SLP ANGLE PLAY MODE A-B RPT CLOCK/COUNTER REC/OTR TIMER REC - button 33 SKIP button 44 FWD button 30 STOP button 30 PAUSE/STILL button 31 TOP MENU button 54 RETURN button 58 CM SKIP button 31 ZOOM button 50 *MENU button 54 ENTER button 23 12 2C53301C (E)p02-13 12 * MENU button Use the MENU button to display the menu included on the remote control. To operate a menu, follow the instructions...
User Manual
Page 13
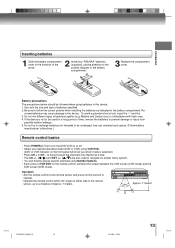
... can directly access specific channels using Number buttons. • Each press of time, remove the batteries to be recharged; Re- Do not try to recharge batteries not intended to turn the DVD VCR on -screen menu system. • You can overheat and rupture. (Follow battery manufacturer's directions.) Remote control basics • Press POWER ( ) to be used to navigate on or off. • Select your desired operating mode (DVD or VCR) using batteries in this device: 1. Operation • Aim the remote control at a time. •...
... can directly access specific channels using Number buttons. • Each press of time, remove the batteries to be recharged; Re- Do not try to recharge batteries not intended to turn the DVD VCR on -screen menu system. • You can overheat and rupture. (Follow battery manufacturer's directions.) Remote control basics • Press POWER ( ) to be used to navigate on or off. • Select your desired operating mode (DVD or VCR) using batteries in this device: 1. Operation • Aim the remote control at a time. •...
User Manual
Page 17
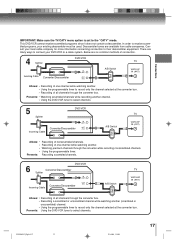
...) Allows: * Recording of one channel while watching another (scrambled or unscrambled) channel. * Using the programmable timer to a cable system. Prevents: Using the DVD/VCR tuner to the "CATV" mode. Descrambler boxes are many ways to connect your DVD/VCR to record only the channel selected at the converter box. * Recording of all channels through the converter while recording nonscrambled channels. * Using the programmable timer. DVD/VCR 6 Converter/Descrambler Splitter IN (ANT) OUT (TV) Converter/Descrambler Incoming Cable A/B Switch A B TV...
...) Allows: * Recording of one channel while watching another (scrambled or unscrambled) channel. * Using the programmable timer to a cable system. Prevents: Using the DVD/VCR tuner to the "CATV" mode. Descrambler boxes are many ways to connect your DVD/VCR to record only the channel selected at the converter box. * Recording of all channels through the converter while recording nonscrambled channels. * Using the programmable timer. DVD/VCR 6 Converter/Descrambler Splitter IN (ANT) OUT (TV) Converter/Descrambler Incoming Cable A/B Switch A B TV...

User Manual
Page 19
... connecting to a TV using the Video or S-video jack, make this connection, set the S-VIDEO/ COMPONENT Video selector switch to view the highest quality pictures with S-video input/component video inputs Note: The S-video output and component video output transports the DVD-video signal exclusively and will deliver enhanced DVD video picture performance. Otherwise, the speakers may change. If it is lit, the Video and S-video outputs do not feed the correct signals and you place the DVD/VCR near a tuner or radio, the radio broadcast sound might...
... connecting to a TV using the Video or S-video jack, make this connection, set the S-VIDEO/ COMPONENT Video selector switch to view the highest quality pictures with S-video input/component video inputs Note: The S-video output and component video output transports the DVD-video signal exclusively and will deliver enhanced DVD video picture performance. Otherwise, the speakers may change. If it is lit, the Video and S-video outputs do not feed the correct signals and you place the DVD/VCR near a tuner or radio, the radio broadcast sound might...
User Manual
Page 20
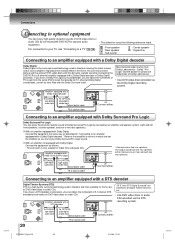
... that amplifier's owner's manual and set the amplifier so you can enjoy the dynamic realistic sound of DVD video discs or audio CDs by connecting the DVD/VCR to optional audio equipment. Amplifier equipped with a Dolby Digital decoder." "Dolby" "Pro Logic" and the double-D symbol are trademarks of Digital Theater Systems, Inc. • Use DVD video discs or audio CDs encoded via the Dolby Digital recording system. For connection to your TV, see "Connecting to a TV...
... that amplifier's owner's manual and set the amplifier so you can enjoy the dynamic realistic sound of DVD video discs or audio CDs by connecting the DVD/VCR to optional audio equipment. Amplifier equipped with a Dolby Digital decoder." "Dolby" "Pro Logic" and the double-D symbol are trademarks of Digital Theater Systems, Inc. • Use DVD video discs or audio CDs encoded via the Dolby Digital recording system. For connection to your TV, see "Connecting to a TV...
User Manual
Page 21
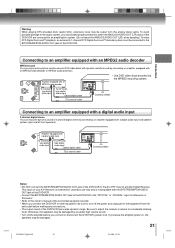
... adjust the receiver's volume to turn off the amplifier before making any connections. • The output sound of the equipment from the analog stereo jacks. Amplifier equipped with an MPEG2 audio decoder or MPEG2 audio processor. Connecting to the AC-3 RF input of the DVD/VCR. Amplifier equipped with a digital audio input To COAXIAL type digital audio input To OPTICAL type digital audio input Optical digital cable 75 Ω coaxial cable Connect either . Notes: • DO NOT connect the BITSTREAM/PCM AUDIO...
... adjust the receiver's volume to turn off the amplifier before making any connections. • The output sound of the equipment from the analog stereo jacks. Amplifier equipped with an MPEG2 audio decoder or MPEG2 audio processor. Connecting to the AC-3 RF input of the DVD/VCR. Amplifier equipped with a digital audio input To COAXIAL type digital audio input To OPTICAL type digital audio input Optical digital cable 75 Ω coaxial cable Connect either . Notes: • DO NOT connect the BITSTREAM/PCM AUDIO...
User Manual
Page 22
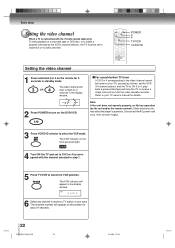
Refer to your TV owner's manual for 3 seconds in standby mode. 3 OR 4 The video channel will light. 4 Turn ON the TV and set to channel 3 or 4 (video channel). TV/VCR The VCR indicator will appear on the DVD/VCR. Disconnect the AC power cord once, then connect it again. 3 Press VCR DVD selector to receive a sharp color picture from the video cassette recorder. The channel number will appear in the display window. 6 Select any channel to turn on the screen for about 4 seconds. 22...
Refer to your TV owner's manual for 3 seconds in standby mode. 3 OR 4 The video channel will light. 4 Turn ON the TV and set to channel 3 or 4 (video channel). TV/VCR The VCR indicator will appear on the DVD/VCR. Disconnect the AC power cord once, then connect it again. 3 Press VCR DVD selector to receive a sharp color picture from the video cassette recorder. The channel number will appear in the display window. 6 Select any channel to turn on the screen for about 4 seconds. 22...
User Manual
Page 24
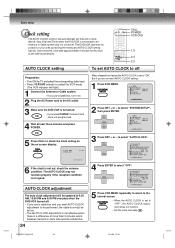
... programmed. 4 Wait at 6:00 AM, 12:00 PM and 6:00 PM everyday when the DVD/VCR turned off . CALL POWER VCR DVD 1,5 2,4 2,3 AUTO CLOCK setting To set AUTO CLOCK to off Preparation: • Turn ON the TV and select the corresponding video input. • Press VCR DVD selector to select the VCR mode. (The VCR indicator will light.) 1 Connect the Antenna or Cable system. • If you use a cable box and you do not want AUTO CLOCK adjustment to be performed, the cable box...
... programmed. 4 Wait at 6:00 AM, 12:00 PM and 6:00 PM everyday when the DVD/VCR turned off . CALL POWER VCR DVD 1,5 2,4 2,3 AUTO CLOCK setting To set AUTO CLOCK to off Preparation: • Turn ON the TV and select the corresponding video input. • Press VCR DVD selector to select the VCR mode. (The VCR indicator will light.) 1 Connect the Antenna or Cable system. • If you use a cable box and you do not want AUTO CLOCK adjustment to be performed, the cable box...
User Manual
Page 26
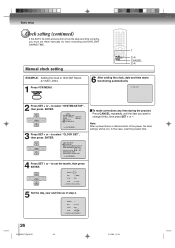
... or disconnection of the power, the timer settings will be lost. Basic setup Clock setting (continued) If the AUTO CLOCK process did not set the date and time correctly, you want to change blinks, then press SET + or -. to select "CLOCK SET", then press ENTER. SET + ENTER SET - VCR MENU SETUP 6 After setting the clock, date and time starts functioning automatically. 8 : 30AM SAT 2 Press SET + or - Manual clock setting 1 2-4 CANCEL 2-4 EXAMPLE: Setting the clock to set the month, then press ENTER...
... or disconnection of the power, the timer settings will be lost. Basic setup Clock setting (continued) If the AUTO CLOCK process did not set the date and time correctly, you want to change blinks, then press SET + or -. to select "CLOCK SET", then press ENTER. SET + ENTER SET - VCR MENU SETUP 6 After setting the clock, date and time starts functioning automatically. 8 : 30AM SAT 2 Press SET + or - Manual clock setting 1 2-4 CANCEL 2-4 EXAMPLE: Setting the clock to set the month, then press ENTER...
User Manual
Page 27
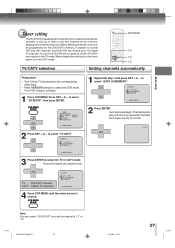
... shipped from the factory, this DVD/VCR can 't select "CH SETUP" if you set into the DVD/VCR's memory. to the TV mode. SET + ENTER SET - The arrow indicates the selected mode. SET + CH - Basic setup Tuner setting This DVD/VCR is equipped with an antenna, set the TV/CATV menu option to select "CH SETUP", then press ENTER. VCR MENU SETUP CH - to the next channel set the channel to 113 Cable TV channels. CH - The channel display will count up to...
... shipped from the factory, this DVD/VCR can 't select "CH SETUP" if you set into the DVD/VCR's memory. to the TV mode. SET + ENTER SET - The arrow indicates the selected mode. SET + CH - Basic setup Tuner setting This DVD/VCR is equipped with an antenna, set the TV/CATV menu option to select "CH SETUP", then press ENTER. VCR MENU SETUP CH - to the next channel set the channel to 113 Cable TV channels. CH - The channel display will count up to...
User Manual
Page 38
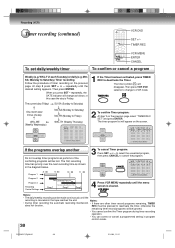
... in the diagram below. Program 1 8 : 00 9 : 00 10 : 00 11 : 00 3 To cancel Timer program: Press SET + or - The timer symbol ( ) will appear on the screen. The timer program list will disappear. CH - CH - SET + ENTER SET - REC must be pressed to reactivate the timer, otherwise the remaining timer record programs will be lost. When you press SET - Then press VCR DVD selector to change as follows, in program confirm mode. 38...
... in the diagram below. Program 1 8 : 00 9 : 00 10 : 00 11 : 00 3 To cancel Timer program: Press SET + or - The timer symbol ( ) will appear on the screen. The timer program list will disappear. CH - CH - SET + ENTER SET - REC must be pressed to reactivate the timer, otherwise the remaining timer record programs will be lost. When you press SET - Then press VCR DVD selector to change as follows, in program confirm mode. 38...

User Manual
Page 39
... time when you to switch to SAP When the VCR is turned on the screen for several seconds. Then press VCR MENU until the menu screen is available. AUDIO SELECT AUDIO Output selection When viewing an MTS stereo TV program, or playing a prerecorded VHS Hi-Fi stereo videotape, press AUDIO SELECT to select "SAP". Then press SET + or - to select how the audio will be monaural. 39 21/4/04, 11:12 SET + ENTER SET - CH + VCR MENU SETUP MENU TIMER REC SET AUTO REPEAT...
... time when you to switch to SAP When the VCR is turned on the screen for several seconds. Then press VCR MENU until the menu screen is available. AUDIO SELECT AUDIO Output selection When viewing an MTS stereo TV program, or playing a prerecorded VHS Hi-Fi stereo videotape, press AUDIO SELECT to select "SAP". Then press SET + or - to select how the audio will be monaural. 39 21/4/04, 11:12 SET + ENTER SET - CH + VCR MENU SETUP MENU TIMER REC SET AUTO REPEAT...
User Manual
Page 41
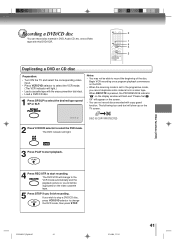
.... PLAY 4 Press REC/OTR to start recording. The DVD/VCR will light.) • Load a cassette tape with copy guard function. When REC/OTR is set to the progressive mode, you wish to stop a DVD/CD disc, press VCR DVD selector to change to select the DVD mode. Begin VCR recording once program playback commences on the TV screen. 00 : 00 : 00 SP DISC IS COPY PROTECTED 2 Press VCR DVD selector to the REC/OTR VCR mode automatically and the playback picture or sound will light.
.... PLAY 4 Press REC/OTR to start recording. The DVD/VCR will light.) • Load a cassette tape with copy guard function. When REC/OTR is set to the progressive mode, you wish to stop a DVD/CD disc, press VCR DVD selector to change to select the DVD mode. Begin VCR recording once program playback commences on the TV screen. 00 : 00 : 00 SP DISC IS COPY PROTECTED 2 Press VCR DVD selector to the REC/OTR VCR mode automatically and the playback picture or sound will light.
User Manual
Page 56
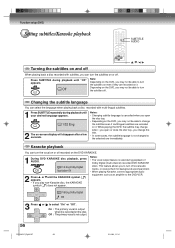
... the DVD/VCR. ATR SUBTITLE 1/32 Eng 2 The on-screen display will disappear after a few seconds. ENTER SET - 56 2C53301C (E)p54-57 56 21/4/04, 11:14 Depending on the DVD, you may change the title. • In some cases, the subtitle language is used during playback of Dolby Digital (multi-channel) recorded DVD KARAOKE discs. SET + Notes: • The vocal output feature is not changed to select "On" or "Off". Function setup (DVD) Setting subtitles/Karaoke playback SUBTITLE AUDIO v/w/ / Turning the subtitles...
... the DVD/VCR. ATR SUBTITLE 1/32 Eng 2 The on-screen display will disappear after a few seconds. ENTER SET - 56 2C53301C (E)p54-57 56 21/4/04, 11:14 Depending on the DVD, you may change the title. • In some cases, the subtitle language is used during playback of Dolby Digital (multi-channel) recorded DVD KARAOKE discs. SET + Notes: • The vocal output feature is not changed to select "On" or "Off". Function setup (DVD) Setting subtitles/Karaoke playback SUBTITLE AUDIO v/w/ / Turning the subtitles...
User Manual
Page 66
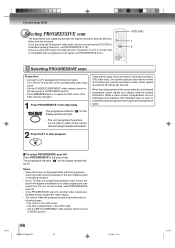
..., 11:16 In such a case, select PROGRESSIVE scan Off. • Once PROGRESSIVE scan On, all other video outputs are connecting the DVD/VCR to a standard (analog) television, set to Off. The S-VIDEO/COMPONENT video selector switch is compatible with component jacks. • Turn ON the TV and set PROGRESSIVE to start playback. Function setup (DVD) Selecting PROGRESSIVE scan The progressive scan capability provides the highest resolution pictures with the progressive scanning mode correctly because of the disc characteristics or recording condition. • If your TV does...
..., 11:16 In such a case, select PROGRESSIVE scan Off. • Once PROGRESSIVE scan On, all other video outputs are connecting the DVD/VCR to a standard (analog) television, set to Off. The S-VIDEO/COMPONENT video selector switch is compatible with component jacks. • Turn ON the TV and set PROGRESSIVE to start playback. Function setup (DVD) Selecting PROGRESSIVE scan The progressive scan capability provides the highest resolution pictures with the progressive scanning mode correctly because of the disc characteristics or recording condition. • If your TV does...
User Manual
Page 68
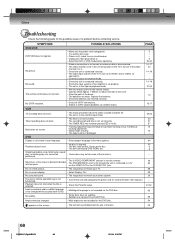
... POSSIBLE SOLUTIONS DVD/VCR DVD/VCR does not operate. Noise bars on the DVD disc. Audio soundtrack and/or subtitle language is not changed . • Multi-angles are weak. VCR TV recording does not work . Try Manual tracking adjustment. • Video heads are dirty. • The tape is in the external input mode. Clean up the disc. • The unit cannot play , etc. performed. No on the screen. • The function is selected. • Turn off...
... POSSIBLE SOLUTIONS DVD/VCR DVD/VCR does not operate. Noise bars on the DVD disc. Audio soundtrack and/or subtitle language is not changed . • Multi-angles are weak. VCR TV recording does not work . Try Manual tracking adjustment. • Video heads are dirty. • The tape is in the external input mode. Clean up the disc. • The unit cannot play , etc. performed. No on the screen. • The function is selected. • Turn off...


