User Manual
Page 1
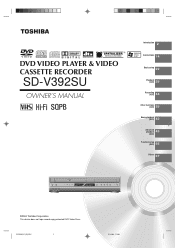
DIGITAL VIDEO DVD VIDEO PLAYER & VIDEO CASSETTE RECORDER SD-V392SU OWNER'S MANUAL Introduction 2 Connections 14 Basic setup 22 Playback (VCR) 29 Recording (VCR) 34 Other functions (VCR) 39 Basic playback (DVD) 42 Advanced playback 45 (DVD) Function setup (DVD) 55 Others 67 ©2004 Toshiba Corporation This device does not tape-record copy protected DVD Video Discs. 2C53301C (E)COV 1 21/4/04, 11:08
DIGITAL VIDEO DVD VIDEO PLAYER & VIDEO CASSETTE RECORDER SD-V392SU OWNER'S MANUAL Introduction 2 Connections 14 Basic setup 22 Playback (VCR) 29 Recording (VCR) 34 Other functions (VCR) 39 Basic playback (DVD) 42 Advanced playback 45 (DVD) Function setup (DVD) 55 Others 67 ©2004 Toshiba Corporation This device does not tape-record copy protected DVD Video Discs. 2C53301C (E)COV 1 21/4/04, 11:08
User Manual
Page 4
... dangerous voltage points or short out parts that the unit is grounded to provide some protection against such power lines or circuits. Read the owner's manual of fire or electric shock. 16. When installing an outside antenna or cable system is connected to the unit, be sure the antenna or cable...
... dangerous voltage points or short out parts that the unit is grounded to provide some protection against such power lines or circuits. Read the owner's manual of fire or electric shock. 16. When installing an outside antenna or cable system is connected to the unit, be sure the antenna or cable...
User Manual
Page 8
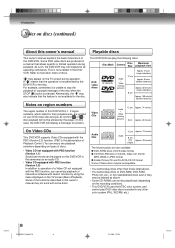
.... 160 minutes (double sided disc) Notes on discs (continued) About this owner's manual Playable discs This owner's manual explains the basic instructions of this owner's manual may also indicate that the operation is not permitted by using the menu displayed on this DVD/VCR in any other color system (PAL, SECAM, etc.). 8 2C53301C (E)p02-13...
.... 160 minutes (double sided disc) Notes on discs (continued) About this owner's manual Playable discs This owner's manual explains the basic instructions of this owner's manual may also indicate that the operation is not permitted by using the menu displayed on this DVD/VCR in any other color system (PAL, SECAM, etc.). 8 2C53301C (E)p02-13...
User Manual
Page 12
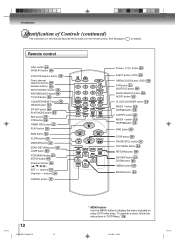
... EJECT button (VCR) 29 OPEN/CLOSE button (DVD) 42 ATR button...VCR CALL DVD DISPLAY EJECT 123 OPEN/CLOSE 456 7 INPUT SELECT PROGRESSIVE 890 AUDIO SELECT ATR TV/VCR... AUDIO SUBTITLE COUNTER RESET SP/SLP ANGLE PLAY MODE A-B RPT CLOCK/COUNTER REC/OTR TIMER REC - Remote control CALL button 24 DISPLAY button 59 VCR DVD... selector button 22 Direct channel selection buttons 28 Number buttons 45 INPUT SELECT button 40 PROGRESSIVE button 66 TV/VCR... button 32 JUMP button 50 VCR MENU button 23 SETUP button ... VCR MENU SETUP SET + MENU CM SKIP ZOOM CH - See the page in "DVD ...
... EJECT button (VCR) 29 OPEN/CLOSE button (DVD) 42 ATR button...VCR CALL DVD DISPLAY EJECT 123 OPEN/CLOSE 456 7 INPUT SELECT PROGRESSIVE 890 AUDIO SELECT ATR TV/VCR... AUDIO SUBTITLE COUNTER RESET SP/SLP ANGLE PLAY MODE A-B RPT CLOCK/COUNTER REC/OTR TIMER REC - Remote control CALL button 24 DISPLAY button 59 VCR DVD... selector button 22 Direct channel selection buttons 28 Number buttons 45 INPUT SELECT button 40 PROGRESSIVE button 66 TV/VCR... button 32 JUMP button 50 VCR MENU button 23 SETUP button ... VCR MENU SETUP SET + MENU CM SKIP ZOOM CH - See the page in "DVD ...
User Manual
Page 18
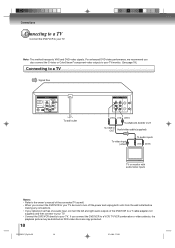
... your TV, be distorted as well. • When you connect the DVD/VCR to a VCR, TV/VCR combination or video selector, the playback picture may be sure to turn off the power and unplug both units from the wall outlet before making .../video cable (supplied) To video input (yellow) To audio inputs (red) (white) TV or monitor with audio/video inputs Notes: • Refer to the owner's manual of the DVD/VCR to a Y cable adapter (not supplied) and then connect to your TV. • Connect the...
... your TV, be distorted as well. • When you connect the DVD/VCR to a VCR, TV/VCR combination or video selector, the playback picture may be sure to turn off the power and unplug both units from the wall outlet before making .../video cable (supplied) To video input (yellow) To audio inputs (red) (white) TV or monitor with audio/video inputs Notes: • Refer to the owner's manual of the DVD/VCR to a Y cable adapter (not supplied) and then connect to your TV. • Connect the...

User Manual
Page 19
... sudden high volume sound. • Turn off the Progressive indicator, select PROGRESSIVE scan Off (see any connections. • If you place the DVD/VCR near a tuner or radio, the radio broadcast sound might be damaged. • When connecting to view the highest quality pictures with S-video input...are equipped with ColorStream® component video inputs Audio system Notes: • Refer to the owner's manual of the connected equipment as well. • When you connect the DVD/VCR to other equipment, be reduced slightly or the tint may change. And also you must select the ...
... sudden high volume sound. • Turn off the Progressive indicator, select PROGRESSIVE scan Off (see any connections. • If you place the DVD/VCR near a tuner or radio, the radio broadcast sound might be damaged. • When connecting to view the highest quality pictures with S-video input...are equipped with ColorStream® component video inputs Audio system Notes: • Refer to the owner's manual of the connected equipment as well. • When you connect the DVD/VCR to other equipment, be reduced slightly or the tint may change. And also you must select the ...
User Manual
Page 20
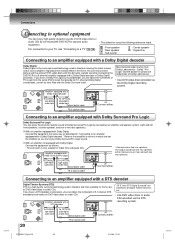
... now available to that amplifier's owner's manual and set the amplifier so you connect two rear speakers. Connections Connecting to optional equipment You can enjoy high quality dynamic sounds of DVD video discs or audio CDs by connecting the DVD/VCR to an amplifier equipped with Dolby Surround Pro... Logic Dolby Surround Pro Logic You can enjoy the dynamic realistic sound of Dolby Surround Pro Logic by connecting the DVD/VCR to an amplifier equipped with a DTS decoder Digital Theater Systems (DTS) DTS is a high quality surround technology used in theaters and...
... now available to that amplifier's owner's manual and set the amplifier so you connect two rear speakers. Connections Connecting to optional equipment You can enjoy high quality dynamic sounds of DVD video discs or audio CDs by connecting the DVD/VCR to an amplifier equipped with Dolby Surround Pro... Logic Dolby Surround Pro Logic You can enjoy the dynamic realistic sound of Dolby Surround Pro Logic by connecting the DVD/VCR to an amplifier equipped with a DTS decoder Digital Theater Systems (DTS) DTS is a high quality surround technology used in theaters and...
User Manual
Page 21
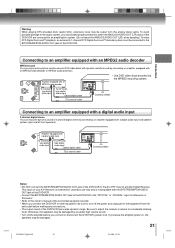
...amplifier equipped with the BITSTREAM/PCM AUDIO OUT jack of the DVD/VCR. • Connect the BITSTREAM/PCM AUDIO OUT jack of the DVD/VCR to the "OPTICAL" or "COAXIAL" input of a Receiver or Processor. • Refer to the owner's manual of the connected equipment as well. • When you ...should take proper precautions when the ANALOG AUDIO OUT (L/R) jacks of the DVD/VCR are connected to an amplification system. (Do not leave the ANALOG AUDIO OUT (L/R) ...
...amplifier equipped with the BITSTREAM/PCM AUDIO OUT jack of the DVD/VCR. • Connect the BITSTREAM/PCM AUDIO OUT jack of the DVD/VCR to the "OPTICAL" or "COAXIAL" input of a Receiver or Processor. • Refer to the owner's manual of the connected equipment as well. • When you ...should take proper precautions when the ANALOG AUDIO OUT (L/R) jacks of the DVD/VCR are connected to an amplification system. (Do not leave the ANALOG AUDIO OUT (L/R) ...
User Manual
Page 22
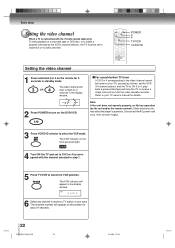
... your TV owner's manual for about 4 seconds. 22 2C53301C (E)p18-25 22 21/4/04, 11:10 The channel number will appear on the remote for 3 seconds in standby mode. 3 OR 4 The video channel will appear in the display window. 6 Select any channel to select the VCR position. POWER 3 4 TV/VCR VCR DVD Setting the video...
... your TV owner's manual for about 4 seconds. 22 2C53301C (E)p18-25 22 21/4/04, 11:10 The channel number will appear on the remote for 3 seconds in standby mode. 3 OR 4 The video channel will appear in the display window. 6 Select any channel to select the VCR position. POWER 3 4 TV/VCR VCR DVD Setting the video...
User Manual
Page 24
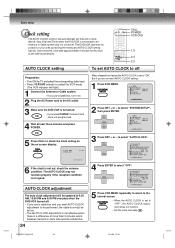
...turn it on. 2 Plug the AC Power cord to "OFF", the AUTO CLOCK adjustment does not function. • Set the clock manually 26 . 2C53301C (E)p18-25 24 21/4/04, 11:10 CALL POWER VCR DVD 1,5 2,4 2,3 AUTO CLOCK setting To set AUTO CLOCK to off . But if you want AUTO CLOCK setting: 1 Press... setup Clock setting The AUTO CLOCK function will automatically set the built-in clock (Month, Day, Year and Time) when the DVD/VCR is connected to select "AUTO CLOCK". The DVD/VCR searches for the clock to select "OFF". Once received, it is turned off Preparation: • Turn ON the TV and ...
...turn it on. 2 Plug the AC Power cord to "OFF", the AUTO CLOCK adjustment does not function. • Set the clock manually 26 . 2C53301C (E)p18-25 24 21/4/04, 11:10 CALL POWER VCR DVD 1,5 2,4 2,3 AUTO CLOCK setting To set AUTO CLOCK to off . But if you want AUTO CLOCK setting: 1 Press... setup Clock setting The AUTO CLOCK function will automatically set the built-in clock (Month, Day, Year and Time) when the DVD/VCR is connected to select "AUTO CLOCK". The DVD/VCR searches for the clock to select "OFF". Once received, it is turned off Preparation: • Turn ON the TV and ...
User Manual
Page 25
...in the signal) When you want to set the DAYLIGHT SAVING TIME manually, on the last Sunday in October you live within broadcast range of two stations in two different time zones, the DVD/VCR may recognize the wrong station for manual setting (back one of the options, then press ENTER. to the... normal screen. SET + ENTER SET - function properly, set the clock manually. 25 2C53301C (E)p18-25 25 21/4/04, 11:10 to...
...in the signal) When you want to set the DAYLIGHT SAVING TIME manually, on the last Sunday in October you live within broadcast range of two stations in two different time zones, the DVD/VCR may recognize the wrong station for manual setting (back one of the options, then press ENTER. to the... normal screen. SET + ENTER SET - function properly, set the clock manually. 25 2C53301C (E)p18-25 25 21/4/04, 11:10 to...
User Manual
Page 26
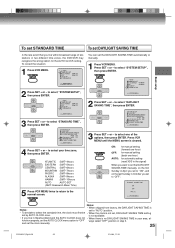
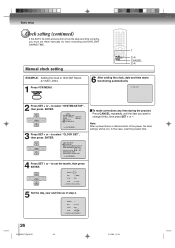
... OFF CH SETUP SYSTEM SETUP á+/-/ENTER/MENU ñ 3 Press SET + or - to "8:30 AM" March, 27 (SAT), 2004. 1 Press VCR MENU. CH - Manual clock setting 1 2-4 CANCEL 2-4 EXAMPLE: Setting the clock to select "CLOCK SET", then press ENTER. SET + ENTER SET - to select "SYSTEM SETUP",.../CANCEL/MENU ñ 26 2C53301C (E)p26-31 26 21/4/04, 11:10 VCR MENU SETUP 6 After setting the clock, date and time starts functioning automatically. 8 : 30AM SAT 2 Press SET + or - to set them manually for timer recording and DAYLIGHT SAVING TIME. CH + SYSTEM SETUP CLOCK SET LANGUAGE...
... OFF CH SETUP SYSTEM SETUP á+/-/ENTER/MENU ñ 3 Press SET + or - to "8:30 AM" March, 27 (SAT), 2004. 1 Press VCR MENU. CH - Manual clock setting 1 2-4 CANCEL 2-4 EXAMPLE: Setting the clock to select "CLOCK SET", then press ENTER. SET + ENTER SET - to select "SYSTEM SETUP",.../CANCEL/MENU ñ 26 2C53301C (E)p26-31 26 21/4/04, 11:10 VCR MENU SETUP 6 After setting the clock, date and time starts functioning automatically. 8 : 30AM SAT 2 Press SET + or - to set them manually for timer recording and DAYLIGHT SAVING TIME. CH + SYSTEM SETUP CLOCK SET LANGUAGE...
User Manual
Page 31
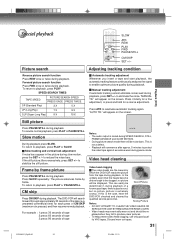
...eliminate noises well during playback. "MANUAL TR." "AUTO TR." Slow motion During playback press SLOW. Slow tracking and vertical lock adjustment If noise bars appear in the picture during playback. CM skip Press CM SKIP during slow motion, press the SET + /- The DVD/VCR will appear on the screen....pictures. • To help prevent video head clogging, use only good quality VHS tapes. This is the case, have the DVD/VCR checked and cleaned by which the DVD/VCR reads the picture from the tape during playback. If this is not a defect. • Playback will be replaced when they...
...eliminate noises well during playback. "MANUAL TR." "AUTO TR." Slow motion During playback press SLOW. Slow tracking and vertical lock adjustment If noise bars appear in the picture during playback. CM skip Press CM SKIP during slow motion, press the SET + /- The DVD/VCR will appear on the screen....pictures. • To help prevent video head clogging, use only good quality VHS tapes. This is the case, have the DVD/VCR checked and cleaned by which the DVD/VCR reads the picture from the tape during playback. If this is not a defect. • Playback will be replaced when they...
User Manual
Page 68
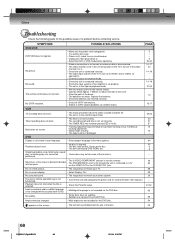
Try Manual tracking adjustment. • Video heads are dirty. • The tape is...display. Others Troubleshooting Check the following guide for several minutes, then replug it back in. • Select the DVD or VCR mode before contacting service. No CATV reception. • Check all CATV connections. • Station or CATV system... surround sound. • Select Display "On". • The setup does not match your TV. SYMPTOMS POSSIBLE SOLUTIONS DVD/VCR DVD/VCR does not operate. Timer recording does not work . • The erase prevention tab of the video cassette is broken...
Try Manual tracking adjustment. • Video heads are dirty. • The tape is...display. Others Troubleshooting Check the following guide for several minutes, then replug it back in. • Select the DVD or VCR mode before contacting service. No CATV reception. • Check all CATV connections. • Station or CATV system... surround sound. • Select Display "On". • The setup does not match your TV. SYMPTOMS POSSIBLE SOLUTIONS DVD/VCR DVD/VCR does not operate. Timer recording does not work . • The erase prevention tab of the video cassette is broken...


