
User Guide
Page 4
...icons This manual contains safety instructions that must be shortened. ❖ Never install or remove the battery pack without first turning off the power and disconnecting the AC adaptor. ❖ Only use the supplied AC adaptor or USB cable, or an optional Toshiba battery charger to ... injuries, damage to charge the battery pack. NOTE Provides important information. Dispose of the risk, and icons highlight these instructions as replacements. 4 About the battery pack ❖ Use only batteries recommended by local ordinances or regulations. ❖ Charge the battery pack only in an...
...icons This manual contains safety instructions that must be shortened. ❖ Never install or remove the battery pack without first turning off the power and disconnecting the AC adaptor. ❖ Only use the supplied AC adaptor or USB cable, or an optional Toshiba battery charger to ... injuries, damage to charge the battery pack. NOTE Provides important information. Dispose of the risk, and icons highlight these instructions as replacements. 4 About the battery pack ❖ Use only batteries recommended by local ordinances or regulations. ❖ Charge the battery pack only in an...
User Guide
Page 6
Contents Chapter 1: Getting to Know Your Camcorder 9 Overview 9 Check the Components 10 System Requirements 10 Front view 11 Rear view 11 Side views 12 Underside view 12 Chapter 2: Getting Started 13 Loading the battery 13 Charge your battery 14 Inserting and removing an SD™ Card (optional).....18 Turning the camcorder on and getting started .......19 Turning off the camcorder 19 Chapter 3: Record Mode 20 Button functions 20 LCD touch screen information 21 Menu options 22 Movie recording 24 6
Contents Chapter 1: Getting to Know Your Camcorder 9 Overview 9 Check the Components 10 System Requirements 10 Front view 11 Rear view 11 Side views 12 Underside view 12 Chapter 2: Getting Started 13 Loading the battery 13 Charge your battery 14 Inserting and removing an SD™ Card (optional).....18 Turning the camcorder on and getting started .......19 Turning off the camcorder 19 Chapter 3: Record Mode 20 Button functions 20 LCD touch screen information 21 Menu options 22 Movie recording 24 6
User Guide
Page 7
...movies 25 Using the Flash or digital light function 26 Using zoom 26 Record menu options 27 Movie Record mode menu 27 Picture record mode menu 27 Record mode operations 27 Movie resolution 28 Picture resolution 29 White balance 29 Scene 30 Movie effects 31 Stabilization 31 Macro mode 32 Motion Detection 32 Slow Motion 33 Time Lapse 33 Picture effects 34 Self-Timer 34 Macro mode 35 ISO 35 Chapter 4: Playback Mode 36 LCD touch screen information 37 Playback mode operations 39 Movie playback 40 Delete movies 41 Picture playback 42 Delete picture 43 Chapter 5: Camcorder...
...movies 25 Using the Flash or digital light function 26 Using zoom 26 Record menu options 27 Movie Record mode menu 27 Picture record mode menu 27 Record mode operations 27 Movie resolution 28 Picture resolution 29 White balance 29 Scene 30 Movie effects 31 Stabilization 31 Macro mode 32 Motion Detection 32 Slow Motion 33 Time Lapse 33 Picture effects 34 Self-Timer 34 Macro mode 35 ISO 35 Chapter 4: Playback Mode 36 LCD touch screen information 37 Playback mode operations 39 Movie playback 40 Delete movies 41 Picture playback 42 Delete picture 43 Chapter 5: Camcorder...
User Guide
Page 8
... Language 46 Time Settings 46 Format 47 Default settings 48 Chapter 6: Viewing Pictures and Movies on TV 50 Connecting to a high-definition 16:9 (wide) TV.......50 Connecting to a non-high-definition 4:3 TV ...........51 Chapter 7: Viewing Pictures and Movies on a Computer ...... 52 Installing bundled software 52 Transferring pictures or movies to a computer.......53 Chapter 8: Burning Recorded Clips to DVD 54 Chapter 9: Uploading Video Files to YouTube 58 Chapter 10: Video File Converter 64 Chapter 11: Specifications 67 Operating...
... Language 46 Time Settings 46 Format 47 Default settings 48 Chapter 6: Viewing Pictures and Movies on TV 50 Connecting to a high-definition 16:9 (wide) TV.......50 Connecting to a non-high-definition 4:3 TV ...........51 Chapter 7: Viewing Pictures and Movies on a Computer ...... 52 Installing bundled software 52 Transferring pictures or movies to a computer.......53 Chapter 8: Burning Recorded Clips to DVD 54 Chapter 9: Uploading Video Files to YouTube 58 Chapter 10: Video File Converter 64 Chapter 11: Specifications 67 Operating...
User Guide
Page 9
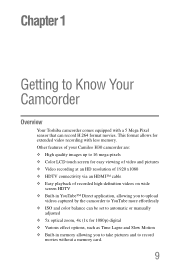
... Toshiba camcorder comes equipped with less memory. Other features of your Camileo H30 camcorder are: ❖ High quality images up to 16 mega-pixels ❖ Color LCD touch screen for 1080p) digital ❖ Various effect options, such as Time Lapse and Slow Motion ❖ Built-in YouTube™ Direct application, allowing you to upload videos captured by the camcorder to YouTube more effortlessly ❖ ISO and color balance can record H.264 format movies...
... Toshiba camcorder comes equipped with less memory. Other features of your Camileo H30 camcorder are: ❖ High quality images up to 16 mega-pixels ❖ Color LCD touch screen for 1080p) digital ❖ Various effect options, such as Time Lapse and Slow Motion ❖ Built-in YouTube™ Direct application, allowing you to upload videos captured by the camcorder to YouTube more effortlessly ❖ ISO and color balance can record H.264 format movies...
User Guide
Page 10
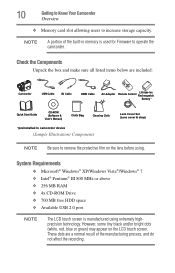
... CD-ROM Drive ❖ 700 MB free HDD space ❖ Available USB 2.0 port NOTE The LCD touch screen is used for Firmware to operate the camcorder. However, some tiny black and/or bright dots (white, red, blue or green) may appear on the lens before using extremely highprecision technology. These dots are included: Camcorder USB Cable AV Cable HDMI Cable SET AC-Adaptor Remote Control Lithiunm-ion Rechargeable Battery 㕚 Quick Start Guide CD-ROM (Software & User's Manual) Cloth Bag Cleaning Cloth...
... CD-ROM Drive ❖ 700 MB free HDD space ❖ Available USB 2.0 port NOTE The LCD touch screen is used for Firmware to operate the camcorder. However, some tiny black and/or bright dots (white, red, blue or green) may appear on the lens before using extremely highprecision technology. These dots are included: Camcorder USB Cable AV Cable HDMI Cable SET AC-Adaptor Remote Control Lithiunm-ion Rechargeable Battery 㕚 Quick Start Guide CD-ROM (Software & User's Manual) Cloth Bag Cleaning Cloth...

User Guide
Page 11
Front view Getting to Know Your Camcorder 11 Overview Speaker Tele/Wide button Lens Flash Self-Timer LED (Sample Illustration) Front view Rear view Playback LED indicator Playback button Rolling wheel Microphone Movie Mode LED indicator Picture Mode LED indicator Mode button OK button (Sample Illustration) Rear view
Front view Getting to Know Your Camcorder 11 Overview Speaker Tele/Wide button Lens Flash Self-Timer LED (Sample Illustration) Front view Rear view Playback LED indicator Playback button Rolling wheel Microphone Movie Mode LED indicator Picture Mode LED indicator Mode button OK button (Sample Illustration) Rear view
User Guide
Page 14
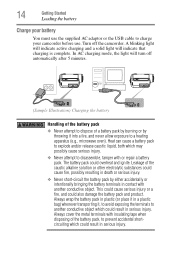
... to charge your battery You must use . A blinking light will indicate active charging and a solid light will turn off the camcorder. Always cover the metal terminals with insulating tape when disposing of a battery pack by burning or by either accidentally or intentionally bringing the battery terminals in serious injury. 14 Getting Started Loading the battery Charge your camcorder before use the supplied AC adaptor or the USB cable...
... to charge your battery You must use . A blinking light will indicate active charging and a solid light will turn off the camcorder. Always cover the metal terminals with insulating tape when disposing of a battery pack by burning or by either accidentally or intentionally bringing the battery terminals in serious injury. 14 Getting Started Loading the battery Charge your camcorder before use the supplied AC adaptor or the USB cable...
User Guide
Page 16
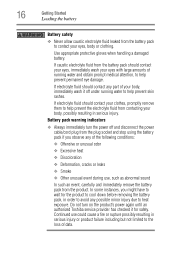
...part of running water to help prevent skin rashes. If electrolyte fluid should contact your clothes, promptly remove them to help prevent permanent eye damage. Battery pack warning indicators ❖ Always immediately turn on the product's power again until an authorized Toshiba service provider has checked it off and disconnect the power cable/cord plug from the plug socket and stop using the battery... removing the battery pack, in serious injury. Continued use , such as abnormal sound In such an event, carefully and immediately remove the battery pack from the battery ...
...part of running water to help prevent skin rashes. If electrolyte fluid should contact your clothes, promptly remove them to help prevent permanent eye damage. Battery pack warning indicators ❖ Always immediately turn on the product's power again until an authorized Toshiba service provider has checked it off and disconnect the power cable/cord plug from the plug socket and stop using the battery... removing the battery pack, in serious injury. Continued use , such as abnormal sound In such an event, carefully and immediately remove the battery pack from the battery ...
User Guide
Page 17
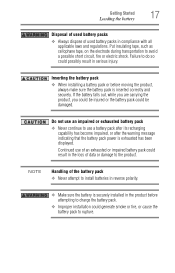
...tape, such as cellophane tape, on the electrode during transportation to use a battery pack after its recharging capability has become impaired, or after the warning message indicating that the battery pack power is exhausted has been displayed. Inserting the battery pack ❖ When installing a battery pack or before attempting to charge the battery pack. ❖ Improper installation...Loading the battery Disposal of used battery packs ❖ Always dispose of used battery packs in the loss of data or damage to the product. Continued use an impaired or exhausted battery pack ❖...
...tape, such as cellophane tape, on the electrode during transportation to use a battery pack after its recharging capability has become impaired, or after the warning message indicating that the battery pack power is exhausted has been displayed. Inserting the battery pack ❖ When installing a battery pack or before attempting to charge the battery pack. ❖ Improper installation...Loading the battery Disposal of used battery packs ❖ Always dispose of used battery packs in the loss of data or damage to the product. Continued use an impaired or exhausted battery pack ❖...
User Guide
Page 19
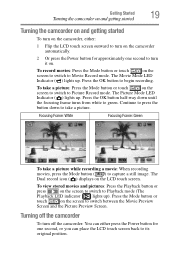
... Turning the camcorder on and getting started Turning the camcorder on and getting started To turn on the camcorder, either press the Power button for approximately one second, or you can either : 1 Flip the LCD touch screen outward to turn it on. To take a picture. The Dual record icon ( ) displays on the screen to switch to Picture Record mode. To view stored movies and pictures: Press the Playback button or press on the LCD touch screen...
... Turning the camcorder on and getting started Turning the camcorder on and getting started To turn on the camcorder, either press the Power button for approximately one second, or you can either : 1 Flip the LCD touch screen outward to turn it on. To take a picture. The Dual record icon ( ) displays on the screen to switch to Picture Record mode. To view stored movies and pictures: Press the Playback button or press on the LCD touch screen...

User Guide
Page 20
Chapter 3 Record Mode Button functions Rolling button: Rotate to take pictures. Left button: Flash Auto/Red-Eye-Reduction/Digital Light/Flash OFF. Up button: Move between option items. Down button: Move between Record and Playback modes. 2 Press after recording for a quick review. 3 In the Record menu, press to exit. 20 Right button: LCD touch screen information ON/OFF. In Record menu, press to return to the submenu. In the Record menu, press to switch to the main menu. Tele button: Zoom in Wide button: Zoom out Playback button: 1 Switch between...
Chapter 3 Record Mode Button functions Rolling button: Rotate to take pictures. Left button: Flash Auto/Red-Eye-Reduction/Digital Light/Flash OFF. Up button: Move between option items. Down button: Move between Record and Playback modes. 2 Press after recording for a quick review. 3 In the Record menu, press to exit. 20 Right button: LCD touch screen information ON/OFF. In Record menu, press to return to the submenu. In the Record menu, press to switch to the main menu. Tele button: Zoom in Wide button: Zoom out Playback button: 1 Switch between...
User Guide
Page 24
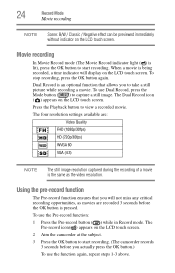
To stop recording, press the OK button again. Movie recording In Movie Record mode (The Movie Record indicator light ( ) is an optional function that you will display on the LCD touch screen. 2 Aim the camcorder at the subject. 3 Press the OK button to take a still picture while recording a movie. Dual Record is lit), press the OK button to start recording. (The camcorder records 3 seconds before the OK button is being recorded, a time indicator will not miss any critical recording opportunities...
To stop recording, press the OK button again. Movie recording In Movie Record mode (The Movie Record indicator light ( ) is an optional function that you will display on the LCD touch screen. 2 Aim the camcorder at the subject. 3 Press the OK button to take a still picture while recording a movie. Dual Record is lit), press the OK button to start recording. (The camcorder records 3 seconds before the OK button is being recorded, a time indicator will not miss any critical recording opportunities...
User Guide
Page 26
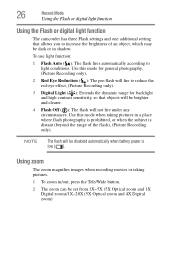
... allows you to light conditions. To use light function: 1 Flash Auto ( ): The flash fires automatically according to increase the brightness of the flash), (Picture Recording only). NOTE The flash will be disabled automatically when battery power is distant (beyond the range of an object, which may be dark or in shadow. 26 Record Mode Using the Flash or digital light function Using the Flash or digital light function The camcorder has three Flash settings and one additional setting that objects...
... allows you to light conditions. To use light function: 1 Flash Auto ( ): The flash fires automatically according to increase the brightness of the flash), (Picture Recording only). NOTE The flash will be disabled automatically when battery power is distant (beyond the range of an object, which may be dark or in shadow. 26 Record Mode Using the Flash or digital light function Using the Flash or digital light function The camcorder has three Flash settings and one additional setting that objects...
User Guide
Page 28
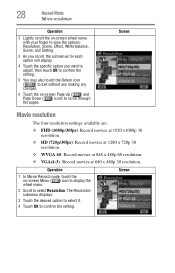
... Record Mode Movie resolution Operation 2 Lightly scroll the on-screen wheel menu with your finger to view the options: Resolution, Scene, Effect, White Balance, Scene, and Setting. 3 As you scroll, the submenus for each option will display. 4 Touch the specific option you want to adjust, then touch OK to confirm the setting. 5 You may also touch the Return icon ( ) to exit without any making any changes...
... Record Mode Movie resolution Operation 2 Lightly scroll the on-screen wheel menu with your finger to view the options: Resolution, Scene, Effect, White Balance, Scene, and Setting. 3 As you scroll, the submenus for each option will display. 4 Touch the specific option you want to adjust, then touch OK to confirm the setting. 5 You may also touch the Return icon ( ) to exit without any making any changes...
User Guide
Page 33
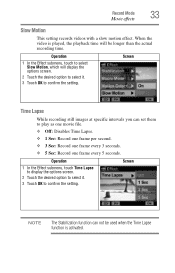
... Slow Motion, which will be used when the Time Lapse function is played, the playback time will display the options screen. 2 Touch the desired option to select it . 3 Touch OK to confirm the setting. When the video is activated. Operation 1 In the Effect submenu, touch Time Lapse to display the options screen. 2 Touch the desired option to select it . 3 Touch OK to play as one movie file. ❖ Off: Disables Time...
... Slow Motion, which will be used when the Time Lapse function is played, the playback time will display the options screen. 2 Touch the desired option to select it . 3 Touch OK to confirm the setting. When the video is activated. Operation 1 In the Effect submenu, touch Time Lapse to display the options screen. 2 Touch the desired option to select it . 3 Touch OK to play as one movie file. ❖ Off: Disables Time...

User Guide
Page 35
... (23.4inch)~Infinite (setting the ( ) switch to Tele). Use Macro mode when objects are also available (800/1600). Operation 1 In the Effect submenu, touch Macro Mode, to display the options screen. 2 Touch the desired option to select it . 3 Touch OK to confirm the setting. Macro ( ): The camcorder adjusts the focus on close-up objects. Record Mode 35 Picture effects Macro mode Auto: The camcorder automatically adjusts the focus. Operation Screen 1 In the...
... (23.4inch)~Infinite (setting the ( ) switch to Tele). Use Macro mode when objects are also available (800/1600). Operation 1 In the Effect submenu, touch Macro Mode, to display the options screen. 2 Touch the desired option to select it . 3 Touch OK to confirm the setting. Macro ( ): The camcorder adjusts the focus on close-up objects. Record Mode 35 Picture effects Macro mode Auto: The camcorder automatically adjusts the focus. Operation Screen 1 In the...
User Guide
Page 44
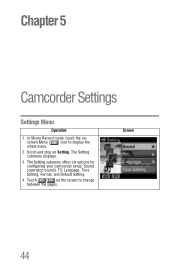
The Setting submenu displays. 3 The Setting submenu offers six options for configuring your camcorder setup: Sound (operation sound), TV, Language, Time Setting, Format, and Default Setting. 4 Touch / on the screen to display the wheel menu. 2 Scroll and stop on Setting. Chapter 5 Camcorder Settings Settings Menu Operation 1 In Movie Record mode, touch the onscreen Menu ( ) icon to change between the pages. Screen 44
The Setting submenu displays. 3 The Setting submenu offers six options for configuring your camcorder setup: Sound (operation sound), TV, Language, Time Setting, Format, and Default Setting. 4 Touch / on the screen to display the wheel menu. 2 Scroll and stop on Setting. Chapter 5 Camcorder Settings Settings Menu Operation 1 In Movie Record mode, touch the onscreen Menu ( ) icon to change between the pages. Screen 44

User Guide
Page 52
... the User's Manual. To install the bundled software: 1 Insert the CD-ROM into compatible format with your media, burning your videos onto DVD, and uploading your videos to YouTube™ easily. ❖ ArcSoft MediaConverter® is a powerful application that converts multiple video formats into your camcorder. ❖ Adobe® Reader® is a popular program that you need to complete the installation. The autorun screen appears. 2 Click "Install Application Software". Chapter 7 Viewing Pictures and Movies...
... the User's Manual. To install the bundled software: 1 Insert the CD-ROM into compatible format with your media, burning your videos onto DVD, and uploading your videos to YouTube™ easily. ❖ ArcSoft MediaConverter® is a powerful application that converts multiple video formats into your camcorder. ❖ Adobe® Reader® is a popular program that you need to complete the installation. The autorun screen appears. 2 Click "Install Application Software". Chapter 7 Viewing Pictures and Movies...
User Guide
Page 72
... obtain warranty service by contacting the telephone support center at 1-888-592-0944. Warranty Service Customers located in the fifty (50) United States and District of the page. The CAMILEO warranty booklet is found online by going to www.warranty.toshiba.com then selecting Click to regularly check the Toshiba Web site at www.pcsupport.toshiba.com. Customers...
... obtain warranty service by contacting the telephone support center at 1-888-592-0944. Warranty Service Customers located in the fifty (50) United States and District of the page. The CAMILEO warranty booklet is found online by going to www.warranty.toshiba.com then selecting Click to regularly check the Toshiba Web site at www.pcsupport.toshiba.com. Customers...


