
User Guide
Page 2
If this equipment, not expressly approved by TOSHIBA or parties authorized by one or more of the following measures: ❖ Reorient or relocate the receiving antenna. ❖ Increase the separation between the equipment ... radiate radio frequency energy and, if not installed and used in accordance with the limits for help. 2 Regulatory Information FCC Information Product Name: Camcorder Model number: CAMILEO H30 FCC notice "Declaration of Conformity Information" This equipment has been tested and found to comply with the instructions, may cause harmful interference to radio...
If this equipment, not expressly approved by TOSHIBA or parties authorized by one or more of the following measures: ❖ Reorient or relocate the receiving antenna. ❖ Increase the separation between the equipment ... radiate radio frequency energy and, if not installed and used in accordance with the limits for help. 2 Regulatory Information FCC Information Product Name: Camcorder Model number: CAMILEO H30 FCC notice "Declaration of Conformity Information" This equipment has been tested and found to comply with the instructions, may cause harmful interference to radio...

User Guide
Page 3
...incorrect type. 12 Dispose of the FCC Rules. Including interference that may affect the functionality of the camcorder. 8 Remove the battery if it in direct sunlight. Contact Address: TOSHIBA America Information Systems, Inc. 9740 Irvine Boulevard Irvine, California 92618-1697 Telephone: (949) 583-...3000 Safety Instructions 1 Do not drop, puncture or disassemble the camcorder; otherwise the warranty will be voided. 2 Avoid all...
...incorrect type. 12 Dispose of the FCC Rules. Including interference that may affect the functionality of the camcorder. 8 Remove the battery if it in direct sunlight. Contact Address: TOSHIBA America Information Systems, Inc. 9740 Irvine Boulevard Irvine, California 92618-1697 Telephone: (949) 583-...3000 Safety Instructions 1 Do not drop, puncture or disassemble the camcorder; otherwise the warranty will be voided. 2 Avoid all...
User Guide
Page 6
Contents Chapter 1: Getting to Know Your Camcorder 9 Overview 9 Check the Components 10 System Requirements 10 Front view 11 Rear view 11 Side views 12 Underside view 12 Chapter 2: Getting Started 13 Loading the battery 13 Charge your battery 14 Inserting and removing an SD™ Card (optional).....18 Turning the camcorder on and getting started .......19 Turning off the camcorder 19 Chapter 3: Record Mode 20 Button functions 20 LCD touch screen information 21 Menu options 22 Movie recording 24 6
Contents Chapter 1: Getting to Know Your Camcorder 9 Overview 9 Check the Components 10 System Requirements 10 Front view 11 Rear view 11 Side views 12 Underside view 12 Chapter 2: Getting Started 13 Loading the battery 13 Charge your battery 14 Inserting and removing an SD™ Card (optional).....18 Turning the camcorder on and getting started .......19 Turning off the camcorder 19 Chapter 3: Record Mode 20 Button functions 20 LCD touch screen information 21 Menu options 22 Movie recording 24 6
User Guide
Page 7
... 4: Playback Mode 36 LCD touch screen information 37 Playback mode operations 39 Movie playback 40 Delete movies 41 Picture playback 42 Delete picture 43 Chapter 5: Camcorder Settings 44 Settings Menu 44 Sound 45 TV 45
... 4: Playback Mode 36 LCD touch screen information 37 Playback mode operations 39 Movie playback 40 Delete movies 41 Picture playback 42 Delete picture 43 Chapter 5: Camcorder Settings 44 Settings Menu 44 Sound 45 TV 45
User Guide
Page 9
Other features of your Camileo H30 camcorder are: ❖ High quality images up to 16 mega-pixels ❖ Color LCD touch screen for easy viewing of video and pictures ❖ Video recording ... recorded high-definition videos on wide screen HDTV ❖ Built-in YouTube™ Direct application, allowing you to take pictures and to Know Your Camcorder Overview Your Toshiba camcorder comes equipped with less memory. Chapter 1 Getting to record movies without a memory card. 9 This format allows for 1080p) digital ❖ Various effect options, such...
Other features of your Camileo H30 camcorder are: ❖ High quality images up to 16 mega-pixels ❖ Color LCD touch screen for easy viewing of video and pictures ❖ Video recording ... recorded high-definition videos on wide screen HDTV ❖ Built-in YouTube™ Direct application, allowing you to take pictures and to Know Your Camcorder Overview Your Toshiba camcorder comes equipped with less memory. Chapter 1 Getting to record movies without a memory card. 9 This format allows for 1080p) digital ❖ Various effect options, such...
User Guide
Page 10
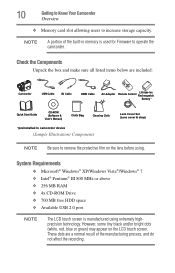
... the Components Unpack the box and make sure all listed items below are a normal result of the built-in camcorder device (Sample Illustration) Components Lens Cover Set (Lens cover & strap) NOTE Be sure to remove the protective film on the LCD touch screen....black and/or bright dots (white, red, blue or green) may appear on the lens before using extremely highprecision technology. These dots are included: Camcorder USB Cable AV Cable HDMI Cable SET AC-Adaptor Remote Control Lithiunm-ion Rechargeable Battery 㕚 Quick Start Guide CD-ROM (Software & User's Manual...
... the Components Unpack the box and make sure all listed items below are a normal result of the built-in camcorder device (Sample Illustration) Components Lens Cover Set (Lens cover & strap) NOTE Be sure to remove the protective film on the LCD touch screen....black and/or bright dots (white, red, blue or green) may appear on the lens before using extremely highprecision technology. These dots are included: Camcorder USB Cable AV Cable HDMI Cable SET AC-Adaptor Remote Control Lithiunm-ion Rechargeable Battery 㕚 Quick Start Guide CD-ROM (Software & User's Manual...

User Guide
Page 11
Front view Getting to Know Your Camcorder 11 Overview Speaker Tele/Wide button Lens Flash Self-Timer LED (Sample Illustration) Front view Rear view Playback LED indicator Playback button Rolling wheel Microphone Movie Mode LED indicator Picture Mode LED indicator Mode button OK button (Sample Illustration) Rear view
Front view Getting to Know Your Camcorder 11 Overview Speaker Tele/Wide button Lens Flash Self-Timer LED (Sample Illustration) Front view Rear view Playback LED indicator Playback button Rolling wheel Microphone Movie Mode LED indicator Picture Mode LED indicator Mode button OK button (Sample Illustration) Rear view

User Guide
Page 12
12 Getting to Know Your Camcorder Overview Side views Power button Pre-Record/YouTube™ Direct button LCD touch screen TV port Mini USB 2.0 port HDMI™ port (Sample Illustration) Side views Underside view Tripod socket Battery/SD™ Card cover (Sample Illustration) Underside view
12 Getting to Know Your Camcorder Overview Side views Power button Pre-Record/YouTube™ Direct button LCD touch screen TV port Mini USB 2.0 port HDMI™ port (Sample Illustration) Side views Underside view Tripod socket Battery/SD™ Card cover (Sample Illustration) Underside view
User Guide
Page 13
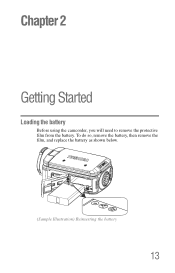
Chapter 2 Getting Started Loading the battery Before using the camcorder, you will need to remove the protective film from the battery. To do so, remove the battery, then remove the film, and replace the battery as shown below. (Sample Illustration) Reinserting the battery 13
Chapter 2 Getting Started Loading the battery Before using the camcorder, you will need to remove the protective film from the battery. To do so, remove the battery, then remove the film, and replace the battery as shown below. (Sample Illustration) Reinserting the battery 13
User Guide
Page 14
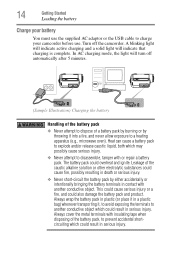
...possibly cause serious injury. ❖ Never attempt to charge your battery You must use . 14 Getting Started Loading the battery Charge your camcorder before use the supplied AC adaptor or the USB cable to disassemble, tamper with or repair a battery pack. In AC charging mode... the light will indicate that charging is complete. A blinking light will indicate active charging and a solid light will turn off the camcorder. Leakage of the caustic alkaline solution or other electrolytic substances could cause fire, possibly resulting in serious injury. Always cover the metal ...
...possibly cause serious injury. ❖ Never attempt to charge your battery You must use . 14 Getting Started Loading the battery Charge your camcorder before use the supplied AC adaptor or the USB cable to disassemble, tamper with or repair a battery pack. In AC charging mode... the light will indicate that charging is complete. A blinking light will indicate active charging and a solid light will turn off the camcorder. Leakage of the caustic alkaline solution or other electrolytic substances could cause fire, possibly resulting in serious injury. Always cover the metal ...

User Guide
Page 18
... Illustration) Inserting and removing an SD™ Card NOTE When a memory card is lithium ion batteries, which can expand the memory capacity by TOSHIBA as replacements. ❖ Charge the battery pack only in an ambient temperature between 5 and 35 degrees Celsius. 18 Getting Started Inserting and removing... memory card. 1 Insert the memory card into the slot until it . Inserting and removing an SD™ Card (optional) Your camcorder comes with internal memory that allows you to release it locks in place as required by local ordinances or regulations. Dispose of properly.
... Illustration) Inserting and removing an SD™ Card NOTE When a memory card is lithium ion batteries, which can expand the memory capacity by TOSHIBA as replacements. ❖ Charge the battery pack only in an ambient temperature between 5 and 35 degrees Celsius. 18 Getting Started Inserting and removing... memory card. 1 Insert the memory card into the slot until it . Inserting and removing an SD™ Card (optional) Your camcorder comes with internal memory that allows you to release it locks in place as required by local ordinances or regulations. Dispose of properly.
User Guide
Page 19
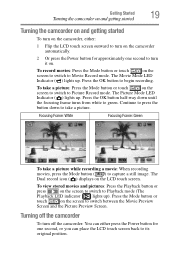
... Dual record icon ( ) displays on the screen to switch between the Movie Preview Screen and the Picture Preview Screen. Turning off the camcorder To turn it on. Continue to press the button down until the focusing frame turns from white to begin recording. The Movie Mode LED... Indicator ( ) lights up ). Getting Started 19 Turning the camcorder on and getting started Turning the camcorder on and getting started To turn on the camcorder, either press the Power button for one second, or you can either : 1 Flip the LCD touch...
... Dual record icon ( ) displays on the screen to switch between the Movie Preview Screen and the Picture Preview Screen. Turning off the camcorder To turn it on. Continue to press the button down until the focusing frame turns from white to begin recording. The Movie Mode LED... Indicator ( ) lights up ). Getting Started 19 Turning the camcorder on and getting started Turning the camcorder on and getting started To turn on the camcorder, either press the Power button for one second, or you can either : 1 Flip the LCD touch...

User Guide
Page 21
Pre-Record/YouTube™ Direct button: In Record mode, press to turn the camcorder on the LCD touch screen when recording movies and/or taking pictures: (Sample Image) LCD touch screen icons LCD touch screen information The indicators shown below may appear on or off. Power button: Press down for one second to activate the Pre-Record function and the movie will be recorded 3 seconds before the OK button is pressed. Record Mode 21 LCD touch screen information Mode button: 1 Switch between Movie mode and Picture mode. 2 When recording movies, press to capture a still image.
Pre-Record/YouTube™ Direct button: In Record mode, press to turn the camcorder on the LCD touch screen when recording movies and/or taking pictures: (Sample Image) LCD touch screen icons LCD touch screen information The indicators shown below may appear on or off. Power button: Press down for one second to activate the Pre-Record function and the movie will be recorded 3 seconds before the OK button is pressed. Record Mode 21 LCD touch screen information Mode button: 1 Switch between Movie mode and Picture mode. 2 When recording movies, press to capture a still image.
User Guide
Page 24
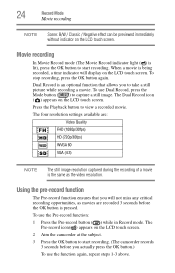
Dual Record is an optional function that you will display on the LCD touch screen. 2 Aim the camcorder at the subject. 3 Press the OK button to view a recorded movie. To use Dual Record, press the Mode button ( ) to take a still picture while recording a ... button to start recording. Movie recording In Movie Record mode (The Movie Record indicator light ( ) is lit), press the OK button to start recording. (The camcorder records 3 seconds before the OK button is the same as the video resolution. The Dual Record icon ( ) appears on the LCD touch screen.
Dual Record is an optional function that you will display on the LCD touch screen. 2 Aim the camcorder at the subject. 3 Press the OK button to view a recorded movie. To use Dual Record, press the Mode button ( ) to take a still picture while recording a ... button to start recording. Movie recording In Movie Record mode (The Movie Record indicator light ( ) is lit), press the OK button to start recording. (The camcorder records 3 seconds before the OK button is the same as the video resolution. The Dual Record icon ( ) appears on the LCD touch screen.
User Guide
Page 26
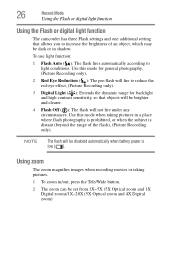
..., so that allows you to light conditions. 26 Record Mode Using the Flash or digital light function Using the Flash or digital light function The camcorder has three Flash settings and one additional setting that objects will be brighter and clearer. 4 Flash Off ( ): The flash will not fire under any circumstances...
..., so that allows you to light conditions. 26 Record Mode Using the Flash or digital light function Using the Flash or digital light function The camcorder has three Flash settings and one additional setting that objects will be brighter and clearer. 4 Flash Off ( ): The flash will not fire under any circumstances...

User Guide
Page 29
... to confirm the setting. The White Balance submenu displays. 3 Touch the desired option to select it . 4 Touch OK to confirm the setting. White balance The camcorder automatically adjusts the color balance of images. There are : ❖ High (16 MP): Take pictures at 4608 x 3456, 16 MP quality. ❖ Standard (10 ... Operation Screen 1 In Picture Record mode, touch the on -screen Menu ( ) icon to display the wheel menu. 2 Scroll to the Auto setting. ❖ Auto: The camcorder automatically adjusts white balance. ❖ Daylight: Use in addition to select White Balance.
... to confirm the setting. The White Balance submenu displays. 3 Touch the desired option to select it . 4 Touch OK to confirm the setting. White balance The camcorder automatically adjusts the color balance of images. There are : ❖ High (16 MP): Take pictures at 4608 x 3456, 16 MP quality. ❖ Standard (10 ... Operation Screen 1 In Picture Record mode, touch the on -screen Menu ( ) icon to display the wheel menu. 2 Scroll to the Auto setting. ❖ Auto: The camcorder automatically adjusts white balance. ❖ Daylight: Use in addition to select White Balance.

User Guide
Page 30
Screen NOTE To avoid blurry pictures, place the camcorder on -screen Menu ( ) icon to display the wheel menu. 2 Scroll to a negative version of the original. 30 Record Mode White balance Scene You can select ...
Screen NOTE To avoid blurry pictures, place the camcorder on -screen Menu ( ) icon to display the wheel menu. 2 Scroll to a negative version of the original. 30 Record Mode White balance Scene You can select ...
User Guide
Page 31
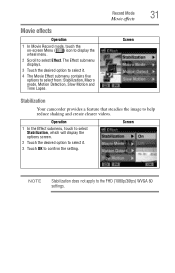
... Lapse. The Effect submenu displays. 3 Touch the desired option to select it . 3 Touch OK to select Effect. Record Mode 31 Movie effects Screen Stabilization Your camcorder provides a feature that steadies the image to the FHD (1080p/30fps) WVGA 60 settings. Screen NOTE Stabilization does not apply to help reduce shaking and...
... Lapse. The Effect submenu displays. 3 Touch the desired option to select it . 3 Touch OK to select Effect. Record Mode 31 Movie effects Screen Stabilization Your camcorder provides a feature that steadies the image to the FHD (1080p/30fps) WVGA 60 settings. Screen NOTE Stabilization does not apply to help reduce shaking and...
User Guide
Page 32
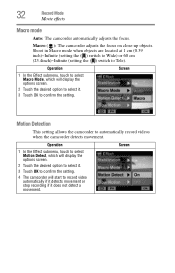
..., which will display the options screen. 2 Touch the desired option to select it. 3 Touch OK to confirm the setting. 4 The camcorder will display the options screen. 2 Touch the desired option to confirm the setting. 32 Record Mode Movie effects Macro mode Auto: The... switch to Wide) or 60 cm (23.4inch)~Infinite (setting the ( ) switch to automatically record videos when the camcorder detects movement. Screen Motion Detection This setting allows the camcorder to Tele). Operation 1 In the Effect submenu, touch to select Motion Detect, which will start to record video automatically if...
..., which will display the options screen. 2 Touch the desired option to select it. 3 Touch OK to confirm the setting. 4 The camcorder will display the options screen. 2 Touch the desired option to confirm the setting. 32 Record Mode Movie effects Macro mode Auto: The... switch to Wide) or 60 cm (23.4inch)~Infinite (setting the ( ) switch to automatically record videos when the camcorder detects movement. Screen Motion Detection This setting allows the camcorder to Tele). Operation 1 In the Effect submenu, touch to select Motion Detect, which will start to record video automatically if...

User Guide
Page 34
... just before the picture is activated. 34 Record Mode Picture effects Picture effects Operation 1 In Picture Record mode, touch the on the front of the camcorder blinks to indicate the feature is taken. Screen Screen Self-Timer The self-timer allows you to select from: Self-Timer, Macro mode, and ISO...
... just before the picture is activated. 34 Record Mode Picture effects Picture effects Operation 1 In Picture Record mode, touch the on the front of the camcorder blinks to indicate the feature is taken. Screen Screen Self-Timer The self-timer allows you to select from: Self-Timer, Macro mode, and ISO...


