
User Guide
Page 5
... Windows, and Windows Vista are either registered trademarks or trademarks of Microsoft Corporation in the United States and/or other countries. TOSHIBA assumes no liability for damages incurred directly or indirectly from errors, omissions or discrepancies between this product and the documentation. Trademarks Adobe... other brand and product names are registered trademarks of their respective companies. 5 Additional Information © Copyright 2010 TOSHIBA CORPORATION. YouTube and the YouTube logo are trademarks or registered trademarks of Google, Inc. All other countries.
... Windows, and Windows Vista are either registered trademarks or trademarks of Microsoft Corporation in the United States and/or other countries. TOSHIBA assumes no liability for damages incurred directly or indirectly from errors, omissions or discrepancies between this product and the documentation. Trademarks Adobe... other brand and product names are registered trademarks of their respective companies. 5 Additional Information © Copyright 2010 TOSHIBA CORPORATION. YouTube and the YouTube logo are trademarks or registered trademarks of Google, Inc. All other countries.
User Guide
Page 8
... a Computer ...... 52 Installing bundled software 52 Transferring pictures or movies to a computer.......53 Chapter 8: Burning Recorded Clips to DVD 54 Chapter 9: Uploading Video Files to YouTube 58 Chapter 10: Video File Converter 64 Chapter 11: Specifications 67 Operating Environment Conditions 68 Chapter 12: Troubleshooting 69 Chapter 13: Other Information 71...
... a Computer ...... 52 Installing bundled software 52 Transferring pictures or movies to a computer.......53 Chapter 8: Burning Recorded Clips to DVD 54 Chapter 9: Uploading Video Files to YouTube 58 Chapter 10: Video File Converter 64 Chapter 11: Specifications 67 Operating Environment Conditions 68 Chapter 12: Troubleshooting 69 Chapter 13: Other Information 71...
User Guide
Page 9
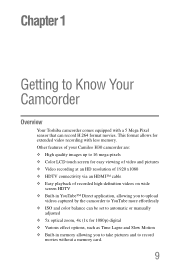
Other features of your Camileo H30 camcorder are: ❖ High quality images up to 16 mega-pixels ❖ Color LCD touch screen for easy viewing of video and pictures ❖ Video ... by the camcorder to YouTube more effortlessly ❖ ISO and color balance can be set to automatic or manually adjusted ❖ 5x optical zoom, 4x (1x for extended video recording with a 5 Mega Pixel sensor that can record H.264 format movies. Chapter 1 Getting to Know Your Camcorder Overview Your Toshiba camcorder comes equipped...
Other features of your Camileo H30 camcorder are: ❖ High quality images up to 16 mega-pixels ❖ Color LCD touch screen for easy viewing of video and pictures ❖ Video ... by the camcorder to YouTube more effortlessly ❖ ISO and color balance can be set to automatic or manually adjusted ❖ 5x optical zoom, 4x (1x for extended video recording with a 5 Mega Pixel sensor that can record H.264 format movies. Chapter 1 Getting to Know Your Camcorder Overview Your Toshiba camcorder comes equipped...

User Guide
Page 12
12 Getting to Know Your Camcorder Overview Side views Power button Pre-Record/YouTube™ Direct button LCD touch screen TV port Mini USB 2.0 port HDMI™ port (Sample Illustration) Side views Underside view Tripod socket Battery/SD™ Card cover (Sample Illustration) Underside view
12 Getting to Know Your Camcorder Overview Side views Power button Pre-Record/YouTube™ Direct button LCD touch screen TV port Mini USB 2.0 port HDMI™ port (Sample Illustration) Side views Underside view Tripod socket Battery/SD™ Card cover (Sample Illustration) Underside view

User Guide
Page 21
Pre-Record/YouTube™ Direct button: In Record mode, press to capture a still image. Record Mode 21 LCD touch screen information Mode button: 1 Switch between Movie mode and Picture mode. 2 When recording movies, press to activate the Pre-Record function and the movie will be recorded 3 seconds before the OK button is pressed. Power button: Press down for one second to turn the camcorder on the LCD touch screen when recording movies and/or taking pictures: (Sample Image) LCD touch screen icons LCD touch screen information The indicators shown below may appear on or off.
Pre-Record/YouTube™ Direct button: In Record mode, press to capture a still image. Record Mode 21 LCD touch screen information Mode button: 1 Switch between Movie mode and Picture mode. 2 When recording movies, press to activate the Pre-Record function and the movie will be recorded 3 seconds before the OK button is pressed. Power button: Press down for one second to turn the camcorder on the LCD touch screen when recording movies and/or taking pictures: (Sample Image) LCD touch screen icons LCD touch screen information The indicators shown below may appear on or off.

User Guide
Page 36
... information ON/OFF. OK button: 1 Enter Movie/Picture Playback mode. 2 Confirm the setting. 3 In Picture Playback mode, press to You Tube™. 36 Pre-Record/YouTube™ Direct button: In Movie Playback mode, press to select the current movie to upload to start/stop the slideshow. Mode button: Switch between Record...
... information ON/OFF. OK button: 1 Enter Movie/Picture Playback mode. 2 Confirm the setting. 3 In Picture Playback mode, press to You Tube™. 36 Pre-Record/YouTube™ Direct button: In Movie Playback mode, press to select the current movie to upload to start/stop the slideshow. Mode button: Switch between Record...
User Guide
Page 38
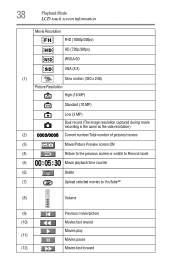
.../movies (3) Movie/Picture Preview screen ON (4) Return to the previous screen or switch to Record mode (5) Movie playback time counter (6) Delete (7) Upload selected movies to YouTube™ (8) Volume (9) Previous movie/picture (10) Movies fast rewind Movies play (11) Movies pause (12) Movies fast forward
.../movies (3) Movie/Picture Preview screen ON (4) Return to the previous screen or switch to Record mode (5) Movie playback time counter (6) Delete (7) Upload selected movies to YouTube™ (8) Volume (9) Previous movie/picture (10) Movies fast rewind Movies play (11) Movies pause (12) Movies fast forward
User Guide
Page 40
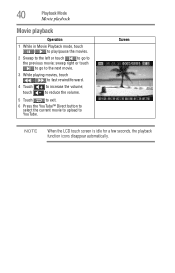
to reduce the volume. 5 Touch to exit. 6 Press the YouTube™ Direct button to select the current movie to upload to increase the volume; Screen NOTE When the LCD touch screen is idle for a few ... the movies. 2 Sweep to the left or touch to go to the next movie. 3 While playing movies, touch / to fast rewind/forward. 4 Touch touch to YouTube.
to reduce the volume. 5 Touch to exit. 6 Press the YouTube™ Direct button to select the current movie to upload to increase the volume; Screen NOTE When the LCD touch screen is idle for a few ... the movies. 2 Sweep to the left or touch to go to the next movie. 3 While playing movies, touch / to fast rewind/forward. 4 Touch touch to YouTube.

User Guide
Page 52
.... To install the bundled software: 1 Insert the CD-ROM into compatible format with your media, burning your videos onto DVD, and uploading your videos to YouTube™ easily. ❖ ArcSoft MediaConverter® is a powerful application that converts multiple video formats into your camcorder. ❖ Adobe® Reader® is a user-friendly...
.... To install the bundled software: 1 Insert the CD-ROM into compatible format with your media, burning your videos onto DVD, and uploading your videos to YouTube™ easily. ❖ ArcSoft MediaConverter® is a powerful application that converts multiple video formats into your camcorder. ❖ Adobe® Reader® is a user-friendly...

User Guide
Page 58
Chapter 9 Uploading Video Files to YouTube™ The built-in Movie Playback mode by pressing the YouTube Direct button ( ). 58 Also, the bundled software, ArcSoft MediaImpression, can be used to upload your video clips to YouTube instantly. It helps you share them with ( ) to YouTube: 1 Select the video clips in YouTube™ Direct application offers you an easy way to upload your video clips to YouTube. 9.1 YouTube Direct To upload video files marked with your family and friends on the YouTube website. NOTE You must have internet access to upload videos to YouTube.
Chapter 9 Uploading Video Files to YouTube™ The built-in Movie Playback mode by pressing the YouTube Direct button ( ). 58 Also, the bundled software, ArcSoft MediaImpression, can be used to upload your video clips to YouTube instantly. It helps you share them with ( ) to YouTube: 1 Select the video clips in YouTube™ Direct application offers you an easy way to upload your video clips to YouTube. 9.1 YouTube Direct To upload video files marked with your family and friends on the YouTube website. NOTE You must have internet access to upload videos to YouTube.

User Guide
Page 59
Uploading Video Files to YouTube™ 59 2 Connect the camcorder to your computer by using the supplied USB cable. (Sample Illustration) 3 Press YouTube Direct button ( ) on the camcorder to launch the YouTube Direct application automatically. (Before the computer launches YouTube Direct, you must install the application included on the CD first.) (Sample Image) 4 Upload video clips: ❖ Press YouTube Direct button ( again. ) on the camcorder ❖ The videos clips marked with ( ) will be uploaded to the website automatically. (You may be asked to fill in
Uploading Video Files to YouTube™ 59 2 Connect the camcorder to your computer by using the supplied USB cable. (Sample Illustration) 3 Press YouTube Direct button ( ) on the camcorder to launch the YouTube Direct application automatically. (Before the computer launches YouTube Direct, you must install the application included on the CD first.) (Sample Image) 4 Upload video clips: ❖ Press YouTube Direct button ( again. ) on the camcorder ❖ The videos clips marked with ( ) will be uploaded to the website automatically. (You may be asked to fill in
User Guide
Page 60
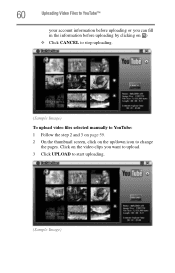
60 Uploading Video Files to YouTube™ your account information before uploading or you can fill in the information before uploading by clicking on ) ❖ Click CANCEL to stop uploading. (Sample Image) To upload video files selected manually to YouTube: 1 Follow the step 2 and 3 on page 59. 2 On the thumbnail screen, click on the video clips you want to upload. 3 Click UPLOAD to change the pages. Click on the up/down icon to start uploading. (Sample Image)
60 Uploading Video Files to YouTube™ your account information before uploading or you can fill in the information before uploading by clicking on ) ❖ Click CANCEL to stop uploading. (Sample Image) To upload video files selected manually to YouTube: 1 Follow the step 2 and 3 on page 59. 2 On the thumbnail screen, click on the video clips you want to upload. 3 Click UPLOAD to change the pages. Click on the up/down icon to start uploading. (Sample Image)
User Guide
Page 61
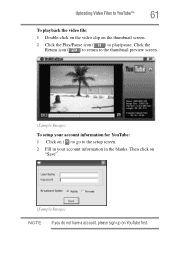
Uploading Video Files to YouTube™ 61 To playback the video file: 1 Double-click on the video clip on YouTube first. Then click on "Save". (Sample Image) NOTE If you do not have a account, please sign up on the thumbnail screen. 2 Click the Play/Pause icon ( ) to the setup screen. 2 Fill in your account information in the blanks. Click the Return icon ( ) to return to the thumbnail preview screen. (Sample Image) To setup your account information for YouTube: 1 Click on ( ) to go to play/pause.
Uploading Video Files to YouTube™ 61 To playback the video file: 1 Double-click on the video clip on YouTube first. Then click on "Save". (Sample Image) NOTE If you do not have a account, please sign up on the thumbnail screen. 2 Click the Play/Pause icon ( ) to the setup screen. 2 Fill in your account information in the blanks. Click the Return icon ( ) to return to the thumbnail preview screen. (Sample Image) To setup your account information for YouTube: 1 Click on ( ) to go to play/pause.
User Guide
Page 62
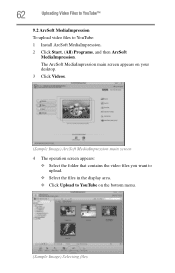
62 Uploading Video Files to YouTube™ 9.2 ArcSoft MediaImpression To upload video files to YouTube on the bottom menu. (Sample Image) Selecting files The ArcSoft MediaImpression main screen appears on your desktop. 3 Click Videos. (Sample Image) ArcSoft MediaImpression main screen 4 The operation screen appears: ❖ Select the folder that contains the video files you want to upload. ❖ Select the files in the display area. ❖ Click Upload to YouTube: 1 Install ArcSoft MediaImpression. 2 Click Start, (All) Programs, and then ArcSoft MediaImpression.
62 Uploading Video Files to YouTube™ 9.2 ArcSoft MediaImpression To upload video files to YouTube on the bottom menu. (Sample Image) Selecting files The ArcSoft MediaImpression main screen appears on your desktop. 3 Click Videos. (Sample Image) ArcSoft MediaImpression main screen 4 The operation screen appears: ❖ Select the folder that contains the video files you want to upload. ❖ Select the files in the display area. ❖ Click Upload to YouTube: 1 Install ArcSoft MediaImpression. 2 Click Start, (All) Programs, and then ArcSoft MediaImpression.

User Guide
Page 63
Uploading Video Files to YouTube™ 63 5 Fill in your YouTube account information in the blanks, and then click Login. (Sample Image) Entering account information 6 Fill in the information on the video clips, and then click Upload. (Sample Image) Uploading to YouTube
Uploading Video Files to YouTube™ 63 5 Fill in your YouTube account information in the blanks, and then click Login. (Sample Image) Entering account information 6 Fill in the information on the video clips, and then click Upload. (Sample Image) Uploading to YouTube
