Owner's Manual - English
Page 1
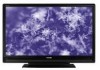
...picture, the TV must be receiving a High Definition signal (such as an over-the-air High Definition TV broadcast, a High Definition digital cable program, or a High Definition digital satellite program). For details, please contact your TV antenna installer, cable provider, or satellite provider. © 2008 TOSHIBA...back of steps for setting up your new TV, see page 9. Record these numbers whenever you communicate with your Toshiba dealer about this TV. Integrated High Definition LCD Television HIGH-DEFINITION TELEVISION 32CV510U 37CV510U For an overview of your TV. Refer to these ...
...picture, the TV must be receiving a High Definition signal (such as an over-the-air High Definition TV broadcast, a High Definition digital cable program, or a High Definition digital satellite program). For details, please contact your TV antenna installer, cable provider, or satellite provider. © 2008 TOSHIBA...back of steps for setting up your new TV, see page 9. Record these numbers whenever you communicate with your Toshiba dealer about this TV. Integrated High Definition LCD Television HIGH-DEFINITION TELEVISION 32CV510U 37CV510U For an overview of your TV. Refer to these ...

Owner's Manual - English
Page 7
...in the channel memory 29 Labeling channels 30 Setting the HDMI™ audio mode 31 Viewing the digital signal meter 32 Setting the time zone 32 Viewing the system status 33 Selecting the Power-On Mode 33 Chapter 6: Using the TV's features 34 Selecting the video input source ...37 Switching between two channels using Channel Return 38 Switching between two channels using SurfLock™. . . . 38 Selecting the picture size 38 Scrolling the TheaterWide® picture (TheaterWide 2 and 3 only 40 Using the auto aspect ratio feature 40 Selecting the cinema mode (480i and 1080i signals ...
...in the channel memory 29 Labeling channels 30 Setting the HDMI™ audio mode 31 Viewing the digital signal meter 32 Setting the time zone 32 Viewing the system status 33 Selecting the Power-On Mode 33 Chapter 6: Using the TV's features 34 Selecting the video input source ...37 Switching between two channels using Channel Return 38 Switching between two channels using SurfLock™. . . . 38 Selecting the picture size 38 Scrolling the TheaterWide® picture (TheaterWide 2 and 3 only 40 Using the auto aspect ratio feature 40 Selecting the cinema mode (480i and 1080i signals ...

Owner's Manual - English
Page 8
Chapter 7: Using the TV's advanced features 54 Using the advanced picture settings features 54 Using dynamic contrast 54 Using the static gamma feature 54 Selecting the color temperature 55 Using CableClear® digital noise reduction 55 Using ... troubleshooting 57 LED indications 59 Chapter 9: Appendix 60 Specifications 60 Acceptable signal formats for PC IN and HDMI terminals 61 Limited United States Warranty for LCD Televisions 26" and Larger 62 Limited Canadian Warranty for Toshiba Brand Flat Panel Televisions 63 Index 66 8
Chapter 7: Using the TV's advanced features 54 Using the advanced picture settings features 54 Using dynamic contrast 54 Using the static gamma feature 54 Selecting the color temperature 55 Using CableClear® digital noise reduction 55 Using ... troubleshooting 57 LED indications 59 Chapter 9: Appendix 60 Specifications 60 Acceptable signal formats for PC IN and HDMI terminals 61 Limited United States Warranty for LCD Televisions 26" and Larger 62 Limited Canadian Warranty for Toshiba Brand Flat Panel Televisions 63 Index 66 8

Owner's Manual - English
Page 9
...Toshiba widescreen, integrated HD, LCD TV: • Integrated digital tuning (8VSB ATSC and QAM) eliminates the need for a separate digital converter set up your TV and begin using its many exciting features. 1 Observe the following when choosing a location for the TV: • Read "Important notes about your LCD TV" (- page 50). • Two sets of external devices from the TV... remote via HDMI connection (- page 45). • CableClear® digital picture noise ...
...Toshiba widescreen, integrated HD, LCD TV: • Integrated digital tuning (8VSB ATSC and QAM) eliminates the need for a separate digital converter set up your TV and begin using its many exciting features. 1 Observe the following when choosing a location for the TV: • Read "Important notes about your LCD TV" (- page 50). • Two sets of external devices from the TV... remote via HDMI connection (- page 45). • CableClear® digital picture noise ...
Owner's Manual - English
Page 12
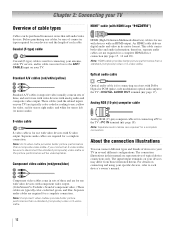
... video cables (red/green/blue) Analog RGB (15-pin) computer cable is Toshiba's brand of component video.) These cables are for connecting a PC to each cable. Component video cables come in sets of three, and are typically color-coded red, green, and blue. Separate audio... cables are required for a complete connection. These cables (and the related inputs on your TV) are representative of typical device connections only. Note: An S-video cable provides better picture performance than ...
... video cables (red/green/blue) Analog RGB (15-pin) computer cable is Toshiba's brand of component video.) These cables are for connecting a PC to each cable. Component video cables come in sets of three, and are typically color-coded red, green, and blue. Separate audio... cables are required for a complete connection. These cables (and the related inputs on your TV) are representative of typical device connections only. Note: An S-video cable provides better picture performance than ...
Owner's Manual - English
Page 13
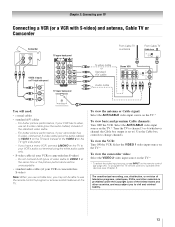
... CH 4 OUT L R IN from ANT OUT to TV You will be able to use , distribution, or revision of television programs, videotapes, DVDs, and other materials is set to). Use the Cable box controls to civil and criminal liability. 13 For better picture performance, if your camcorder has S-video, connect an ...S-video cable (plus the audio cables) instead of the VIDEO 2 on the TV back instead of the standard video ...
... CH 4 OUT L R IN from ANT OUT to TV You will be able to use , distribution, or revision of television programs, videotapes, DVDs, and other materials is set to). Use the Cable box controls to civil and criminal liability. 13 For better picture performance, if your camcorder has S-video, connect an ...S-video cable (plus the audio cables) instead of the VIDEO 2 on the TV back instead of the standard video ...

Owner's Manual - English
Page 14
... COMPONENT VIDEO S-VIDEO VIDEO OUT OUT DVD player with component video TV lower back panel You will be used to either set of television programs, videotapes, DVDs, and other countries, and may subject you to VIDEO 1 at the same time or the picture performance will need: • coaxial cables • standard A/V cables - Select...
... COMPONENT VIDEO S-VIDEO VIDEO OUT OUT DVD player with component video TV lower back panel You will be used to either set of television programs, videotapes, DVDs, and other countries, and may subject you to VIDEO 1 at the same time or the picture performance will need: • coaxial cables • standard A/V cables - Select...
Owner's Manual - English
Page 18
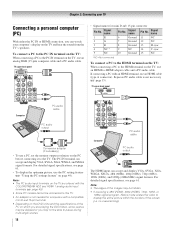
... back panel • Signal names for computers with a compatible mini D-sub15-pin terminal. • Depending on the TV, use the PC setting feature (- TV upper back panel Computer PC audio cable PC audio output Conversion adapter (if necessary) • To use an HDMI-to the PC IN terminal on ..., Native mode scales the video to display the entire picture within the borders of the PC on the TV are playing the DVD-Video, some scenes may be skipped or you may not be connected to the HDMI terminal on the TV, use a PC, set the monitor output resolution on page 49). page 49...
... back panel • Signal names for computers with a compatible mini D-sub15-pin terminal. • Depending on the TV, use the PC setting feature (- TV upper back panel Computer PC audio cable PC audio output Conversion adapter (if necessary) • To use an HDMI-to the PC IN terminal on ..., Native mode scales the video to display the entire picture within the borders of the PC on the TV are playing the DVD-Video, some scenes may be skipped or you may not be connected to the HDMI terminal on the TV, use a PC, set the monitor output resolution on page 49). page 49...
Owner's Manual - English
Page 20
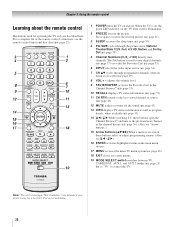
... are described here. page 50). 4 PIC SIZE cycles through programmed channels when no menu is on -screen (- Set to "TV" to the last viewed channel or source (- Press again to edit the Favorites List (- page 35). 6 INPUT selects the video input source (- page 38...Using the remote control Learning about the remote control The buttons used to tune digital channels (- page 37) or to restore the moving picture (- page 43). 13 INFO displays TV status information as well as program details, when available (- page 36). (Also see the remote control functional key chart (- page 35...
... are described here. page 50). 4 PIC SIZE cycles through programmed channels when no menu is on -screen (- Set to "TV" to the last viewed channel or source (- Press again to edit the Favorites List (- page 35). 6 INPUT selects the video input source (- page 38...Using the remote control Learning about the remote control The buttons used to tune digital channels (- page 37) or to restore the moving picture (- page 43). 13 INFO displays TV status information as well as program details, when available (- page 36). (Also see the remote control functional key chart (- page 35...

Owner's Manual - English
Page 21
.../reverses the tape or DVD. (Press during play mode to view the picture moving rapidly backward.) 18 TV/VCR To view one program while recording another, press to use those features, you have a non-Toshiba device or a Toshiba device that the remote control is programmed, it may not work on and... control Using the remote control to control your TV remote control to operate a: • Cable converter box or satellite receiver, set the MODE SELECT switch to CABLE/SAT. • VCR, set the MODE SELECT switch to AUX 1. • DVD player or HTIB, set the MODE SELECT switch to control a DVD ...
.../reverses the tape or DVD. (Press during play mode to view the picture moving rapidly backward.) 18 TV/VCR To view one program while recording another, press to use those features, you have a non-Toshiba device or a Toshiba device that the remote control is programmed, it may not work on and... control Using the remote control to control your TV remote control to operate a: • Cable converter box or satellite receiver, set the MODE SELECT switch to CABLE/SAT. • VCR, set the MODE SELECT switch to AUX 1. • DVD player or HTIB, set the MODE SELECT switch to control a DVD ...
Owner's Manual - English
Page 22
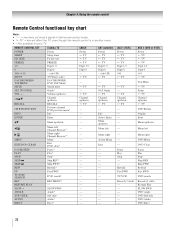
...™ --- REMOTE CONTROL KEY Toshiba TV CABLE SAT (satellite) POWER SLEEP PIC SIZE FREEZE Power Sleep timer Picture size FREEZE Power s TV s TV s TV Power s TV s TV s TV 1-9 Digit 1-9 Digit 1-9 Digit 1-9 0 Digit 0 Digit 0 Digit 0 100/-/+10 INPUT - (sub CH) TV/Video select --s TV - (sub CH) s TV FAV BROWSER/ TOP MENU MUTE FAV BROWSER DVD TOP Menu* Sound mute --s TV --s TV SET UP/GUIDE VOL + - Select...
...™ --- REMOTE CONTROL KEY Toshiba TV CABLE SAT (satellite) POWER SLEEP PIC SIZE FREEZE Power Sleep timer Picture size FREEZE Power s TV s TV s TV Power s TV s TV s TV 1-9 Digit 1-9 Digit 1-9 Digit 1-9 0 Digit 0 Digit 0 Digit 0 100/-/+10 INPUT - (sub CH) TV/Video select --s TV - (sub CH) s TV FAV BROWSER/ TOP MENU MUTE FAV BROWSER DVD TOP Menu* Sound mute --s TV --s TV SET UP/GUIDE VOL + - Select...
Owner's Manual - English
Page 26
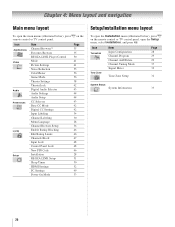
... Locks Setup Item Channel Browser™ Favorites Browser REGZA-LINK Player Control Mode Picture Settings Noise Reduction ColorMaster Game Mode Theater Settings TheaterLock Digital Audio Selector Audio Settings Audio Setup CC Selector Base CC Mode Digital CC Settings Input Labeling Channel Labeling Menu Language Channel Browser Setup Enable Rating Blocking Edit Rating... 51 50 52 49 33 Setup/Installation menu layout To open the Installation menu (illustrated below), press Y on the remote control or TV control panel, open the main menus (illustrated below), press Y on the remote control or...
... Locks Setup Item Channel Browser™ Favorites Browser REGZA-LINK Player Control Mode Picture Settings Noise Reduction ColorMaster Game Mode Theater Settings TheaterLock Digital Audio Selector Audio Settings Audio Setup CC Selector Base CC Mode Digital CC Settings Input Labeling Channel Labeling Menu Language Channel Browser Setup Enable Rating Blocking Edit Rating... 51 50 52 49 33 Setup/Installation menu layout To open the Installation menu (illustrated below), press Y on the remote control or TV control panel, open the main menus (illustrated below), press Y on the remote control or...
Owner's Manual - English
Page 38
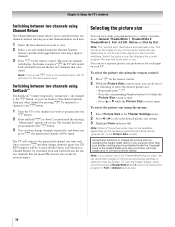
... channel quickly from a non-antenna input, the TV will display. To select the picture size using the menus: 1 Select Picture Size in Full or Natural picture size. 38 To view the hidden edges, either scroll the picture (TheaterWide 2 and 3 only) or try viewing the program in the Theater Settings menu. 2 Press C or c to select the desired...
... channel quickly from a non-antenna input, the TV will display. To select the picture size using the menus: 1 Select Picture Size in Full or Natural picture size. 38 To view the hidden edges, either scroll the picture (TheaterWide 2 and 3 only) or try viewing the program in the Theater Settings menu. 2 Press C or c to select the desired...
Owner's Manual - English
Page 40
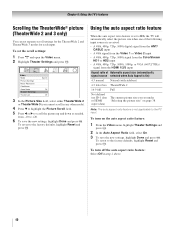
... Done and press T. Using the auto aspect ratio feature When the auto aspect ratio feature is set to On, the TV will automatically select the picture size when one of the following input sources is received: • A 480i, 480p, 720p, 1080i digital signal from the ANT/ ... 2 16:9 full Full Not defined (no ID-1 data or HDMI aspect data) The current picture size you cannot scroll in step 2 above. 40 Chapter 6: Using the TV's features Scrolling the TheaterWide® picture (TheaterWide 2 and 3 only) You can set the scroll settings: 1 Press Y and open the Video menu. 2 Highlight Theater...
... Done and press T. Using the auto aspect ratio feature When the auto aspect ratio feature is set to On, the TV will automatically select the picture size when one of the following input sources is received: • A 480i, 480p, 720p, 1080i digital signal from the ANT/ ... 2 16:9 full Full Not defined (no ID-1 data or HDMI aspect data) The current picture size you cannot scroll in step 2 above. 40 Chapter 6: Using the TV's features Scrolling the TheaterWide® picture (TheaterWide 2 and 3 only) You can set the scroll settings: 1 Press Y and open the Video menu. 2 Highlight Theater...

Owner's Manual - English
Page 41
... be prohibited under the Copyright Laws of the entire screen. Adjusting the picture quality You can adjust the picture quality (Contrast, Backlight, DynaLight™, Brightness, Color, Tint, and Sharpness) to your desired picture settings from a DVD player connected to Film. Note: If the TV is input, this will return to the factory defaults, highlight Reset...
... be prohibited under the Copyright Laws of the entire screen. Adjusting the picture quality You can adjust the picture quality (Contrast, Backlight, DynaLight™, Brightness, Color, Tint, and Sharpness) to your desired picture settings from a DVD player connected to Film. Note: If the TV is input, this will return to the factory defaults, highlight Reset...
Owner's Manual - English
Page 42
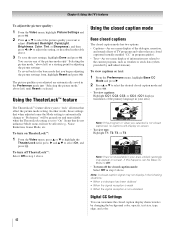
..., press B or b to highlight the TheaterLock field, press c and B b to adjust the setting, as a starting point for adjusting the picture settings. Chapter 6: Using the TV's features To adjust the picture quality: 1 From the Video menu, highlight Picture Settings and press T. 2 Press B or b to select the picture quality you want to adjust (Contrast, Backlight, DynaLight, Brightness, Color, Tint, or...
..., press B or b to highlight the TheaterLock field, press c and B b to adjust the setting, as a starting point for adjusting the picture settings. Chapter 6: Using the TV's features To adjust the picture quality: 1 From the Video menu, highlight Picture Settings and press T. 2 Press B or b to select the picture quality you want to adjust (Contrast, Backlight, DynaLight, Brightness, Color, Tint, or...
Owner's Manual - English
Page 47
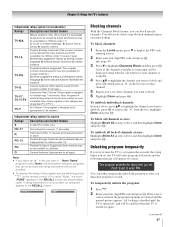
...unblock, press T to remove the "5" from the box, highlight Done and press T. PG L V NONE Blocking channels With the Channels Block feature, you set. To unblock all locked channels at once: Highlight Block All in the box next to that channel. 5 Repeat step 4 for other programs in this ...program suitable for all ages.) TV-Y7, TV-Y7FV Directed to Older Children (This program is released and the normal picture appears. If the correct code is entered, the program lock mode is designed for children age 7 and ...
...unblock, press T to remove the "5" from the box, highlight Done and press T. PG L V NONE Blocking channels With the Channels Block feature, you set. To unblock all locked channels at once: Highlight Block All in the box next to that channel. 5 Repeat step 4 for other programs in this ...program suitable for all ages.) TV-Y7, TV-Y7FV Directed to Older Children (This program is released and the normal picture appears. If the correct code is entered, the program lock mode is designed for children age 7 and ...
Owner's Manual - English
Page 49
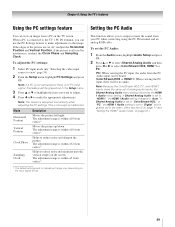
... from the PC Audio input can be grayed out in the menu. (Also see item 5 on page 11 and "Setting the HDMI™ audio mode" on page 31.) * The default settings and /or adjustment range vary depending on the screen. If Shared Analog Audio is grayed out in the Setup menu. ...If Shared Analog Audio is set to "ColorStream HD2," or "PC," the HDMI 1 Audio setting is set to "Digital" and is set to "HDMI 1," the HDMI 1 Audio setting changes to output or mute the sound from a PC on the TV screen. If the picture is not a sign of malfunction. To set of the picture are cut off, readjust...
... from the PC Audio input can be grayed out in the menu. (Also see item 5 on page 11 and "Setting the HDMI™ audio mode" on page 31.) * The default settings and /or adjustment range vary depending on the screen. If Shared Analog Audio is grayed out in the Setup menu. ...If Shared Analog Audio is set to "ColorStream HD2," or "PC," the HDMI 1 Audio setting is set to "Digital" and is set to "HDMI 1," the HDMI 1 Audio setting changes to output or mute the sound from a PC on the TV screen. If the picture is not a sign of malfunction. To set of the picture are cut off, readjust...
Owner's Manual - English
Page 54
... the static gamma. Note: If you to Preference. To select dynamic contrast preferences: 1 Press Y and open the Video menu. 2 Highlight Picture Settings and press T. Chapter 7: Using the TV's advanced features Using the advanced picture settings features Using dynamic contrast When dynamic contrast is moved in the plus direction, the detail of black colors will detect...
... the static gamma. Note: If you to Preference. To select dynamic contrast preferences: 1 Press Y and open the Video menu. 2 Highlight Picture Settings and press T. Chapter 7: Using the TV's advanced features Using the advanced picture settings features Using dynamic contrast When dynamic contrast is moved in the plus direction, the detail of black colors will detect...

Owner's Manual - English
Page 55
...especially a Cable channel) or playing a noisy video cassette or disc. To change the CableClear settings: 1 From the Video menu, highlight Noise Reduction and press T. 2 In the CableClear field, select your TV picture. Off is automatically selected when this feature is ColorStream HD1, ColorStream HD2, HDMI 1, HDMI ...select one of the factory-set picture modes (Sports, Standard, Movie, or PC) and then change the color temperature mode, the picture mode automatically changes to Preference. To revert to the strength of the noise. Chapter 7: Using the TV's advanced features Selecting the ...
...especially a Cable channel) or playing a noisy video cassette or disc. To change the CableClear settings: 1 From the Video menu, highlight Noise Reduction and press T. 2 In the CableClear field, select your TV picture. Off is automatically selected when this feature is ColorStream HD1, ColorStream HD2, HDMI 1, HDMI ...select one of the factory-set picture modes (Sports, Standard, Movie, or PC) and then change the color temperature mode, the picture mode automatically changes to Preference. To revert to the strength of the noise. Chapter 7: Using the TV's advanced features Selecting the ...


