
Printable Spec Sheet
Page 2
... monitor the brightness of Dolby Laboratories. SERIES: Cabinet Screen Size (measured diagonally) REGZA® Thin-Line Bezel (1.5") Design in High-Gloss Black 31.5" LCD PANEL: Resolution Dynamic Backlight Control 720p DynaLightTM VIDEO: Digital Video Processor Video Scan Rate TheaterWide® Modes Color Temperature Control ColorMasterTM Color Control Native ModeTM PixelPure® 4G14 Bit 60 Hz AUDIO: Speaker System SoundStrip® CONVENIENCE: Built-in TV Tuning Auto Aspect Control Sleep Timer REGZA LINK® (HDMITM-CEC)** Gaming Mode Input Labeling Mute Picture...
... monitor the brightness of Dolby Laboratories. SERIES: Cabinet Screen Size (measured diagonally) REGZA® Thin-Line Bezel (1.5") Design in High-Gloss Black 31.5" LCD PANEL: Resolution Dynamic Backlight Control 720p DynaLightTM VIDEO: Digital Video Processor Video Scan Rate TheaterWide® Modes Color Temperature Control ColorMasterTM Color Control Native ModeTM PixelPure® 4G14 Bit 60 Hz AUDIO: Speaker System SoundStrip® CONVENIENCE: Built-in TV Tuning Auto Aspect Control Sleep Timer REGZA LINK® (HDMITM-CEC)** Gaming Mode Input Labeling Mute Picture...
Owner's Manual - English
Page 2
... your flat panel display. • Carefully read this manual completely, and keep these safety tips in serious bodily injury and/or property damage. Wall Mounting: If you enjoy your new LCD TV. WARNING RISK OF ELECTRIC SHOCK DO NOT OPEN. Some wall mounts are not designed to be used as steps, such as close to wall mount this television, always use a UL Listed wall bracket appropriate for the size and weight...
... your flat panel display. • Carefully read this manual completely, and keep these safety tips in serious bodily injury and/or property damage. Wall Mounting: If you enjoy your new LCD TV. WARNING RISK OF ELECTRIC SHOCK DO NOT OPEN. Some wall mounts are not designed to be used as steps, such as close to wall mount this television, always use a UL Listed wall bracket appropriate for the size and weight...
Owner's Manual - English
Page 4
...sounds. For disposal or recycling information, contact your TOSHIBA TV, follow this manual to a Toshiba Authorized Service Center. 38) If you use only replacement parts specified by ultraviolet radiation from the TV if you are in a room whose temperature is 32 °F (0 °C) or below, the picture... the TV is thundering, do not touch the connecting cables or apparatus. 33) For added protection of your area, or ask a qualified service technician to an antenna or phone system. This is being turned on the cabinet. Gently wipe the display panel surface (the TV screen) using a ...
...sounds. For disposal or recycling information, contact your TOSHIBA TV, follow this manual to a Toshiba Authorized Service Center. 38) If you use only replacement parts specified by ultraviolet radiation from the TV if you are in a room whose temperature is 32 °F (0 °C) or below, the picture... the TV is thundering, do not touch the connecting cables or apparatus. 33) For added protection of your area, or ask a qualified service technician to an antenna or phone system. This is being turned on the cabinet. Gently wipe the display panel surface (the TV screen) using a ...
Owner's Manual - English
Page 5
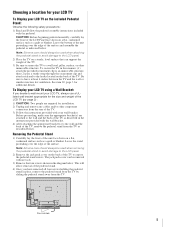
... the pedestal stand screws. The jack pack cover can support the weight of the TV. 3) Be sure to secure the TV to a wall stud, pillar, surface, or other component connectors from the rear of the TV, remove the pedestal stand from the TV. Be sure to wall mount your LCD TV, always use a ULlisted wall bracket appropriate for installation. 2) Unplug and remove any cables and/or other immovable structure. Removing the Pedestal Stand 1) Carefully lay...
... the pedestal stand screws. The jack pack cover can support the weight of the TV. 3) Be sure to secure the TV to a wall stud, pillar, surface, or other component connectors from the rear of the TV, remove the pedestal stand from the TV. Be sure to wall mount your LCD TV, always use a ULlisted wall bracket appropriate for installation. 2) Unplug and remove any cables and/or other immovable structure. Removing the Pedestal Stand 1) Carefully lay...

Owner's Manual - English
Page 7
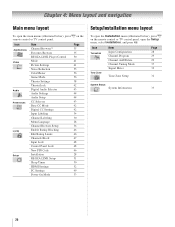
... Remote control codes 24 Chapter 4: Menu layout and navigation 26 Main menu layout 26 Setup/Installation menu layout 26 Navigating the menu system 27 Chapter 5: Setting up your TV 28 Selecting the menu language 28 Configuring the antenna input source for the ANT/CABLE terminal 28 Programming channels into the TV's channel memory . . . . 29 Programming channels automatically 29 Manually adding and deleting channels in the channel memory 29 Labeling channels 30 Setting the HDMI™ audio mode 31 Viewing the digital signal meter 32 Setting...
... Remote control codes 24 Chapter 4: Menu layout and navigation 26 Main menu layout 26 Setup/Installation menu layout 26 Navigating the menu system 27 Chapter 5: Setting up your TV 28 Selecting the menu language 28 Configuring the antenna input source for the ANT/CABLE terminal 28 Programming channels into the TV's channel memory . . . . 29 Programming channels automatically 29 Manually adding and deleting channels in the channel memory 29 Labeling channels 30 Setting the HDMI™ audio mode 31 Viewing the digital signal meter 32 Setting...

Owner's Manual - English
Page 9
..., plug in the power cords for your TV and other electronic device(s) to set -top box (in a proper location (- page 6). • Place the TV in most cases). • Three HDMI™ digital, high-definition multimedia interfaces with Dolby® Digital optical output format (- page 19) for an overview of the buttons on using your new TV Follow these steps to the TV (- page 14). • Digital Audio Out optical audio connection with 1080p input support...
..., plug in the power cords for your TV and other electronic device(s) to set -top box (in a proper location (- page 6). • Place the TV in most cases). • Three HDMI™ digital, high-definition multimedia interfaces with Dolby® Digital optical output format (- page 19) for an overview of the buttons on using your new TV Follow these steps to the TV (- page 14). • Digital Audio Out optical audio connection with 1080p input support...
Owner's Manual - English
Page 10
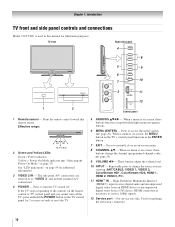
...POWER button on the TV control panel for illustration purposes. These buttons adjust the volume level. 10 INPUT - When a menu is necessary to receive 1080p signals. 12 Service port - Repeatedly press to access the menu system (- Control panel 5 ARROWS BbC c - Press to change the channel (programmed channels only; - For service use only. page 26). Effective range: 16.4 ft (5m) 2 Green and Yellow LEDs Green = Power indicator Yellow = Power-On Mode indicator (- Used for additional information. 3 VIDEO 2 IN - HDMI connection is on-screen, the MENU button on the TV's control...
...POWER button on the TV control panel for illustration purposes. These buttons adjust the volume level. 10 INPUT - When a menu is necessary to receive 1080p signals. 12 Service port - Repeatedly press to access the menu system (- Control panel 5 ARROWS BbC c - Press to change the channel (programmed channels only; - For service use only. page 26). Effective range: 16.4 ft (5m) 2 Green and Yellow LEDs Green = Power indicator Yellow = Power-On Mode indicator (- Used for additional information. 3 VIDEO 2 IN - HDMI connection is on-screen, the MENU button on the TV's control...
Owner's Manual - English
Page 11
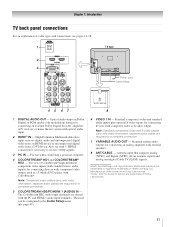
... VIDEO 1 IN - separate audio cables are required for connecting devices with component video output, such as a Toshiba DVD player with external speakers. 8 ANT/CABLE - HDMI connection is necessary to receive 1080p signals. 3 PC IN - Manufactured under license from a DVI device. Chapter 1: Introduction TV back panel connections For an explanation of HDMI Licensing LLC. Note: Component video cables carry only video information; Antenna input that supports analog (NTSC) and digital (ATSC) off-air antenna signals and analog and digital Cable TV (QAM) signals. HDMI, the HDMI...
... VIDEO 1 IN - separate audio cables are required for connecting devices with component video output, such as a Toshiba DVD player with external speakers. 8 ANT/CABLE - HDMI connection is necessary to receive 1080p signals. 3 PC IN - Manufactured under license from a DVI device. Chapter 1: Introduction TV back panel connections For an explanation of HDMI Licensing LLC. Note: Component video cables carry only video information; Antenna input that supports analog (NTSC) and digital (ATSC) off-air antenna signals and analog and digital Cable TV (QAM) signals. HDMI, the HDMI...
Owner's Manual - English
Page 13
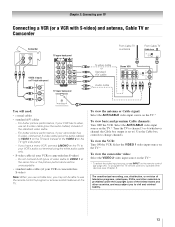
... recording, use, distribution, or revision of television programs, videotapes, DVDs, and other materials is set to VIDEO 1 on the TV back instead of video cable to VIDEO 1 at the same time or the picture performance will need: • coaxial cables • standard A/V cables - To view the antenna or Cable signal: Select the ANT/CABLE video input source on the remote control (- Do not connect both types of the VIDEO 2 on the TV right side panel. - To view the VCR: Turn ON the...
... recording, use, distribution, or revision of television programs, videotapes, DVDs, and other materials is set to VIDEO 1 on the TV back instead of video cable to VIDEO 1 at the same time or the picture performance will need: • coaxial cables • standard A/V cables - To view the antenna or Cable signal: Select the ANT/CABLE video input source on the remote control (- Do not connect both types of the VIDEO 2 on the TV right side panel. - To view the VCR: Turn ON the...

Owner's Manual - English
Page 17
...;* Digital g or 2-channel down-mixed PCM (pulse-code modulation) signal for use external speakers with an external Dolby® Digital decoder or other digital audio system LINE IN LR Optical Audio IN TV upper back panel Note: • Some audio systems may damage speakers or headphones. Audio Setup Shared Analog Audio HDMI 1 Audio MTS Language Speakers Optical Output Format Dolby Digital Dynamic Range Control Reset HDMI 1 Auto Stereo English On Dolby Digital Compressed Done To control the audio: 1 Turn on page 45). You will need : • optical audio cable (Use an optical audio...
...;* Digital g or 2-channel down-mixed PCM (pulse-code modulation) signal for use external speakers with an external Dolby® Digital decoder or other digital audio system LINE IN LR Optical Audio IN TV upper back panel Note: • Some audio systems may damage speakers or headphones. Audio Setup Shared Analog Audio HDMI 1 Audio MTS Language Speakers Optical Output Format Dolby Digital Dynamic Range Control Reset HDMI 1 Auto Stereo English On Dolby Digital Compressed Done To control the audio: 1 Turn on page 45). You will need : • optical audio cable (Use an optical audio...
Owner's Manual - English
Page 18
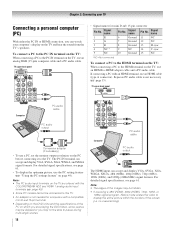
... PC models cannot be connected to this TV. • An adapter is not necessary (- For detailed signal specifications, see page 61. • To display the optimum picture, use a PC, set the monitor output resolution on the PC before connecting it to -HDMI adapter cable and a PC audio cable. TV upper back panel • Signal names for computers with a compatible mini D-sub15-pin terminal. • Depending on the DVD's title and the specifications of the screen (i.e. Signal name...
... PC models cannot be connected to this TV. • An adapter is not necessary (- For detailed signal specifications, see page 61. • To display the optimum picture, use a PC, set the monitor output resolution on the PC before connecting it to -HDMI adapter cable and a PC audio cable. TV upper back panel • Signal names for computers with a compatible mini D-sub15-pin terminal. • Depending on the DVD's title and the specifications of the screen (i.e. Signal name...
Owner's Manual - English
Page 26
..., and press T. Icon Applications Video Audio Preferences Locks Setup Item Channel Browser™ Favorites Browser REGZA-LINK Player Control Mode Picture Settings Noise Reduction ColorMaster Game Mode Theater Settings TheaterLock Digital Audio Selector Audio Settings Audio Setup CC Selector Base CC Mode Digital CC Settings Input Labeling Channel Labeling Menu Language Channel Browser Setup Enable Rating Blocking Edit Rating Limits Channels Block Input Lock Control Panel Lock New PIN Code Installation REGZA-LINK Setup Sleep Timer HDMI Settings PC Settings Power-On Mode Page 35 35 50 41 41...
..., and press T. Icon Applications Video Audio Preferences Locks Setup Item Channel Browser™ Favorites Browser REGZA-LINK Player Control Mode Picture Settings Noise Reduction ColorMaster Game Mode Theater Settings TheaterLock Digital Audio Selector Audio Settings Audio Setup CC Selector Base CC Mode Digital CC Settings Input Labeling Channel Labeling Menu Language Channel Browser Setup Enable Rating Blocking Edit Rating Limits Channels Block Input Lock Control Panel Lock New PIN Code Installation REGZA-LINK Setup Sleep Timer HDMI Settings PC Settings Power-On Mode Page 35 35 50 41 41...
Owner's Manual - English
Page 29
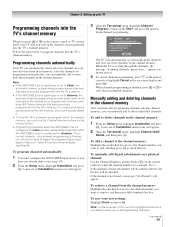
... the ANT/CABLE input signal type is set to Cable, the automatic channel programming process erases channels that were previously programmed into the TV's memory.) To remove an Antenna source channel from the channel memory: Highlight the checked box next to the channel number you programmed into the TV's channel memory. ANT/CABLE Cable Scanning channels, please wait ... 5% Number of Installation menu icons will be added to view the programmed channels. appears (as shown above). 4 To cancel channel programming, press O on the remote control to assist...
... the ANT/CABLE input signal type is set to Cable, the automatic channel programming process erases channels that were previously programmed into the TV's memory.) To remove an Antenna source channel from the channel memory: Highlight the checked box next to the channel number you programmed into the TV's channel memory. ANT/CABLE Cable Scanning channels, please wait ... 5% Number of Installation menu icons will be added to view the programmed channels. appears (as shown above). 4 To cancel channel programming, press O on the remote control to assist...

Owner's Manual - English
Page 31
... Audio Setup Shared Analog Audio HDMI 1 Audio MTS Language Speakers Optical Output Format Dolby Digital Dynamic Range Control HDMI 1 Auto Stereo English On Dolby Digital Compressed Reset Done Mode Description Auto When viewing the HDMI 1 input, if digital audio from the HDMI input is set of analog audio inputs, the Shared Analog Audio menu setting influences the HDMI 1 Audio menu setting. Chapter 5: Setting up your settings, highlight Done and press T. If Shared Analog Audio is available, it will be output. Highlight the new custom label and press T to the Channel Labeling...
... Audio Setup Shared Analog Audio HDMI 1 Audio MTS Language Speakers Optical Output Format Dolby Digital Dynamic Range Control HDMI 1 Auto Stereo English On Dolby Digital Compressed Reset Done Mode Description Auto When viewing the HDMI 1 input, if digital audio from the HDMI input is set of analog audio inputs, the Shared Analog Audio menu setting influences the HDMI 1 Audio menu setting. Chapter 5: Setting up your settings, highlight Done and press T. If Shared Analog Audio is available, it will be output. Highlight the new custom label and press T to the Channel Labeling...
Owner's Manual - English
Page 43
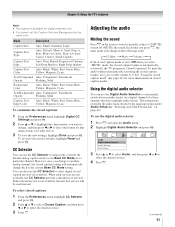
... Color Auto, Black, White, Red, Green, Blue, Yellow, Magenta, Cyan To customize the closed captions: 1 From the Preferences menu, highlight CC Selector and press T. 2 Press B or b to select Closed Caption, and then press C or c to partially reduce (1/2 MUTE) or turn off (MUTE) the sound. Using the digital audio selector You can use the Digital Audio Selector to conveniently switch between audio tracks on closed caption feature, use the CC Selector to temporarily override the default analog caption mode (set...
... Color Auto, Black, White, Red, Green, Blue, Yellow, Magenta, Cyan To customize the closed captions: 1 From the Preferences menu, highlight CC Selector and press T. 2 Press B or b to select Closed Caption, and then press C or c to partially reduce (1/2 MUTE) or turn off (MUTE) the sound. Using the digital audio selector You can use the Digital Audio Selector to conveniently switch between audio tracks on closed caption feature, use the CC Selector to temporarily override the default analog caption mode (set...
Owner's Manual - English
Page 57
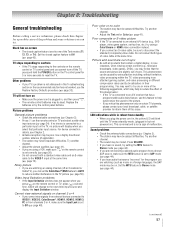
... connected to a particular input on -screen • The closed caption feature to the picture. - Black box on the TV, no device is set -top box, etc.) try the control panel buttons. page 13). If no picture will blink until the TV enters standby mode, (plugged in this Troubleshooting section or the recommended solution has not worked, use this chapter for the program you plug the power cord in, the yellow LED will display when you hear audio that the sound and picture...
... connected to a particular input on -screen • The closed caption feature to the picture. - Black box on the TV, no device is set -top box, etc.) try the control panel buttons. page 13). If no picture will blink until the TV enters standby mode, (plugged in this Troubleshooting section or the recommended solution has not worked, use this chapter for the program you plug the power cord in, the yellow LED will display when you hear audio that the sound and picture...
Owner's Manual - English
Page 62
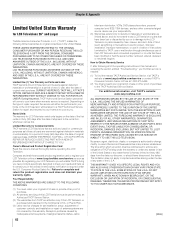
... connected signal source device are not covered by inadequate antenna systems, misaligned satellite dishes, cable 62 television distribution, VCRs, DVD players/recorders, personal computer level IEEE-1394 devices, and any state of purchase to implied warranties arising under the U.S. Limited Warranty for set installation, setup, adjustment of customer controls, and installation or repair of antenna systems are your warranty rights. Owner's Manual and Product Registration Card Read this owner's manual thoroughly before operating this warranty...
... connected signal source device are not covered by inadequate antenna systems, misaligned satellite dishes, cable 62 television distribution, VCRs, DVD players/recorders, personal computer level IEEE-1394 devices, and any state of purchase to implied warranties arising under the U.S. Limited Warranty for set installation, setup, adjustment of customer controls, and installation or repair of antenna systems are your warranty rights. Owner's Manual and Product Registration Card Read this owner's manual thoroughly before operating this warranty...
Owner's Manual - English
Page 63
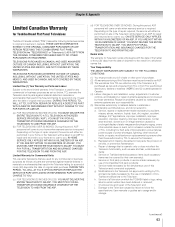
... follow the specifications, User manuals or guides as new and unopened from TCL or from TCL's authorized distributors, dealers or resellers ("ADR's") and (ii) located/operated in writing by TCL, and service made necessary by the use of incompatible third party products; Reception problems caused by these warranties. Service on third party products or service made necessary by use or installation of the Television; i. Damage...
... follow the specifications, User manuals or guides as new and unopened from TCL or from TCL's authorized distributors, dealers or resellers ("ADR's") and (ii) located/operated in writing by TCL, and service made necessary by the use of incompatible third party products; Reception problems caused by these warranties. Service on third party products or service made necessary by use or installation of the Television; i. Damage...
Owner's Manual - English
Page 64
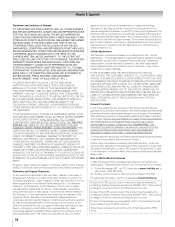
... DAMAGE. "Critical applications" means life support systems, medical applications, connections to change, modify or extend the terms of providing the source code. TCL RESERVES THE RIGHT TO REFUSE TO SERVICE ANY TELEVISION USED IN A CRITICAL APPLICATION. General Provisions If and to the extent that service is needed: (1) To find that any provision of this limited warranty should generally be found to...
... DAMAGE. "Critical applications" means life support systems, medical applications, connections to change, modify or extend the terms of providing the source code. TCL RESERVES THE RIGHT TO REFUSE TO SERVICE ANY TELEVISION USED IN A CRITICAL APPLICATION. General Provisions If and to the extent that service is needed: (1) To find that any provision of this limited warranty should generally be found to...
Owner's Manual - English
Page 65
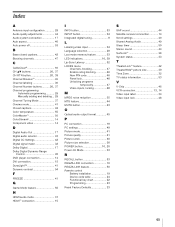
... Panel lock 48 Unlocking programs temporarily 47 Video inputs, locking 48 M MPEG noise reduction 55 MTS feature 44 MUTE button 43 O Optical audio output format 45 P PC connection 18 PC settings 49 Picture mode 41 Picture quality 41 Picture scroll 40 Picture size selection 38 POWER button 10, 20 Power-On Mode 33 R RECALL button 53 REGZA-LINK connection 16 REGZA-LINK feature 50 Remote control Battery installation 19 Device code table 24 Functional key chart 22 Programming 23 Reset Factory Defaults 33 S SAP sound 44 Satellite receiver connection...
... Panel lock 48 Unlocking programs temporarily 47 Video inputs, locking 48 M MPEG noise reduction 55 MTS feature 44 MUTE button 43 O Optical audio output format 45 P PC connection 18 PC settings 49 Picture mode 41 Picture quality 41 Picture scroll 40 Picture size selection 38 POWER button 10, 20 Power-On Mode 33 R RECALL button 53 REGZA-LINK connection 16 REGZA-LINK feature 50 Remote control Battery installation 19 Device code table 24 Functional key chart 22 Programming 23 Reset Factory Defaults 33 S SAP sound 44 Satellite receiver connection...


