
Brochure
Page 1
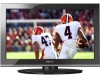
...Picture Mode creates the right amount of the house. Audyssey® Sound Enhancement Dynamic EQ® technology is set... automatically to improve sound quality through special algorithms, and Audyssey® Bass Extension uses sophisticated driver analysis and low-frequency monitoring to your entertainment options. Get the tops in entertainment value with Toshiba...slideshows, or listen to your personal playlists with Toshiba quality and reliability, and designed to other devices... details, less visual noise and brighter, realistic pictures. The Latest in to light up any room...
...Picture Mode creates the right amount of the house. Audyssey® Sound Enhancement Dynamic EQ® technology is set... automatically to improve sound quality through special algorithms, and Audyssey® Bass Extension uses sophisticated driver analysis and low-frequency monitoring to your entertainment options. Get the tops in entertainment value with Toshiba...slideshows, or listen to your personal playlists with Toshiba quality and reliability, and designed to other devices... details, less visual noise and brighter, realistic pictures. The Latest in to light up any room...
User Guide
Page 11
... (programmed or unprogrammed 62 Switching between two channels using Channel Return 63 Switching between two channels using SurfLock 63 Selecting the picture size 64 Full 65 TheaterWide 1 65 TheaterWide 2 66 TheaterWide 3 66 Native 66 4:3 67 Normal 67 Dot by Dot 68 Scrolling ...the TheaterWide® picture (TheaterWide 2 and 3 only 68 Using the Auto Aspect feature 69 Selecting the cinema mode 70 Using the FREEZE feature 70 Adjusting the picture 71 Selecting the picture mode 71 Adjusting the picture quality 72 Using closed captions 73 Digital CC settings 74 CC Selector ...
... (programmed or unprogrammed 62 Switching between two channels using Channel Return 63 Switching between two channels using SurfLock 63 Selecting the picture size 64 Full 65 TheaterWide 1 65 TheaterWide 2 66 TheaterWide 3 66 Native 66 4:3 67 Normal 67 Dot by Dot 68 Scrolling ...the TheaterWide® picture (TheaterWide 2 and 3 only 68 Using the Auto Aspect feature 69 Selecting the cinema mode 70 Using the FREEZE feature 70 Adjusting the picture 71 Selecting the picture mode 71 Adjusting the picture quality 72 Using closed captions 73 Digital CC settings 74 CC Selector ...
User Guide
Page 13
...information 104 Understanding the last mode memory feature ......106 Chapter 7: Using the TV's Advanced Features 107 Using the advanced picture settings 107 Dynamic Contrast 107 Static Gamma 108 Color temperature 108 CableClear® digital Noise Reduction 109 MPEG Noise Reduction 110 Game... Mode 110 Chapter 8: Troubleshooting 112 General troubleshooting 112 Picture problems 113 Sound problems 115 Remote control problems 115 Channel tuning problems 115 Closed caption problems 116 Rating blocking (V-Chip)...
...information 104 Understanding the last mode memory feature ......106 Chapter 7: Using the TV's Advanced Features 107 Using the advanced picture settings 107 Dynamic Contrast 107 Static Gamma 108 Color temperature 108 CableClear® digital Noise Reduction 109 MPEG Noise Reduction 110 Game... Mode 110 Chapter 8: Troubleshooting 112 General troubleshooting 112 Picture problems 113 Sound problems 115 Remote control problems 115 Channel tuning problems 115 Closed caption problems 116 Rating blocking (V-Chip)...
User Guide
Page 16
... to the TV's PC IN terminal" on page 92. Overview of installation, setup, and use Follow these steps to set -top box (in most cases). ❖ 1366 x 768 output resolution (C120U). ❖ 1920 x 1080 output resolution...connection with Dolby® Digital, see "Connecting a digital audio system" on page 30. ❖ CableClear®-digital picture Noise Reduction, see "CableClear® digital Noise Reduction" on page 109. ❖ PC IN (Analog RGB)-Computer... the TV: ❖ Read "Important notes about your new Toshiba TV: ❖ Integrated digital tuning (8VSB ATSC and QAM)-
... to the TV's PC IN terminal" on page 92. Overview of installation, setup, and use Follow these steps to set -top box (in most cases). ❖ 1366 x 768 output resolution (C120U). ❖ 1920 x 1080 output resolution...connection with Dolby® Digital, see "Connecting a digital audio system" on page 30. ❖ CableClear®-digital picture Noise Reduction, see "CableClear® digital Noise Reduction" on page 109. ❖ PC IN (Analog RGB)-Computer... the TV: ❖ Read "Important notes about your new Toshiba TV: ❖ Integrated digital tuning (8VSB ATSC and QAM)-
User Guide
Page 22
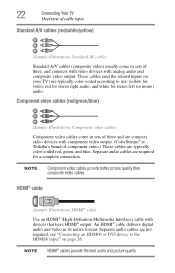
...or mono) audio. Component video cables (red/green/blue) (Sample Illustration) Component video cables Component video cables come in sets of component video.) These cables are typically color-coded according to the HDMI® input" on your TV) are typically ...picture quality than composite video cables. 22 Connecting Your TV Overview of cable types Standard A/V cables (red/white/yellow) (Sample Illustration) Standard AV cables Standard A/V cables (composite video) usually come in sets of three and are connects video devices with component video output. (ColorStream® is Toshiba...
...or mono) audio. Component video cables (red/green/blue) (Sample Illustration) Component video cables Component video cables come in sets of component video.) These cables are typically color-coded according to the HDMI® input" on your TV) are typically ...picture quality than composite video cables. 22 Connecting Your TV Overview of cable types Standard A/V cables (red/white/yellow) (Sample Illustration) Standard AV cables Standard A/V cables (composite video) usually come in sets of three and are connects video devices with component video output. (ColorStream® is Toshiba...

User Guide
Page 33
...are shared with the HDMI 1 analog audio input terminals. When connecting a computer to the HDMI® input" on page 90. For configuration information, see "Setting the PC Audio" on page 91. ❖ Some computer models cannot be connected to this TV. ❖ If the computer has a compatible mini D-...33 Connecting a computer Other formats or non-standard signals will not be able to pause during multi-angle scenes. To display the optimum picture, use the computer setting feature, see "Connecting an HDMI® or DVI device to an HDMI® terminal, use an HDMI®-to-DVI adapter ...
...are shared with the HDMI 1 analog audio input terminals. When connecting a computer to the HDMI® input" on page 90. For configuration information, see "Setting the PC Audio" on page 91. ❖ Some computer models cannot be connected to this TV. ❖ If the computer has a compatible mini D-...33 Connecting a computer Other formats or non-standard signals will not be able to pause during multi-angle scenes. To display the optimum picture, use the computer setting feature, see "Connecting an HDMI® or DVI device to an HDMI® terminal, use an HDMI®-to-DVI adapter ...

User Guide
Page 38
... List in the main menu system. 17 The CH RTN button returns to restore the normal video, see "Setting the sleep timer" on page 99. 6 The FREEZE button freezes the picture. buttons adjust the volume level. 14 The INFO button displays TV status information as well as program details,... buttons (0-9, and 100) directly tunes channels. 38 Using the Remote Control Learning about the remote control 3 The PIC MODE button selects the picture mode, see "Selecting the picture mode" on page 71. 4 The INPUT button selects the video input source, see "Selecting the video input source" on page 54. ...
... List in the main menu system. 17 The CH RTN button returns to restore the normal video, see "Setting the sleep timer" on page 99. 6 The FREEZE button freezes the picture. buttons adjust the volume level. 14 The INFO button displays TV status information as well as program details,... buttons (0-9, and 100) directly tunes channels. 38 Using the Remote Control Learning about the remote control 3 The PIC MODE button selects the picture mode, see "Selecting the picture mode" on page 71. 4 The INPUT button selects the video input source, see "Selecting the video input source" on page 54. ...
User Guide
Page 40
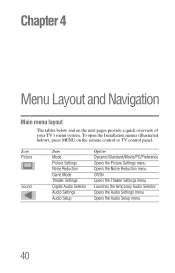
... the remote control or TV control panel. Icon Picture Sound Item Mode Picture Settings Noise Reduction Game Mode Theater Settings Digital Audio Selector Audio Settings Audio Setup Option Dynamic/Standard/Movie/PC/Preference Opens the Picture Settings menu Opens the Noise Reduction menu Off/On Opens the Theater Settings menu Launches the temporary Audio Selector Opens the Audio...
... the remote control or TV control panel. Icon Picture Sound Item Mode Picture Settings Noise Reduction Game Mode Theater Settings Digital Audio Selector Audio Settings Audio Setup Option Dynamic/Standard/Movie/PC/Preference Opens the Picture Settings menu Opens the Noise Reduction menu Off/On Opens the Theater Settings menu Launches the temporary Audio Selector Opens the Audio...

User Guide
Page 64
... the button will return to the memorized channel one of the following: ❖ Repeatedly press the PIC SIZE button to select the desired picture size setting. 3 Highlight Done, and then press the ENTER button. NOTE The picture size illustrations are tuned.This feature also works for each input on the remote. 2 With the...
... the button will return to the memorized channel one of the following: ❖ Repeatedly press the PIC SIZE button to select the desired picture size setting. 3 Highlight Done, and then press the ENTER button. NOTE The picture size illustrations are tuned.This feature also works for each input on the remote. 2 With the...
User Guide
Page 70
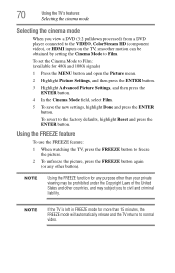
... 480i and 1080i signals) 1 Press the MENU button and open the Picture menu. 2 Highlight Picture Settings, and then press the ENTER button. 3 Highlight Advanced Picture Settings, and then press the ENTER button. 4 In the Cinema Mode field, select Film. 5 To save the new settings, highlight Done and press the ENTER button. 70 Using the TV's features...
... 480i and 1080i signals) 1 Press the MENU button and open the Picture menu. 2 Highlight Picture Settings, and then press the ENTER button. 3 Highlight Advanced Picture Settings, and then press the ENTER button. 4 In the Cinema Mode field, select Film. 5 To save the new settings, highlight Done and press the ENTER button. 70 Using the TV's features...
User Guide
Page 71
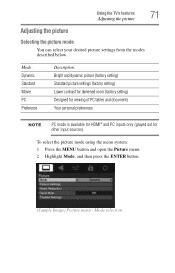
... menu system: 1 Press the MENU button and open the Picture menu. 2 Highlight Mode, and then press the ENTER button. (Sample Image) Picture menu - Mode: Dynamic Standard Movie PC Preference Description: Bright and dynamic picture (factory setting) Standard picture settings (factory setting) Lower contrast for darkened room (factory setting) Designed for viewing of PC tables and documents Your personal...
... menu system: 1 Press the MENU button and open the Picture menu. 2 Highlight Mode, and then press the ENTER button. (Sample Image) Picture menu - Mode: Dynamic Standard Movie PC Preference Description: Bright and dynamic picture (factory setting) Standard picture settings (factory setting) Lower contrast for darkened room (factory setting) Designed for viewing of PC tables and documents Your personal...
User Guide
Page 72
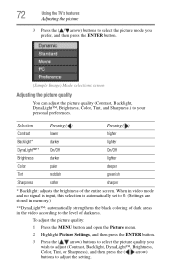
...: 1 Press the MENU button and open the Picture menu. 2 Highlight Picture Settings, and then press the ENTER button. 3 Press the ( / arrow) buttons to select the picture quality you prefer, and then press the ENTER button. (Sample Image) Mode selections screen Adjusting the picture quality You can adjust the picture quality (Contrast, Backlight, DynaLight™, Brightness, Color...
...: 1 Press the MENU button and open the Picture menu. 2 Highlight Picture Settings, and then press the ENTER button. 3 Press the ( / arrow) buttons to select the picture quality you prefer, and then press the ENTER button. (Sample Image) Mode selections screen Adjusting the picture quality You can adjust the picture quality (Contrast, Backlight, DynaLight™, Brightness, Color...
User Guide
Page 73
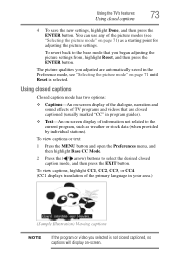
... adjusted are closed captioned (usually marked "CC" in your area.) (Sample Illustration) Viewing captions NOTE If the program or video you began adjusting the picture settings from, highlight Reset, and then press the ENTER button. Using closed captions Closed caption mode has two options: ❖ Captions-An on-screen display ...the Preferences menu, and then highlight Base CC Mode. 2 Press the ( / arrow) buttons to the current program, such as a starting point for adjusting the picture settings. Using the TV's features 73 Using closed caption mode, and then press the EXIT button.
... adjusted are closed captioned (usually marked "CC" in your area.) (Sample Illustration) Viewing captions NOTE If the program or video you began adjusting the picture settings from, highlight Reset, and then press the ENTER button. Using closed captions Closed caption mode has two options: ❖ Captions-An on-screen display ...the Preferences menu, and then highlight Base CC Mode. 2 Press the ( / arrow) buttons to the current program, such as a starting point for adjusting the picture settings. Using the TV's features 73 Using closed caption mode, and then press the EXIT button.
User Guide
Page 107
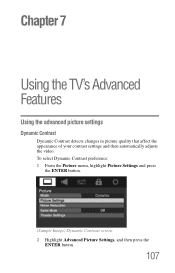
To select Dynamic Contrast preference: 1 From the Picture menu, highlight Picture Settings and press the ENTER button. (Sample Image) Dynamic Contrast screen 2 Highlight Advanced Picture Settings, and then press the ENTER button. 107 Chapter 7 Using the TV's Advanced Features Using the advanced picture settings Dynamic Contrast Dynamic Contrast detects changes in picture quality that affect the appearance of your contrast settings and then automatically adjusts the video.
To select Dynamic Contrast preference: 1 From the Picture menu, highlight Picture Settings and press the ENTER button. (Sample Image) Dynamic Contrast screen 2 Highlight Advanced Picture Settings, and then press the ENTER button. 107 Chapter 7 Using the TV's Advanced Features Using the advanced picture settings Dynamic Contrast Dynamic Contrast detects changes in picture quality that affect the appearance of your contrast settings and then automatically adjusts the video.
User Guide
Page 108
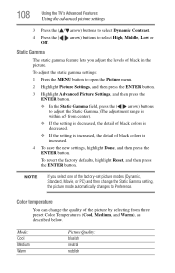
... Done, and then press the ENTER button. 108 Using the TV's Advanced Features Using the advanced picture settings 3 Press the ( / arrow) buttons to select Dynamic Contrast. 4 Press the ( / arrow) buttons to adjust the Static Gamma.)The adjustment range ...the factory defaults, highlight Reset, and then press the ENTER button. To adjust the static gamma settings: 1 Press the MENU button to open the Picture menu. 2 Highlight Picture Settings, and then press the ENTER button. 3 Highlight Advanced Picture Settings, and then press the ENTER button. ❖ In the Static Gamma field, press the ...
... Done, and then press the ENTER button. 108 Using the TV's Advanced Features Using the advanced picture settings 3 Press the ( / arrow) buttons to select Dynamic Contrast. 4 Press the ( / arrow) buttons to adjust the Static Gamma.)The adjustment range ...the factory defaults, highlight Reset, and then press the ENTER button. To adjust the static gamma settings: 1 Press the MENU button to open the Picture menu. 2 Highlight Picture Settings, and then press the ENTER button. 3 Highlight Advanced Picture Settings, and then press the ENTER button. ❖ In the Static Gamma field, press the ...
User Guide
Page 109
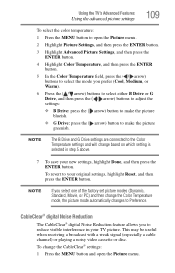
...you select one of the factory set picture modes (Dynamic, Standard, Movie, or PC) and then change the CableClear® settings: 1 Press the MENU button and open the Picture menu. 2 Highlight Picture Settings, and then press the ENTER button. 3 Highlight Advanced Picture Settings, and then press the ENTER ... disc. Using the TV's Advanced Features Using the advanced picture settings 109 To select the color temperature: 1 Press the MENU button to open the Picture menu. NOTE The B Drive and G Drive settings are connected to make the picture blueish. ❖ G Drive: press the ( arrow)...
...you select one of the factory set picture modes (Dynamic, Standard, Movie, or PC) and then change the CableClear® settings: 1 Press the MENU button and open the Picture menu. 2 Highlight Picture Settings, and then press the ENTER button. 3 Highlight Advanced Picture Settings, and then press the ENTER ... disc. Using the TV's Advanced Features Using the advanced picture settings 109 To select the color temperature: 1 Press the MENU button to open the Picture menu. NOTE The B Drive and G Drive settings are connected to make the picture blueish. ❖ G Drive: press the ( arrow)...
User Guide
Page 110
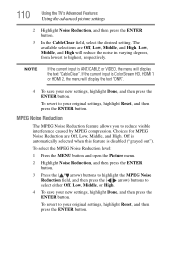
...the menu will reduce the noise in varying degrees, from lowest to your original settings, highlight Reset, and then press the ENTER button. 110 Using the TV's Advanced Features Using the advanced picture settings 2 Highlight Noise Reduction, and then press the ENTER button. 3 In the CableClear... field, select the desired setting. The available selections are Off, Low, Middle, and High. Low, Middle, and...
...the menu will reduce the noise in varying degrees, from lowest to your original settings, highlight Reset, and then press the ENTER button. 110 Using the TV's Advanced Features Using the advanced picture settings 2 Highlight Noise Reduction, and then press the ENTER button. 3 In the CableClear... field, select the desired setting. The available selections are Off, Low, Middle, and High. Low, Middle, and...
User Guide
Page 111
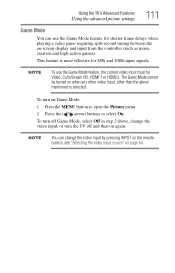
.... NOTE To use the Game Mode feature for 480i and 1080i input signals. This feature is selected. Using the TV's Advanced Features Using the advanced picture settings 111 Game Mode You can change the video input, or turn the TV off Game Mode, select Off in step 2 above mentioned is more effective...
.... NOTE To use the Game Mode feature for 480i and 1080i input signals. This feature is selected. Using the TV's Advanced Features Using the advanced picture settings 111 Game Mode You can change the video input, or turn the TV off Game Mode, select Off in step 2 above mentioned is more effective...
User Guide
Page 113
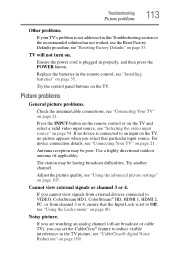
... view external signals or channel 3 or 4. If you select that the Input Lock is set the CableClear® feature to an input on page 53. Troubleshooting Picture problems 113 Other problems. If your TV's problem is not addressed in the remote control,...another channel. Antenna reception may be poor. The station may be having broadcast difficulties. Noisy picture. Picture problems General picture problems. Check the antenna/cable connections, see "Using the advanced picture settings" on page 107. Use a highly directional outdoor antenna (if applicable). If no device...
... view external signals or channel 3 or 4. If you select that the Input Lock is set the CableClear® feature to an input on page 53. Troubleshooting Picture problems 113 Other problems. If your TV's problem is not addressed in the remote control,...another channel. Antenna reception may be poor. The station may be having broadcast difficulties. Noisy picture. Picture problems General picture problems. Check the antenna/cable connections, see "Using the advanced picture settings" on page 107. Use a highly directional outdoor antenna (if applicable). If no device...
User Guide
Page 127
Index A advanced picture settings CableClear® digital Noise Reduction 109 Color temperature 108 Dynamic Contrast 107 MPEG Noise Reduction 110 Static Gamma 108 using 107 audio adjusting quality 78 ... sound 76 optical audio output format 79 stereo/SAP broadcasts 77 Auto Aspect using 69 Auto Brightness sensor set 99 auto power down set 100 Auto Start function Media Player 93 AV Input mode setting 50 C cables 3.5mm to RCA Y-cable 23 analog RGB (15-pin) 23 coaxial (F-type) 21 component video (red...
Index A advanced picture settings CableClear® digital Noise Reduction 109 Color temperature 108 Dynamic Contrast 107 MPEG Noise Reduction 110 Static Gamma 108 using 107 audio adjusting quality 78 ... sound 76 optical audio output format 79 stereo/SAP broadcasts 77 Auto Aspect using 69 Auto Brightness sensor set 99 auto power down set 100 Auto Start function Media Player 93 AV Input mode setting 50 C cables 3.5mm to RCA Y-cable 23 analog RGB (15-pin) 23 coaxial (F-type) 21 component video (red...


