Brochure
Page 2
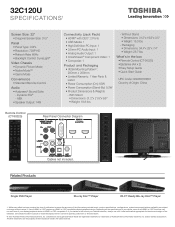
...device, some or all HDMI® w/ CEC functions may not work even if your Toshiba television, always use a UL Listed wall bracket appropriate for the size and weight of their...should be taken to ensure the accuracy of HDMI® w/ CEC requires an HDMI® w/ CEC compatible display/peripheral device. 32C120U S P E C I F I C AT I O N S1 Screen Size: 32" • Diagonal Screen Size: 31...or install the display where it cannot be pushed, pulled over, or knocked down. © 2012 Toshiba America Information Systems, Inc. Without Stand • Dimensions: 31.2"x 19.8"x 3.5" • Weight:...
...device, some or all HDMI® w/ CEC functions may not work even if your Toshiba television, always use a UL Listed wall bracket appropriate for the size and weight of their...should be taken to ensure the accuracy of HDMI® w/ CEC requires an HDMI® w/ CEC compatible display/peripheral device. 32C120U S P E C I F I C AT I O N S1 Screen Size: 32" • Diagonal Screen Size: 31...or install the display where it cannot be pushed, pulled over, or knocked down. © 2012 Toshiba America Information Systems, Inc. Without Stand • Dimensions: 31.2"x 19.8"x 3.5" • Weight:...
User Guide
Page 9
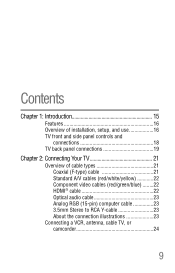
Contents Chapter 1: Introduction 15 Features 16 Overview of installation, setup, and use 16 TV front and side panel controls and connections 18 TV back panel connections 19 Chapter 2: Connecting Your TV 21 Overview of cable types 21 Coaxial (F-type) cable 21 Standard A/V cables (red/white/yellow 22 Component video cables (red/green/blue) ........22 HDMI® cable 22 Optical audio cable 23 Analog RGB (15-pin) computer cable 23 3.5mm Stereo to RCA Y-cable 23 About the connection illustrations 23 Connecting a VCR, antenna, cable TV, or camcorder 24 9
Contents Chapter 1: Introduction 15 Features 16 Overview of installation, setup, and use 16 TV front and side panel controls and connections 18 TV back panel connections 19 Chapter 2: Connecting Your TV 21 Overview of cable types 21 Coaxial (F-type) cable 21 Standard A/V cables (red/white/yellow 22 Component video cables (red/green/blue) ........22 HDMI® cable 22 Optical audio cable 23 Analog RGB (15-pin) computer cable 23 3.5mm Stereo to RCA Y-cable 23 About the connection illustrations 23 Connecting a VCR, antenna, cable TV, or camcorder 24 9
User Guide
Page 10
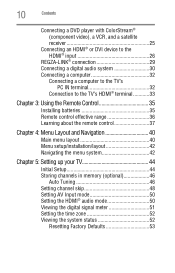
... Learning about the remote control 37 Chapter 4: Menu Layout and Navigation 40 Main menu layout 40 Menu setup/installation/layout 42 Navigating the menu system 42 Chapter 5: Setting up your TV 44 Initial Setup 44 Storing channels in memory (optional 46 Auto Tuning 46 Setting channel skip 48 Setting AV Input mode...
... Learning about the remote control 37 Chapter 4: Menu Layout and Navigation 40 Main menu layout 40 Menu setup/installation/layout 42 Navigating the menu system 42 Chapter 5: Setting up your TV 44 Initial Setup 44 Storing channels in memory (optional 46 Auto Tuning 46 Setting channel skip 48 Setting AV Input mode...
User Guide
Page 16
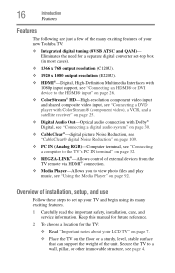
...; Place the TV on page 92. Eliminates the need for the TV: ❖ Read "Important notes about your new Toshiba TV: ❖ Integrated digital tuning (8VSB ATSC and QAM)- Overview of installation, setup, and use Follow these steps to a wall, pillar, or other immovable structure, see "Using the Media Player" on the...
...; Place the TV on page 92. Eliminates the need for the TV: ❖ Read "Important notes about your new Toshiba TV: ❖ Integrated digital tuning (8VSB ATSC and QAM)- Overview of installation, setup, and use Follow these steps to a wall, pillar, or other immovable structure, see "Using the Media Player" on the...
User Guide
Page 17
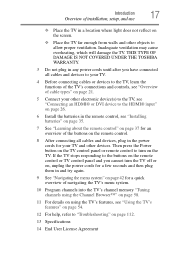
...of the TV's connections and controls, see "Connecting an HDMI® or DVI device to "Troubleshooting" on the TV. Introduction 17 Overview of installation, setup, and use ❖ Place the TV in the power cords for your other electronic device(s) to the TV, see "Overview of cable types" on ... your TV and other devices. Inadequate ventilation may cause overheating, which will damage the TV. THIS TYPE OF DAMAGE IS NOT COVERED UNDER THE TOSHIBA WARRANTY. 3 Do not plug in any power cords until after you cannot turn on page 112. 13 Specifications 14 End User License Agreement
...of the TV's connections and controls, see "Connecting an HDMI® or DVI device to "Troubleshooting" on the TV. Introduction 17 Overview of installation, setup, and use ❖ Place the TV in the power cords for your other electronic device(s) to the TV, see "Overview of cable types" on ... your TV and other devices. Inadequate ventilation may cause overheating, which will damage the TV. THIS TYPE OF DAMAGE IS NOT COVERED UNDER THE TOSHIBA WARRANTY. 3 Do not plug in any power cords until after you cannot turn on page 112. 13 Specifications 14 End User License Agreement
User Guide
Page 19
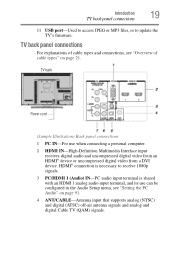
... uncompressed digital video from a DVI device. TV back Power cord (Sample Illustration) Back panel connections 1 PC IN-For use can be configured in the Audio Setup menu, see "Overview of cable types and connections, see "Setting the PC Audio" on page 21. TV back panel connections For explanations of cable types...
... uncompressed digital video from a DVI device. TV back Power cord (Sample Illustration) Back panel connections 1 PC IN-For use can be configured in the Audio Setup menu, see "Overview of cable types and connections, see "Setting the PC Audio" on page 21. TV back panel connections For explanations of cable types...
User Guide
Page 29
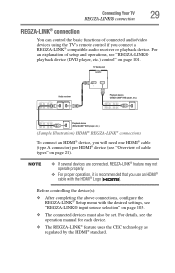
... REGZA-LINK® compatible audio receiver or playback device. Before controlling the device(s): ❖ After completing the above connections, configure the REGZA-LINK® Setup menu with the HDMI® Logo ( ). For details, see "REGZA-LINK® playback device (DVD player, etc.) control" on page 101. ...an HDMI® cable with the desired settings, see "REGZA-LINK® input source selection" on page 21). For an explanation of setup and operations, see the operation manual for each device. ❖ The REGZA-LINK® feature uses the CEC technology as regulated by ...
... REGZA-LINK® compatible audio receiver or playback device. Before controlling the device(s): ❖ After completing the above connections, configure the REGZA-LINK® Setup menu with the HDMI® Logo ( ). For details, see "REGZA-LINK® playback device (DVD player, etc.) control" on page 101. ...an HDMI® cable with the desired settings, see "REGZA-LINK® input source selection" on page 21). For an explanation of setup and operations, see the operation manual for each device. ❖ The REGZA-LINK® feature uses the CEC technology as regulated by ...

User Guide
Page 31
... that may damage speakers or headphones. Connecting Your TV 31 Connecting a digital audio system 3 Press the ( / arrow) buttons to highlight Audio Setup, and then press the ENTER button. (Sample Image) Audio Setup screen 4 Press the ( / arrow) buttons to select Optical Output Format. 5 Press the ( / arrow) buttons to the factory defaults, highlight Reset...
... that may damage speakers or headphones. Connecting Your TV 31 Connecting a digital audio system 3 Press the ( / arrow) buttons to highlight Audio Setup, and then press the ENTER button. (Sample Image) Audio Setup screen 4 Press the ( / arrow) buttons to select Optical Output Format. 5 Press the ( / arrow) buttons to the factory defaults, highlight Reset...

User Guide
Page 33
... displayed correctly. For configuration information, see "Setting the PC Audio" on page 91. ❖ Some computer models cannot be necessary, depending on computer hardware and setup, see "Using the PC settings feature" on the content playback and the computer's specifications, some scenes may be skipped or you may not be connected...
... displayed correctly. For configuration information, see "Setting the PC Audio" on page 91. ❖ Some computer models cannot be necessary, depending on computer hardware and setup, see "Using the PC settings feature" on the content playback and the computer's specifications, some scenes may be skipped or you may not be connected...
User Guide
Page 40
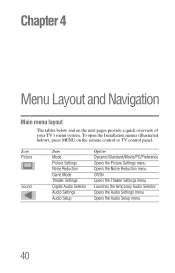
Icon Picture Sound Item Mode Picture Settings Noise Reduction Game Mode Theater Settings Digital Audio Selector Audio Settings Audio Setup Option Dynamic/Standard/Movie/PC/Preference Opens the Picture Settings menu Opens the Noise Reduction menu Off/On Opens the Theater Settings menu ...Launches the temporary Audio Selector Opens the Audio Settings menu Opens the Audio Setup menu 40 To open the Installation menus (illustrated below and on the remote control or TV control panel. Chapter 4 Menu Layout and Navigation ...
Icon Picture Sound Item Mode Picture Settings Noise Reduction Game Mode Theater Settings Digital Audio Selector Audio Settings Audio Setup Option Dynamic/Standard/Movie/PC/Preference Opens the Picture Settings menu Opens the Noise Reduction menu Off/On Opens the Theater Settings menu ...Launches the temporary Audio Selector Opens the Audio Settings menu Opens the Audio Setup menu 40 To open the Installation menus (illustrated below and on the remote control or TV control panel. Chapter 4 Menu Layout and Navigation ...
User Guide
Page 41
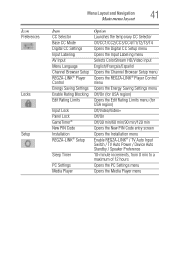
...Layout and Navigation 41 Main menu layout Item CC Selector Base CC Mode Digital CC Settings Input Labeling AV Input Menu Language Channel Browser Setup REGZA-LINK® Player Control Energy Saving Settings Enable Rating Blocking Edit Rating Limits Input Lock Panel Lock GameTimer® New PIN Code ...Installation REGZA-LINK® Setup Sleep Timer PC Settings Media Player Option Launches the temporary CC Selector Off/CC1/CC2/CC3/CC4/T1/T2/T3/T4 Opens the Digital CC...
...Layout and Navigation 41 Main menu layout Item CC Selector Base CC Mode Digital CC Settings Input Labeling AV Input Menu Language Channel Browser Setup REGZA-LINK® Player Control Energy Saving Settings Enable Rating Blocking Edit Rating Limits Input Lock Panel Lock GameTimer® New PIN Code ...Installation REGZA-LINK® Setup Sleep Timer PC Settings Media Player Option Launches the temporary CC Selector Off/CC1/CC2/CC3/CC4/T1/T2/T3/T4 Opens the Digital CC...
User Guide
Page 42
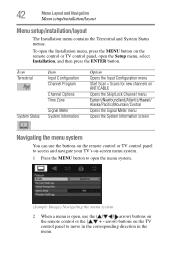
... screen Navigating the menu system You can use the ( / / / arrow) buttons on the remote control or the ( / + - 42 Menu Layout and Navigation Menu setup/installation/layout Menu setup/installation/layout The Installation menu contains the Terrestrial and System Status menus. arrow) buttons on -screen menu system. 1 Press the MENU button to move... and navigate your TV's on the TV control panel to open the menu system. (Sample Image) Navigating the menu system 2 When a menu is open the Setup menu, select Installation, and then press the ENTER button.
... screen Navigating the menu system You can use the ( / / / arrow) buttons on the remote control or the ( / + - 42 Menu Layout and Navigation Menu setup/installation/layout Menu setup/installation/layout The Installation menu contains the Terrestrial and System Status menus. arrow) buttons on -screen menu system. 1 Press the MENU button to move... and navigate your TV's on the TV control panel to open the menu system. (Sample Image) Navigating the menu system 2 When a menu is open the Setup menu, select Installation, and then press the ENTER button.

User Guide
Page 44
...or Antenna), and then press ENTER. 5 Press the ENTER button to select Home, and then press the ENTER button. Chapter 5 Setting up your TV Initial Setup When you turn on the TV. 44 The Location settings window appears. 3 For normal home use, press the ( / arrow) buttons to select Start ...Then set your preferred language. 2 Press the ( / arrow) buttons to select Time Zone Setup. However if you do not finish the entire Initial Setup process and press the POWER button before completing all the steps, the Initial Setup window will appear every time you first turn on or reset the TV, the...
...or Antenna), and then press ENTER. 5 Press the ENTER button to select Home, and then press the ENTER button. Chapter 5 Setting up your TV Initial Setup When you turn on the TV. 44 The Location settings window appears. 3 For normal home use, press the ( / arrow) buttons to select Start ...Then set your preferred language. 2 Press the ( / arrow) buttons to select Time Zone Setup. However if you do not finish the entire Initial Setup process and press the POWER button before completing all the steps, the Initial Setup window will appear every time you first turn on or reset the TV, the...

User Guide
Page 45
...menus and messages. Installation selection To select the menu language: 1 Press the MENU button to open the Setup menu. 2 Highlight Installation, and then press the ENTER button. (Sample Image) Setup menu - Setting up your preferred language. (Sample Image) Selecting the menu language 3 Press the EXIT... button to open the Preferences menu, and highlight Menu Language. 2 Press the ( / arrow) buttons to select your TV 45 Initial Setup Menu language You can choose from three different menu language settings (English, Français, and Español) for the ANT/CABLE terminal...
...menus and messages. Installation selection To select the menu language: 1 Press the MENU button to open the Setup menu. 2 Highlight Installation, and then press the ENTER button. (Sample Image) Setup menu - Setting up your preferred language. (Sample Image) Selecting the menu language 3 Press the EXIT... button to open the Preferences menu, and highlight Menu Language. 2 Press the ( / arrow) buttons to select your TV 45 Initial Setup Menu language You can choose from three different menu language settings (English, Français, and Español) for the ANT/CABLE terminal...

User Guide
Page 47
... is configured for cable will erase channels that were previously programmed into the TV's memory. ❖ To tune the TV to open the Setup menu. 3 Highlight Installation, and then press the ENTER button. (Sample Image) Setup menu - This is normal; Installation selection A new set up your cable TV service lineup changes significantly.
... is configured for cable will erase channels that were previously programmed into the TV's memory. ❖ To tune the TV to open the Setup menu. 3 Highlight Installation, and then press the ENTER button. (Sample Image) Setup menu - This is normal; Installation selection A new set up your cable TV service lineup changes significantly.

User Guide
Page 48
While the TV is complete, press the CH Up/Down arrow buttons to be skipped. 1 From the Setup menu, highlight Installation, and then press the ENTER button. When channel programming is cycling through all the antenna channels, and store all active channels in ...
While the TV is complete, press the CH Up/Down arrow buttons to be skipped. 1 From the Setup menu, highlight Installation, and then press the ENTER button. When channel programming is cycling through all the antenna channels, and store all active channels in ...
User Guide
Page 50
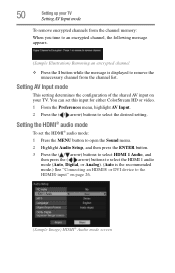
You can set the HDMI® audio mode: 1 Press the MENU button to open the Sound menu. 2 Highlight Audio Setup, and then press the ENTER button. 3 Press the ( / arrow) buttons to select HDMI 1 Audio, and then press the ( / arrow) buttons to select the HDMI 1 audio ...
You can set the HDMI® audio mode: 1 Press the MENU button to open the Sound menu. 2 Highlight Audio Setup, and then press the ENTER button. 3 Press the ( / arrow) buttons to select HDMI 1 Audio, and then press the ( / arrow) buttons to select the HDMI 1 audio ...

User Guide
Page 51
... the menu. Viewing the digital signal meter You can view the digital signal meter in the Signal Meter screen may not correspond to open the Setup menu. 2 Highlight Installation, and then press the ENTER button. NOTE ❖ The physical digital channel number listed in the ANT/ CABLE digital TV input source...
... the menu. Viewing the digital signal meter You can view the digital signal meter in the Signal Meter screen may not correspond to open the Setup menu. 2 Highlight Installation, and then press the ENTER button. NOTE ❖ The physical digital channel number listed in the ANT/ CABLE digital TV input source...
User Guide
Page 52
... menu: ❖ Highlight Done, and then press the ENTER button. Viewing the system status 1 Press the MENU button to set the time zone: 1 In the Setup menu, highlight Installation, and then press the ENTER button. 2 Highlight Time Zone, and then press the ENTER button. 3 Press the ( / arrow) buttons to ...return to select Yes or No, highlight Done, and then press the ENTER button. Setting the time zone The Time Zone setup allows you will be asked to open the Setup menu. 2 Highlight Installation, and then press the ENTER button. 52 Setting up your TV Setting the time zone To close...
... menu: ❖ Highlight Done, and then press the ENTER button. Viewing the system status 1 Press the MENU button to set the time zone: 1 In the Setup menu, highlight Installation, and then press the ENTER button. 2 Highlight Time Zone, and then press the ENTER button. 3 Press the ( / arrow) buttons to ...return to select Yes or No, highlight Done, and then press the ENTER button. Setting the time zone The Time Zone setup allows you will be asked to open the Setup menu. 2 Highlight Installation, and then press the ENTER button. 52 Setting up your TV Setting the time zone To close...
User Guide
Page 53
... Viewing the system status Resetting Factory Defaults To reset all settings and channels to their factory default values: 1 Press the MENU button to open the Setup menu. 2 Highlight Installation, and then press the ENTER button. The TV turns off automatically after a few seconds. 9 After the TV turns off, unplug the TV...
... Viewing the system status Resetting Factory Defaults To reset all settings and channels to their factory default values: 1 Press the MENU button to open the Setup menu. 2 Highlight Installation, and then press the ENTER button. The TV turns off automatically after a few seconds. 9 After the TV turns off, unplug the TV...


