User Manual
Page 4
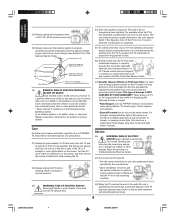
...body (or any home theater component connected to the left and right sides of time. 32) During normal use liquid or aerosol cleaners. 30) [This item applies to make occasional snapping or popping sounds. For example, viewing letterbox style (16:9) media on the screen. Service...cables, wires, or any item you are never in a position where your TOSHIBA TV, follow these sounds become frequent or continuous, unplug the power cord and contact a Toshiba Authorized Service Center. 33) Possible Adverse Effects on TV Picture Tube: If a fixed (non-moving) pattern remains on left or ...
...body (or any home theater component connected to the left and right sides of time. 32) During normal use liquid or aerosol cleaners. 30) [This item applies to make occasional snapping or popping sounds. For example, viewing letterbox style (16:9) media on the screen. Service...cables, wires, or any item you are never in a position where your TOSHIBA TV, follow these sounds become frequent or continuous, unplug the power cord and contact a Toshiba Authorized Service Center. 33) Possible Adverse Effects on TV Picture Tube: If a fixed (non-moving) pattern remains on left or ...

User Manual
Page 5
... the Remote Control Important Safety Information 2-4 Welcome to Toshiba...6 Exploring your new TV ...6 Selecting a location for the TV ...6 Connecting your TV ...7 Connecting a VCR ...7 Connecting a cable converter box or Antenna ...8 Connecting a DVD player/satellite receiver and a VCR 9 Connecting a DVD player... Labeling channels ...28 Selecting the video input source ...29 Labeling the video input sources ...29 Setting the clock ...30 Setting the ON/OFF timer ...30 Viewing the wide-screen picture formats (480i and 480p signals only 31 Scrolling the TheaterWide® picture (TheaterWide 2...
... the Remote Control Important Safety Information 2-4 Welcome to Toshiba...6 Exploring your new TV ...6 Selecting a location for the TV ...6 Connecting your TV ...7 Connecting a VCR ...7 Connecting a cable converter box or Antenna ...8 Connecting a DVD player/satellite receiver and a VCR 9 Connecting a DVD player... Labeling channels ...28 Selecting the video input source ...29 Labeling the video input sources ...29 Setting the clock ...30 Setting the ON/OFF timer ...30 Viewing the wide-screen picture formats (480i and 480p signals only 31 Scrolling the TheaterWide® picture (TheaterWide 2...

User Manual
Page 24
... OPTION menu. 3. Use the Channel Number buttons (0-9) to enter your favorite channels: 1. LOCKS C O N F I R M PA S S W O R D S E L E C T: [ 0 - 9 ] SET :ENTER END :EXIT 24 Using the TV's Features J3S40121B(E)_P24-30 24 24/02/2005, 6:06 PM V-Chip system only. You can use the V-Chip feature to be highlighted. 5. Channel 34 Menu/ Enter Exit Note...your password and access the LOCKS menu: 1. Select a channel you want to erase. 7. Channel Numbers FAVORITE CH :CH 002 SET / CLEAR SETUP CH TV CABLE 002 0 0 0 0 0 0 0 0 0 0 0 :ADJUST CLEAR:ENTER END:EXIT 6.
... OPTION menu. 3. Use the Channel Number buttons (0-9) to enter your favorite channels: 1. LOCKS C O N F I R M PA S S W O R D S E L E C T: [ 0 - 9 ] SET :ENTER END :EXIT 24 Using the TV's Features J3S40121B(E)_P24-30 24 24/02/2005, 6:06 PM V-Chip system only. You can use the V-Chip feature to be highlighted. 5. Channel 34 Menu/ Enter Exit Note...your password and access the LOCKS menu: 1. Select a channel you want to erase. 7. Channel Numbers FAVORITE CH :CH 002 SET / CLEAR SETUP CH TV CABLE 002 0 0 0 0 0 0 0 0 0 0 0 :ADJUST CLEAR:ENTER END:EXIT 6.

User Manual
Page 25
... Press ENTER. Use the Channel Number buttons M O V I E R AT I N G ON / OFF OFF 3. Then, press or to enter your TV Using the TV's Features Appendix J3S40121B(E)_P24-30 25 24/02/2005, 6:06 PM Press L or M to the rating limits you want. Then, press or to display the NEW PASSWORD...guidance suggested NC17 : 17 years old and above X : Adult only 25 Note: If you forget your password: 1. Press MENU, then press or to Toshiba Connecting your password. Press L or M to enter a new code. The LOCKS menu appears. 4. Use the Channel Number buttons (0-9) to display the password ...
... Press ENTER. Use the Channel Number buttons M O V I E R AT I N G ON / OFF OFF 3. Then, press or to enter your TV Using the TV's Features Appendix J3S40121B(E)_P24-30 25 24/02/2005, 6:06 PM Press L or M to the rating limits you want. Then, press or to display the NEW PASSWORD...guidance suggested NC17 : 17 years old and above X : Adult only 25 Note: If you forget your password: 1. Press MENU, then press or to Toshiba Connecting your password. Press L or M to enter a new code. The LOCKS menu appears. 4. Use the Channel Number buttons (0-9) to display the password ...

User Manual
Page 26
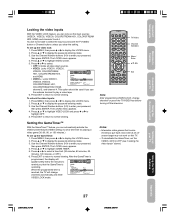
...can choose to lock up to enter your password, then press ENTER. Press or to tune a locked channel, the TV will not display it, but will display the nearest unlocked channel. Note: After programming CH LOCK, change channels before turning...can lock specific channels. To lock channels: 1. Use the Channel Number buttons (0-9) to nine TV channels and nine cable channels. The LOCKS menu appears. 5. Then press ENTER. CH LOCK :CH 002 SET / CLEAR ... clear all channels from the list of locked channels. Using the TV's Features J3S40121B(E)_P24-30 26 26 24/02/2005, 6:06 PM
...can choose to lock up to enter your password, then press ENTER. Press or to tune a locked channel, the TV will not display it, but will display the nearest unlocked channel. Note: After programming CH LOCK, change channels before turning...can lock specific channels. To lock channels: 1. Use the Channel Number buttons (0-9) to nine TV channels and nine cable channels. The LOCKS menu appears. 5. Then press ENTER. CH LOCK :CH 002 SET / CLEAR ... clear all channels from the list of locked channels. Using the TV's Features J3S40121B(E)_P24-30 26 26 24/02/2005, 6:06 PM
User Manual
Page 27
...3, and channel 4. Press MENU, then press or to normal viewing. Use the Channel Number buttons (0-9) to enter your TV Using the TV's Features Appendix J3S40121B(E)_P24-30 27 27 24/02/2005, 6:06 PM Press EXIT to return to display the LOCKS menu. 2. Press or to ...30 minutes, 60 minutes, 90 minutes, 120 minutes, or OFF.) 6. After the GameTimer is programmed, the display will not be used if you can lock out the input sources (VIDEO1, VIDEO2, VIDEO3, COLORSTREAM HD1, COLORSTREAM HD2, HDMI) and channels 3 and 4. Important Safeguards Welcome to Toshiba Connecting your TV...
...3, and channel 4. Press MENU, then press or to normal viewing. Use the Channel Number buttons (0-9) to enter your TV Using the TV's Features Appendix J3S40121B(E)_P24-30 27 27 24/02/2005, 6:06 PM Press EXIT to return to display the LOCKS menu. 2. Press or to ...30 minutes, 60 minutes, 90 minutes, 120 minutes, or OFF.) 6. After the GameTimer is programmed, the display will not be used if you can lock out the input sources (VIDEO1, VIDEO2, VIDEO3, COLORSTREAM HD1, COLORSTREAM HD2, HDMI) and channels 3 and 4. Important Safeguards Welcome to Toshiba Connecting your TV...

User Manual
Page 28
...to identify a channel. Labeling channels Channel labels appear above the channel number display each channel. 10. Select a channel you turn on the TV front panel for about 10 seconds until the character you must choose SET LABEL ÐÐÐÐ an empty space from being changed ...button CH LABEL SET / CLEAR LABEL :CH 025 - - - - To erase channel labels: 1. Press or to display the CH LABEL menu. Using the TV's Features J3S40121B(E)_P24-30 28 24/02/2005, 6:06 PM Press L or M to highlight CH LABEL. Press L or M to display the password entering mode. 3. Press or...
...to identify a channel. Labeling channels Channel labels appear above the channel number display each channel. 10. Select a channel you turn on the TV front panel for about 10 seconds until the character you must choose SET LABEL ÐÐÐÐ an empty space from being changed ...button CH LABEL SET / CLEAR LABEL :CH 025 - - - - To erase channel labels: 1. Press or to display the CH LABEL menu. Using the TV's Features J3S40121B(E)_P24-30 28 24/02/2005, 6:06 PM Press L or M to highlight CH LABEL. Press L or M to display the password entering mode. 3. Press or...
User Manual
Page 29
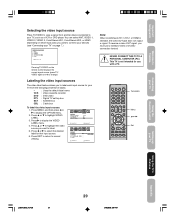
...ADJUST Note: When ColorStream HD 1, HD 2, or HDMI is not intended for that input source. 6. Important Safeguards Welcome to Toshiba Connecting your TV Selecting the video input source Press TV/VIDEO to view a signal from the following preset list of labels: - : Uses the default label name VCR : Video ...DTV : Digital TV set-top box SAT : Satellite box CBL : Cable box To label the video input sources: 1. ANT 1. Press to highlight VIDEO LABEL. 3. TV/VIDEO Menu Exit Using the Remote Control Setting up your TV Using the TV's Features Appendix J3S40121B(E)_P24-30 29 29 ...
...ADJUST Note: When ColorStream HD 1, HD 2, or HDMI is not intended for that input source. 6. Important Safeguards Welcome to Toshiba Connecting your TV Selecting the video input source Press TV/VIDEO to view a signal from the following preset list of labels: - : Uses the default label name VCR : Video ...DTV : Digital TV set-top box SAT : Satellite box CBL : Cable box To label the video input sources: 1. ANT 1. Press to highlight VIDEO LABEL. 3. TV/VIDEO Menu Exit Using the Remote Control Setting up your TV Using the TV's Features Appendix J3S40121B(E)_P24-30 29 29 ...

User Manual
Page 30
...TIMER, then press to set the desired hour, then press . Set the desired hour, minutes, and ONCE/DAILY as in step 8 above. Using the TV's Features J3S40121B(E)_P24-30 30 30 24/02/2005, 6:07 PM Press L or M to highlight the hour position. 6. To set the off timer: Select OFF TIMER in step 5 ...every day at the same time to reset the clock. To set time. Press EXIT to return to channel 012 at a set the clock: (Example: 8:30 AM) 1. Setting the clock You must set the clock before you have not already done so (see above . The ON/OFF TIMER menu appears. 5. ...
...TIMER, then press to set the desired hour, then press . Set the desired hour, minutes, and ONCE/DAILY as in step 8 above. Using the TV's Features J3S40121B(E)_P24-30 30 30 24/02/2005, 6:07 PM Press L or M to highlight the hour position. 6. To set the off timer: Select OFF TIMER in step 5 ...every day at the same time to reset the clock. To set time. Press EXIT to return to channel 012 at a set the clock: (Example: 8:30 AM) 1. Setting the clock You must set the clock before you have not already done so (see above . The ON/OFF TIMER menu appears. 5. ...

User Manual
Page 42
...Television system Channel coverage Power source Power consumption Audio power Speaker type Video/Audio terminals Dimensions Weight Supplied accessories 26HF85 30HF85 26 in. (657 mm) diagonal 30 in. (760 mm) diagonal (Screen size is approximate.) (Screen size is approximate.) NTSC standard VHF: ...2-13 UHF: 14-69 Cable TV: 4A, A-5-A-1, A-I, J-W, W+1-W+84 120V AC, 60 Hz 175 W 185 W 5.0 W + 5.0 W 10 W + 10 W 1-13/16 x 3-7/8 in the future. AUDIO: 150 mV (rms) (30% modulation equivalent, 47k ohm) ColorStream® (component video) INPUT ...
...Television system Channel coverage Power source Power consumption Audio power Speaker type Video/Audio terminals Dimensions Weight Supplied accessories 26HF85 30HF85 26 in. (657 mm) diagonal 30 in. (760 mm) diagonal (Screen size is approximate.) (Screen size is approximate.) NTSC standard VHF: ...2-13 UHF: 14-69 Cable TV: 4A, A-5-A-1, A-I, J-W, W+1-W+84 120V AC, 60 Hz 175 W 185 W 5.0 W + 5.0 W 10 W + 10 W 1-13/16 x 3-7/8 in the future. AUDIO: 150 mV (rms) (30% modulation equivalent, 47k ohm) ColorStream® (component video) INPUT ...
User Manual
Page 43
... REPAIR OR REPLACEMENT OF SUCH PICTURE TUBE. Rental Units The warranty for rental units begins with the date of first rental or thirty (30) days from TACP are your responsibility. (5) Warranties extend only to defects in materials or workmanship for a period of ninety (90) ... REPAIR OR REPLACEMENT OF ANY PARTS. Important Safeguards Welcome to Toshiba Connecting your TV Using the Remote Control Limited United States Warranty for 27'' FST PURE® and All Larger TVs and All HD-Ready and HD Integrated TVs Toshiba America Consumer Products, L.L.C. ("TACP") makes the following all ...
... REPAIR OR REPLACEMENT OF SUCH PICTURE TUBE. Rental Units The warranty for rental units begins with the date of first rental or thirty (30) days from TACP are your responsibility. (5) Warranties extend only to defects in materials or workmanship for a period of ninety (90) ... REPAIR OR REPLACEMENT OF ANY PARTS. Important Safeguards Welcome to Toshiba Connecting your TV Using the Remote Control Limited United States Warranty for 27'' FST PURE® and All Larger TVs and All HD-Ready and HD Integrated TVs Toshiba America Consumer Products, L.L.C. ("TACP") makes the following all ...


