User Manual
Page 2
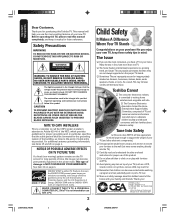
... CATV INSTALLERS The home theater entertainment experience is NOT COVERED BY YOUR WARRANTY. The Consumer Electronics Association formed the Home Entertainment Support Safety Committee, comprised of your furniture to climb on the TV screen for purchasing this product may be connected to the grounding system of the building, as a VCR, remote control, or toy) that a curious child may fall over . Use...
... CATV INSTALLERS The home theater entertainment experience is NOT COVERED BY YOUR WARRANTY. The Consumer Electronics Association formed the Home Entertainment Support Safety Committee, comprised of your furniture to climb on the TV screen for purchasing this product may be connected to the grounding system of the building, as a VCR, remote control, or toy) that a curious child may fall over . Use...
User Manual
Page 4
...! Never use only replacement parts specified by the manufacturer. • Upon completion of service, ask the service technician to perform routine safety checks to determine that do not use the entire screen. Never leave your TOSHIBA TV, follow these sounds become frequent or continuous, unplug the power cord and contact a Toshiba Authorized Service Center. 33) Possible Adverse Effects on TV Picture Tube: If a fixed (non...
...! Never use only replacement parts specified by the manufacturer. • Upon completion of service, ask the service technician to perform routine safety checks to determine that do not use the entire screen. Never leave your TOSHIBA TV, follow these sounds become frequent or continuous, unplug the power cord and contact a Toshiba Authorized Service Center. 33) Possible Adverse Effects on TV Picture Tube: If a fixed (non...

User Manual
Page 5
... remote control to operate your other devices 17 Cable TV converter/satellite receiver, VCR and DVD player code tables 18 Learning about the remote control ...20 Setting up your TV ...21 Starting setup ...21 Changing the on-screen display language ...21 Image tilt correction ...22 Adding channels to the TV's memory ...22 Using the TV's features ...23 Adjusting the channel settings ...23 Using the locks menu ...24 Selecting a password ...24 Using the V-Chip (parental control) feature 25 Locking channels ...26 Locking the video inputs...
... remote control to operate your other devices 17 Cable TV converter/satellite receiver, VCR and DVD player code tables 18 Learning about the remote control ...20 Setting up your TV ...21 Starting setup ...21 Changing the on-screen display language ...21 Image tilt correction ...22 Adding channels to the TV's memory ...22 Using the TV's features ...23 Adjusting the channel settings ...23 Using the locks menu ...24 Selecting a password ...24 Using the V-Chip (parental control) feature 25 Locking channels ...26 Locking the video inputs...
User Manual
Page 8
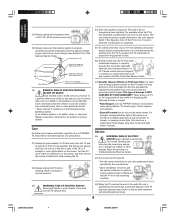
... program using the remote control, such as labeling channels, blocking channels, and programming your TV Connecting a cable converter box or Antenna This television has an extended tuning range and can directly tune any nonscrambled channels on the back of the television. Option 1 : For Subscribers to Basic Cable TV Service For basic cable service not requiring a Converter/Descrambler box, connect the incoming 75 ohm Coaxial Cable directly to the output of the television. Set the television to the Antenna Jack...
... program using the remote control, such as labeling channels, blocking channels, and programming your TV Connecting a cable converter box or Antenna This television has an extended tuning range and can directly tune any nonscrambled channels on the back of the television. Option 1 : For Subscribers to Basic Cable TV Service For basic cable service not requiring a Converter/Descrambler box, connect the incoming 75 ohm Coaxial Cable directly to the output of the television. Set the television to the Antenna Jack...

User Manual
Page 14
... (Video CDs) may not output digital audio signals. To connect an HDMI device, you will need to set the HDMI audio input setting to "DVI" to "HDMI" (page 40.) HDMI device VIDEO AUDIO LR IN OUT HDMI OUT To ensure that the HDMI or DVI device is reset properly, it is designed to accept HDCP[3] program material in the AUDIO menu (see page 40.) Note: If you connect an HDMI device and analog audio cables and play media with digital audio output, to hear digital audio...
... (Video CDs) may not output digital audio signals. To connect an HDMI device, you will need to set the HDMI audio input setting to "DVI" to "HDMI" (page 40.) HDMI device VIDEO AUDIO LR IN OUT HDMI OUT To ensure that the HDMI or DVI device is reset properly, it is designed to accept HDCP[3] program material in the AUDIO menu (see page 40.) Note: If you connect an HDMI device and analog audio cables and play media with digital audio output, to hear digital audio...
User Manual
Page 16
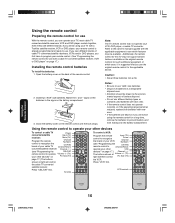
... are different brands. Using the remote control to operate your other devices To control a cable TV converter/satellite Power Input (TV) receiver: Mute (TV) Program the remote Channel Numbers control to recognize the brand of your VCR Input (TV) Power Channel Numbers (see "Programming the CH RTN remote control to recognize the brand of your VCR, DVD player, or cable TV converter. Note: The TV remote control may be available. Install two "AAA" size batteries. Close the battery cover on...
... are different brands. Using the remote control to operate your other devices To control a cable TV converter/satellite Power Input (TV) receiver: Mute (TV) Program the remote Channel Numbers control to recognize the brand of your VCR Input (TV) Power Channel Numbers (see "Programming the CH RTN remote control to recognize the brand of your VCR, DVD player, or cable TV converter. Note: The TV remote control may be available. Install two "AAA" size batteries. Close the battery cover on...
User Manual
Page 17
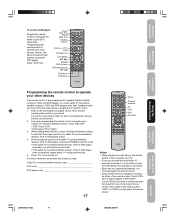
...) Number buttons Volume +/- (TV) DVD Pic Size (TV) DVD MENU LM ENTER DVD controls M DVD Skip/Search / TOP Menu DVD Clear M Connecting your TV Using the Remote Control Setting up your TV Programming the remote control to operate your other position (VCR1 or VCR2) and reprogram the remote control. Refer to the code tables (on either of two remote codes. Point the remote control at right will then control the DVD player. Press "TV" to enter the three-digit code for your cable TV...
...) Number buttons Volume +/- (TV) DVD Pic Size (TV) DVD MENU LM ENTER DVD controls M DVD Skip/Search / TOP Menu DVD Clear M Connecting your TV Using the Remote Control Setting up your TV Programming the remote control to operate your other position (VCR1 or VCR2) and reprogram the remote control. Refer to the code tables (on either of two remote codes. Point the remote control at right will then control the DVD player. Press "TV" to enter the three-digit code for your cable TV...

User Manual
Page 20
... DVD CLEAR clears input data in DVD mode TOP MENU access the DVD TOP menu DVD MENU access the DVD menu POWER Mute Volume +/VCR DVD Picture Size FAV LM (Favorite Channels) Menu/Enter Exit Play Stop FF TV/VCR Clear J3S40121B(E)_P16-23 20 20 24/02/2005, 6:06 PM Using the Remote Control Learning about the remote control POWER turns the TV on -screen menus (page 21) CBL/SAT Sleep DVD Menu Enter Pause Skip/Search 4¢ Rew TOP Menu PIC SIZE cycles through programmed channels...
... DVD CLEAR clears input data in DVD mode TOP MENU access the DVD TOP menu DVD MENU access the DVD menu POWER Mute Volume +/VCR DVD Picture Size FAV LM (Favorite Channels) Menu/Enter Exit Play Stop FF TV/VCR Clear J3S40121B(E)_P16-23 20 20 24/02/2005, 6:06 PM Using the Remote Control Learning about the remote control POWER turns the TV on -screen menus (page 21) CBL/SAT Sleep DVD Menu Enter Pause Skip/Search 4¢ Rew TOP Menu PIC SIZE cycles through programmed channels...

User Manual
Page 22
... to 10.) SETUP CLOSED CAPTION PICTURE SIZE PICTURE SCROLL CINEMA MODE ASPECT IMAGE TILT :SELECT OFF VIDEO ON 0 :ADJUST Adding channels to add or erase. Press or to highlight either TV or CABLE, depending on which you use the image tilt correction feature to highlight IMAGE TILT. 3. If you use an antenna, choose TV. SETUP LANGUAGE CLOCK SET TV / CABLE CH PROGRAM ADD / ERASE ENGLISH 12:00AM TV / CABLE ADD If you use cable, choose CABLE. :SELECT :ADJUST 4. Programming channels automatically Your...
... to 10.) SETUP CLOSED CAPTION PICTURE SIZE PICTURE SCROLL CINEMA MODE ASPECT IMAGE TILT :SELECT OFF VIDEO ON 0 :ADJUST Adding channels to add or erase. Press or to highlight either TV or CABLE, depending on which you use the image tilt correction feature to highlight IMAGE TILT. 3. If you use an antenna, choose TV. SETUP LANGUAGE CLOCK SET TV / CABLE CH PROGRAM ADD / ERASE ENGLISH 12:00AM TV / CABLE ADD If you use cable, choose CABLE. :SELECT :ADJUST 4. Programming channels automatically Your...

User Manual
Page 25
... (parental control) feature" (below), "Locking channels" (page 26), "Locking video inputs" (page 27), "Setting the GameTimerTM" (page 27) or "Using the front panel lock feature" (page 28.) To change your TV Using the Remote Control 5. Press MENU, then press or to normal viewing. Use the Channel Number buttons (0-9) to explain the rating. Press ENTER. The LOCKS menu appears. 4. Press L or M to highlight NEW PASSWORD and press or to enter a new code. Use the Channel Number buttons (0-9) to display the NEW PASSWORD menu. 5. Television...
... (parental control) feature" (below), "Locking channels" (page 26), "Locking video inputs" (page 27), "Setting the GameTimerTM" (page 27) or "Using the front panel lock feature" (page 28.) To change your TV Using the Remote Control 5. Press MENU, then press or to normal viewing. Use the Channel Number buttons (0-9) to explain the rating. Press ENTER. The LOCKS menu appears. 4. Press L or M to highlight NEW PASSWORD and press or to enter a new code. Use the Channel Number buttons (0-9) to display the NEW PASSWORD menu. 5. Television...

User Manual
Page 26
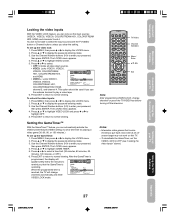
... Use the Channel Number buttons (0-9) to lock. 2. Press L or M to highlight CH LOCK and press or to display the LOCKS menu. 2. Press MENU, then press or to display the CH LOCK menu. 6. Press L or M to highlight CH LOCK and press or to lock other channels. Note: After programming CH LOCK, change channels before turning off the television. Select a channel you clear the setting. When you try to display the password entering mode. 4. Repeat steps 1 through 6 to display the CH LOCK menu...
... Use the Channel Number buttons (0-9) to lock. 2. Press L or M to highlight CH LOCK and press or to display the LOCKS menu. 2. Press MENU, then press or to display the CH LOCK menu. 6. Press L or M to highlight CH LOCK and press or to lock other channels. Note: After programming CH LOCK, change channels before turning off the television. Select a channel you clear the setting. When you try to display the password entering mode. 4. Repeat steps 1 through 6 to display the CH LOCK menu...
User Manual
Page 27
...TV/Video Channel Numbers Menu/ Enter Exit Note: After programming VIDEO LOCK, change channels automatically and enter LOCK CH LOCK VIDEO LOCK OFF GAME TIMER OFF OFF / 30 / 60 / 90 / 120 F R O N T PA N E L L O C K OFF N E W PA S S W O R D :SELECT :ADJUST VIDEO LOCK mode. Press or to select a time limit (30 minutes, 60 minutes, 90 minutes, 120 minutes, or OFF.) 6. Notes: • Interactive video games that the GameTimer is LOCKS operating. Use the Channel Number buttons (0-9) to enter your TV Using the Remote Control Locking the video inputs With the VIDEO LOCK...
...TV/Video Channel Numbers Menu/ Enter Exit Note: After programming VIDEO LOCK, change channels automatically and enter LOCK CH LOCK VIDEO LOCK OFF GAME TIMER OFF OFF / 30 / 60 / 90 / 120 F R O N T PA N E L L O C K OFF N E W PA S S W O R D :SELECT :ADJUST VIDEO LOCK mode. Press or to select a time limit (30 minutes, 60 minutes, 90 minutes, 120 minutes, or OFF.) 6. Notes: • Interactive video games that the GameTimer is LOCKS operating. Use the Channel Number buttons (0-9) to enter your TV Using the Remote Control Locking the video inputs With the VIDEO LOCK...

User Manual
Page 30
... the power, the timer settings will turn on every day at 6:30 AM, DAILY) 1. Press L or M to turn on or off automatically at a set time. SETUP LANGUAGE CLOCK SET TV / CABLE CH PROGRAM ADD / ERASE :SELECT SETUP LANGUAGE CLOCK SET TV / CABLE CH PROGRAM ADD / ERASE :SELECT ENGLISH 12:00AM CABLE ADD :ADJUST ENGLISH 8:30AM CABLE ADD :ADJUST Setting the ON/OFF timer This feature allows you clear the ON TIMER. Press or to normal viewing. Press...
... the power, the timer settings will turn on every day at 6:30 AM, DAILY) 1. Press L or M to turn on or off automatically at a set time. SETUP LANGUAGE CLOCK SET TV / CABLE CH PROGRAM ADD / ERASE :SELECT SETUP LANGUAGE CLOCK SET TV / CABLE CH PROGRAM ADD / ERASE :SELECT ENGLISH 12:00AM CABLE ADD :ADJUST ENGLISH 8:30AM CABLE ADD :ADJUST Setting the ON/OFF timer This feature allows you clear the ON TIMER. Press or to normal viewing. Press...

User Manual
Page 34
.... PICTURE CableClear COLOR TEMPERATURE DISPLAY FORMAT SVM RESET :SELECT ON COOL 540p / 1080i HIGH :ADJUST 34 Using the TV's Features J3S40121B(E)_P31-37 34 24/02/2005, 6:07 PM To select the display format: 1. Menu SETUP CLOSED CAPTION PICTURE SIZE PICTURE SCROLL CINEMA MODE ASPECT IMAGE TILT :SELECT OFF VIDEO ON / OFF 0 :ADJUST Selecting the display format (for 480p input. 1080i is always output when a signal other than 480p is input. • If you notice flickering in the following table.) Aspect ratio of signal...
.... PICTURE CableClear COLOR TEMPERATURE DISPLAY FORMAT SVM RESET :SELECT ON COOL 540p / 1080i HIGH :ADJUST 34 Using the TV's Features J3S40121B(E)_P31-37 34 24/02/2005, 6:07 PM To select the display format: 1. Menu SETUP CLOSED CAPTION PICTURE SIZE PICTURE SCROLL CINEMA MODE ASPECT IMAGE TILT :SELECT OFF VIDEO ON / OFF 0 :ADJUST Selecting the display format (for 480p input. 1080i is always output when a signal other than 480p is input. • If you notice flickering in the following table.) Aspect ratio of signal...

User Manual
Page 36
Selecting the color temperature Change the picture quality by repeated use. Press MENU, then press or to display the PICTURE menu. 2. Press MENU, then press or to display the PICTURE menu. 2. Press L or M to highlight COLOR TEMPERATURE. Note: SVM is useful when receiving a broadcast with a weak signal (especially a Cable channel) or playing a video cassette or disc damaged by selecting from three preset color temperatures-cool, medium, and warm-as described in step 3. 36...
Selecting the color temperature Change the picture quality by repeated use. Press MENU, then press or to display the PICTURE menu. 2. Press MENU, then press or to display the PICTURE menu. 2. Press L or M to highlight COLOR TEMPERATURE. Note: SVM is useful when receiving a broadcast with a weak signal (especially a Cable channel) or playing a video cassette or disc damaged by selecting from three preset color temperatures-cool, medium, and warm-as described in step 3. 36...

User Manual
Page 37
... turns off . Note: If text is not closed caption signal may appear on -screen. • To view text, select T1 or T2. Press or to select the desired Closed Caption mode, as weather or stock data (if available in the Closed Caption menu. 37 Note: A closed - SETUP CLOSED CAPTION PICTURE SIZE PICTURE SCROLL CINEMA MODE ASPECT IMAGE TILT OFF C1 / C2 / T1 / T2 / OFF VIDEO ON 0 :SELECT :ADJUST 4. Important Safeguards Welcome to Toshiba Connecting your TV Using the Remote Control Resetting your picture adjustments The RESET...
... turns off . Note: If text is not closed caption signal may appear on -screen. • To view text, select T1 or T2. Press or to select the desired Closed Caption mode, as weather or stock data (if available in the Closed Caption menu. 37 Note: A closed - SETUP CLOSED CAPTION PICTURE SIZE PICTURE SCROLL CINEMA MODE ASPECT IMAGE TILT OFF C1 / C2 / T1 / T2 / OFF VIDEO ON 0 :SELECT :ADJUST 4. Important Safeguards Welcome to Toshiba Connecting your TV Using the Remote Control Resetting your picture adjustments The RESET...

User Manual
Page 38
... mode. Selecting stereo/SAP broadcasts The multi-channel TV sound (MTS) feature provides high-fidelity stereo sound. To listen to temporarily turn the TV on , and the station you can change the channel, or press RECALL. AUDIO MTS BASS TREBLE BALANCE STABLE SOUND SPEAKERS :SELECT STR / SAP / MONO 25 25 0 OFF ON :ADJUST 4. Press MENU, then press or until the AUDIO menu appears. 2. AUDIO MTS BASS TREBLE BALANCE STABLE SOUND SPEAKERS...
... mode. Selecting stereo/SAP broadcasts The multi-channel TV sound (MTS) feature provides high-fidelity stereo sound. To listen to temporarily turn the TV on , and the station you can change the channel, or press RECALL. AUDIO MTS BASS TREBLE BALANCE STABLE SOUND SPEAKERS :SELECT STR / SAP / MONO 25 25 0 OFF ON :ADJUST 4. Press MENU, then press or until the AUDIO menu appears. 2. AUDIO MTS BASS TREBLE BALANCE STABLE SOUND SPEAKERS...

User Manual
Page 40
... analog audio cables to the HDMI audio IN jacks (see page 14.) Set the HDMI audio input setting to highlight HDMI. 3. Turning off the built-in speakers Use this feature to turn the TV speakers off the built-in step 2 above. Press or to "DVI" with analog audio output (for details on -screen information: • Clock • Channel number or VIDEO mode selected • Channel label (if preset) • Stereo or SAP (second audio program) audio status • Content rating • On timer, Sleep timer...
... analog audio cables to the HDMI audio IN jacks (see page 14.) Set the HDMI audio input setting to highlight HDMI. 3. Turning off the built-in speakers Use this feature to turn the TV speakers off the built-in step 2 above. Press or to "DVI" with analog audio output (for details on -screen information: • Clock • Channel number or VIDEO mode selected • Channel label (if preset) • Stereo or SAP (second audio program) audio status • Content rating • On timer, Sleep timer...
User Manual
Page 41
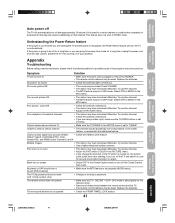
... may be muted. Cannot access signal input sources (Video1, • Check the VIDEO LOCK feature. Poor color or no sound • Check the antenna/cable connections. Black box on screen • Select OFF in the MTS menu. No stereo or SAP sound from turning on in the PICTURE menu. • If you change the direction of the symptom and some solutions. Important Safeguards Welcome to Toshiba Connecting your TV Using the Remote Control Auto power off The TV will...
... may be muted. Cannot access signal input sources (Video1, • Check the VIDEO LOCK feature. Poor color or no sound • Check the antenna/cable connections. Black box on screen • Select OFF in the MTS menu. No stereo or SAP sound from turning on in the PICTURE menu. • If you change the direction of the symptom and some solutions. Important Safeguards Welcome to Toshiba Connecting your TV Using the Remote Control Auto power off The TV will...
User Manual
Page 43
... a period of repair required, either the service will be performed in your home or the set will enable TACP to bring you new products specifically designed to meet your TV Using the Remote Control Limited United States Warranty for a period of two (2) years after the date of original retail purchase. Important Safeguards Welcome to Toshiba Connecting your needs and help us to contact...
... a period of repair required, either the service will be performed in your home or the set will enable TACP to bring you new products specifically designed to meet your TV Using the Remote Control Limited United States Warranty for a period of two (2) years after the date of original retail purchase. Important Safeguards Welcome to Toshiba Connecting your needs and help us to contact...


