
User Manual
Page 2
...cause harmful interference with or arising out of the purchase or use of these materials, and the sole and exclusive liability of Texas Instruments, regardless of the form of action, shall not exceed the purchase price of this equipment does cause harmful interference to radio ...turning the equipment off and on, you can radiate radio frequency energy and, if not installed and used in connection with radio communications. US FCC Information Concerning Radio Frequency Interference This equipment has been tested and found to comply with the limits for help. Moreover, Texas Instruments...
...cause harmful interference with or arising out of the purchase or use of these materials, and the sole and exclusive liability of Texas Instruments, regardless of the form of action, shall not exceed the purchase price of this equipment does cause harmful interference to radio ...turning the equipment off and on, you can radiate radio frequency energy and, if not installed and used in connection with radio communications. US FCC Information Concerning Radio Frequency Interference This equipment has been tested and found to comply with the limits for help. Moreover, Texas Instruments...

User Manual
Page 3
Table of Contents TI-86 Quick Start 1 Preparing to Use Your New TI-86 2 Installing the AAA Batteries 2 Turning On and Turning Off the TI-86 2 Adjusting the Contrast 2 Resetting All Memory and Defaults 3 Calculating on the Home Screen 3 Calculating the Sine of a Number 3 Storing the Last Answer to a Variable 3 Using a ...In on a Portion of the Graph Screen 14 Chapter 1: Operating the TI-86 15 Installing or Replacing Batteries 16 When to Replace Batteries 16 Turning On and Turning Off the TI-86 17 Adjusting the Display Contrast 17 The Home Screen 18 Displaying Entries ...
Table of Contents TI-86 Quick Start 1 Preparing to Use Your New TI-86 2 Installing the AAA Batteries 2 Turning On and Turning Off the TI-86 2 Adjusting the Contrast 2 Resetting All Memory and Defaults 3 Calculating on the Home Screen 3 Calculating the Sine of a Number 3 Storing the Last Answer to a Variable 3 Using a ...In on a Portion of the Graph Screen 14 Chapter 1: Operating the TI-86 15 Installing or Replacing Batteries 16 When to Replace Batteries 16 Turning On and Turning Off the TI-86 17 Adjusting the Display Contrast 17 The Home Screen 18 Displaying Entries ...
User Manual
Page 7
... Points, Lines, and Curves 107 Placing Text on a Graph 108 Turning On or Turning Off Points 108 Chapter 7: Tables 109 Displaying the Table 110 TABLE Menu 110 The Table 110 Independent and Dependent Variables in the Table 111 Navigating the Table 111 TI-86 Table of Contents vii The Table Menus 112 Setting Up...
... Points, Lines, and Curves 107 Placing Text on a Graph 108 Turning On or Turning Off Points 108 Chapter 7: Tables 109 Displaying the Table 110 TABLE Menu 110 The Table 110 Independent and Dependent Variables in the Table 111 Navigating the Table 111 TI-86 Table of Contents vii The Table Menus 112 Setting Up...

User Manual
Page 10
... 185 Chapter 14: Statistics 187 Statistical Analysis on the TI-86 188 Setting Up a Statistical Analysis 188 The STAT (Statistics) Menu 188 Entering Statistical Data 189 The LIST NAMES Menu 189 The STAT CALC (Calculations) Menu 189 Automatic Regression Equation Storage 191 Results of ...a Statistical Analysis 192 The STAT VARS (Statistical Variables) Menu 192 Plotting Statistical Data 194 The STAT PLOT Status Screen 194 The STAT PLOT Menu 195 Setting Up a Stat Plot 195 Turning On and Turning ...
... 185 Chapter 14: Statistics 187 Statistical Analysis on the TI-86 188 Setting Up a Statistical Analysis 188 The STAT (Statistics) Menu 188 Entering Statistical Data 189 The LIST NAMES Menu 189 The STAT CALC (Calculations) Menu 189 Automatic Regression Equation Storage 191 Results of ...a Statistical Analysis 192 The STAT VARS (Statistical Variables) Menu 192 Plotting Statistical Data 194 The STAT PLOT Status Screen 194 The STAT PLOT Menu 195 Setting Up a Stat Plot 195 Turning On and Turning ...

User Manual
Page 14
... and 1 keystroke combinations. 2 Quick Start After about four minutes of inactivity, the TI-86 turns off the TI-86, press - ž. Before you begin, you must install the batteries, turn off the calculator, press -, and then the key under OFF, which is ^. Chapter 1 has ... diagram in the battery compartment on the calculator, adjust the contrast, and reset the memory and the defaults. Turning On and Turning Off the TI-86 To turn off automatically. For example, to Use Your New TI-86 The brief examples in the TI-86 retail package. This guidebook uses brackets ( ...
... and 1 keystroke combinations. 2 Quick Start After about four minutes of inactivity, the TI-86 turns off the TI-86, press - ž. Before you begin, you must install the batteries, turn off the calculator, press -, and then the key under OFF, which is ^. Chapter 1 has ... diagram in the battery compartment on the calculator, adjust the contrast, and reset the memory and the defaults. Turning On and Turning Off the TI-86 To turn off automatically. For example, to Use Your New TI-86 The brief examples in the TI-86 retail package. This guidebook uses brackets ( ...

User Manual
Page 27
1 Operating the TI-86 Installing or Replacing Batteries 16 Turning On and Turning Off the TI-86 17 Adjusting the Display Contrast 17 The Home Screen 18 Entering Numbers 19 Entering Other Characters 20 Entering Expressions and Instructions 24 Diagnosing an Error 27 Reusing Previous Entries and the Last Answer 28 Using TI-86 Menus 31 Viewing and Changing Modes 34 TI -86 M1 M2 M3 M4 M5 F1 F2 F3 F4 F5
1 Operating the TI-86 Installing or Replacing Batteries 16 Turning On and Turning Off the TI-86 17 Adjusting the Display Contrast 17 The Home Screen 18 Entering Numbers 19 Entering Other Characters 20 Entering Expressions and Instructions 24 Diagnosing an Error 27 Reusing Previous Entries and the Last Answer 28 Using TI-86 Menus 31 Viewing and Changing Modes 34 TI -86 M1 M2 M3 M4 M5 F1 F2 F3 F4 F5

User Manual
Page 28
... not operate until the latch snaps closed. Replace the lithium backup battery about every three or four years. 16 Chapter 1: Operating the TI-86 To express - You must install them before you turn on the calculator. A lithium backup battery is installed in memory. ᕢ Slide the protective cover over the keyboard. ᕣ Holding the...
... not operate until the latch snaps closed. Replace the lithium backup battery about every three or four years. 16 Chapter 1: Operating the TI-86 To express - You must install them before you turn on the calculator. A lithium backup battery is installed in memory. ᕢ Slide the protective cover over the keyboard. ᕣ Holding the...
User Manual
Page 29
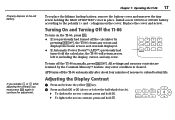
...error. Any error condition is cleared. APD turns off the calculator, the TI-86 will return as it was last displayed. ♦ If Automatic Power DownTM (APDTM) previously had turned off the TI-86 manually, press - ž. Chapter 1: Operating the TI-86 17 To replace the lithium backup battery, remove... life. Properly dispose of non-use to the polarity (+ and N) diagram on the TI-86, press ^. ♦ If you must press - Turning On and Turning Off the TI-86 To turn off the calculator by the Constant MemoryTM feature. Adjusting the Display Contrast ᕡ Press and release the ...
...error. Any error condition is cleared. APD turns off the calculator, the TI-86 will return as it was last displayed. ♦ If Automatic Power DownTM (APDTM) previously had turned off the TI-86 manually, press - ž. Chapter 1: Operating the TI-86 17 To replace the lithium backup battery, remove... life. Properly dispose of non-use to the polarity (+ and N) diagram on the TI-86, press ^. ♦ If you must press - Turning On and Turning Off the TI-86 To turn off the calculator by the Constant MemoryTM feature. Adjusting the Display Contrast ᕡ Press and release the ...

User Manual
Page 30
... contrast level. If an expression or series of the display. You can enter and evaluate expressions, and view the results. For example, say you first turn on the next line. The Home Screen When you set the contrast to 4, then 5, then 6, and so on, to begin a new entry. You also ...can adjust the display contrast anytime to eight lines with fresh batteries. Displaying Entries and Answers The home screen displays up to suit your TI-86, the home screen is a blank screen, except for the entry cursor ( Å ) in the top-left corner. The number is not visible when the contrast...
... contrast level. If an expression or series of the display. You can enter and evaluate expressions, and view the results. For example, say you first turn on the next line. The Home Screen When you set the contrast to 4, then 5, then 6, and so on, to begin a new entry. You also ...can adjust the display contrast anytime to eight lines with fresh batteries. Displaying Entries and Answers The home screen displays up to suit your TI-86, the home screen is a blank screen, except for the entry cursor ( Å ) in the top-left corner. The number is not visible when the contrast...

User Manual
Page 40
...previous entry. ᕢ Edit the retrieved entry. ᕣ Re-execute the edited entry. - ¢ ! ! ! ! ! 32 b Retrieving Previous Entries The TI-86 retains as many previous entries as possible in ENTRY, up to the line. continuing to ENTRY, repeat - ¢. To retrieve the last entry, press - &#...162;. When you press - ¢ after displaying the oldest stored entry, the newest stored entry is displayed again; If you turn off the TI-86, ENTRY is retained in a storage area called ENTRY (last entry). To scroll from the newest to the older previous entries stored to press...
...previous entry. ᕢ Edit the retrieved entry. ᕣ Re-execute the edited entry. - ¢ ! ! ! ! ! 32 b Retrieving Previous Entries The TI-86 retains as many previous entries as possible in ENTRY, up to the line. continuing to ENTRY, repeat - ¢. To retrieve the last entry, press - &#...162;. When you press - ¢ after displaying the oldest stored entry, the newest stored entry is displayed again; If you turn off the TI-86, ENTRY is retained in a storage area called ENTRY (last entry). To scroll from the newest to the older previous entries stored to press...

User Manual
Page 41
... Multiple Entries To store two or more expressions or instructions together to ENTRY, enter them on the home screen or in a program, the TI-86 stores the answer to find the radius of 200. 8 X - Retrieving the Last Answer When an expression is evaluated successfully on one entry... you can manipulate this task. Store 8 to approach the answer of a circle with which you turn off the TI-86, the value in Ans is stored in variable called Ans (last answer). Chapter 1: Operating the TI-86 29 Consecutively entered entries separated by colons (page 26) are stored as a new guess. The ...
... Multiple Entries To store two or more expressions or instructions together to ENTRY, enter them on the home screen or in a program, the TI-86 stores the answer to find the radius of 200. 8 X - Retrieving the Last Answer When an expression is evaluated successfully on one entry... you can manipulate this task. Store 8 to approach the answer of a circle with which you turn off the TI-86, the value in Ans is stored in variable called Ans (last answer). Chapter 1: Operating the TI-86 29 Consecutively entered entries separated by colons (page 26) are stored as a new guess. The ...

User Manual
Page 46
m. 34 Chapter 1: Operating the TI-86 In the screen to the right, the default mode settings are highlighted along the left of E and the appropriate power of 10 (which is always a ...). ᕢ Move the cursor to the mode settings. Mode settings control how the TI-86 displays and interprets numbers and graphs. All numbers, including elements of the screen. The Constant Memory feature retains current mode settings when the TI-86 is turned off. This example changes the decimal mode setting to the left side of...
m. 34 Chapter 1: Operating the TI-86 In the screen to the right, the default mode settings are highlighted along the left of E and the appropriate power of 10 (which is always a ...). ᕢ Move the cursor to the mode settings. Mode settings control how the TI-86 displays and interprets numbers and graphs. All numbers, including elements of the screen. The Constant Memory feature retains current mode settings when the TI-86 is turned off. This example changes the decimal mode setting to the left side of...

User Manual
Page 87
...use this cursor to the Func, Pol, Param, and DifEq equation editors. Chapter 5: Function Graphing 75 Chapter 1 describes all selected functions and turned on graphs or test pixels The GRAPH Menu 6 y(x)= WIND ZOOM TRACE GRAPH 4 MATH DRAW FORMT STGDB RCGDB 4 EVAL STPIC RCPIC y(x)= WIND ...ZOOM TRACE GRAPH MATH DRAW Displays the equation editor; The TI-86 retains in detail. changing the graphing mode does not affect them. use this screen to enter functions to explore graphs mathematically Displays the GRAPH...
...use this cursor to the Func, Pol, Param, and DifEq equation editors. Chapter 5: Function Graphing 75 Chapter 1 describes all selected functions and turned on graphs or test pixels The GRAPH Menu 6 y(x)= WIND ZOOM TRACE GRAPH 4 MATH DRAW FORMT STGDB RCGDB 4 EVAL STPIC RCPIC y(x)= WIND ...ZOOM TRACE GRAPH MATH DRAW Displays the equation editor; The TI-86 retains in detail. changing the graphing mode does not affect them. use this screen to enter functions to explore graphs mathematically Displays the GRAPH...

User Manual
Page 115
...) PxChg(row,column) PxTest(row,column) TanLn(expression,x) DrInv expression Shades a specified area of a graph (See page 104) Draws expression as a function Turns on the pixel at (row,column) Turns off the pixel at (row,column) Changes the onàoff Draws expression as a function and a tangent line of expression at (row...
...) PxChg(row,column) PxTest(row,column) TanLn(expression,x) DrInv expression Shades a specified area of a graph (See page 104) Draws expression as a function Turns on the pixel at (row,column) Turns off the pixel at (row,column) Changes the onàoff Draws expression as a function and a tangent line of expression at (row...
User Manual
Page 116
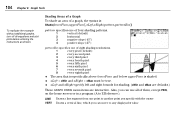
..., you can use all equations and stat plots before entering the instructions as shown. 104 Chapter 6: Graph Tools To replicate the example without additional graphs, turn off all of them, except PEN, on the home screen or in a program (A to any displayed x value Shading Areas of a Graph To shade an area...
..., you can use all equations and stat plots before entering the instructions as shown. 104 Chapter 6: Graph Tools To replicate the example without additional graphs, turn off all of them, except PEN, on the home screen or in a program (A to any displayed x value Shading Areas of a Graph To shade an area...
User Manual
Page 117
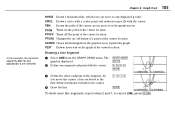
... the graph TEXT Draws characters on àoff the point at the cursor location PTCHG Changes the on the graph at the cursor location PTOFF Turns off status of the segment. to any displayed y value CIRCL Draws a circle with a center point and radius you move it on the graph screen ...PTON Turns on the point at the cursor location Drawing a Line Segment ᕡ Select LINE from the graph screen; The graph is displayed. ᕢ Define one ...
... the graph TEXT Draws characters on àoff the point at the cursor location PTCHG Changes the on the graph at the cursor location PTOFF Turns off status of the segment. to any displayed y value CIRCL Draws a circle with a center point and radius you move it on the graph screen ...PTON Turns on the point at the cursor location Drawing a Line Segment ᕡ Select LINE from the graph screen; The graph is displayed. ᕢ Define one ...
User Manual
Page 119
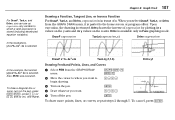
...plotting its x values on the y-axis and its y values on the x-axis. DrInv is stored (including deselected equation variables). " # ! $ ᕥ Turn off the pen. To cancel, press :. DrInv draws the inverse of x. Also, ZSTD was executed. b To draw more points, lines, or curves, ...repeat steps 2 through 5. To draw a diagonal line or curve, turn on the pen, press b b, press ! $ (or # ", and so on the pen. Upon execution, the drawing is selected. Chapter 6: Graph Tools 107 ...
...plotting its x values on the y-axis and its y values on the x-axis. DrInv is stored (including deselected equation variables). " # ! $ ᕥ Turn off the pen. To cancel, press :. DrInv draws the inverse of x. Also, ZSTD was executed. b To draw more points, lines, or curves, ...repeat steps 2 through 5. To draw a diagonal line or curve, turn on the pen, press b b, press ! $ (or # ", and so on the pen. Upon execution, the drawing is selected. Chapter 6: Graph Tools 107 ...

User Manual
Page 120
...enter text. Placing Text on ). - To cancel PTON, press :. n ¤ to the PEN example drawing. Points are turned on (or turn off) the point. " # ! $ ᕣ Turn on at (L5,5), (5,5), (5,L5), and (L5,L5). To erase a character when using TEXT, move the TEXT cursor above... ( Ï ) is selected. n 1 ãMä ãIä ãNä " # ! $ ãMä ãAä ãXä Turning On or Turning Off Points ᕡ Select PTON (or PTOFF) from the GRAPH DRAW menu. b To continue drawing points, repeat steps 2 and 3. Before you start, you want...
...enter text. Placing Text on ). - To cancel PTON, press :. n ¤ to the PEN example drawing. Points are turned on (or turn off) the point. " # ! $ ᕣ Turn on at (L5,5), (5,5), (5,L5), and (L5,L5). To erase a character when using TEXT, move the TEXT cursor above... ( Ï ) is selected. n 1 ãMä ãIä ãNä " # ! $ ãMä ãAä ãXä Turning On or Turning Off Points ᕡ Select PTON (or PTOFF) from the GRAPH DRAW menu. b To continue drawing points, repeat steps 2 and 3. Before you start, you want...

User Manual
Page 206
... box plot, and regular box plot. ᕡ Store the statistical data in the current equation editor as appropriate (Chapter 5). ᕣ Define the statistical plot. ᕤ Turn on the plots you select another plot type, some prompts may change a setting, select PLOT1, PLOT2, or PLOT3 from the STAT PLOT status screen menu...
... box plot, and regular box plot. ᕡ Store the statistical data in the current equation editor as appropriate (Chapter 5). ᕣ Define the statistical plot. ᕤ Turn on the plots you select another plot type, some prompts may change a setting, select PLOT1, PLOT2, or PLOT3 from the STAT PLOT status screen menu...

User Manual
Page 207
... right shows the stat plot editor for Plot3 PlOn [1,2,3] Turns on all three stat plots, select PlOn or PlOff from the STAT PLOT menu. Turning On and Turning Off a Stat Plot When you enter no arguments) or turns on specified plots only PlOff [1,2,3] Turns off all plots (if you display a stat plot editor... from the STAT PLOT menu. If you can use STAT PLOT menu items PlOn or PlOff to turn on or off specified plots only To turn off all plots (if you enter no arguments) or turns off . Press b. In this guidebook, brackets ( ã and ä ) with vectors and matrices. Each ...
... right shows the stat plot editor for Plot3 PlOn [1,2,3] Turns on all three stat plots, select PlOn or PlOff from the STAT PLOT menu. Turning On and Turning Off a Stat Plot When you enter no arguments) or turns on specified plots only PlOff [1,2,3] Turns off all plots (if you display a stat plot editor... from the STAT PLOT menu. If you can use STAT PLOT menu items PlOn or PlOff to turn on or off specified plots only To turn off all plots (if you enter no arguments) or turns off . Press b. In this guidebook, brackets ( ã and ä ) with vectors and matrices. Each ...

