User Guide
Page 4
China South Building, No.5 Keyuan Road, Central Zone, Science & Technology Park, Nanshan, Shenzhen, P. R. TP-LINK TECHNOLOGIES CO., LTD DECLARATION OF CONFORMITY For the following equipment: Product Description: Wireless N Router Model No.: TL-WR940N Trademark: TP-LINK We declare under our own responsibility that the above products satisfy all the technical regulations applicable to the product within the scope of...
China South Building, No.5 Keyuan Road, Central Zone, Science & Technology Park, Nanshan, Shenzhen, P. R. TP-LINK TECHNOLOGIES CO., LTD DECLARATION OF CONFORMITY For the following equipment: Product Description: Wireless N Router Model No.: TL-WR940N Trademark: TP-LINK We declare under our own responsibility that the above products satisfy all the technical regulations applicable to the product within the scope of...

User Guide
Page 5
... 4.4 QSS...18 4.5 Network ...24 4.5.1 LAN...24 4.5.2 WAN ...25 4.5.3 MAC Clone ...34 4.6 Wireless ...35 4.6.1 Wireless Settings 35 4.6.2 Wireless Security 38 4.6.3 Wireless MAC Filtering 41 4.6.4 Wireless Advanced 43 I TL-WR940N Wireless N Router CONTENTS Package Contents ...1 Chapter 1. Connecting the Router 6 2.1 System Requirements 6 2.2 Installation Environment Requirements 6 2.3 Connecting the Router 6 Chapter 3. Introduction...2 1.1 Overview of the Router 2 1.2 Conventions ...2 1.3 Main Features ...3 1.4 Panel Layout ...3 1.4.1 The Front Panel 3 1.4.2 The Rear Panel...
... 4.4 QSS...18 4.5 Network ...24 4.5.1 LAN...24 4.5.2 WAN ...25 4.5.3 MAC Clone ...34 4.6 Wireless ...35 4.6.1 Wireless Settings 35 4.6.2 Wireless Security 38 4.6.3 Wireless MAC Filtering 41 4.6.4 Wireless Advanced 43 I TL-WR940N Wireless N Router CONTENTS Package Contents ...1 Chapter 1. Connecting the Router 6 2.1 System Requirements 6 2.2 Installation Environment Requirements 6 2.3 Connecting the Router 6 Chapter 3. Introduction...2 1.1 Overview of the Router 2 1.2 Conventions ...2 1.3 Main Features ...3 1.4 Panel Layout ...3 1.4.1 The Front Panel 3 1.4.2 The Rear Panel...

User Guide
Page 7
TL-WR940N Wireless N Router 4.15.3 No-ip.com DDNS 78 4.16 System Tools ...79 4.16.1 Time Setting...80 4.16.2 Diagnostic...81 4.16.3 Firmware Upgrade 82 4.16.4 Factory Defaults 83 4.16.5 Backup & Restore 83 4.16.6 Reboot ...84 4.16.7 Password...85 4.16.8 System Log...85 4.16.9 Statistics ...88 Appendix A: FAQ...90 Appendix B: Configuring the PCs 95 Appendix C: Specifications ...99 III
TL-WR940N Wireless N Router 4.15.3 No-ip.com DDNS 78 4.16 System Tools ...79 4.16.1 Time Setting...80 4.16.2 Diagnostic...81 4.16.3 Firmware Upgrade 82 4.16.4 Factory Defaults 83 4.16.5 Backup & Restore 83 4.16.6 Reboot ...84 4.16.7 Password...85 4.16.8 System Log...85 4.16.9 Statistics ...88 Appendix A: FAQ...90 Appendix B: Configuring the PCs 95 Appendix C: Specifications ...99 III

User Guide
Page 8
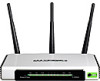
TL-WR940N Wireless N Router Package Contents The following items should be found in your package: ¾ TL-WR940N Wireless N Router ¾ DC Power Adapter for TL-WR940N Wireless N Router ¾ Quick Installation Guide ¾ Resource CD for TL-WR940N Wireless N Router, including: • This Guide • Other Helpful Information ) Note: Make sure that the package contains the above items. If any of the listed items are damaged or missing, please contact with your distributor. -1-
TL-WR940N Wireless N Router Package Contents The following items should be found in your package: ¾ TL-WR940N Wireless N Router ¾ DC Power Adapter for TL-WR940N Wireless N Router ¾ Quick Installation Guide ¾ Resource CD for TL-WR940N Wireless N Router, including: • This Guide • Other Helpful Information ) Note: Make sure that the package contains the above items. If any of the listed items are damaged or missing, please contact with your distributor. -1-
User Guide
Page 9
... the need of this guide stands for children or staff. Simple Installation Since the Router is compatible with all the major operating systems, it ideal for choosing the TL-WR940N Wireless N Router. 1.1 Overview of the Router The TL-WR940N Wireless N Router integrates 4-port Switch, Firewall, NAT-Router and Wireless AP. Multiple Security Protections With multiple protection measures, including SSID broadcast control and...
... the need of this guide stands for children or staff. Simple Installation Since the Router is compatible with all the major operating systems, it ideal for choosing the TL-WR940N Wireless N Router. 1.1 Overview of the Router The TL-WR940N Wireless N Router integrates 4-port Switch, Firewall, NAT-Router and Wireless AP. Multiple Security Protections With multiple protection measures, including SSID broadcast control and...

User Guide
Page 10
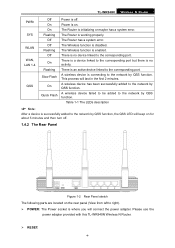
Name Status Indication -3- TL-WR940N Wireless N Router 1.3 Main Features ¾ Complies with IEEE 802.11n to provide a wireless data rate of up to 300Mbps. ¾ One 10/100M Auto-Negotiation RJ45 WAN port, four 10/100M Auto-Negotiation RJ45 LAN ports, ... filtering. ¾ Connects Internet on demand and disconnects from the Internet when idle for PPPoE. ¾ Provides 64/128/152-bit WEP encryption security and wireless LAN ACL (Access Control List). ¾ Supports Flow Statistics. ¾ Supports firmware upgrade and Web management. 1.4 Panel Layout 1.4.1 The Front Panel Figure 1-1 ...
Name Status Indication -3- TL-WR940N Wireless N Router 1.3 Main Features ¾ Complies with IEEE 802.11n to provide a wireless data rate of up to 300Mbps. ¾ One 10/100M Auto-Negotiation RJ45 WAN port, four 10/100M Auto-Negotiation RJ45 LAN ports, ... filtering. ¾ Connects Internet on demand and disconnects from the Internet when idle for PPPoE. ¾ Provides 64/128/152-bit WEP encryption security and wireless LAN ACL (Access Control List). ¾ Supports Flow Statistics. ¾ Supports firmware upgrade and Web management. 1.4 Panel Layout 1.4.1 The Front Panel Figure 1-1 ...
User Guide
Page 11
... on the rear panel (View from left to the corresponding port. Off There is no device linked to the network by QSS function. Please use the power adapter provided with this TL-WR940N Wireless N Router. ¾ RESET: -4- Quick Flash A wireless device failed to be added to the corresponding port. This process will connect the power adapter.
... on the rear panel (View from left to the corresponding port. Off There is no device linked to the network by QSS function. Please use the power adapter provided with this TL-WR940N Wireless N Router. ¾ RESET: -4- Quick Flash A wireless device failed to be added to the corresponding port. This process will connect the power adapter.
User Guide
Page 12
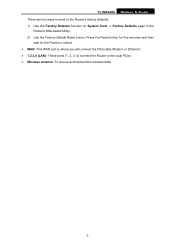
TL-WR940N Wireless N Router There are two ways to reset to the Router's factory defaults: 1) Use the Factory Defaults function on System Tools -> Factory Defaults page in the Router's Web-based Utility. 2) Use the Factory Default Reset button: Press the Reset button for five seconds and then wait for the Router to reboot. ¾ WAN: This WAN port is where you will connect the DSL/cable Modem, or Ethernet. ¾ 1,2,3,4 (LAN): These ports (1, 2, 3, 4) connect the Router to the local PC(s). ¾ Wireless antenna: To receive and transmit the wireless data. -5-
TL-WR940N Wireless N Router There are two ways to reset to the Router's factory defaults: 1) Use the Factory Defaults function on System Tools -> Factory Defaults page in the Router's Web-based Utility. 2) Use the Factory Default Reset button: Press the Reset button for five seconds and then wait for the Router to reboot. ¾ WAN: This WAN port is where you will connect the DSL/cable Modem, or Ethernet. ¾ 1,2,3,4 (LAN): These ports (1, 2, 3, 4) connect the Router to the local PC(s). ¾ Wireless antenna: To receive and transmit the wireless data. -5-

User Guide
Page 13
... can skip this step.) 5. Connect the power adapter to the following steps. Locate an optimum location for the Router. Adjust the direction of your ISP. The best place is a good direction. 4. TL-WR940N Wireless N Router Chapter 2. Connecting the Router 2.1 System Requirements ¾ Broadband Internet Access Service (DSL/Cable/Ethernet) ¾ One DSL/Cable Modem that , please...
... can skip this step.) 5. Connect the power adapter to the following steps. Locate an optimum location for the Router. Adjust the direction of your ISP. The best place is a good direction. 4. TL-WR940N Wireless N Router Chapter 2. Connecting the Router 2.1 System Requirements ¾ Broadband Internet Access Service (DSL/Cable/Ethernet) ¾ One DSL/Cable Modem that , please...

User Guide
Page 14
TL-WR940N Wireless N Router Figure 2-1 Hardware Installation of the TL-WR940N Wireless N Router -7-
TL-WR940N Wireless N Router Figure 2-1 Hardware Installation of the TL-WR940N Wireless N Router -7-
User Guide
Page 15
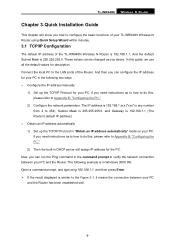
...Appendix B: "Configuring the PC." 2) Then the built-in "Obtain an IP address automatically" mode on your PC and the Router has been established well. -8- TL-WR940N Wireless N Router Chapter 3. The IP address is 192.168.1.xxx ("xxx" is any number from 2 to Appendix B: "Configuring the PC." ... values can configure the IP address for your TL-WR940N Wireless N Router using Quick Setup Wizard within minutes. 3.1 TCP/IP Configuration The default IP address of the Router. In this , please refer to the LAN ports of the TL-WR940N Wireless N Router is 255.255.255.0. The following two ways...
...Appendix B: "Configuring the PC." 2) Then the built-in "Obtain an IP address automatically" mode on your PC and the Router has been established well. -8- TL-WR940N Wireless N Router Chapter 3. The IP address is 192.168.1.xxx ("xxx" is any number from 2 to Appendix B: "Configuring the PC." ... values can configure the IP address for your TL-WR940N Wireless N Router using Quick Setup Wizard within minutes. 3.1 TCP/IP Configuration The default IP address of the Router. In this , please refer to the LAN ports of the TL-WR940N Wireless N Router is 255.255.255.0. The following two ways...
User Guide
Page 16
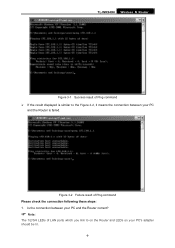
Is the connection between your PC and the Router correct? ) Note: The 1/2/3/4 LEDs of LAN ports which you link to the Figure 3-2, it means the connection between your PC's adapter should be lit. -9- Figure 3-2 Failure result of Ping command Please check the connection following these steps: 1. TL-WR940N Wireless N Router Figure 3-1 Success result of Ping command ¾ If the result displayed is similar to on the Router and LEDs on your PC and the Router is failed.
Is the connection between your PC and the Router correct? ) Note: The 1/2/3/4 LEDs of LAN ports which you link to the Figure 3-2, it means the connection between your PC's adapter should be lit. -9- Figure 3-2 Failure result of Ping command Please check the connection following these steps: 1. TL-WR940N Wireless N Router Figure 3-1 Success result of Ping command ¾ If the result displayed is similar to on the Router and LEDs on your PC and the Router is failed.
User Guide
Page 17
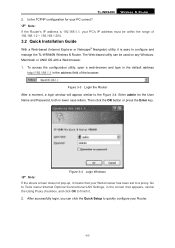
Is the TCP/IP configuration for the User Name and Password, both in the screen that your Router. -10- Figure 3-3 Login the Router After a moment, a login window will appear, similar to finish it. 2. Go to Tools...-based utility can click the Quick Setup to quickly configure your Web-browser has been set to configure and manage the TL-WR940N Wireless N Router. Then click the OK button or press the Enter key. ) Note: Figure 3-4 Login Windows If the above screen... it means that appears, cancel the Using Proxy checkbox, and click OK to the Figure 3-4. TL-WR940N Wireless N Router 2.
Is the TCP/IP configuration for the User Name and Password, both in the screen that your Router. -10- Figure 3-3 Login the Router After a moment, a login window will appear, similar to finish it. 2. Go to Tools...-based utility can click the Quick Setup to quickly configure your Web-browser has been set to configure and manage the TL-WR940N Wireless N Router. Then click the OK button or press the Enter key. ) Note: Figure 3-4 Login Windows If the above screen... it means that appears, cancel the Using Proxy checkbox, and click OK to the Figure 3-4. TL-WR940N Wireless N Router 2.
User Guide
Page 18
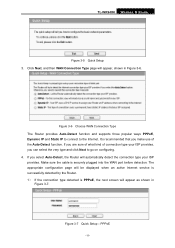
TL-WR940N Wireless N Router Figure 3-5 Quick Setup 3. It's recommended that you make use of connection type... PPPoE -11- The appropriate configuration page will be displayed when an active Internet service is successfully detected by the Router. 1) If the connection type detected is securely plugged into the WAN port before detection. Click Next, and...provides, you are sure of what kind of the Auto-Detect function. Figure 3-6 Choose WAN Connection Type The Router provides Auto-Detect function and supports three popular ways PPPoE, Dynamic IP and Static IP to connect to go ...
TL-WR940N Wireless N Router Figure 3-5 Quick Setup 3. It's recommended that you make use of connection type... PPPoE -11- The appropriate configuration page will be displayed when an active Internet service is successfully detected by the Router. 1) If the connection type detected is securely plugged into the WAN port before detection. Click Next, and...provides, you are sure of what kind of the Auto-Detect function. Figure 3-6 Choose WAN Connection Type The Router provides Auto-Detect function and supports three popular ways PPPoE, Dynamic IP and Static IP to connect to go ...

User Guide
Page 19
... the WAN IP address as shown in Figure 3-9. -12- Static IP ¾ IP Address - Then you have difficulty with the wireless configuration. 3) If the connection type detected is Static IP, the next screen will appear as shown in Figure 3-8. Enter the gateway...required. ¾ Secondary DNS - Figure 3-8 Quick Setup - Click Next to continue, the Wireless settings page will appear as shown in Figure 3-9. These fields are case sensitive. Enter the DNS Server IP address into this process, please contact your ISP. TL-WR940N Wireless N Router ¾ User Name and Password -
... the WAN IP address as shown in Figure 3-9. -12- Static IP ¾ IP Address - Then you have difficulty with the wireless configuration. 3) If the connection type detected is Static IP, the next screen will appear as shown in Figure 3-8. Enter the gateway...required. ¾ Secondary DNS - Figure 3-8 Quick Setup - Click Next to continue, the Wireless settings page will appear as shown in Figure 3-9. These fields are case sensitive. Enter the DNS Server IP address into this process, please contact your ISP. TL-WR940N Wireless N Router ¾ User Name and Password -

User Guide
Page 20
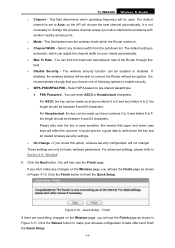
TL-WR940N Wireless N Router Figure 3-9 Quick Setup - Wireless ¾ Wireless Radio - Enable or disable the wireless radio choosing from the pull-down list. This value is NOT the same as test. ¾ Region - Select your local region from the pull-down list. ¾ SSID - This field specifies the region where the wireless..., please contact your network. Enter a value of each Router's MAC address). It may be TP-LINK_XXXXXX (XXXXXX indicates the last unique six numbers of up to use the wireless function of the Router in a region other than one of those specified in ...
TL-WR940N Wireless N Router Figure 3-9 Quick Setup - Wireless ¾ Wireless Radio - Enable or disable the wireless radio choosing from the pull-down list. This value is NOT the same as test. ¾ Region - Select your local region from the pull-down list. ¾ SSID - This field specifies the region where the wireless..., please contact your network. Enter a value of each Router's MAC address). It may be TP-LINK_XXXXXX (XXXXXX indicates the last unique six numbers of up to use the wireless function of the Router in a region other than one of those specified in ...
User Guide
Page 21
... channel width from the pull-down the key and all related wireless security settings. ¾ No Change - TL-WR940N Wireless N Router ¾ Channel - Select any letters A to connect the Router without encryption. This field determines the wireless mode which operating frequency will be used. If disabled, the wireless stations will be able to Z, the length should be made...
... channel width from the pull-down the key and all related wireless security settings. ¾ No Change - TL-WR940N Wireless N Router ¾ Channel - Select any letters A to connect the Router without encryption. This field determines the wireless mode which operating frequency will be used. If disabled, the wireless stations will be able to Z, the length should be made...
User Guide
Page 23
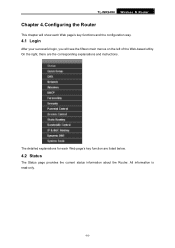
On the right, there are listed below. 4.2 Status The Status page provides the current status information about the Router. The detailed explanations for each Web page's key functions and the configuration way. 4.1 Login After your successful login, you will see the fifteen main menus on the left of the Web-based utility. All information is read-only. -16- Configuring the Router This chapter will show each Web page's key function are the corresponding explanations and instructions. TL-WR940N Wireless N Router Chapter 4.
On the right, there are listed below. 4.2 Status The Status page provides the current status information about the Router. The detailed explanations for each Web page's key functions and the configuration way. 4.1 Login After your successful login, you will see the fifteen main menus on the left of the Web-based utility. All information is read-only. -16- Configuring the Router This chapter will show each Web page's key function are the corresponding explanations and instructions. TL-WR940N Wireless N Router Chapter 4.
User Guide
Page 44
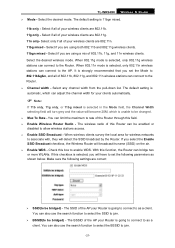
... 11bgn mixed. 11b only - The SSID of the Router through this box to the AP. TL-WR940N Wireless N Router ¾ Mode - Select if you select the Enable SSID Broadcast checkbox, the Wireless Router will detect the SSID broadcast by the Router. When 802.11n mode is selected, only 802.11g wireless stations can also use the search function to...
... 11bgn mixed. 11b only - The SSID of the Router through this box to the AP. TL-WR940N Wireless N Router ¾ Mode - Select if you select the Enable SSID Broadcast checkbox, the Wireless Router will detect the SSID broadcast by the Router. When 802.11n mode is selected, only 802.11g wireless stations can also use the search function to...
User Guide
Page 101
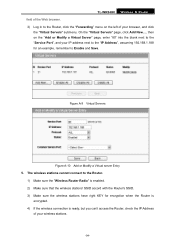
Figure A-9 Virtual Servers Figure A-10 Add or Modify a Virtual server Entry 5. TL-WR940N Wireless N Router field of the Web browser. 3) Log in to the Router, click the "Forwarding" menu on the "Add or Modify a Virtual Server" page, enter "80" into the blank next to the ...188 for an example, remember to the Router. 1) Make sure the "Wireless Router Radio" is enabled. 2) Make sure that the wireless stations' SSID accord with the Router's SSID. 3) Make sure the wireless stations have right KEY for encryption when the Router is encrypted. 4) If the wireless connection is ready, but you can't ...
Figure A-9 Virtual Servers Figure A-10 Add or Modify a Virtual server Entry 5. TL-WR940N Wireless N Router field of the Web browser. 3) Log in to the Router, click the "Forwarding" menu on the "Add or Modify a Virtual Server" page, enter "80" into the blank next to the ...188 for an example, remember to the Router. 1) Make sure the "Wireless Router Radio" is enabled. 2) Make sure that the wireless stations' SSID accord with the Router's SSID. 3) Make sure the wireless stations have right KEY for encryption when the Router is encrypted. 4) If the wireless connection is ready, but you can't ...


