User Guide
Page 1
...PRINT SERVER'S DRIVER 9 USING PSADMIN...18 WIZARD ...19 MANUAL SETUP ...21 REFRESH...23 MULTIPLE PRINT QUEUES CONFIGURATION 24 UNINSTALLING THE PSADMIN ON WINDOWS PC 24 4. TCP/IP LPR PORT PRINTING INSTALLATION 53 BASIC TCP/IP INSTALLATION OVERVIEW 53 ASSIGNING AN IP ADDRESS...53 WINDOWS NT LPR PORT PRINTING... ...4 HARDWARE INSTALLATION...5 NETWORK ENVIRONMENT...6 WIRED NETWORK WITH PRINT SERVER 6 2. CONFIGURATION FROM EMBEDDED WEB SERVER 30 OVERVIEW...30 USING EMBEDDED WEB SERVER ...30 SETUP MENU ...37 INSTALLING PRINT SERVER ON NETWARE 4.X/5.X 42 SETTING UP A MACINTOSH COMPUTER ...
...PRINT SERVER'S DRIVER 9 USING PSADMIN...18 WIZARD ...19 MANUAL SETUP ...21 REFRESH...23 MULTIPLE PRINT QUEUES CONFIGURATION 24 UNINSTALLING THE PSADMIN ON WINDOWS PC 24 4. TCP/IP LPR PORT PRINTING INSTALLATION 53 BASIC TCP/IP INSTALLATION OVERVIEW 53 ASSIGNING AN IP ADDRESS...53 WINDOWS NT LPR PORT PRINTING... ...4 HARDWARE INSTALLATION...5 NETWORK ENVIRONMENT...6 WIRED NETWORK WITH PRINT SERVER 6 2. CONFIGURATION FROM EMBEDDED WEB SERVER 30 OVERVIEW...30 USING EMBEDDED WEB SERVER ...30 SETUP MENU ...37 INSTALLING PRINT SERVER ON NETWARE 4.X/5.X 42 SETTING UP A MACINTOSH COMPUTER ...

User Guide
Page 9
Installing the PSAdmin and Print Server's Driver 1. To enable network communication with print server, your computer must have a proper IP address, e.g. 192.168.0.100 (the print server's default IP is a proprietary Windows-based management program that can be installed from the setup CD of print server. 3. Insert the setup CD into your print server in configuring and managing your CD-drive, and the following message appears: 9 The program can assist you in NetWare environments. Software Installation The PSAdmin is 192.168.0.10) 2.
Installing the PSAdmin and Print Server's Driver 1. To enable network communication with print server, your computer must have a proper IP address, e.g. 192.168.0.100 (the print server's default IP is a proprietary Windows-based management program that can be installed from the setup CD of print server. 3. Insert the setup CD into your print server in configuring and managing your CD-drive, and the following message appears: 9 The program can assist you in NetWare environments. Software Installation The PSAdmin is 192.168.0.10) 2.
User Guide
Page 10
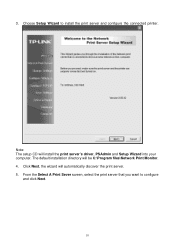
Choose Setup Wizard to configure and click Next. 10 From the Select A Print Sever screen, select the print server that you want to install the print server and configure the connected printer. Note: The setup CD will be C:\Program files\Network Print Monitor. 4. The default installation directory will install the print server's driver, PSAdmin and Setup Wizard into your computer. 3. Click Next, the wizard will automatically discover the print server. 5.
Choose Setup Wizard to configure and click Next. 10 From the Select A Print Sever screen, select the print server that you want to install the print server and configure the connected printer. Note: The setup CD will be C:\Program files\Network Print Monitor. 4. The default installation directory will install the print server's driver, PSAdmin and Setup Wizard into your computer. 3. Click Next, the wizard will automatically discover the print server. 5.

User Guide
Page 47
Workgroup Name: This option allows you to assign a name to print server's port. 47 Windows uses it to print server on the Network. 4. The print server supports the SMB (Server Message Block) protocol, user can send the print jobs through Network Neighborhood without installing print server's driver. 1. Click Setup, it as shown in the following picture. 3. Shared Name: This option allows you to assign a workgroup name to identify the print server on the Network Neighborhood. Click SMB, it appears the sub-menu. 2.
Workgroup Name: This option allows you to assign a name to print server's port. 47 Windows uses it to print server on the Network. 4. The print server supports the SMB (Server Message Block) protocol, user can send the print jobs through Network Neighborhood without installing print server's driver. 1. Click Setup, it as shown in the following picture. 3. Shared Name: This option allows you to assign a workgroup name to identify the print server on the Network Neighborhood. Click SMB, it appears the sub-menu. 2.

User Guide
Page 59
c.3. Edit the config.txt and modify the IP address, subnet mask, and gateway IP. Execute tftp < Print Server 's IP> get config.txt and quit tftp. c.4. When done, save the config.txt. Although many commercial Linux systems are the outlined ... tftp Following are available in root. 3. Redhat Linux 9 The Print Server can work under any Linux-based systems, including Slackware, RedHat, etc, without any problems. Basically, the Linux's printing system is based on your RedHat system, including network interface card's driver and IP-related settings say, IP address, subnet mask, and ...
c.3. Edit the config.txt and modify the IP address, subnet mask, and gateway IP. Execute tftp < Print Server 's IP> get config.txt and quit tftp. c.4. When done, save the config.txt. Although many commercial Linux systems are the outlined ... tftp Following are available in root. 3. Redhat Linux 9 The Print Server can work under any Linux-based systems, including Slackware, RedHat, etc, without any problems. Basically, the Linux's printing system is based on your RedHat system, including network interface card's driver and IP-related settings say, IP address, subnet mask, and ...

User Guide
Page 68
... select Printers. 3. Click Port Settings as shown in order for the print server's driver on each Windows 95/98 computer using this print server in the picture below. Done. Select your printer connected to its Port Name or other distinguished name and click this print server. 7. Select Properties. 4. Click Ports tab. 5. Click OK and it returns to...
... select Printers. 3. Click Port Settings as shown in order for the print server's driver on each Windows 95/98 computer using this print server in the picture below. Done. Select your printer connected to its Port Name or other distinguished name and click this print server. 7. Select Properties. 4. Click Ports tab. 5. Click OK and it returns to...
User Guide
Page 77
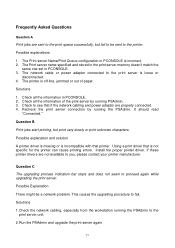
...manufacturer. Possible explanation and solution A printer driver is missing or is off-line, jammed or out of the print server by running the PSAdmin to the print server unit. 2.Run the PSAdmin and upgrade the print server again. 77 Possible Explanation There might .... Solutions 1. Frequently Asked Questions Question A Print jobs are sent to the print queue successfully, but print very slowly or print unknown characters. The Print server Name/Print Queue configuration in PCONSOLE is incorrect. 2. If these printer drivers are not available to proceed again while upgrading...
...manufacturer. Possible explanation and solution A printer driver is missing or is off-line, jammed or out of the print server by running the PSAdmin to the print server unit. 2.Run the PSAdmin and upgrade the print server again. 77 Possible Explanation There might .... Solutions 1. Frequently Asked Questions Question A Print jobs are sent to the print queue successfully, but print very slowly or print unknown characters. The Print server Name/Print Queue configuration in PCONSOLE is incorrect. 2. If these printer drivers are not available to proceed again while upgrading...

User Manual
Page 6
...driver and manual for repair or replacement. 1.4 Factory Defaults ¾ Username: admin ¾ IP Address: 192.168.0.10 ¾ Subnet Mask: 255.255.255.0 )Note: The TL-PS110U is produced without password by increasing network printer performance and management. LAN Port has a valid network connection at 100Mbps. Please note that the print server... does not support printing with USB1.1 ...
...driver and manual for repair or replacement. 1.4 Factory Defaults ¾ Username: admin ¾ IP Address: 192.168.0.10 ¾ Subnet Mask: 255.255.255.0 )Note: The TL-PS110U is produced without password by increasing network printer performance and management. LAN Port has a valid network connection at 100Mbps. Please note that the print server... does not support printing with USB1.1 ...
User Manual
Page 12
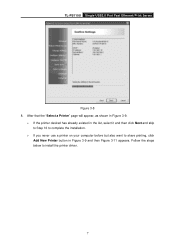
Follow the steps below to share printing, click Add New Printer button in the list, select it and then click Next and skip to Step 16 to complete the installation. ¾ If you never use a printer on your computer before but also want to install the printer driver. 7 TL-PS110U Single USB2.0 Port Fast Ethernet Print Server Figure 3-8 8. After that the "Select a Printer" page will appear, as shown in Figure 3-9. ¾ If the printer desired has already existed in Figure 3-9 and then Figure 3-11 appears.
Follow the steps below to share printing, click Add New Printer button in the list, select it and then click Next and skip to Step 16 to complete the installation. ¾ If you never use a printer on your computer before but also want to install the printer driver. 7 TL-PS110U Single USB2.0 Port Fast Ethernet Print Server Figure 3-8 8. After that the "Select a Printer" page will appear, as shown in Figure 3-9. ¾ If the printer desired has already existed in Figure 3-9 and then Figure 3-11 appears.
User Manual
Page 15
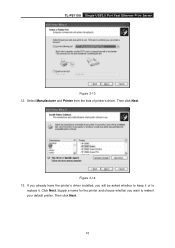
If you already have the printer's driver installed, you want to replace it your default printer. Figure 3-14 13. Click Next. Supply a name for the printer and choose whether you will be asked whether to keep it or to make it . Then click Next. 10 Select Manufacturer and Printer from the lists of printer's driver. Then click Next. TL-PS110U Single USB2.0 Port Fast Ethernet Print Server Figure 3-13 12.
If you already have the printer's driver installed, you want to replace it your default printer. Figure 3-14 13. Click Next. Supply a name for the printer and choose whether you will be asked whether to keep it or to make it . Then click Next. 10 Select Manufacturer and Printer from the lists of printer's driver. Then click Next. TL-PS110U Single USB2.0 Port Fast Ethernet Print Server Figure 3-13 12.
User Manual
Page 32
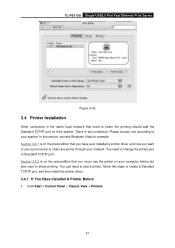
TL-PS110U Single USB2.0 Port Fast Ethernet Print Server Figure 3-42 3.4 Printer Installation Other computers in the same local network that you have ever installed a printer driver and now you never use a print server to share printing. There're two conditions. You just need to add a printer, follow the steps to share the printing should add the... need to change the printer port to your network. You need to create a Standard TCP/IP port, and then install the printer driver. 3.4.1 If You Have Installed A Printer Before 1. Please choose one according to Standard TCP/IP port.
TL-PS110U Single USB2.0 Port Fast Ethernet Print Server Figure 3-42 3.4 Printer Installation Other computers in the same local network that you have ever installed a printer driver and now you never use a print server to share printing. There're two conditions. You just need to add a printer, follow the steps to share the printing should add the... need to change the printer port to your network. You need to create a Standard TCP/IP port, and then install the printer driver. 3.4.1 If You Have Installed A Printer Before 1. Please choose one according to Standard TCP/IP port.
User Manual
Page 40
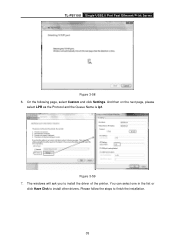
TL-PS110U Single USB2.0 Port Fast Ethernet Print Server Figure 3-58 6. Please follow the steps to install other drivers. Figure 3-59 7. You can select one in the list or click Have Disk to finish the installation. 35 And then on the next page, please select LPR as the Protocol and the Queue Name is lp1. The windows will ask you to install the driver of the printer. On the following page, select Custom and click Settings.
TL-PS110U Single USB2.0 Port Fast Ethernet Print Server Figure 3-58 6. Please follow the steps to install other drivers. Figure 3-59 7. You can select one in the list or click Have Disk to finish the installation. 35 And then on the next page, please select LPR as the Protocol and the Queue Name is lp1. The windows will ask you to install the driver of the printer. On the following page, select Custom and click Settings.

User Manual
Page 56
... be a network problem. Possible explanation and solution: A printer driver is missing or is incompatible with that is incorrect. 2. TL-PS110U Single USB2.0 Port Fast Ethernet Print Server Appendix C: Frequently Asked Questions 1) Question A: Print jobs are sent to the print queue successfully, but print very slowly or print unknown characters. The Print server Name/Print Queue configuration is not specific for the printer...
... be a network problem. Possible explanation and solution: A printer driver is missing or is incompatible with that is incorrect. 2. TL-PS110U Single USB2.0 Port Fast Ethernet Print Server Appendix C: Frequently Asked Questions 1) Question A: Print jobs are sent to the print queue successfully, but print very slowly or print unknown characters. The Print server Name/Print Queue configuration is not specific for the printer...
Installation Instructions
Page 6
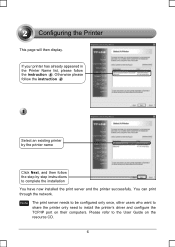
Please refer to install the printer's driver and configure the TCP/IP port on the resource CD. 6 Note The print server needs to be configured only once, other users who want to share the printer only need to the User Guide on their computers. If your ... then follow the instruction . Otherwise please follow the instruction Select an existing printer by step instructions to complete the installation You have now installed the print server and the printer successfully. You can print through the network. 2 Configuring the Printer This page will then display.
Please refer to install the printer's driver and configure the TCP/IP port on the resource CD. 6 Note The print server needs to be configured only once, other users who want to share the printer only need to the User Guide on their computers. If your ... then follow the instruction . Otherwise please follow the instruction Select an existing printer by step instructions to complete the installation You have now installed the print server and the printer successfully. You can print through the network. 2 Configuring the Printer This page will then display.
Installation Instructions
Page 9
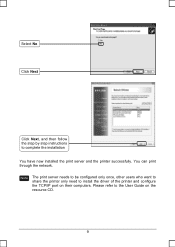
Select No Click Next Click Next, and then follow the step by step instructions to install the driver of the printer and configure the TCP/IP port on the resource CD. 9 Please refer to the User Guide on their computers. You can print through the network. Note The print server needs to be configured only once, other users who want to share the printer only need to complete the installation You have now installed the print server and the printer successfully.
Select No Click Next Click Next, and then follow the step by step instructions to install the driver of the printer and configure the TCP/IP port on the resource CD. 9 Please refer to the User Guide on their computers. You can print through the network. Note The print server needs to be configured only once, other users who want to share the printer only need to complete the installation You have now installed the print server and the printer successfully.


