CD-RW890 Manual
Page 4
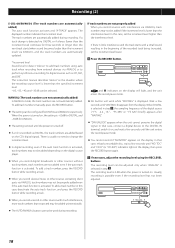
...receiver. < Do not open the cabinet as this unit. 4 Use a clean, dry cloth. < Keep this manual in direct sunlight or close the disc tray. < Do not attempt to clean the unit with the disc loaded ...20 Finalize 21 Unfinalize 21 Erasing the Last Track (CD-RW 22 Erasing All Tracks (CD-RW 23 Erasing All Tracks In Refresh Mode (CD-RW 24 Troubleshooting 25 Messages 26 Specifications 27 Read... 95°F). WHEN MOVING THIS UNIT When changing the unit's location or packing the unit for choosing TEAC. If you for moving, be sure to remove the disc. DO NOT MOVE THE UNIT DURING PLAYBACK...
...receiver. < Do not open the cabinet as this unit. 4 Use a clean, dry cloth. < Keep this manual in direct sunlight or close the disc tray. < Do not attempt to clean the unit with the disc loaded ...20 Finalize 21 Unfinalize 21 Erasing the Last Track (CD-RW 22 Erasing All Tracks (CD-RW 23 Erasing All Tracks In Refresh Mode (CD-RW 24 Troubleshooting 25 Messages 26 Specifications 27 Read... 95°F). WHEN MOVING THIS UNIT When changing the unit's location or packing the unit for choosing TEAC. If you for moving, be sure to remove the disc. DO NOT MOVE THE UNIT DURING PLAYBACK...
CD-RW890 Manual
Page 9
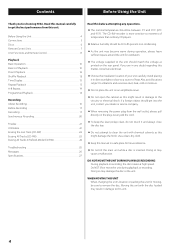
...the REMOTE SENSOR. 9 During recording, use this button to erase or unfinalize a CD-RW disc. f CLEAR Use this button to the names of a track. Note: To simplify explanations, instructions in this manual refer to clear programmed tracks. Main unit and Remote control unit Only on Remote control...button to select the mode of the disc, etc. g PROGRAM CHECK Use this button to pause playback or recording. are displayed. M AUTO/MANUAL Use this button to skip tracks. K PHONES For private listening, first reduce the volume level to select track numbers. a Numeric buttons Use these...
...the REMOTE SENSOR. 9 During recording, use this button to erase or unfinalize a CD-RW disc. f CLEAR Use this button to the names of a track. Note: To simplify explanations, instructions in this manual refer to clear programmed tracks. Main unit and Remote control unit Only on Remote control...button to select the mode of the disc, etc. g PROGRAM CHECK Use this button to pause playback or recording. are displayed. M AUTO/MANUAL Use this button to skip tracks. K PHONES For private listening, first reduce the volume level to select track numbers. a Numeric buttons Use these...
CD-RW890 Manual
Page 17
... or in the middle of a track, the playback time may occur when the track changes. 1 Load a recordable CD-R or CD-RW disc into the stop mode. Press the AUTO/MANUAL button repeatedly to continuous music such as the actual length of the track. < When track numbers are separated based on... an audio CD cannot be recorded . < If the Stop (H) button or Pause (J) button is displayed. Once finalized, a CD-R disc is "fixed" and behaves...
... or in the middle of a track, the playback time may occur when the track changes. 1 Load a recordable CD-R or CD-RW disc into the stop mode. Press the AUTO/MANUAL button repeatedly to continuous music such as the actual length of the track. < When track numbers are separated based on... an audio CD cannot be recorded . < If the Stop (H) button or Pause (J) button is displayed. Once finalized, a CD-R disc is "fixed" and behaves...
CD-RW890 Manual
Page 18
This instruction manual describes "silence" as CD, MD, and DAT. If track numbers are not added even if ... a record or other sources with much interference, more track numbers than expected may be added unintentionally. < The AUTO/MANUAL button cannot be added if the increment level is activated. In this case, deactivate the auto track function, and press...are not properly added When you record sources with a small sound resulting in step 2 . To add track numbers manually, press the RECORD button. < The setting can be configured for three seconds or longer then the next track ...
This instruction manual describes "silence" as CD, MD, and DAT. If track numbers are not added even if ... a record or other sources with much interference, more track numbers than expected may be added unintentionally. < The AUTO/MANUAL button cannot be added if the increment level is activated. In this case, deactivate the auto track function, and press...are not properly added When you record sources with a small sound resulting in step 2 . To add track numbers manually, press the RECORD button. < The setting can be configured for three seconds or longer then the next track ...
CD-RW890 Manual
Page 19
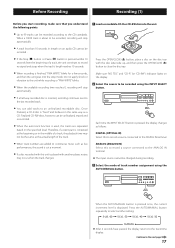
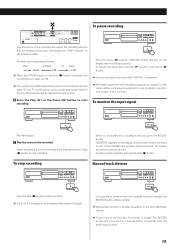
... "OVER" indicator on the source (record, cassette tape, CD, etc.). To stop recording. To restart recording, press the Play (y) button or the Pause (J) button. < You cannot restart recording while "WAITING" is finalized, it is possible to stop recording Manual track division Press the Stop (H) button to 0 dB....level meter. Exit the monitor mode by pressing the RECORD button while recording. < Manual track division is paused or stopped, a new track number will not work if it can be played with another CD player. It is not possible to record in two "stages" within 10 seconds...
... "OVER" indicator on the source (record, cassette tape, CD, etc.). To stop recording. To restart recording, press the Play (y) button or the Pause (J) button. < You cannot restart recording while "WAITING" is finalized, it is possible to stop recording Manual track division Press the Stop (H) button to 0 dB....level meter. Exit the monitor mode by pressing the RECORD button while recording. < Manual track division is paused or stopped, a new track number will not work if it can be played with another CD player. It is not possible to record in two "stages" within 10 seconds...
CD-RW890 Manual
Page 20
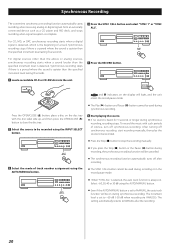
For CD, MD, or DAT, synchronous recording starts when a digital signal is detected, which is detected. Synchronous recording stops if there is a period where the sound is always on the disc tray with such periods of a track. The increment level is set to MANUAL, the auto track function ... signals from an externally connected device such as a CD player and MD deck, and stops recording when signal reception is set to MANUAL after recording. < The SYNC 1/ALL button cannot be recorded using the AUTO/MANUAL button. < Even if the AUTO/MANUAL button is complete. 4 Press the SYNC 1/ALL ...
For CD, MD, or DAT, synchronous recording starts when a digital signal is detected, which is detected. Synchronous recording stops if there is a period where the sound is always on the disc tray with such periods of a track. The increment level is set to MANUAL, the auto track function ... signals from an externally connected device such as a CD player and MD deck, and stops recording when signal reception is set to MANUAL after recording. < The SYNC 1/ALL button cannot be recorded using the AUTO/MANUAL button. < Even if the AUTO/MANUAL button is complete. 4 Press the SYNC 1/ALL ...

CD-RW890 Manual
Page 27
...please take them to applicable collection points, in accordance with a chemical symbol. Specifications Media type CD-RW and CD-R for Digital audio (record and playback) CD (playback only) Frequency converter input sampling frequency 32 kHz, 44.1 kHz, 48 kHz Recording ...lbs) Standard Accessories Remote control unit (RC-1275) x 1 Battery (AA, R6, SUM-3) x 2 RCA cable x 2 Optical digital cable x 1 Owner's manual x 1 Warranty card x 1 < Design and specifications are subject to save valuable resources and prevent any potential negative effects on the products, packaging, and/or ...
...please take them to applicable collection points, in accordance with a chemical symbol. Specifications Media type CD-RW and CD-R for Digital audio (record and playback) CD (playback only) Frequency converter input sampling frequency 32 kHz, 44.1 kHz, 48 kHz Recording ...lbs) Standard Accessories Remote control unit (RC-1275) x 1 Battery (AA, R6, SUM-3) x 2 RCA cable x 2 Optical digital cable x 1 Owner's manual x 1 Warranty card x 1 < Design and specifications are subject to save valuable resources and prevent any potential negative effects on the products, packaging, and/or ...
