CD-RW890 Brochure
Page 1
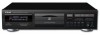
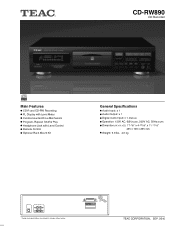
CAUTION AC IN TEAC CORPORATION, SEP. 2010 CD-RW890 CD Recorder Main Features CD-R and CD-RW Recording FL Display with Level Meter Centre-mounted Drive Mechanism Program, Repeat, Shuffle Play Headphone Jack with Level Control Remote Control Optional Rack Mount Kit General Specifications Audio Input: x 1 Audio Output: x 1 Digital Audio Input: x 1 (Optical) Operation: 120V AC, 60Hz (US), 230V AC, 50Hz (EUR) Dimention (W x H x D): 17-1/8" x 4-15/16" x 11-11/16" 435 x 100 x 295 mm Weight: 9.9 lbs. 4.5 kg Rev. 1 SEP01-10 ...
CAUTION AC IN TEAC CORPORATION, SEP. 2010 CD-RW890 CD Recorder Main Features CD-R and CD-RW Recording FL Display with Level Meter Centre-mounted Drive Mechanism Program, Repeat, Shuffle Play Headphone Jack with Level Control Remote Control Optional Rack Mount Kit General Specifications Audio Input: x 1 Audio Output: x 1 Digital Audio Input: x 1 (Optical) Operation: 120V AC, 60Hz (US), 230V AC, 50Hz (EUR) Dimention (W x H x D): 17-1/8" x 4-15/16" x 11-11/16" 435 x 100 x 295 mm Weight: 9.9 lbs. 4.5 kg Rev. 1 SEP01-10 ...

CD-RW890 Manual
Page 2
... manufacturer's instructions. 8) Do not install near any way, such as power-supply cord or plug is used , use this apparatus in a confined space such as vases, on the apparatus. < Do not install this apparatus near water. 6) Clean only with its POWER or STANDBY/ON switch not in the literature accompanying the appliance. A polarized plug has two blades with the product because excessive sound pressure (volume) from...
... manufacturer's instructions. 8) Do not install near any way, such as power-supply cord or plug is used , use this apparatus in a confined space such as vases, on the apparatus. < Do not install this apparatus near water. 6) Clean only with its POWER or STANDBY/ON switch not in the literature accompanying the appliance. A polarized plug has two blades with the product because excessive sound pressure (volume) from...
CD-RW890 Manual
Page 3
... A SERVICE REFERRAL. Optical pickup : Type: SF-DS1XD Manufacturer: SANYO ELECTRIC CO., LTD. Laser output: Less than 1.6 mW (Play) on the objective lens Less than 47 mW (Record) on the objective lens Less than 13 mW (Erase) on a circuit different from that interference will void the user's warranty. DO NOT USE THE PRODUCT UNTIL IT HAS BEEN REPAIRED. { For U.S.A. < USE OF CONTROLS OR ADJUSTMENTS...
... A SERVICE REFERRAL. Optical pickup : Type: SF-DS1XD Manufacturer: SANYO ELECTRIC CO., LTD. Laser output: Less than 1.6 mW (Play) on the objective lens Less than 47 mW (Record) on the objective lens Less than 13 mW (Erase) on a circuit different from that interference will void the user's warranty. DO NOT USE THE PRODUCT UNTIL IT HAS BEEN REPAIRED. { For U.S.A. < USE OF CONTROLS OR ADJUSTMENTS...
CD-RW890 Manual
Page 4
Before Using the Unit 4 Connections 5 Discs 6 Remote Control Unit 7 Unit Functions and Remote Control 8 Playback Basic Operation 10 Basics of Playback 10 Direct Playback 12 Shuffle Playback 12 Time Display 13 Repeat Playback 13 A-B Repeat 14 Programmed Playback 14 Recording About Recording 16 Before Recording 17 Recording 17 Synchronous Recording 20 Finalize 21 Unfinalize 21 Erasing the Last Track (CD-RW 22 Erasing All Tracks (CD-RW 23 Erasing All Tracks In Refresh Mode (CD-RW 24 Troubleshooting 25 Messages 26 Specifications 27 Read this before attempting...
Before Using the Unit 4 Connections 5 Discs 6 Remote Control Unit 7 Unit Functions and Remote Control 8 Playback Basic Operation 10 Basics of Playback 10 Direct Playback 12 Shuffle Playback 12 Time Display 13 Repeat Playback 13 A-B Repeat 14 Programmed Playback 14 Recording About Recording 16 Before Recording 17 Recording 17 Synchronous Recording 20 Finalize 21 Unfinalize 21 Erasing the Last Track (CD-RW 22 Erasing All Tracks (CD-RW 23 Erasing All Tracks In Refresh Mode (CD-RW 24 Troubleshooting 25 Messages 26 Specifications 27 Read this before attempting...
CD-RW890 Manual
Page 5
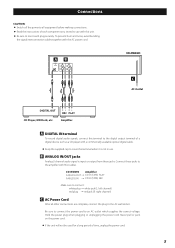
... is input or output from these jacks to an AC outlet which supplies the correct voltage. Connections CAUTION: < Switch off the power to all other connections are complete, connect the plug to the AC wall socket. CD-RW890 Amplifier ANALOG OUT q CD-R (TAPE) PLAY ANALOG IN q CD-R (TAPE) REC Make sure to connect: white plug q white jack (L: left channel) red plug q red jack (R: right channel) C AC Power Cord After all equipment before making connections. < Read the instructions of time, unplug the power cord. 5
... is input or output from these jacks to an AC outlet which supplies the correct voltage. Connections CAUTION: < Switch off the power to all other connections are complete, connect the plug to the AC wall socket. CD-RW890 Amplifier ANALOG OUT q CD-R (TAPE) PLAY ANALOG IN q CD-R (TAPE) REC Make sure to connect: white plug q white jack (L: left channel) red plug q red jack (R: right channel) C AC Power Cord After all equipment before making connections. < Read the instructions of time, unplug the power cord. 5
CD-RW890 Manual
Page 6
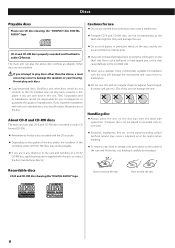
... one side.) < Scratches, fingerprints, dirt, etc. If you experience problems with the label side uppermost. (Compact discs can play discs other discs which do not use CD discs bearing the "COMPACT disc DIGITAL AUDIO" logo. Recordable discs CD-R and CD-RW discs bearing the "DIGITAL AUDIO" logo How to remove the disc How to hold the disc 6 Discs Playable discs Please use any protective coating spray. < Use a soft oil-based felt-tipped pen to write the information...
... one side.) < Scratches, fingerprints, dirt, etc. If you experience problems with the label side uppermost. (Compact discs can play discs other discs which do not use CD discs bearing the "COMPACT disc DIGITAL AUDIO" logo. Recordable discs CD-R and CD-RW discs bearing the "DIGITAL AUDIO" logo How to remove the disc How to hold the disc 6 Discs Playable discs Please use any protective coating spray. < Use a soft oil-based felt-tipped pen to write the information...
CD-RW890 Manual
Page 9
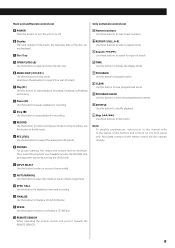
... time of a track. E MUSIC SKIP (.//) Use these buttons to adjust the analog recording level. J REC LEVEL Use these buttons to stop playback or recording. Associated controls on the remote control will also operate similarly. K PHONES For private listening, first reduce the volume level to erase or unfinalize a CD-RW disc. N SYNC 1/ALL Use this button for shuffle playback. P ERASE Use this button to minimum. C Disc Tray b REPEAT (1/ALL, A-B) Use these buttons to skip tracks. H Stop (H) Use this button to select a repeat mode. During recording, use this button to program...
... time of a track. E MUSIC SKIP (.//) Use these buttons to adjust the analog recording level. J REC LEVEL Use these buttons to stop playback or recording. Associated controls on the remote control will also operate similarly. K PHONES For private listening, first reduce the volume level to erase or unfinalize a CD-RW disc. N SYNC 1/ALL Use this button for shuffle playback. P ERASE Use this button to minimum. C Disc Tray b REPEAT (1/ALL, A-B) Use these buttons to skip tracks. H Stop (H) Use this button to select a repeat mode. During recording, use this button to program...

CD-RW890 Manual
Page 10
... volume level to minimum. Then insert the plug from your fingers in the center of the disc are displayed. 10 When turning the power on the tray. < The disc must be produced. The tray is always centered on the tray. < Do not force the tray by turning the LEVEL knob. Wait until the total number of the tracks and the total play time of the disc tray. Basic Operation Turning...
... volume level to minimum. Then insert the plug from your fingers in the center of the disc are displayed. 10 When turning the power on the tray. < The disc must be produced. The tray is always centered on the tray. < Do not force the tray by turning the LEVEL knob. Wait until the total number of the tracks and the total play time of the disc tray. Basic Operation Turning...
CD-RW890 Manual
Page 11
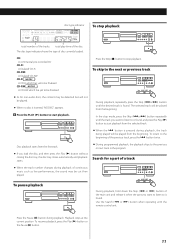
... the stop mode, press the Skip (.or/) button repeatedly until the desired track is found , and press the Play (y) button to the next or previous track < As for a part of a track < When the track number changes during playback. Search for non-audio discs, the content may be played. < When no disc is found . To skip to start playback. button twice. To pause playback During playback, hold down the Skip (. disc type indicator To stop playback. During playback, repeatedly...
... the stop mode, press the Skip (.or/) button repeatedly until the desired track is found , and press the Play (y) button to the next or previous track < As for a part of a track < When the track number changes during playback. Search for non-audio discs, the content may be played. < When no disc is found . To skip to start playback. button twice. To pause playback During playback, hold down the Skip (. disc type indicator To stop playback. During playback, repeatedly...
CD-RW890 Manual
Page 12
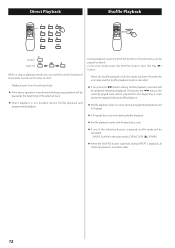
... stop mode), OPEN/CLOSE (L), POWER < When the SHUFFLE button is cancelled. < If you press the . button, the currently played track will be played randomly. During playback, press the SHUFFLE button so that the tracks can use the numeric buttons of all the tracks has been finished, the unit stops and the shuffle playback mode is pressed during REPEAT 1 playback, all tracks are played in stop mode, press the SHUFFLE button, then the Play (y) button. When the shuffle playback of the remote control unit to select a track. Direct Playback Shuffle Playback track 7: track...
... stop mode), OPEN/CLOSE (L), POWER < When the SHUFFLE button is cancelled. < If you press the . button, the currently played track will be played randomly. During playback, press the SHUFFLE button so that the tracks can use the numeric buttons of all the tracks has been finished, the unit stops and the shuffle playback mode is pressed during REPEAT 1 playback, all tracks are played in stop mode, press the SHUFFLE button, then the Play (y) button. When the shuffle playback of the remote control unit to select a track. Direct Playback Shuffle Playback track 7: track...

CD-RW890 Manual
Page 14
... programming. < Programmed playback works with finalized discs only. 1 Press the PROGRAM button in the stop programming, press the Stop (H) button. The designated section will be canceled: A-B, Stop (H), OPEN/CLOSE (L), POWER The selected track is reached, press the A-B button again. Note that have not been finalized cannot be used for A-B repeat. 2 Press the numeric button to select a track. < After designating point A, the Search (m/,) button can be 10 seconds or longer. total time of track repeatedly. "REPEAT...
... programming. < Programmed playback works with finalized discs only. 1 Press the PROGRAM button in the stop programming, press the Stop (H) button. The designated section will be canceled: A-B, Stop (H), OPEN/CLOSE (L), POWER The selected track is reached, press the A-B button again. Note that have not been finalized cannot be used for A-B repeat. 2 Press the numeric button to select a track. < After designating point A, the Search (m/,) button can be 10 seconds or longer. total time of track repeatedly. "REPEAT...

CD-RW890 Manual
Page 15
... start program playback. track 7: track 10: The track is overwritten to the selected track. 2 Press the numeric button to the end of the program. To add a track to select a track. Continue to select a track. To overwrite the program 1 In the stop mode, press the PROGRAM CHECK button repeatedly to be used while the "PROGRAM" indicator blinks. The "PROGRAM" indicator stops blinking and lights up. In the stop mode, press the PROGRAM button repeatedly until the program number to...
... start program playback. track 7: track 10: The track is overwritten to the selected track. 2 Press the numeric button to the end of the program. To add a track to select a track. Continue to select a track. To overwrite the program 1 In the stop mode, press the PROGRAM CHECK button repeatedly to be used while the "PROGRAM" indicator blinks. The "PROGRAM" indicator stops blinking and lights up. In the stop mode, press the PROGRAM button repeatedly until the program number to...
CD-RW890 Manual
Page 16
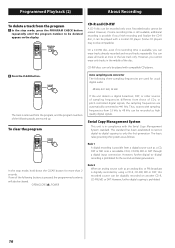
... recording is removed from the program, and the program numbers of the disc. Auto sampling rate converter The following tracks are automatically converted to 48 kHz can erase tracks already recorded and record tracks repeatedly. OPEN/CLOSE (L), POWER Rule 2 When an analog source such as a CD, DAT or MD onto a recordable CD-R, CD-RW, MD or DAT through a digital input connection. Programmed Playback (2) About Recording To delete a track from the program 1 In the stop mode, hold down the CLEAR button...
... recording is removed from the program, and the program numbers of the disc. Auto sampling rate converter The following tracks are automatically converted to 48 kHz can erase tracks already recorded and record tracks repeatedly. OPEN/CLOSE (L), POWER Rule 2 When an analog source such as a CD, DAT or MD onto a recordable CD-R, CD-RW, MD or DAT through a digital input connection. Programmed Playback (2) About Recording To delete a track from the program 1 In the stop mode, hold down the CLEAR button...
CD-RW890 Manual
Page 17
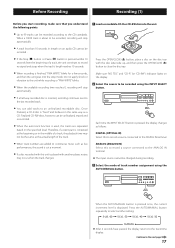
... an audio CD cannot be recorded . < If the Stop (H) button or Pause (J) button is pressed within 10 seconds from the beginning of track number assignment using the INPUT SELECT button. Make sure "NO TOC" and "CD-R" (or "CD-RW") indicator lights on the disc tray with another setting. Once finalized, a CD-R disc is pressed, the display changes as a CD. Each time the INPUT SELECT button is "fixed" and behaves in the same way as follows: DIGITAL (OPTICAL IN...
... an audio CD cannot be recorded . < If the Stop (H) button or Pause (J) button is pressed within 10 seconds from the beginning of track number assignment using the INPUT SELECT button. Make sure "NO TOC" and "CD-R" (or "CD-RW") indicator lights on the disc tray with another setting. Once finalized, a CD-R disc is pressed, the display changes as a CD. Each time the INPUT SELECT button is "fixed" and behaves in the same way as follows: DIGITAL (OPTICAL IN...
CD-RW890 Manual
Page 18
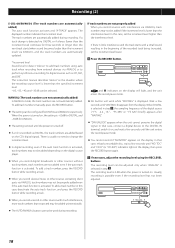
..., track numbers may not be adjusted only when "ANALOG" is displayed. In this case, deactivate the auto track function, and press the RECORD button while recording a track. The recording level can be added depending on . There is usually no need to the DIGITAL IN terminal, switch it on, and wait a few seconds until the power is turned off. < If a CD is recorded via ANALOG, track numbers may not be selected. The displayed number...
..., track numbers may not be adjusted only when "ANALOG" is displayed. In this case, deactivate the auto track function, and press the RECORD button while recording a track. The recording level can be added depending on . There is usually no need to the DIGITAL IN terminal, switch it on, and wait a few seconds until the power is turned off. < If a CD is recorded via ANALOG, track numbers may not be selected. The displayed number...
CD-RW890 Manual
Page 19
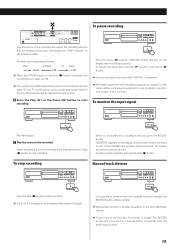
To pause recording Play the source to be recorded and adjust the recording level so that every time recording is paused or stopped, a new track number will not work if it is finalized, it can be played with another CD player. To monitor the input signal Recording starts. 7 Play the source to stop recording. When the playback of a track. 19 Press the Pause (J) button. It is reset to divide a track into multiple tracks by pressing the Stop (H) button. The...
To pause recording Play the source to be recorded and adjust the recording level so that every time recording is paused or stopped, a new track number will not work if it is finalized, it can be played with another CD player. To monitor the input signal Recording starts. 7 Play the source to stop recording. When the playback of a track. 19 Press the Pause (J) button. It is reset to divide a track into multiple tracks by pressing the Stop (H) button. The...
CD-RW890 Manual
Page 20
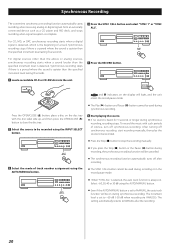
... record the music with the disc label side up, and then press the OPEN/CLOSE (L) button to close the disc tray. 2 Select the source to MANUAL, the auto track function will be cancelled. 3 Select the mode of track number assignment using the INPUT SELECT button. 6 Start playing the source. < If no sound is set to MANUAL after recording. < The SYNC 1/ALL button cannot be recorded. < Press the Stop (H) button to stop the recording manually. < If you press the Stop (H) button or...
... record the music with the disc label side up, and then press the OPEN/CLOSE (L) button to close the disc tray. 2 Select the source to MANUAL, the auto track function will be cancelled. 3 Select the mode of track number assignment using the INPUT SELECT button. 6 Start playing the source. < If no sound is set to MANUAL after recording. < The SYNC 1/ALL button cannot be recorded. < Press the Stop (H) button to stop the recording manually. < If you press the Stop (H) button or...
CD-RW890 Manual
Page 21
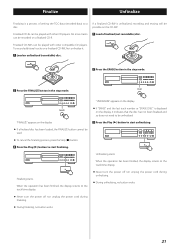
... the Stop (H) button. 3 Press the Play (y) button to start finalizing. possible on the CD-RW. Finalized CD-Rs can be played with other CD players. Finalized CD-RWs can be played with other compatible CD players. When the operation has been finished, the display returns to the track/time display. < Never turn the power off nor unplug the power cord during unfinalizing. < During unfinalizing, no button works. < Never turn the power off nor unplug the power cord during...
... the Stop (H) button. 3 Press the Play (y) button to start finalizing. possible on the CD-RW. Finalized CD-Rs can be played with other CD players. Finalized CD-RWs can be played with other compatible CD players. When the operation has been finished, the display returns to the track/time display. < Never turn the power off nor unplug the power cord during unfinalizing. < During unfinalizing, no button works. < Never turn the power off nor unplug the power cord during...
CD-RW890 Manual
Page 25
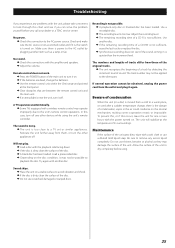
... is the danger of the unit to the unit's remote control operations. No sound. e Check the connections with a wireless remote control may not be applied to a warm place, or used after a sudden temperature change the batteries. Remote control does not work. e Press the POWER button of sound. e If the batteries are between the remote control unit and the main unit. e Use the remote control unit within the (5m) range and pointed at...
... is the danger of the unit to the unit's remote control operations. No sound. e Check the connections with a wireless remote control may not be applied to a warm place, or used after a sudden temperature change the batteries. Remote control does not work. e Press the POWER button of sound. e If the batteries are between the remote control unit and the main unit. e Use the remote control unit within the (5m) range and pointed at...

CD-RW890 Manual
Page 27
...) ×1 Line input voltage 0.5 Vrms Line output voltage 2.0 Vrms Power requirements AC 230V, 50 Hz (European model) AC 120V, 60Hz (North American model) Power consumption 16 W Dimensions (W x H x D 435 x 100 x 295 mm (17 1/8" x 3 15/16" x 11 5/8") Weight (Net 4.5 kg (9 15/16 lbs) Standard Accessories Remote control unit (RC-1275) x 1 Battery (AA, R6, SUM-3) x 2 RCA cable x 2 Optical digital cable x 1 Owner's manual x 1 Warranty card x 1 < Design and specifications are subject to change without notice...
...) ×1 Line input voltage 0.5 Vrms Line output voltage 2.0 Vrms Power requirements AC 230V, 50 Hz (European model) AC 120V, 60Hz (North American model) Power consumption 16 W Dimensions (W x H x D 435 x 100 x 295 mm (17 1/8" x 3 15/16" x 11 5/8") Weight (Net 4.5 kg (9 15/16 lbs) Standard Accessories Remote control unit (RC-1275) x 1 Battery (AA, R6, SUM-3) x 2 RCA cable x 2 Optical digital cable x 1 Owner's manual x 1 Warranty card x 1 < Design and specifications are subject to change without notice...


