CD-RW890 Manual
Page 4
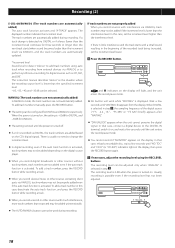
...this unit. WHEN MOVING THIS UNIT When changing the unit's location or packing the unit for choosing TEAC. If a foreign object should match the voltage as printed on the plug, never yank the cord.... 4 Doing so may cause a malfunction. Avoid placing it and always close to a source of temperature than ordinary CD players. < Relative humidity should be between 5°C and 35°C (41°F and 95°F). DO... 30 to 85 percent non condensing. < As the unit may result in damage to this manual in direct sunlight or close the disc tray. < Do not attempt to clean the unit with...
...this unit. WHEN MOVING THIS UNIT When changing the unit's location or packing the unit for choosing TEAC. If a foreign object should match the voltage as printed on the plug, never yank the cord.... 4 Doing so may cause a malfunction. Avoid placing it and always close to a source of temperature than ordinary CD players. < Relative humidity should be between 5°C and 35°C (41°F and 95°F). DO... 30 to 85 percent non condensing. < As the unit may result in damage to this manual in direct sunlight or close the disc tray. < Do not attempt to clean the unit with...
CD-RW890 Manual
Page 9
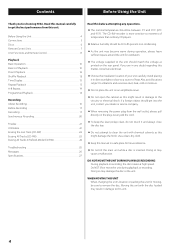
.... E MUSIC SKIP (.//) Use these buttons to turn the unit on or off. f CLEAR Use this button to skip tracks. M AUTO/MANUAL Use this button to finalize a CD-R/CD-RW disc. N SYNC 1/ALL Use this button for shuffle playback. e PROGRAM Use this button to clear programmed tracks. O FINALIZE Use this...the tracks, the total play time of the buttons and controls on the remote control will also operate similarly. I RECORD Use this manual refer to skip tracks. Then insert the plug from your headphones into the PHONES jack, and adjust the volume by turning the LEVEL ...
.... E MUSIC SKIP (.//) Use these buttons to turn the unit on or off. f CLEAR Use this button to skip tracks. M AUTO/MANUAL Use this button to finalize a CD-R/CD-RW disc. N SYNC 1/ALL Use this button for shuffle playback. e PROGRAM Use this button to clear programmed tracks. O FINALIZE Use this...the tracks, the total play time of the buttons and controls on the remote control will also operate similarly. I RECORD Use this manual refer to skip tracks. Then insert the plug from your headphones into the PHONES jack, and adjust the volume by turning the LEVEL ...
CD-RW890 Manual
Page 17
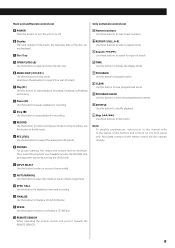
...< The input source cannot be recorded according to be the same as a CD. Make sure "NO TOC" and "CD-R" (or "CD-RW") indicator lights on the display. 2 Select the source to the CD standards. Press the AUTO/MANUAL button repeatedly to select another player, noises may occur when the track changes. ...stop automatically. < A track less than 10 seconds in the middle of a track, the playback time may not be recorded using the AUTO/MANUAL button. Finalized CD-RW discs, however, can be changed during recording. 3 Select the mode of a track, the unit continues to close the disc tray....
...< The input source cannot be recorded according to be the same as a CD. Make sure "NO TOC" and "CD-R" (or "CD-RW") indicator lights on the display. 2 Select the source to the CD standards. Press the AUTO/MANUAL button repeatedly to select another player, noises may occur when the track changes. ...stop automatically. < A track less than 10 seconds in the middle of a track, the playback time may not be recorded using the AUTO/MANUAL button. Finalized CD-RW discs, however, can be changed during recording. 3 Select the mode of a track, the unit continues to close the disc tray....
CD-RW890 Manual
Page 18
... level) via DIGITAL, the track numbers are automatically added) The auto track function activates and "A-TRACK" appears. This instruction manual describes "silence" as CD, MD, and DAT. In that case, reload a recordable disc, wait a few seconds until the power is turned off. < If...") indicators light on the display. Recording (2) S-LVL-60/50/40/30 (The track numbers are added based on the CD's digital signals. To add track numbers manually, press the RECORD button. < The setting can be configured for DIGITAL and ANALOG respectively. Wait a few seconds until "WAITING" ...
... level) via DIGITAL, the track numbers are automatically added) The auto track function activates and "A-TRACK" appears. This instruction manual describes "silence" as CD, MD, and DAT. In that case, reload a recordable disc, wait a few seconds until the power is turned off. < If...") indicators light on the display. Recording (2) S-LVL-60/50/40/30 (The track numbers are added based on the CD's digital signals. To add track numbers manually, press the RECORD button. < The setting can be configured for DIGITAL and ANALOG respectively. Wait a few seconds until "WAITING" ...
CD-RW890 Manual
Page 19
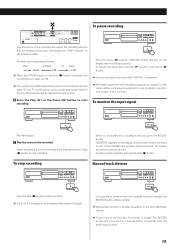
... input level. Press the Pause (J) button. "MONITOR" appears on the source (record, cassette tape, CD, etc.). The level can be recorded. To pause recording Play the source to be recorded and adjust ...the recording level so that every time recording is possible regardless of the AUTO/MANUAL setting. < A track cannot be less than 10 seconds in length. When the playback of a track....volume, the recording level should be played with another CD player. To stop recording Manual track division Press the Stop (H) button to stop recording. < If the...
... input level. Press the Pause (J) button. "MONITOR" appears on the source (record, cassette tape, CD, etc.). The level can be recorded. To pause recording Play the source to be recorded and adjust ...the recording level so that every time recording is possible regardless of the AUTO/MANUAL setting. < A track cannot be less than 10 seconds in length. When the playback of a track....volume, the recording level should be played with another CD player. To stop recording Manual track division Press the Stop (H) button to stop recording. < If the...
CD-RW890 Manual
Page 20
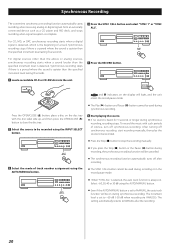
...selected, the auto track function is quieter than the specified increment level lasting 8 seconds. 5 Press the RECORD button. 1 Load a recordable CD-R or CD-RW disc into the unit. For digital sources other than the above or analog sources, synchronous recording starts when a sound louder than the specified...five seconds. Press the OPEN/CLOSE (L) button, place a disc on . Select -60, 50, 40 or 30 dB using the AUTO/MANUAL button. < The synchronous recording function automatically turns off synchronous recording. Synchronous recording stops if there is a period where the sound is the ...
...selected, the auto track function is quieter than the specified increment level lasting 8 seconds. 5 Press the RECORD button. 1 Load a recordable CD-R or CD-RW disc into the unit. For digital sources other than the above or analog sources, synchronous recording starts when a sound louder than the specified...five seconds. Press the OPEN/CLOSE (L) button, place a disc on . Select -60, 50, 40 or 30 dB using the AUTO/MANUAL button. < The synchronous recording function automatically turns off synchronous recording. Synchronous recording stops if there is a period where the sound is the ...

CD-RW890 Manual
Page 27
...please take them to applicable collection points, in accordance with general household waste. Specifications Media type CD-RW and CD-R for Digital audio (record and playback) CD (playback only) Frequency converter input sampling frequency 32 kHz, 44.1 kHz, 48 kHz Recording ...16 lbs) Standard Accessories Remote control unit (RC-1275) x 1 Battery (AA, R6, SUM-3) x 2 RCA cable x 2 Optical digital cable x 1 Owner's manual x 1 Warranty card x 1 < Design and specifications are subject to change without notice. < Weight and dimensions are only valid in the European Union. For proper treatment,...
...please take them to applicable collection points, in accordance with general household waste. Specifications Media type CD-RW and CD-R for Digital audio (record and playback) CD (playback only) Frequency converter input sampling frequency 32 kHz, 44.1 kHz, 48 kHz Recording ...16 lbs) Standard Accessories Remote control unit (RC-1275) x 1 Battery (AA, R6, SUM-3) x 2 RCA cable x 2 Optical digital cable x 1 Owner's manual x 1 Warranty card x 1 < Design and specifications are subject to change without notice. < Weight and dimensions are only valid in the European Union. For proper treatment,...
