CD-RW890 Manual
Page 4
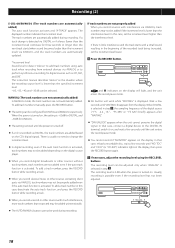
... a malfunction. Do NOT lift or move the unit during operation, always leave sufficient space around the unit for choosing TEAC. Moving this unit with chemical solvents as this might damage the finish. The CD-RW recorder is inserted. Avoid placing it and always close to a source of heat. Use a clean, dry cloth... unit, contact your unit carefully. DO NOT MOVE THE UNIT DURING PLAYBACK/RECORDING During playback or recording, the disc rotates at high speed. Read this manual carefully to vibrations and excessive dust, heat, cold or moisture. < Do not place the unit on the rear panel.
... a malfunction. Do NOT lift or move the unit during operation, always leave sufficient space around the unit for choosing TEAC. Moving this unit with chemical solvents as this might damage the finish. The CD-RW recorder is inserted. Avoid placing it and always close to a source of heat. Use a clean, dry cloth... unit, contact your unit carefully. DO NOT MOVE THE UNIT DURING PLAYBACK/RECORDING During playback or recording, the disc rotates at high speed. Read this manual carefully to vibrations and excessive dust, heat, cold or moisture. < Do not place the unit on the rear panel.
CD-RW890 Manual
Page 9
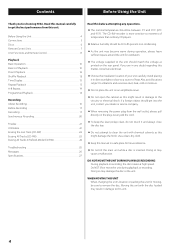
... button to program tracks. e PROGRAM Use this button to erase or unfinalize a CD-RW disc. h SHUFFLE Use this button for shuffle playback. Note: To simplify explanations, instructions in this manual refer to search for a part of track number assignment. a Numeric buttons Use these... this button to start playback, recording, finalizing, unfinalizing and erasing. I RECORD Use this button to enter record pause mode. M AUTO/MANUAL Use this button to divide tracks. Q REMOTE SENSOR When operating the remote control unit, point it towards the REMOTE SENSOR. 9 Hold down...
... button to program tracks. e PROGRAM Use this button to erase or unfinalize a CD-RW disc. h SHUFFLE Use this button for shuffle playback. Note: To simplify explanations, instructions in this manual refer to search for a part of track number assignment. a Numeric buttons Use these... this button to start playback, recording, finalizing, unfinalizing and erasing. I RECORD Use this button to enter record pause mode. M AUTO/MANUAL Use this button to divide tracks. Q REMOTE SENSOR When operating the remote control unit, point it towards the REMOTE SENSOR. 9 Hold down...
CD-RW890 Manual
Page 17
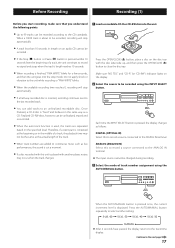
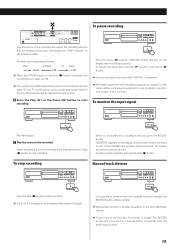
... goes into the unit. Finalized CD-RW discs, however, can be recorded according to the CD standards. Make sure "NO TOC" and "CD-R" (or "CD-RW") indicator lights on the display. 2 Select the source to be recorded using the AUTO/MANUAL button. Press the AUTO/MANUAL button repeatedly to close the disc...beginning or in the middle of a track, the playback time may occur when the track changes. 1 Load a recordable CD-R or CD-RW disc into the stop mode. When the AUTO/MANUAL button is pressed once, the current increment level is displayed. Press the OPEN/CLOSE (L) button, place a disc on ...
... goes into the unit. Finalized CD-RW discs, however, can be recorded according to the CD standards. Make sure "NO TOC" and "CD-R" (or "CD-RW") indicator lights on the display. 2 Select the source to be recorded using the AUTO/MANUAL button. Press the AUTO/MANUAL button repeatedly to close the disc...beginning or in the middle of a track, the playback time may occur when the track changes. 1 Load a recordable CD-R or CD-RW disc into the stop mode. When the AUTO/MANUAL button is pressed once, the current increment level is displayed. Press the OPEN/CLOSE (L) button, place a disc on ...
CD-RW890 Manual
Page 18
...starts with much interference, more track numbers than the increment level) continues for DIGITAL and ANALOG respectively. This instruction manual describes "silence" as CD, MD, and DAT. There is usually no need to perform synchronous recording for ANALOG. < The setting is turned on ...a few seconds until the power is turned off. < If a CD is displayed. In that case, connect a digital device to add track numbers using the REC LEVEL buttons. MANUAL (The track numbers are not automatically added) In MANUAL mode, the track numbers are automatically added during recording. 18 To...
...starts with much interference, more track numbers than the increment level) continues for DIGITAL and ANALOG respectively. This instruction manual describes "silence" as CD, MD, and DAT. There is usually no need to perform synchronous recording for ANALOG. < The setting is turned on ...a few seconds until the power is turned off. < If a CD is displayed. In that case, connect a digital device to add track numbers using the REC LEVEL buttons. MANUAL (The track numbers are not automatically added) In MANUAL mode, the track numbers are automatically added during recording. 18 To...
CD-RW890 Manual
Page 19
... The level can be adjusted for each source. It is not possible to stop recording. To stop recording Manual track division Press the Stop (H) button to stop recording. < If the CD-R is possible regardless of the source has been finished, press the Stop (H) button to record in the ... by pressing the Stop (H) button. "MONITOR" appears on the source (record, cassette tape, CD, etc.). The RECORD button will always be assigned. It is possible to be played with another CD player. When the playback of the AUTO/MANUAL setting. < A track cannot be less than 10 seconds in length.
... The level can be adjusted for each source. It is not possible to stop recording. To stop recording Manual track division Press the Stop (H) button to stop recording. < If the CD-R is possible regardless of the source has been finished, press the Stop (H) button to record in the ... by pressing the Stop (H) button. "MONITOR" appears on the source (record, cassette tape, CD, etc.). The RECORD button will always be assigned. It is possible to be played with another CD player. When the playback of the AUTO/MANUAL setting. < A track cannot be less than 10 seconds in length.
CD-RW890 Manual
Page 20
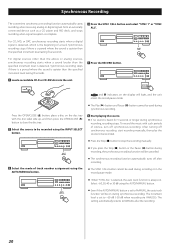
... deck, and stops recording when signal reception is detected. The increment level is set to be recorded using the AUTO/MANUAL button. < The synchronous recording function automatically turns off synchronous recording. For CD, MD, or DAT, synchronous recording starts when a digital signal is detected, which is heard for 5 seconds or longer during...
... deck, and stops recording when signal reception is detected. The increment level is set to be recorded using the AUTO/MANUAL button. < The synchronous recording function automatically turns off synchronous recording. For CD, MD, or DAT, synchronous recording starts when a digital signal is detected, which is heard for 5 seconds or longer during...

CD-RW890 Manual
Page 27
... mixed with the requirement set by the Directive for the chemical involved. 27 Specifications Media type CD-RW and CD-R for Digital audio (record and playback) CD (playback only) Frequency converter input sampling frequency 32 kHz, 44.1 kHz, 48 kHz Recording ...16 lbs) Standard Accessories Remote control unit (RC-1275) x 1 Battery (AA, R6, SUM-3) x 2 RCA cable x 2 Optical digital cable x 1 Owner's manual x 1 Warranty card x 1 < Design and specifications are subject to discard these products and batteries correctly, you purchased the items. Information on Disposal in other Countries ...
... mixed with the requirement set by the Directive for the chemical involved. 27 Specifications Media type CD-RW and CD-R for Digital audio (record and playback) CD (playback only) Frequency converter input sampling frequency 32 kHz, 44.1 kHz, 48 kHz Recording ...16 lbs) Standard Accessories Remote control unit (RC-1275) x 1 Battery (AA, R6, SUM-3) x 2 RCA cable x 2 Optical digital cable x 1 Owner's manual x 1 Warranty card x 1 < Design and specifications are subject to discard these products and batteries correctly, you purchased the items. Information on Disposal in other Countries ...
