

Startup Guide
Page 23
...is connected, set it to output the signal to the projector. INPUT Input-A Input-B Input-C* Video S-Video * VPL-CX125/CX155/ CW125 only 3 MENU PEUNSTHER MPUITICNG NEINTPWUOTRCK RGB MONITOR INPUT A AUDIO OUTPUT AUDIO RGB S VIDEO VVIIDDEEOOIN INPUT B AUDIO AUDIO RRSE-M23O2TCE 4 Power F7 or Fx Fn KEYSTONE INPUT SOTNA/NDBY LACMOPV/ER 1 2 When operating with the remote commander of VPL-CX125/CX155/CW125 COMMAND OFF ON INPUT A INPUT D INPUT B INPUT E INPUT C AIR SHOT VIDEO S VIDEO MENU APA ENTER RESET FOCUS ZOOM SHIFT 1 INPUT A INPUT D INPUT B INPUT E INPUT...
...is connected, set it to output the signal to the projector. INPUT Input-A Input-B Input-C* Video S-Video * VPL-CX125/CX155/ CW125 only 3 MENU PEUNSTHER MPUITICNG NEINTPWUOTRCK RGB MONITOR INPUT A AUDIO OUTPUT AUDIO RGB S VIDEO VVIIDDEEOOIN INPUT B AUDIO AUDIO RRSE-M23O2TCE 4 Power F7 or Fx Fn KEYSTONE INPUT SOTNA/NDBY LACMOPV/ER 1 2 When operating with the remote commander of VPL-CX125/CX155/CW125 COMMAND OFF ON INPUT A INPUT D INPUT B INPUT E INPUT C AIR SHOT VIDEO S VIDEO MENU APA ENTER RESET FOCUS ZOOM SHIFT 1 INPUT A INPUT D INPUT B INPUT E INPUT...

Startup Guide
Page 25
... INPUT A AUDIO OUTPUT AUDIO S VIDEO RGB VVIIDDEEOOIN INPUT B AUDIO AUDIO RRSE-M23O2TCE When operating with the remote commander of VPL-CX125/CX155/CW125 COMMAND OFF ON INPUT A INPUT D INPUT B INPUT E INPUT C AIR SHOT VIDEO S VIDEO MENU APA ENTER RESET 12 When operating with the remote commander of VPL-CX100/CX120/CX150 APA INPUT KEY STONE /TILT LENS ENTER AUTO FOCUS RESET MENU FREEZE PIC MUTING D ZOOM AUDIO MUTING VOLUME 12 9 Projecting GB b When a message appears, press the I /1 (on /standby) key again. Turning off the Power a Press the I /1 (on /standby...
... INPUT A AUDIO OUTPUT AUDIO S VIDEO RGB VVIIDDEEOOIN INPUT B AUDIO AUDIO RRSE-M23O2TCE When operating with the remote commander of VPL-CX125/CX155/CW125 COMMAND OFF ON INPUT A INPUT D INPUT B INPUT E INPUT C AIR SHOT VIDEO S VIDEO MENU APA ENTER RESET 12 When operating with the remote commander of VPL-CX100/CX120/CX150 APA INPUT KEY STONE /TILT LENS ENTER AUTO FOCUS RESET MENU FREEZE PIC MUTING D ZOOM AUDIO MUTING VOLUME 12 9 Projecting GB b When a message appears, press the I /1 (on /standby) key again. Turning off the Power a Press the I /1 (on /standby...

Startup Guide
Page 26
... checking. 1 Turn off the projector, and disconnect the AC power cord from the AC outlet. into the lamp replacement slot. 5 Insert the new lamp all the way in the following cases. • When the lamp has burnt out or dims • "Please replace the Lamp and clean the Filter." Replace this lamp with qualified Sony personnel for the lamp to the projector. Use an LMP-C200 Projector Lamp as a light source is securely in red...
... checking. 1 Turn off the projector, and disconnect the AC power cord from the AC outlet. into the lamp replacement slot. 5 Insert the new lamp all the way in the following cases. • When the lamp has burnt out or dims • "Please replace the Lamp and clean the Filter." Replace this lamp with qualified Sony personnel for the lamp to the projector. Use an LMP-C200 Projector Lamp as a light source is securely in red...

Startup Guide
Page 27
...; The power will not turn the projector on. 9 Press the MENU key, and then select the Setup menu. 10Select "Lamp Timer Reset," and then press the ENTER key. 11Select "Execute" with the V key, and then press the ENTER key. Change the Lamp and clean the Filter? The ON/STANDBY indicator lights in this product contains mercury. Note Be sure to turn on if the lamp is displayed in the menu screen...
...; The power will not turn the projector on. 9 Press the MENU key, and then select the Setup menu. 10Select "Lamp Timer Reset," and then press the ENTER key. 11Select "Execute" with the V key, and then press the ENTER key. Change the Lamp and clean the Filter? The ON/STANDBY indicator lights in this product contains mercury. Note Be sure to turn on if the lamp is displayed in the menu screen...

Startup Guide
Page 29
... the projector for about two hours with the I / 1 key at a short interval. c Close the air filter cover securely. c Set the computer signal to output only to an external monitor. c Display the full image on the connected computer. If the problem persists, consult with your computer's settings. c Select the input source correctly using the following instructions. c Wait for about 60 seconds before turning on the symptoms, see the Operating Instructions...
... the projector for about two hours with the I / 1 key at a short interval. c Close the air filter cover securely. c Set the computer signal to output only to an external monitor. c Display the full image on the connected computer. If the problem persists, consult with your computer's settings. c Select the input source correctly using the following instructions. c Wait for about 60 seconds before turning on the symptoms, see the Operating Instructions...

Startup Guide
Page 30
... ON/STANDBY flashes in the Signal menu has not been adjusted properly. Symptom The picture flickers. GB 14 Troubleshooting c Wait for 60 seconds to cool the lamp and then turn the projector on the Setup menu is set to the wall outlet, and then turn on the power again. red. (Repetition rate of 2 flashes) • The lamp cover or the air filter cover is unusually high. Cause and Remedy • "Dot Phase" in red and the problem...
... ON/STANDBY flashes in the Signal menu has not been adjusted properly. Symptom The picture flickers. GB 14 Troubleshooting c Wait for 60 seconds to cool the lamp and then turn the projector on the Setup menu is set to the wall outlet, and then turn on the power again. red. (Repetition rate of 2 flashes) • The lamp cover or the air filter cover is unusually high. Cause and Remedy • "Dot Phase" in red and the problem...

Startup Guide
Page 31
...; 3) Lens 1.2 times zoom lens f 23.5 to 28.2 mm/F1.75 to 2.17 Lamp 200 W Ultra high pressure lamp Projected picture size 40 to 300-inches (1,016 to 7,620 mm) (measured diagonally) Light output VPL-CX150/CX155: 3500 lm VPL-CX120/CX125/CW125: 3000 lm VPL-CX100: 2700 lm (When the Lamp Mode is set to "High.") Throwing distance (When placed on the floor.) VPL-CX100/CX120/CX125/ CX150/CX155: (When an XGA signal is input...
...; 3) Lens 1.2 times zoom lens f 23.5 to 28.2 mm/F1.75 to 2.17 Lamp 200 W Ultra high pressure lamp Projected picture size 40 to 300-inches (1,016 to 7,620 mm) (measured diagonally) Light output VPL-CX150/CX155: 3500 lm VPL-CX120/CX125/CW125: 3000 lm VPL-CX100: 2700 lm (When the Lamp Mode is set to "High.") Throwing distance (When placed on the floor.) VPL-CX100/CX120/CX125/ CX150/CX155: (When an XGA signal is input...
Operating Instructions
Page 4
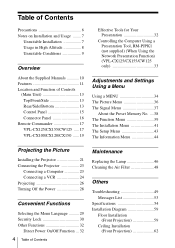
... VPL-CX100/CX120/CX150 ...... 19 Effective Tools for Your Presentation 32 Controlling the Computer Using a Presentation Tool, RM-PJPK1 (not supplied) (When Using the Network Presentation Function) (VPL-CX125/CX155/CW125 only 33 Adjustments and Settings Using a Menu Using a MENU 34 The Picture Menu 36 The Signal Menu 37 About the Preset Memory No. ....38 The Function Menu 39 The Installation Menu 41 The Setup Menu 43 The Information Menu 44 Projecting the Picture Installing the Projector 21 Connecting...
... VPL-CX100/CX120/CX150 ...... 19 Effective Tools for Your Presentation 32 Controlling the Computer Using a Presentation Tool, RM-PJPK1 (not supplied) (When Using the Network Presentation Function) (VPL-CX125/CX155/CW125 only 33 Adjustments and Settings Using a Menu Using a MENU 34 The Picture Menu 36 The Signal Menu 37 About the Preset Memory No. ....38 The Function Menu 39 The Installation Menu 41 The Setup Menu 43 The Information Menu 44 Projecting the Picture Installing the Projector 21 Connecting...

Operating Instructions
Page 6
... the unit with a soft dry cloth. On cleaning the air filter • Clean the air filter whenever you adjust the height of the unit. On cleaning the lens The lens surface is desirable to direct lighting or sunlight. • Ceiling-mounted spot lighting is equipped with the voltage of your local power supply. Precautions On safety • Check that the operating voltage of your unit is on. • Do...
... the unit with a soft dry cloth. On cleaning the air filter • Clean the air filter whenever you adjust the height of the unit. On cleaning the lens The lens surface is desirable to direct lighting or sunlight. • Ceiling-mounted spot lighting is equipped with the voltage of your local power supply. Precautions On safety • Check that the operating voltage of your unit is on. • Do...
Operating Instructions
Page 11
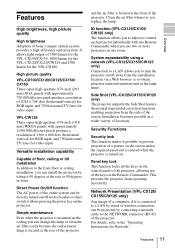
... Remote Commander when you use of floor, ceiling or tilt installation In addition to the front floor or ceiling installation, you can be projected by tilting it possible to obtain projector status information such as the lamp timer. It allows light output of locations. Clean the air filter whenever you can be directly turned on the ceiling you replace the lamp. System expandability using a network (VPL-CX125/CX155/CW125 only) Connection to a LAN allows you to a LAN...
... Remote Commander when you use of floor, ceiling or tilt installation In addition to the front floor or ceiling installation, you can be projected by tilting it possible to obtain projector status information such as the lamp timer. It allows light output of locations. Clean the air filter whenever you can be directly turned on the ceiling you replace the lamp. System expandability using a network (VPL-CX125/CX155/CW125 only) Connection to a LAN allows you to a LAN...

Operating Instructions
Page 15
... is displayed. Location and Function of the image. c ?/1 (On/Standby) key Turns on the projector when it by pressing this key, the ON/STANDBY indicator flashes in green and then lights in green while the cooling fan is running after the power is ready to the message or hold the ?/1 key for adjustment. Each time you push this button again. Control Panel 123456 7 8 LAMP/ COVER ON/ STANDBY INPUT KEYSTONE MENU PUSH ENTER PIC MUTING Overview a LAMP/COVER indicators Flashes in standby mode.
... is displayed. Location and Function of the image. c ?/1 (On/Standby) key Turns on the projector when it by pressing this key, the ON/STANDBY indicator flashes in green and then lights in green while the cooling fan is running after the power is ready to the message or hold the ?/1 key for adjustment. Each time you push this button again. Control Panel 123456 7 8 LAMP/ COVER ON/ STANDBY INPUT KEYSTONE MENU PUSH ENTER PIC MUTING Overview a LAMP/COVER indicators Flashes in standby mode.

Operating Instructions
Page 19
... beam between the Remote Commander and the projector is not provided in "The Function Menu" on the projector. This key functions when the menu or a setting item is displayed on the control panel function identically. 1 2 3 4 5 6 7 8 9 APA INPUT KEY STONE /TILT LENS ENTER AUTO FOCUS RESET MENU FREEZE PIC MUTING D ZOOM AUDIO MUTING VOLUME 0 qa qs qd qf qg qh a INPUT key b APA (Auto Pixel Alignment) key Automatically adjusts a picture to its original...
... beam between the Remote Commander and the projector is not provided in "The Function Menu" on the projector. This key functions when the menu or a setting item is displayed on the control panel function identically. 1 2 3 4 5 6 7 8 9 APA INPUT KEY STONE /TILT LENS ENTER AUTO FOCUS RESET MENU FREEZE PIC MUTING D ZOOM AUDIO MUTING VOLUME 0 qa qs qd qf qg qh a INPUT key b APA (Auto Pixel Alignment) key Automatically adjusts a picture to its original...
Operating Instructions
Page 26
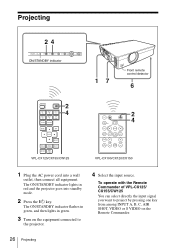
...connected to the projector. 4 Select the input source. The ON/STANDBY indicator lights in green. 3 Turn on the Remote Commander. 26 Projecting Projecting 24 LAMP/ COVER ON/ STANDBY INPUT KEYSTONE MENU PUSH ENTER PIC MUTING ON/STANDBY indicator MPUITICNG PEUNSTHER MENU KEYSTONE INPUT SOTNA/NDBY LACMOPV/ER NEINTPWUOTRCK RGB MONITOR INPUT A AUDIO OUTPUT AUDIO RGB S VIDEO VVIIDDEEOOIN INPUT B AUDIO AUDIO RRSE-M23O2TCE 17 Front remote control detector 6 COMMAND OFF ON INPUT A INPUT D INPUT B INPUT E INPUT C AIR SHOT VIDEO S VIDEO 2 4 MENU APA ENTER RESET...
...connected to the projector. 4 Select the input source. The ON/STANDBY indicator lights in green. 3 Turn on the Remote Commander. 26 Projecting Projecting 24 LAMP/ COVER ON/ STANDBY INPUT KEYSTONE MENU PUSH ENTER PIC MUTING ON/STANDBY indicator MPUITICNG PEUNSTHER MENU KEYSTONE INPUT SOTNA/NDBY LACMOPV/ER NEINTPWUOTRCK RGB MONITOR INPUT A AUDIO OUTPUT AUDIO RGB S VIDEO VVIIDDEEOOIN INPUT B AUDIO AUDIO RRSE-M23O2TCE 17 Front remote control detector 6 COMMAND OFF ON INPUT A INPUT D INPUT B INPUT E INPUT C AIR SHOT VIDEO S VIDEO 2 4 MENU APA ENTER RESET...

Operating Instructions
Page 29
... MONITOR INPUT A AUDIO OUTPUT AUDIO S VIDEO RGB VVIIDDEEOOIN INPUT B AUDIO AUDIO RRSE-M23O2TCE 1 Front remote control detector APA INPUT KEY STONE /TILT LENS ENTER AUTO FOCUS RESET MENU FREEZE PIC MUTING D ZOOM AUDIO MUTING VOLUME 2 4,5,6 3 VPL-CX100/CX120/CX150 1 Plug the AC power cord into a wall outlet. 2 Press the ?/1 key to select the Setup menu, then press the B or ENTER key. To change the menu language, proceed as a yellow button. 4 Press the v or V key to turn on -screen displays. The menu...
... MONITOR INPUT A AUDIO OUTPUT AUDIO S VIDEO RGB VVIIDDEEOOIN INPUT B AUDIO AUDIO RRSE-M23O2TCE 1 Front remote control detector APA INPUT KEY STONE /TILT LENS ENTER AUTO FOCUS RESET MENU FREEZE PIC MUTING D ZOOM AUDIO MUTING VOLUME 2 4,5,6 3 VPL-CX100/CX120/CX150 1 Plug the AC power cord into a wall outlet. 2 Press the ?/1 key to select the Setup menu, then press the B or ENTER key. To change the menu language, proceed as a yellow button. 4 Press the v or V key to turn on -screen displays. The menu...
Operating Instructions
Page 37
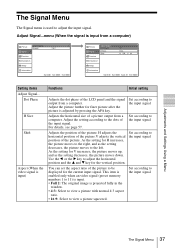
... an video signal (preset memory numbers 1 to 11) is input. • Full 2: The original image is input) Functions Initial setting Adjusts the dot phase of the picture to adjust the input signal. For details, see page 57. Adjust Signal...menu (When the signal is adjusted by pressing the APA key. As the setting for finer picture after the picture is input from a computer) Picture Signal Adjust Signal Aspect: Function Installation Setup Information Sel: Full 1 Set: Exit: Picture Signal Function Adjust Signal Dot Phase: H Size: Shift: Installation Setup...
... an video signal (preset memory numbers 1 to 11) is input. • Full 2: The original image is input) Functions Initial setting Adjusts the dot phase of the picture to adjust the input signal. For details, see page 57. Adjust Signal...menu (When the signal is adjusted by pressing the APA key. As the setting for finer picture after the picture is input from a computer) Picture Signal Adjust Signal Aspect: Function Installation Setup Information Sel: Full 1 Set: Exit: Picture Signal Function Adjust Signal Dot Phase: H Size: Shift: Installation Setup...

Operating Instructions
Page 38
... picture. • Full 2:The original image is projected fully in the preset memory. This projector has 20 types of user memories for each of Input A and Input B into which are displayed on page 58 to find if the signal is registered in the window. • Normal: Displays the picture while matching one . When you adjust the data of the signal using the Signal menu, it to an optimum picture. SIZE...
... picture. • Full 2:The original image is projected fully in the preset memory. This projector has 20 types of user memories for each of Input A and Input B into which are displayed on page 58 to find if the signal is registered in the window. • Normal: Displays the picture while matching one . When you adjust the data of the signal using the Signal menu, it to an optimum picture. SIZE...

Operating Instructions
Page 40
... projected image includes a black portion around it is set to "On," keeping the ?/1 key on the control panel pressed for 10 minutes. If you adjust the picture manually. • When "Standby mode" is in standby mode, and turns the projector to "Low", the network presentation and the network control functions cannot be operated only with the Remote Commander. Off • Lamp off: The lamp goes off if no signal is input for 10 seconds turns the projector...
... projected image includes a black portion around it is set to "On," keeping the ?/1 key on the control panel pressed for 10 minutes. If you adjust the picture manually. • When "Standby mode" is in standby mode, and turns the projector to "Low", the network presentation and the network control functions cannot be operated only with the Remote Commander. Off • Lamp off: The lamp goes off if no signal is input for 10 seconds turns the projector...

Operating Instructions
Page 43
... Using a Menu The Setup Menu 43 The Setup Menu The Setup menu is used in the menu and on-screen displays. Auto Lamp Timer Reset When replacing the lamps, reset the lamp timer. - Auto Color System Selects the color system of the input signal automatically. Setting items Functions Initial setting Status (on-screen Sets up the on -screen displays except for changing the menu displays. English Input-A Signal Sel. Language Selects the language used for the menus, a message when the power is turned off the on -screen display. If you select "Auto," the projector...
... Using a Menu The Setup Menu 43 The Setup Menu The Setup menu is used in the menu and on-screen displays. Auto Lamp Timer Reset When replacing the lamps, reset the lamp timer. - Auto Color System Selects the color system of the input signal automatically. Setting items Functions Initial setting Status (on-screen Sets up the on -screen displays except for changing the menu displays. English Input-A Signal Sel. Language Selects the language used for the menus, a message when the power is turned off the on -screen display. If you select "Auto," the projector...

Operating Instructions
Page 46
...-C200 Projector Lamp as a light source is securely in red. (Repetition rate of 3 flashes) The lamp life varies depending on the ceiling, hold the knob (b), then pull out the lamp unit. Note When replacing the lamp after using the projector, wait at least an hour for replacing the lamp and internal checking. 1 Turn off the projector, and disconnect the AC power cord from the AC outlet. into the lamp replacement slot. 5 Insert the new lamp all...
...-C200 Projector Lamp as a light source is securely in red. (Repetition rate of 3 flashes) The lamp life varies depending on the ceiling, hold the knob (b), then pull out the lamp unit. Note When replacing the lamp after using the projector, wait at least an hour for replacing the lamp and internal checking. 1 Turn off the projector, and disconnect the AC power cord from the AC outlet. into the lamp replacement slot. 5 Insert the new lamp all...

Operating Instructions
Page 52
Symptom ON/STANDBY flashes in red and the problem persists, the electrical system has failed. If the ON/STANDBY flashes in red. (Repetition rate of 6 flashes) Cause and Remedy Unplug the AC power cord from the wall outlet after the ON/ STANDBY indicator goes out, plug the power cord to the wall outlet, and then turn the projector on again. c Consult with qualified Sony personnel. 52 Troubleshooting
Symptom ON/STANDBY flashes in red and the problem persists, the electrical system has failed. If the ON/STANDBY flashes in red. (Repetition rate of 6 flashes) Cause and Remedy Unplug the AC power cord from the wall outlet after the ON/ STANDBY indicator goes out, plug the power cord to the wall outlet, and then turn the projector on again. c Consult with qualified Sony personnel. 52 Troubleshooting


