Operating Instructions
Page 4
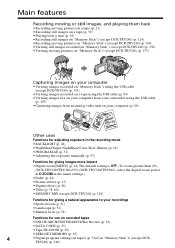
...;Viewing images recorded on "Memory Stick"s using the USB cable (except DCR-TRV240) (p. 155) •Viewing images recorded on a tape using the USB cable (p. 94) •Viewing images live on your computer from your camcorder using the USB cable (p. 103) •Capturing images from an analog...Functions for giving images more impact •Digital zoom [MENU] (p. 24) The default setting is OFF. (To zoom greater than 25×, (DCR-TRV240/TRV340)/15× (DCR-TRV740/TRV840), select the digital zoom power in D ZOOM in the menu settings.) •Fader (p. 44) •Picture effects (p. 47) •...
...;Viewing images recorded on "Memory Stick"s using the USB cable (except DCR-TRV240) (p. 155) •Viewing images recorded on a tape using the USB cable (p. 94) •Viewing images live on your computer from your camcorder using the USB cable (p. 103) •Capturing images from an analog...Functions for giving images more impact •Digital zoom [MENU] (p. 24) The default setting is OFF. (To zoom greater than 25×, (DCR-TRV240/TRV340)/15× (DCR-TRV740/TRV840), select the digital zoom power in D ZOOM in the menu settings.) •Fader (p. 44) •Picture effects (p. 47) •...
Operating Instructions
Page 5
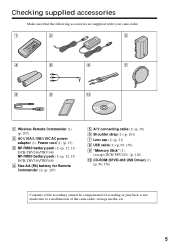
... accessories Make sure that the following accessories are supplied with your camcorder. 1 2 3 4 5 6 7 8 9 0 1 Wireless Remote Commander (1) (p. 207) 2 AC-L10A/L10B/L10C AC power adaptor (1), Power cord (1) (p. 13) 3 NP-FM30 battery pack (1) (p. 12, 13) DCR-TRV240/TRV340 NP-FM50 battery pack (1) (p. 12, 13) DCR-TRV740/TRV840 4 Size AA (R6) battery for Remote Commander (2) (p. 207) 5 A/V connecting cable...
... accessories Make sure that the following accessories are supplied with your camcorder. 1 2 3 4 5 6 7 8 9 0 1 Wireless Remote Commander (1) (p. 207) 2 AC-L10A/L10B/L10C AC power adaptor (1), Power cord (1) (p. 13) 3 NP-FM30 battery pack (1) (p. 12, 13) DCR-TRV240/TRV340 NP-FM50 battery pack (1) (p. 12, 13) DCR-TRV740/TRV840 4 Size AA (R6) battery for Remote Commander (2) (p. 207) 5 A/V connecting cable...

Operating Instructions
Page 6
...Picture effect 47 Using special effects - Frame recording 57 Superimposing a title 58 Making your computer (Windows users only 94 Customizing Your Camcorder Changing the menu settings 105 6 PHOTO SEARCH/PHOTO SCAN 69 Editing Dubbing a tape 71 Dubbing only desired scenes - Tape PB ZOOM...Playing back tapes with digital effects 64 Enlarging recorded images - NightShot/Super NightShot/ Color Slow Shutter 29 Self-timer recording (except DCR-TRV240 31 Checking recordings - Signal convert function 88 Recording video or TV programs ....... 89 Inserting a scene from an analog ...
...Picture effect 47 Using special effects - Frame recording 57 Superimposing a title 58 Making your computer (Windows users only 94 Customizing Your Camcorder Changing the menu settings 105 6 PHOTO SEARCH/PHOTO SCAN 69 Editing Dubbing a tape 71 Dubbing only desired scenes - Tape PB ZOOM...Playing back tapes with digital effects 64 Enlarging recorded images - NightShot/Super NightShot/ Color Slow Shutter 29 Self-timer recording (except DCR-TRV240 31 Checking recordings - Signal convert function 88 Recording video or TV programs ....... 89 Inserting a scene from an analog ...
Operating Instructions
Page 7
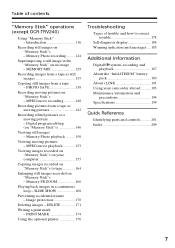
...Self-diagnosis display 184 Warning indicators and messages .... 185 Additional Information Digital8 system, recording and playback 187 About the "InfoLITHIUM" battery pack 189 About i.LINK 191 Using your camcorder abroad .......... 193 Maintenance information and precautions 194 Specifications 199 Quick ...Recording images from a tape - PRINT MARK 174 Using the optional printer 176 Troubleshooting Types of contents "Memory Stick" operations (except DCR-TRV240) Using "Memory Stick" - Getting Started Table of trouble and how to tape 164 Enlarging still images recorded on "Memory ...
...Self-diagnosis display 184 Warning indicators and messages .... 185 Additional Information Digital8 system, recording and playback 187 About the "InfoLITHIUM" battery pack 189 About i.LINK 191 Using your camcorder abroad .......... 193 Maintenance information and precautions 194 Specifications 199 Quick ...Recording images from a tape - PRINT MARK 174 Using the optional printer 176 Troubleshooting Types of contents "Memory Stick" operations (except DCR-TRV240) Using "Memory Stick" - Getting Started Table of trouble and how to tape 164 Enlarging still images recorded on "Memory ...
Operating Instructions
Page 10
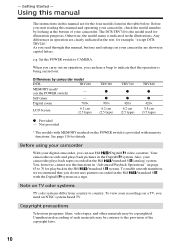
...laws. 10 e.g. Digital zoom 700× LCD Screen 6.2 cm (2.5 type) TRV340 z z 700× 6.2 cm (2.5 type) TRV740 z z 420× 6.2 cm (2.5 type) TRV840 z z 420× 8.8 cm (3.5 type) z Provided - You, however, cannot use Hi8 /Digital8 video cassettes. Set the POWER switch to... pictures recorded in capital letters. TRV240 MEMORY mark* (on a tape. Self-timer - Also, your camcorder, check the model number by camcorder model DCR- Your camcorder records and plays back pictures in the Hi8 /standard 8 (analog) system. Copyright precautions Television programs, ...
...laws. 10 e.g. Digital zoom 700× LCD Screen 6.2 cm (2.5 type) TRV340 z z 700× 6.2 cm (2.5 type) TRV740 z z 420× 6.2 cm (2.5 type) TRV840 z z 420× 8.8 cm (3.5 type) z Provided - You, however, cannot use Hi8 /Digital8 video cassettes. Set the POWER switch to... pictures recorded in capital letters. TRV240 MEMORY mark* (on a tape. Self-timer - Also, your camcorder, check the model number by camcorder model DCR- Your camcorder records and plays back pictures in the Hi8 /standard 8 (analog) system. Copyright precautions Television programs, ...
Operating Instructions
Page 16
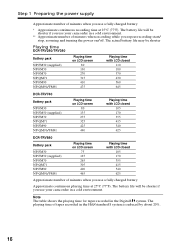
... life will be shorter if you use your camcorder in the Digital8 system. Note The table shows the playing time for tapes recorded in a cold environment. ** Approximate number of minutes when recording while you repeat recording start/ stop, zooming and turning the power on LCD screen 75 125 265 305 400 465 Playing... NP-FM30 (supplied) NP-FM50 NP-FM70 NP-QM71 NP-FM90 NP-QM91/FM91 Playing time on LCD screen 80 130 270 315 410 475 Playing time with LCD closed 110 180 370 430 560 645 DCR-TRV740 Battery pack NP-FM30 NP-FM50 (supplied) NP-FM70 NP-QM71 NP-FM90 NP-QM91/FM91...
... life will be shorter if you use your camcorder in the Digital8 system. Note The table shows the playing time for tapes recorded in a cold environment. ** Approximate number of minutes when recording while you repeat recording start/ stop, zooming and turning the power on LCD screen 75 125 265 305 400 465 Playing... NP-FM30 (supplied) NP-FM50 NP-FM70 NP-QM71 NP-FM90 NP-QM91/FM91 Playing time on LCD screen 80 130 270 315 410 475 Playing time with LCD closed 110 180 370 430 560 645 DCR-TRV740 Battery pack NP-FM30 NP-FM50 (supplied) NP-FM70 NP-QM71 NP-FM90 NP-QM91/FM91...

Operating Instructions
Page 18
... hour and then the minute. (1) Set the POWER switch to CAMERA or MEMORY (except DCR-TRV240), and then press MENU to display the menu settings. (2) Turn the SEL/PUSH EXEC dial to select CLOCK SET in your camcorder for about half a year, the date and time settings may appear) because the built... the date and time Set the date and time settings when you use your camcorder for the first time. "CLOCK SET" will be cleared from memory (bars may be displayed each time that you set the POWER switch to CAMERA/MEMORY (except DCR-TRV240) unless you set the date and time settings.
... hour and then the minute. (1) Set the POWER switch to CAMERA or MEMORY (except DCR-TRV240), and then press MENU to display the menu settings. (2) Turn the SEL/PUSH EXEC dial to select CLOCK SET in your camcorder for about half a year, the date and time settings may appear) because the built... the date and time Set the date and time settings when you use your camcorder for the first time. "CLOCK SET" will be cleared from memory (bars may be displayed each time that you set the POWER switch to CAMERA/MEMORY (except DCR-TRV240) unless you set the date and time settings.
Operating Instructions
Page 19
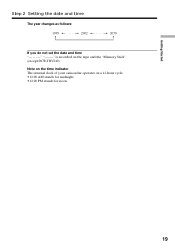
Getting Started Step 2 Setting the date and time The year changes as follows: 1995 T t 2002 T t 2079 If you do not set the date and time is recorded on the tape and the "Memory Stick". (except DCR-TRV240) Note on the time indicator The internal clock of your camcorder operates on a 12-hour cycle. •12:00 AM stands for midnight. •12:00 PM stands for noon. 19
Getting Started Step 2 Setting the date and time The year changes as follows: 1995 T t 2002 T t 2079 If you do not set the date and time is recorded on the tape and the "Memory Stick". (except DCR-TRV240) Note on the time indicator The internal clock of your camcorder operates on a 12-hour cycle. •12:00 AM stands for midnight. •12:00 PM stands for noon. 19
Operating Instructions
Page 20
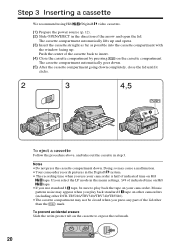
... compartment. To prevent accidental erasure Slide the write-protect tab on your camcorder is half of indicated time on Hi8 tape. •If you use your camcorder. If you select the LP mode in the Digital8 system. • The recording time when you use standard 8 tape,...out the cassette in the direction of the lid other DCR-TRV240/TRV340/TRV740/TRV840). •The cassette compartment may appear when you press any part of the arrow and open the lid. Step 3 Inserting a cassette We recommend using Hi8 /Digital8 video cassettes. (1) Prepare the power source (p. 12)....
... compartment. To prevent accidental erasure Slide the write-protect tab on your camcorder is half of indicated time on Hi8 tape. •If you use your camcorder. If you select the LP mode in the Digital8 system. • The recording time when you use standard 8 tape,...out the cassette in the direction of the lid other DCR-TRV240/TRV340/TRV740/TRV840). •The cassette compartment may appear when you press any part of the arrow and open the lid. Step 3 Inserting a cassette We recommend using Hi8 /Digital8 video cassettes. (1) Prepare the power source (p. 12)....
Operating Instructions
Page 22
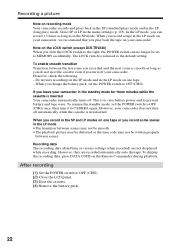
...mode •The transition between the last scene you recorded and the next scene is inserted Your camcorder automatically turns off. However, they are not displayed while recording. Recording data The recording data ... and tape wear. Note on the LOCK switch (except DCR-TRV240) When you turn it to OFF (CHG). When you leave your camcorder in the LP mode on one tape or you record ... off automatically while the cassette is to save battery power and to OFF (CHG). (2) Close the LCD panel. (3) Eject the cassette. (4) Remove the battery pack. 22 This is not inserted. When you...
...mode •The transition between the last scene you recorded and the next scene is inserted Your camcorder automatically turns off. However, they are not displayed while recording. Recording data The recording data ... and tape wear. Note on the LOCK switch (except DCR-TRV240) When you turn it to OFF (CHG). When you leave your camcorder in the LP mode on one tape or you record ... off automatically while the cassette is to save battery power and to OFF (CHG). (2) Close the LCD panel. (3) Eject the cassette. (4) Remove the battery pack. 22 This is not inserted. When you...
Operating Instructions
Page 30
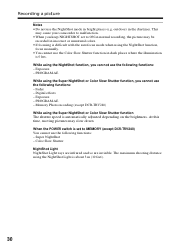
... Slow Shutter NightShot Light NightShot Light rays are infrared and so are invisible. At this time, moving pictures may cause your camcorder to malfunction. •When you cannot use the following functions: - The maximum shooting distance using the Super NightShot or Color... Slow Shutter function The shutter speed is about 3 m (10 feet). 30 Super NightShot - Memory Photo recording (except DCR-TRV240) While using the NightShot Light is automatically adjusted depending on the brightness. PROGRAM AE - outdoors in bright places (e.g. Recording a picture...
... Slow Shutter NightShot Light NightShot Light rays are infrared and so are invisible. At this time, moving pictures may cause your camcorder to malfunction. •When you cannot use the following functions: - The maximum shooting distance using the Super NightShot or Color... Slow Shutter function The shutter speed is about 3 m (10 feet). 30 Super NightShot - Memory Photo recording (except DCR-TRV240) While using the NightShot Light is automatically adjusted depending on the brightness. PROGRAM AE - outdoors in bright places (e.g. Recording a picture...
Operating Instructions
Page 36
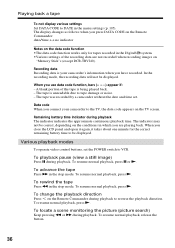
...the stop mode. To advance the tape Press M in the Digital8 system. •Various settings of the tape is your camcorder's information when you connect your camcorder to tape damage or noise. - The tape is unreadable due ...to the TV, the data code appears on the conditions in which you close the LCD panel and open... Commander: date/time y no indicator Notes on "Memory Stick"s (except DCR-TRV240). Various playback modes To operate video control buttons, set .
...the stop mode. To advance the tape Press M in the Digital8 system. •Various settings of the tape is your camcorder's information when you connect your camcorder to tape damage or noise. - The tape is unreadable due ...to the TV, the data code appears on the conditions in which you close the LCD panel and open... Commander: date/time y no indicator Notes on "Memory Stick"s (except DCR-TRV240). Various playback modes To operate video control buttons, set .
Operating Instructions
Page 39
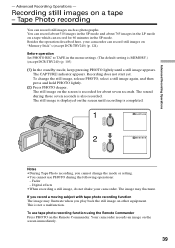
... This is also recorded. Tape Photo recording You can record for about 765 images in the LP mode on "Memory Stick"s (except DCR-TRV240) (p. 124). Advanced Recording Operations - To change the mode or setting. •You cannot use tape photo recording function using ...may fluctuate when you record a moving subject with tape photo recording function The image may fluctuate. Besides the operation described here, your camcorder. The sound during the following operations: - To use PHOTO during those seven seconds is not a malfunction. Before operation Set PHOTO ...
... This is also recorded. Tape Photo recording You can record for about 765 images in the LP mode on "Memory Stick"s (except DCR-TRV240) (p. 124). Advanced Recording Operations - To change the mode or setting. •You cannot use tape photo recording function using ...may fluctuate when you record a moving subject with tape photo recording function The image may fluctuate. Besides the operation described here, your camcorder. The sound during the following operations: - To use PHOTO during those seven seconds is not a malfunction. Before operation Set PHOTO ...

Operating Instructions
Page 40
To record clear and less fluctuated still images We recommend that you record on the screen by pressing PHOTO lightly. Press PHOTO deeper. Tape Photo recording To use the tape photo recording function during normal CAMERA recording You cannot check an image on "Memory Stick"s. The still image is then recorded for about seven seconds, and your camcorder returns to the standby mode. You can record still images on a tape - Recording still images on "Memory Stick"s even in CAMERA mode. (P.124) (except DCR-TRV240) 40
To record clear and less fluctuated still images We recommend that you record on the screen by pressing PHOTO lightly. Press PHOTO deeper. Tape Photo recording To use the tape photo recording function during normal CAMERA recording You cannot check an image on "Memory Stick"s. The still image is then recorded for about seven seconds, and your camcorder returns to the standby mode. You can record still images on a tape - Recording still images on "Memory Stick"s even in CAMERA mode. (P.124) (except DCR-TRV240) 40
Operating Instructions
Page 42
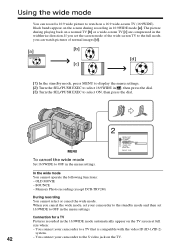
.../PUSH EXEC to select 16:9WIDE in , then press the dial. (3) Turn the SEL/PUSH EXEC to OFF in the widthwise direction. You connect your camcorder to the standby mode and then set 16:9WIDE to select ON, then press the dial. Using the wide mode You can watch pictures of... screen during playing back on the TV screen at full size when: - Connection for a TV Pictures recorded in 16:9WIDE mode [a]. Memory Photo recording (except DCR-TRV240) During recording You cannot select or cancel the wide mode. REC RETURN [MENU] : END OFF ON In the wide mode You cannot operate the...
.../PUSH EXEC to select 16:9WIDE in , then press the dial. (3) Turn the SEL/PUSH EXEC to OFF in the widthwise direction. You connect your camcorder to the standby mode and then set 16:9WIDE to select ON, then press the dial. Using the wide mode You can watch pictures of... screen during playing back on the TV screen at full size when: - Connection for a TV Pictures recorded in 16:9WIDE mode [a]. Memory Photo recording (except DCR-TRV240) During recording You cannot select or cancel the wide mode. REC RETURN [MENU] : END OFF ON In the wide mode You cannot operate the...
Operating Instructions
Page 43
...-1 system sends aspect ratio (screen horizontal/vertical ratio) information (16:9, 4:3, or letter box) with ID-1 signals inserted between video signals when you connect your camcorder to ON (DCR-TRV240/TRV340 only) The SteadyShot function does not work. ID-2 system The ID-2 system sends a copyright protection signal with video signals. If 16:9WIDE...
...-1 system sends aspect ratio (screen horizontal/vertical ratio) information (16:9, 4:3, or letter box) with ID-1 signals inserted between video signals when you connect your camcorder to ON (DCR-TRV240/TRV340 only) The SteadyShot function does not work. ID-2 system The ID-2 system sends a copyright protection signal with video signals. If 16:9WIDE...
Operating Instructions
Page 52
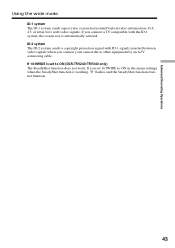
... - BOUNCE •While setting NIGHTSHOT to select the desired mode. Sports lesson 52 Using the PROGRAM AE function (1) In CAMERA or MEMORY (except DCR-TRV240) mode, press MENU to display the menu settings. (2) Turn the SEL/PUSH EXEC dial to select PROGRAM AE in , then press the ... fluorescent lamp, sodium lamp or mercury lamp Flickering or changes in color may occur in the Color Slow Shutter mode. Beach & ski •Your camcorder is set to focus only on subjects in the middle to AUTO in the following modes. Slow shutter - Spotlight - Sunset & moon - Sports ...
... - BOUNCE •While setting NIGHTSHOT to select the desired mode. Sports lesson 52 Using the PROGRAM AE function (1) In CAMERA or MEMORY (except DCR-TRV240) mode, press MENU to display the menu settings. (2) Turn the SEL/PUSH EXEC dial to select PROGRAM AE in , then press the ... fluorescent lamp, sodium lamp or mercury lamp Flickering or changes in color may occur in the Color Slow Shutter mode. Beach & ski •Your camcorder is set to focus only on subjects in the middle to AUTO in the following modes. Slow shutter - Spotlight - Sunset & moon - Sports ...
Operating Instructions
Page 53
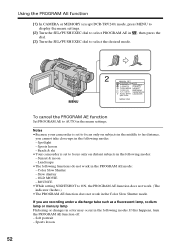
.../PUSH EXEC dial to adjust the brightness. 1 EXPOSURE 2 To return to the automatic exposure mode Press EXPOSURE to the automatic mode: - Color Slow Shutter Your camcorder automatically returns to turn off the indicator. If you adjust the exposure manually, the following cases: - Note When you change the PROGRAM AE mode - BACKLIGHT.... Adjust the exposure manually in the following functions do not work: - When the subject is automatically adjusted. night scenes) faithfully (1) In CAMERA or MEMORY (except DCR-TRV240) mode, press EXPOSURE.
.../PUSH EXEC dial to adjust the brightness. 1 EXPOSURE 2 To return to the automatic exposure mode Press EXPOSURE to the automatic mode: - Color Slow Shutter Your camcorder automatically returns to turn off the indicator. If you adjust the exposure manually, the following cases: - Note When you change the PROGRAM AE mode - BACKLIGHT.... Adjust the exposure manually in the following functions do not work: - When the subject is automatically adjusted. night scenes) faithfully (1) In CAMERA or MEMORY (except DCR-TRV240) mode, press EXPOSURE.
Operating Instructions
Page 63
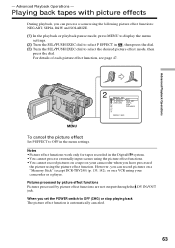
...effect function, see page 47. However, you can record pictures on a "Memory Stick" (except DCR-TRV240) (p. 135, 142), or on your camcorder as a player. Playing back tapes with picture effects During playback, you can process a scene using your camcorder when you set the POWER switch to OFF (CHG) or stop playing back The.... (2) Turn the SEL/PUSH EXEC dial to select P EFFECT in , then press the dial. (3) Turn the SEL/PUSH EXEC dial to OFF in the Digital8 system. •You cannot process externally input scenes using the picture effect function. Advanced Playback Operations -
...effect function, see page 47. However, you can record pictures on a "Memory Stick" (except DCR-TRV240) (p. 135, 142), or on your camcorder as a player. Playing back tapes with picture effects During playback, you can process a scene using your camcorder when you set the POWER switch to OFF (CHG) or stop playing back The.... (2) Turn the SEL/PUSH EXEC dial to select P EFFECT in , then press the dial. (3) Turn the SEL/PUSH EXEC dial to OFF in the Digital8 system. •You cannot process externally input scenes using the picture effect function. Advanced Playback Operations -

Operating Instructions
Page 64
... : END To cancel the digital effect Set D EFFECT to OFF (CHG) or stop playing back The digital effect function is stored in the Digital8 system. •You cannot process externally input scenes using digital effect functions. •You cannot record images on a tape on the screen. TRAIL... During playback, you have processed the image using digital effect functions. However, you can process a scene using your camcorder when you can record images on a "Memory Stick" (except DCR-TRV240) (p. 135, 142), or on a VCR using the following digital effect functions: STILL, FLASH, LUMI. ...
... : END To cancel the digital effect Set D EFFECT to OFF (CHG) or stop playing back The digital effect function is stored in the Digital8 system. •You cannot process externally input scenes using digital effect functions. •You cannot record images on a tape on the screen. TRAIL... During playback, you have processed the image using digital effect functions. However, you can process a scene using your camcorder when you can record images on a "Memory Stick" (except DCR-TRV240) (p. 135, 142), or on a VCR using the following digital effect functions: STILL, FLASH, LUMI. ...


