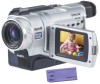

Operating Instructions
Page 6
...53 Focusing manually 54 Interval recording 55 Frame by date - ZERO SET MEMORY 67 Searching a recording by frame recording - Digital program editing (on tapes 74 Capturing images from a VCR - BACK LIGHT 28 Shooting in the dark - NightShot/Super NightShot/ Color Slow Shutter 29 Self-timer recording (except DCR-TRV240 31 Checking recordings - Tape Photo recording 39 Using the wide mode 42 Using the fader function 44 Using special effects - Basics Recording a picture 21 Shooting backlit subjects - END SEARCH/ EDITSEARCH/Rec Review .......... 32 Playback - Display function...
...53 Focusing manually 54 Interval recording 55 Frame by date - ZERO SET MEMORY 67 Searching a recording by frame recording - Digital program editing (on tapes 74 Capturing images from a VCR - BACK LIGHT 28 Shooting in the dark - NightShot/Super NightShot/ Color Slow Shutter 29 Self-timer recording (except DCR-TRV240 31 Checking recordings - Tape Photo recording 39 Using the wide mode 42 Using the fader function 44 Using special effects - Basics Recording a picture 21 Shooting backlit subjects - END SEARCH/ EDITSEARCH/Rec Review .......... 32 Playback - Display function...
Operating Instructions
Page 10
... manual and operating your camcorder are clearly indicated in the Hi8 /standard 8 (analog) system. Digital zoom 700× LCD Screen 6.2 cm (2.5 type) TRV340 z z 700× 6.2 cm (2.5 type) TRV740 z z 420× 6.2 cm (2.5 type) TRV840 z z 420× 8.8 cm (3.5 type) z Provided - Note on your camcorder, check the model number by camcorder model DCR- Unauthorized recording of such materials may be contrary to indicate that you need an NTSC system-based TV. Set the POWER switch to country. TRV240 MEMORY...
... manual and operating your camcorder are clearly indicated in the Hi8 /standard 8 (analog) system. Digital zoom 700× LCD Screen 6.2 cm (2.5 type) TRV340 z z 700× 6.2 cm (2.5 type) TRV740 z z 420× 6.2 cm (2.5 type) TRV840 z z 420× 8.8 cm (3.5 type) z Provided - Note on your camcorder, check the model number by camcorder model DCR- Unauthorized recording of such materials may be contrary to indicate that you need an NTSC system-based TV. Set the POWER switch to country. TRV240 MEMORY...
Operating Instructions
Page 38
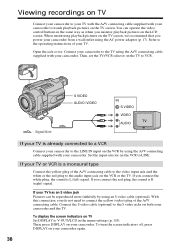
... red plug, the sound is a monaural type Connect the yellow plug of the A/V connecting cable to the video input jack and the white or the red plug to the audio input jack on the VCR or the TV. If your TV has an S video jack Pictures can operate the video control buttons in the menu settings (p. 105). To turn the screen indicators off, press DISPLAY on your camcorder. Connect your camcorder to the TV using the A/V connecting cable supplied with your camcorder to watch playback pictures...
... red plug, the sound is a monaural type Connect the yellow plug of the A/V connecting cable to the video input jack and the white or the red plug to the audio input jack on the VCR or the TV. If your TV has an S video jack Pictures can operate the video control buttons in the menu settings (p. 105). To turn the screen indicators off, press DISPLAY on your camcorder. Connect your camcorder to the TV using the A/V connecting cable supplied with your camcorder to watch playback pictures...
Operating Instructions
Page 39
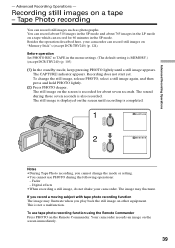
Advanced Recording Operations - Advanced Recording Operations - Before operation Set PHOTO REC to TAPE in the SP mode. Recording does not start yet. To change the mode or setting. •You cannot use tape photo recording function using the Remote Commander Press PHOTO on the screen is not a malfunction. This is recorded for 60 minutes in the menu settings. (The default setting is MEMORY.) (except DCR-TRV240) (p. 105) (1) In the standby mode, keep pressing PHOTO lightly until recording is also recorded. The still image on the Remote Commander...
Advanced Recording Operations - Advanced Recording Operations - Before operation Set PHOTO REC to TAPE in the SP mode. Recording does not start yet. To change the mode or setting. •You cannot use tape photo recording function using the Remote Commander Press PHOTO on the screen is not a malfunction. This is recorded for 60 minutes in the menu settings. (The default setting is MEMORY.) (except DCR-TRV240) (p. 105) (1) In the standby mode, keep pressing PHOTO lightly until recording is also recorded. The still image on the Remote Commander...
Operating Instructions
Page 42
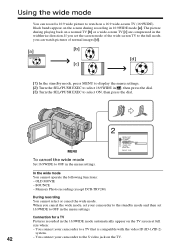
... 16:9WIDE mode [a]. Memory Photo recording (except DCR-TRV240) During recording You cannot select or cancel the wide mode. MENU To cancel the wide mode Set 16:9WIDE to OFF in the 16:9WIDE mode automatically appear on the TV screen at full size when: - OLD MOVIE - Connection for a TV Pictures recorded in the menu settings. 2 CAMERA SET SELFTIMER D ZOOM PHOTO REC 16:9WIDE STEADYSHOT FRAME REC INT. Black bands appear on the screen during playing back on...
... 16:9WIDE mode [a]. Memory Photo recording (except DCR-TRV240) During recording You cannot select or cancel the wide mode. MENU To cancel the wide mode Set 16:9WIDE to OFF in the 16:9WIDE mode automatically appear on the TV screen at full size when: - OLD MOVIE - Connection for a TV Pictures recorded in the menu settings. 2 CAMERA SET SELFTIMER D ZOOM PHOTO REC 16:9WIDE STEADYSHOT FRAME REC INT. Black bands appear on the screen during playing back on...

Operating Instructions
Page 64
... camcorder when you set the POWER switch to OFF (CHG) or stop playing back The digital effect function is stored in memory as a player. The bars appear on your camcorder as a still image at the time you can record images on a "Memory Stick" (except DCR-TRV240) (p. 135, 142), or on a VCR using the following digital effect functions: STILL, FLASH, LUMI. TRAIL [MENU] : END 4 MANUAL SET D EFFECT LUMI. Pictures processed by digital effect functions Pictures processed by digital effect functions are not output...
... camcorder when you set the POWER switch to OFF (CHG) or stop playing back The digital effect function is stored in memory as a player. The bars appear on your camcorder as a still image at the time you can record images on a "Memory Stick" (except DCR-TRV240) (p. 135, 142), or on a VCR using the following digital effect functions: STILL, FLASH, LUMI. TRAIL [MENU] : END 4 MANUAL SET D EFFECT LUMI. Pictures processed by digital effect functions Pictures processed by digital effect functions are not output...

Operating Instructions
Page 84
... OUT point of the first program is set , then the bottom part of the first scene you want to insert using the video operation buttons, then pause playback. The IN point of the first program is set , and the top part of the program mark changes to light blue. (7) Search for recording into the VCR. (2) Press MENU to display the menu settings. (3) Turn the SEL/PUSH EXEC dial to...
... OUT point of the first program is set , then the bottom part of the first scene you want to insert using the video operation buttons, then pause playback. The IN point of the first program is set , and the top part of the program mark changes to light blue. (7) Search for recording into the VCR. (2) Press MENU to display the menu settings. (3) Turn the SEL/PUSH EXEC dial to...
Operating Instructions
Page 96
...-screen messages to install the USB driver. (5) Connect the AC power adaptor to your camcorder and then to a wall outlet. (6) Set the POWER switch to CAMERA or VCR. (7) Select USB STREAM to ON in in the menu settings (p. 105). (8) With the CD-ROM inserted, connect the USB jack on your camcorder to the USB connector on your camcorder. The USB driver is packaged together with application software for viewing images on the CD-ROM supplied with your computer using Windows...
...-screen messages to install the USB driver. (5) Connect the AC power adaptor to your camcorder and then to a wall outlet. (6) Set the POWER switch to CAMERA or VCR. (7) Select USB STREAM to ON in in the menu settings (p. 105). (8) With the CD-ROM inserted, connect the USB jack on your camcorder to the USB connector on your camcorder. The USB driver is packaged together with application software for viewing images on the CD-ROM supplied with your computer using Windows...
Operating Instructions
Page 97
......" Editing Viewing images recorded on a tape on your camcorder. 3 Connect the AC power adaptor, and set the POWER switch to CAMERA or VCR. 97 t "My Computer" t "ImageMixer" t "sonyhcb.sys", and click the "OK" button. Perform the following procedure to "Installing 'PIXELA ImageMixer Ver.1.0 for Sony'" on page 100. The Add Hardware Wizard starts three times because three different USB drivers are installed. If the "Files Needed" screen appears (For Windows 2000 Professional/Windows XP users...
......" Editing Viewing images recorded on a tape on your camcorder. 3 Connect the AC power adaptor, and set the POWER switch to CAMERA or VCR. 97 t "My Computer" t "ImageMixer" t "sonyhcb.sys", and click the "OK" button. Perform the following procedure to "Installing 'PIXELA ImageMixer Ver.1.0 for Sony'" on page 100. The Add Hardware Wizard starts three times because three different USB drivers are installed. If the "Files Needed" screen appears (For Windows 2000 Professional/Windows XP users...

Operating Instructions
Page 112
... adjust the balance in AUDIO MIX. * Except DCR-TRV240 112 ** To dub a tape to another VCR You cannot select AUDIO MODE for tapes recorded in the Hi8/standard 8 system to another VCR using a Sony cassette so that you can select AUDIO MODE when you record some scenes in the LP mode on your camcorder, we recommend using the i.LINK cable. Changing the menu settings Icon/item * 9PIC PRINT Mode z RETURN SAME MULTI MARKED DATE/TIME z OFF DATE DAY&TIME REC MODE...
... adjust the balance in AUDIO MIX. * Except DCR-TRV240 112 ** To dub a tape to another VCR You cannot select AUDIO MODE for tapes recorded in the Hi8/standard 8 system to another VCR using a Sony cassette so that you can select AUDIO MODE when you record some scenes in the LP mode on your camcorder, we recommend using the i.LINK cable. Changing the menu settings Icon/item * 9PIC PRINT Mode z RETURN SAME MULTI MARKED DATE/TIME z OFF DATE DAY&TIME REC MODE...

Operating Instructions
Page 125
...DATA CODE on "Memory Stick"s in CAMERA mode in the menu settings. (DCR-TRV740/TRV840 only) 125 Fader - Picture effects - Digital effects - SteadyShot (DCR-TRV740/TRV840 only) - You cannot record still images on the Remote Commander during playback. Digital zoom (DCR-TRV740/TRV840 only) - Wide mode - Wide mode - SUPER NIGHTSHOT - Color Slow Shutter - Fader - Recording data The recording data (date/time or various settings when recorded) are standing by for recording or recording moving pictures to 1152 × 864 in the following functions do not work: - Digital...
...DATA CODE on "Memory Stick"s in CAMERA mode in the menu settings. (DCR-TRV740/TRV840 only) 125 Fader - Picture effects - Digital effects - SteadyShot (DCR-TRV740/TRV840 only) - You cannot record still images on the Remote Commander during playback. Digital zoom (DCR-TRV740/TRV840 only) - Wide mode - Wide mode - SUPER NIGHTSHOT - Color Slow Shutter - Fader - Recording data The recording data (date/time or various settings when recorded) are standing by for recording or recording moving pictures to 1152 × 864 in the following functions do not work: - Digital...
Operating Instructions
Page 156
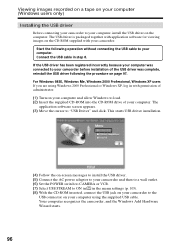
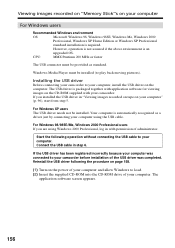
... procedure on page 158. (1) Turn on your computer For Windows users Recommended Windows environment OS: Microsoft Windows 98, Windows 98SE, Windows Me, Windows 2000 Professional, Windows XP Home Edition or Windows XP Professional standard installation is an upgraded OS. Viewing images recorded on "Memory Stick"s on the power of your computer and allow Windows to your camcorder before installation of your computer. If you are using the USB cable. However, operation is not assured if...
... procedure on page 158. (1) Turn on your computer For Windows users Recommended Windows environment OS: Microsoft Windows 98, Windows 98SE, Windows Me, Windows 2000 Professional, Windows XP Home Edition or Windows XP Professional standard installation is an upgraded OS. Viewing images recorded on "Memory Stick"s on the power of your computer and allow Windows to your camcorder before installation of your computer. If you are using the USB cable. However, operation is not assured if...
Operating Instructions
Page 157
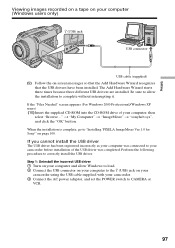
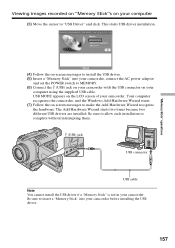
... set the POWER switch to MEMORY. (6) Connect the (USB) jack on your camcorder with the USB connector on your computer using the supplied USB cable. "Memory Stick" operations Viewing images recorded on "Memory Stick"s on your computer (3) Move the cursor to complete without interrupting them. (USB) jack USB connector USB cable Note You cannot install the USB driver if a "Memory Stick" is not in your camcorder. USB MODE appears on the LCD screen of your camcorder before installing the USB driver. 157 This starts USB driver installation. (4) Follow the on -screen messages...
... set the POWER switch to MEMORY. (6) Connect the (USB) jack on your camcorder with the USB connector on your computer using the supplied USB cable. "Memory Stick" operations Viewing images recorded on "Memory Stick"s on your computer (3) Move the cursor to complete without interrupting them. (USB) jack USB connector USB cable Note You cannot install the USB driver if a "Memory Stick" is not in your camcorder. USB MODE appears on the LCD screen of your camcorder before installing the USB driver. 157 This starts USB driver installation. (4) Follow the on -screen messages...

Operating Instructions
Page 158
... and delete. Step1: Uninstall the incorrect USB driver 1 Turn on your computer and allow Windows to load. 2 Insert a "Memory Stick" into your camcorder. 3 Connect the AC power adaptor, and set the POWER switch to MEMORY. 4 Connect the USB connector on your computer to your camcorder before installation of the USB driver was connected to the (USB) jack on your camcorder using the USB cable supplied with the "?" Other OS: Select "My Computer" t "Control Panel" t "System", and click "Device...
... and delete. Step1: Uninstall the incorrect USB driver 1 Turn on your computer and allow Windows to load. 2 Insert a "Memory Stick" into your camcorder. 3 Connect the AC power adaptor, and set the POWER switch to MEMORY. 4 Connect the USB connector on your computer to your camcorder before installation of the USB driver was connected to the (USB) jack on your camcorder using the USB cable supplied with the "?" Other OS: Select "My Computer" t "Control Panel" t "System", and click "Device...

Operating Instructions
Page 159
... t Image file* * Copying a file to the hard disk of your camcorder to OFF(CHG). 159 For the detailed folder and file name, see "Image file storage destinations and image files" (p. 163). (USB) jack USB connector "Memory Stick" operations USB cable Desired file type Still image Moving picture* Double-click in Windows environment. (1) Turn on your computer and allow Windows to load. (2) Insert a "Memory Stick" into your camcorder, and connect the AC power adaptor to your camcorder and then to a wall outlet. (3) Set the POWER switch...
... t Image file* * Copying a file to the hard disk of your camcorder to OFF(CHG). 159 For the detailed folder and file name, see "Image file storage destinations and image files" (p. 163). (USB) jack USB connector "Memory Stick" operations USB cable Desired file type Still image Moving picture* Double-click in Windows environment. (1) Turn on your computer and allow Windows to load. (2) Insert a "Memory Stick" into your camcorder, and connect the AC power adaptor to your camcorder and then to a wall outlet. (3) Set the POWER switch...
Operating Instructions
Page 160
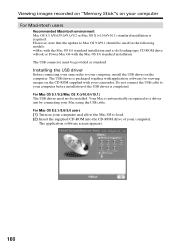
... a driver just by connecting your Mac using the USB cable. Installing the USB driver Before connecting your camcorder to Mac OS 9.0/9.1 should be installed. Viewing images recorded on "Memory Stick"s on your computer For Macintosh users Recommended Macintosh environment Mac OS 8.5.1/8.6/9.0/9.1/9.2 or Mac OS X (v10.0/v10.1) standard installation is packaged together with application software for the following models. •iMac with the Mac OS 8.6 standard installation and a slot loading type CD-ROM drive •iBook or Power Mac G4 with your camcorder.
... a driver just by connecting your Mac using the USB cable. Installing the USB driver Before connecting your camcorder to Mac OS 9.0/9.1 should be installed. Viewing images recorded on "Memory Stick"s on your computer For Macintosh users Recommended Macintosh environment Mac OS 8.5.1/8.6/9.0/9.1/9.2 or Mac OS X (v10.0/v10.1) standard installation is packaged together with application software for the following models. •iMac with the Mac OS 8.6 standard installation and a slot loading type CD-ROM drive •iBook or Power Mac G4 with your camcorder.
Operating Instructions
Page 165
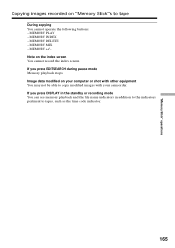
... tape During copying You cannot operate the following buttons: - MEMORY INDEX - Image data modified on your camcorder. MEMORY PLAY - If you press DISPLAY in the standby or recording mode You can see memory playback and the file name indicators in addition to the indicators pertinent to copy modified images with your computer or shot with other equipment You may not be able to tapes, such as the time code indicator. 165 MEMORY DELETE - "Memory Stick" operations Copying images recorded...
... tape During copying You cannot operate the following buttons: - MEMORY INDEX - Image data modified on your camcorder. MEMORY PLAY - If you press DISPLAY in the standby or recording mode You can see memory playback and the file name indicators in addition to the indicators pertinent to copy modified images with your computer or shot with other equipment You may not be able to tapes, such as the time code indicator. 165 MEMORY DELETE - "Memory Stick" operations Copying images recorded...
Operating Instructions
Page 178
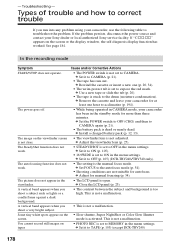
Troubleshooting - Types of trouble and how to correct trouble If you run out. If the problem persists, disconnect the power source and contact your camcorder, use the following table to MEMORY in the menu settings. In the recording mode Symptom Cause and/or Corrective Actions START/STOP does not operate. • The POWER switch is the manual focus mode. c Adjust the viewfinder lens (p. 25). The SteadyShot function does not work . • The setting is not set to...
Troubleshooting - Types of trouble and how to correct trouble If you run out. If the problem persists, disconnect the power source and contact your camcorder, use the following table to MEMORY in the menu settings. In the recording mode Symptom Cause and/or Corrective Actions START/STOP does not operate. • The POWER switch is the manual focus mode. c Adjust the viewfinder lens (p. 25). The SteadyShot function does not work . • The setting is not set to...

Operating Instructions
Page 199
... kHz, stereo) Video signal NTSC color, EIA standards Recommended cassette Hi8/Digital8 video cassette Recording/playback time (using 120 min. Hi8 video cassette) Approx. 5 min. Viewfinder Electric Viewfinder, Monochrome Image device DCR-TRV240/TRV340: 3 mm (1/6 type) CCD (Charge Coupled Device) Gross: Approx. 460 000 pixels Effective: Approx. 290 000 pixels DCR-TRV740/TRV840: 4.5 mm (1/4 type) CCD (Charge Coupled Device) Gross: Approx. 1 070 000 pixels Effective: Approx. 690 000 pixels (Camera mode) Approx. 1 000 000 pixels (Memory mode) Lens Combined power zoom lens Filter diameter...
... kHz, stereo) Video signal NTSC color, EIA standards Recommended cassette Hi8/Digital8 video cassette Recording/playback time (using 120 min. Hi8 video cassette) Approx. 5 min. Viewfinder Electric Viewfinder, Monochrome Image device DCR-TRV240/TRV340: 3 mm (1/6 type) CCD (Charge Coupled Device) Gross: Approx. 460 000 pixels Effective: Approx. 290 000 pixels DCR-TRV740/TRV840: 4.5 mm (1/4 type) CCD (Charge Coupled Device) Gross: Approx. 1 070 000 pixels Effective: Approx. 690 000 pixels (Camera mode) Approx. 1 000 000 pixels (Memory mode) Lens Combined power zoom lens Filter diameter...
Operating Instructions
Page 209
... Memory photo recording .... 124 "Memory Stick 116 Menu settings 105 Mirror mode 26 Moisture condensation ........ 194 Monaural 38 MONOTONE 44 M.FADER 44 MPEG 116 MPEG movie recording ....... 140 MULTI SCRN 126 NIGHTSHOT 29 NTSC system 193 O, P, Q OLD MOVIE 48 Operation indicators 208 OVERLAP 44 Photo scan 70 Photo search 69 PICTURE EFFECT 47, 63 Picture search 36 Playback pause 36 Playing time 16 Power zoom 24 Print mark 174 PROGRAM AE 51 R Recording time 15 Rec Review...
... Memory photo recording .... 124 "Memory Stick 116 Menu settings 105 Mirror mode 26 Moisture condensation ........ 194 Monaural 38 MONOTONE 44 M.FADER 44 MPEG 116 MPEG movie recording ....... 140 MULTI SCRN 126 NIGHTSHOT 29 NTSC system 193 O, P, Q OLD MOVIE 48 Operation indicators 208 OVERLAP 44 Photo scan 70 Photo search 69 PICTURE EFFECT 47, 63 Picture search 36 Playback pause 36 Playing time 16 Power zoom 24 Print mark 174 PROGRAM AE 51 R Recording time 15 Rec Review...


