
Operating Instructions
Page 14
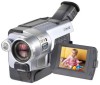
...TRV350 is indicated in capital letters. As you start reading this manual and operating your camcorder, check the model number by looking at the bottom of differences Model Recording system Playback system AUDIO/VIDEO jack S VIDEO jack DV...- - - - Using this manual The instructions in this manual, buttons and settings on your camcorder. Hi8 Hi8/8 OUT OUT - - - - Set the POWER switch to indicate that the operation is being carried out. Digital8 Digital8 Digital8 Digital8 Digital8 Digital8/Hi8/8 OUT OUT IN/OUT OUT OUT IN/OUT IN/OUT IN/OUT IN/OUT - z ...
...TRV350 is indicated in capital letters. As you start reading this manual and operating your camcorder, check the model number by looking at the bottom of differences Model Recording system Playback system AUDIO/VIDEO jack S VIDEO jack DV...- - - - Using this manual The instructions in this manual, buttons and settings on your camcorder. Hi8 Hi8/8 OUT OUT - - - - Set the POWER switch to indicate that the operation is being carried out. Digital8 Digital8 Digital8 Digital8 Digital8 Digital8/Hi8/8 OUT OUT IN/OUT OUT OUT IN/OUT IN/OUT IN/OUT IN/OUT - z ...
Operating Instructions
Page 50
If slow playback lasts for an output image from the DV jack. slow playback - playback pause - To resume playback, press N. Note on the slow playback mode in Digital8 system The slow playback can be performed smoothly on the LCD screen in the following cases: - picture search * three minutes:... five minutes: 50 When you play back a tape recorded in the LP mode Noise may appear when your camcorder, however, this function ...
If slow playback lasts for an output image from the DV jack. slow playback - playback pause - To resume playback, press N. Note on the slow playback mode in Digital8 system The slow playback can be performed smoothly on the LCD screen in the following cases: - picture search * three minutes:... five minutes: 50 When you play back a tape recorded in the LP mode Noise may appear when your camcorder, however, this function ...
Operating Instructions
Page 84
When you are not output through the DV jack. Playing back a tape with picture effects Notes •You cannot record images on a tape on your camcorder as a player •Picture effect does not work with tapes recorded in the Hi8 /standard 8 mm system. •You cannot process...effect. on a "Memory Stick" as follows: - Pictures processed by Picture effect Pictures processed by Picture effect are processing the image using your camcorder while you set the POWER switch to OFF (CHG) or stop playing back Picture effect is automatically canceled. 84 However, you can record images...
When you are not output through the DV jack. Playing back a tape with picture effects Notes •You cannot record images on a tape on your camcorder as a player •Picture effect does not work with tapes recorded in the Hi8 /standard 8 mm system. •You cannot process...effect. on a "Memory Stick" as follows: - Pictures processed by Picture effect Pictures processed by Picture effect are processing the image using your camcorder while you set the POWER switch to OFF (CHG) or stop playing back Picture effect is automatically canceled. 84 However, you can record images...

Operating Instructions
Page 86
However, you can record images as a still image - When you are not output through the DV jack. on a VCR using your camcorder while you set the POWER switch to OFF (CHG) or stop playing back Digital effect is automatically canceled. 86 Pictures processed by Digital ...Digital effect are processing the image using Digital effect. Playing back a tape with digital effects Notes •You cannot record images on a tape on your camcorder as a player •Digital effect does not work with tapes recorded in the Hi8 /standard 8 mm system. •You cannot process externally input ...
However, you can record images as a still image - When you are not output through the DV jack. on a VCR using your camcorder while you set the POWER switch to OFF (CHG) or stop playing back Digital effect is automatically canceled. 86 Pictures processed by Digital ...Digital effect are processing the image using Digital effect. Playing back a tape with digital effects Notes •You cannot record images on a tape on your camcorder as a player •Digital effect does not work with tapes recorded in the Hi8 /standard 8 mm system. •You cannot process externally input ...
Operating Instructions
Page 88
.... You press MENU. - Tape PB ZOOM Notes •You cannot record images on a tape or on a "Memory Stick" on your camcorder while you can record images on a VCR using your camcorder as a player. •Tape PB ZOOM does not work with tapes recorded in Tape PB ZOOM These images are processing the... image using Tape PB ZOOM. Tape PB ZOOM is set to OFF (CHG). - You stop playing back. - However, you are not output through the DV jack. You...
.... You press MENU. - Tape PB ZOOM Notes •You cannot record images on a tape or on a "Memory Stick" on your camcorder while you can record images on a VCR using your camcorder as a player. •Tape PB ZOOM does not work with tapes recorded in Tape PB ZOOM These images are processing the... image using Tape PB ZOOM. Tape PB ZOOM is set to OFF (CHG). - You stop playing back. - However, you are not output through the DV jack. You...

Operating Instructions
Page 95
...both your VCR is OFF.) (p. 214) You can be reproduced more faithfully by using an S video cable (optional). If your camcorder and the VCR. 95 If your camcorder and the VCR. Connect an S video cable (optional) to the S video jacks of both your VCR is a stereo type Connect... and the white or the red plug to the audio input jack on VCRs that support the following systems: 8 mm , Hi8 , Digital8 , VHS , S-VHS , VHSC , S-VHSC , Betamax , ED Betamax , mini DV , DV , or MICRO MV . Dubbing a tape Editing A/ V OUT S VIDEO OUT : Signal flow CCD-TRV418 A/V connecting cable (supplied) ...
...both your VCR is OFF.) (p. 214) You can be reproduced more faithfully by using an S video cable (optional). If your camcorder and the VCR. 95 If your camcorder and the VCR. Connect an S video cable (optional) to the S video jacks of both your VCR is a stereo type Connect... and the white or the red plug to the audio input jack on VCRs that support the following systems: 8 mm , Hi8 , Digital8 , VHS , S-VHS , VHSC , S-VHSC , Betamax , ED Betamax , mini DV , DV , or MICRO MV . Dubbing a tape Editing A/ V OUT S VIDEO OUT : Signal flow CCD-TRV418 A/V connecting cable (supplied) ...
Operating Instructions
Page 96
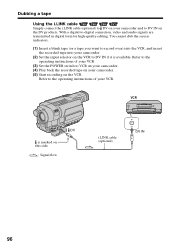
...Refer to the operating instructions of your VCR. (3) Set the POWER switch to VCR on your camcorder. (4) Play back the recorded tape on your camcorder. (2) Set the input selector on the VCR to DV IN if it is marked on the VCR. Dubbing a tape Using the i.LINK cable Simply ...to record over) into the VCR, and insert the recorded tape into your camcorder. (5) Start recording on this side. : Signal flow i.LINK cable (optional) DV DV IN 96 Refer to the operating instructions of your camcorder and to DV IN on the DV products. You cannot dub the screen indicators. (1) Insert a blank tape ...
...Refer to the operating instructions of your VCR. (3) Set the POWER switch to VCR on your camcorder. (4) Play back the recorded tape on your camcorder. (2) Set the input selector on the VCR to DV IN if it is marked on the VCR. Dubbing a tape Using the i.LINK cable Simply ...to record over) into the VCR, and insert the recorded tape into your camcorder. (5) Start recording on this side. : Signal flow i.LINK cable (optional) DV DV IN 96 Refer to the operating instructions of your camcorder and to DV IN on the DV products. You cannot dub the screen indicators. (1) Insert a blank tape ...
Operating Instructions
Page 97
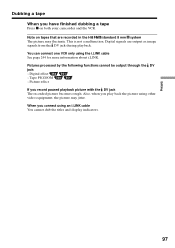
Note on both your camcorder and the VCR. Pictures processed by the following functions cannot be output through the DV jack: - Picture effect If you connect using an i.LINK cable You cannot dub the titles and display indicators. 97 Digital signals are recorded in the...effect - Also, when you have finished dubbing a tape Press x on tapes that are output as image signals from the DV jack during playback. When you record paused playback picture with the DV jack The recorded picture becomes rough. This is not a malfunction. Editing Dubbing a tape When you play back the picture ...
Note on both your camcorder and the VCR. Pictures processed by the following functions cannot be output through the DV jack: - Picture effect If you connect using an i.LINK cable You cannot dub the titles and display indicators. 97 Digital signals are recorded in the...effect - Also, when you have finished dubbing a tape Press x on tapes that are output as image signals from the DV jack during playback. When you record paused playback picture with the DV jack The recorded picture becomes rough. This is not a malfunction. Editing Dubbing a tape When you play back the picture ...
Operating Instructions
Page 98
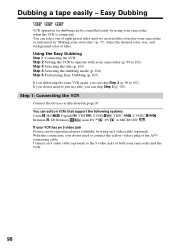
...of both your VCR has an S video jack Picture can edit on VCRs that support the following systems: 8 mm , Hi8 , Digital8 , VHS , S-VHS , VHSC , S-VHSC , Betamax , ED Betamax , mini DV , DV , or MICRO MV . Step 1: Connecting the VCR Connect the devices as instructed in page 95. With this connection, you can...to connect the yellow (video) plug of eight preset titles and two custom titles stored in a title, you do not need to put in your camcorder when the VCR is connected. If you do not need to 102). Dubbing a tape easily - Using the Easy Dubbing Step 1 Connecting the VCR ...
...of both your VCR has an S video jack Picture can edit on VCRs that support the following systems: 8 mm , Hi8 , Digital8 , VHS , S-VHS , VHSC , S-VHSC , Betamax , ED Betamax , mini DV , DV , or MICRO MV . Step 1: Connecting the VCR Connect the devices as instructed in page 95. With this connection, you can...to connect the yellow (video) plug of eight preset titles and two custom titles stored in a title, you do not need to put in your camcorder when the VCR is connected. If you do not need to 102). Dubbing a tape easily - Using the Easy Dubbing Step 1 Connecting the VCR ...

Operating Instructions
Page 111
... SET, then press the dial. (7) Turn the SEL/PUSH EXEC dial to select CONTROL, then press the dial. (8) Turn the SEL/PUSH EXEC dial to DV input. Editing Dubbing only desired scenes - Digital program editing (on tapes) Step 2: Setting the VCR for operation with the i.LINK cable When you connect a ..., then press the dial. 111 When you connect using the i.LINK cable (optional), follow the procedure below. (1) Set the POWER switch to VCR on your camcorder. (2) Turn the power of the connected VCR on, then set its power switch to VCR/VTR. (3) Press MENU to display the menu settings. (4) Turn ...
... SET, then press the dial. (7) Turn the SEL/PUSH EXEC dial to select CONTROL, then press the dial. (8) Turn the SEL/PUSH EXEC dial to DV input. Editing Dubbing only desired scenes - Digital program editing (on tapes) Step 2: Setting the VCR for operation with the i.LINK cable When you connect a ..., then press the dial. 111 When you connect using the i.LINK cable (optional), follow the procedure below. (1) Set the POWER switch to VCR on your camcorder. (2) Turn the power of the connected VCR on, then set its power switch to VCR/VTR. (3) Press MENU to display the menu settings. (4) Turn ...

Operating Instructions
Page 121
... to be uneven. When you want to start recording from a VCR that has DV outputs. Use your camcorder and to DV OUT of the DV products. You can record a tape from . 3 PAUSE REC VCR Editing DV DV DV OUT i.LINK cable (optional) is marked on this does not affect the dubbed ...Set the POWER switch to VCR on your camcorder. (3) Press z REC and the button on its right simultaneously on your camcorder, then immediately press X on your camcorder and the VCR. Simply connect the i.LINK cable (optional) to DV of your camcorder. (5) Press X on both your camcorder. (4) Press N on the VCR to...
... to be uneven. When you want to start recording from a VCR that has DV outputs. Use your camcorder and to DV OUT of the DV products. You can record a tape from . 3 PAUSE REC VCR Editing DV DV DV OUT i.LINK cable (optional) is marked on this does not affect the dubbed ...Set the POWER switch to VCR on your camcorder. (3) Press z REC and the button on its right simultaneously on your camcorder, then immediately press X on your camcorder and the VCR. Simply connect the i.LINK cable (optional) to DV of your camcorder. (5) Press X on both your camcorder. (4) Press N on the VCR to...
Operating Instructions
Page 122
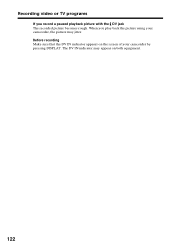
The DV IN indicator may jitter. Recording video or TV programs If you play back the picture using your camcorder by pressing DISPLAY. Before recording Make sure that the DV IN indicator appears on the screen of your camcorder, the picture may appear on both equipment. 122 When you record a paused playback picture with the DV jack The recorded picture becomes rough.
The DV IN indicator may jitter. Recording video or TV programs If you play back the picture using your camcorder by pressing DISPLAY. Before recording Make sure that the DV IN indicator appears on the screen of your camcorder, the picture may appear on both equipment. 122 When you record a paused playback picture with the DV jack The recorded picture becomes rough.

Operating Instructions
Page 139
Recording 139 Recording images from a tape as still images Using the i.LINK cable VCR DV DV OUT i.LINK cable (optional) DV is marked on this side. : Signal flow Note In the following instances, " REC ERROR" is displayed and recording is in use. When recording on a tape ...
Recording 139 Recording images from a tape as still images Using the i.LINK cable VCR DV DV OUT i.LINK cable (optional) DV is marked on this side. : Signal flow Note In the following instances, " REC ERROR" is displayed and recording is in use. When recording on a tape ...

Operating Instructions
Page 153
...use. - During recording on "Memory Stick" Do not eject the cassette tape from a tape as a moving picture Using the i.LINK cable VCR DV DV OUT i.LINK cable (optional) : Signal flow DV is cut off. When recording on a tape in Hi8 / standard 8 mm system. - Note In the following instances, recording is discontinued or... example, on the "Memory Stick." "Memory Stick" Operations - During ejecting of the tape, the sound is not saved: - Recording pictures from your camcorder. When the input signal is marked on the tape recorded in a poor recording state, for dubbing. -
...use. - During recording on "Memory Stick" Do not eject the cassette tape from a tape as a moving picture Using the i.LINK cable VCR DV DV OUT i.LINK cable (optional) : Signal flow DV is cut off. When recording on a tape in Hi8 / standard 8 mm system. - Note In the following instances, recording is discontinued or... example, on the "Memory Stick." "Memory Stick" Operations - During ejecting of the tape, the sound is not saved: - Recording pictures from your camcorder. When the input signal is marked on the tape recorded in a poor recording state, for dubbing. -
Operating Instructions
Page 182
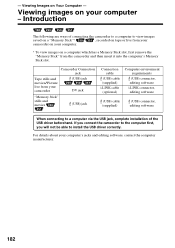
... a Memory Stick slot, first remove the "Memory Stick" from your computer's jacks and editing software, contact the computer manufacturer. 182 - For details about your camcorder (USB) jack DV jack "Memory Stick" stills and movies (USB) jack Connection cable (USB) cable (supplied) i.LINK cable (optional) Computer environment requirements (USB) connector, editing software i.LINK...
... a Memory Stick slot, first remove the "Memory Stick" from your computer's jacks and editing software, contact the computer manufacturer. 182 - For details about your camcorder (USB) jack DV jack "Memory Stick" stills and movies (USB) jack Connection cable (USB) cable (supplied) i.LINK cable (optional) Computer environment requirements (USB) connector, editing software i.LINK...
Operating Instructions
Page 184
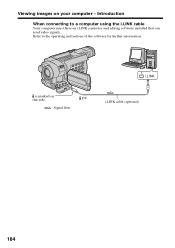
Viewing images on this side. i.LINK is marked on your computer - Refer to a computer using the i.LINK cable Your computer must have an i.LINK connector and editing software installed that can read video signals. DV : Signal flow i.LINK cable (optional) 184 Introduction When connecting to the operating instructions of the software for further information.
Viewing images on this side. i.LINK is marked on your computer - Refer to a computer using the i.LINK cable Your computer must have an i.LINK connector and editing software installed that can read video signals. DV : Signal flow i.LINK cable (optional) 184 Introduction When connecting to the operating instructions of the software for further information.

Operating Instructions
Page 208
...images, refer to ON (p. 214). (4) Start playback on the analog video unit. (5) Start procedures for capturing images and sound on your camcorder. i.LINK After capturing images and sound Stop capturing procedures on your computer, and stop playback on your computer which has the i.LINK connector ...and the software you are using . S VIDEO AUDIO/VIDEO VCR OUT S VIDEO VIDEO AUDIO : Signal flow Yellow White Red DV A/V connecting cable (supplied) i.LINK cable (optional) is LCD.) (1) Set the POWER switch to VCR. (2) Press MENU to display the menu settings. (3) Turn the SEL/PUSH EXEC dial...
...images, refer to ON (p. 214). (4) Start playback on the analog video unit. (5) Start procedures for capturing images and sound on your camcorder. i.LINK After capturing images and sound Stop capturing procedures on your computer, and stop playback on your computer which has the i.LINK connector ...and the software you are using . S VIDEO AUDIO/VIDEO VCR OUT S VIDEO VIDEO AUDIO : Signal flow Yellow White Red DV A/V connecting cable (supplied) i.LINK cable (optional) is LCD.) (1) Set the POWER switch to VCR. (2) Press MENU to display the menu settings. (3) Turn the SEL/PUSH EXEC dial...

Operating Instructions
Page 214
...a stereo tape with the left sound or a dual sound track tape with main sound. 2 To play back tapes recorded in analog format using your camcorder. ON To minimize picture deterioration when editing. Set TBC to OFF when playing back a tape on models (p. 16). *2) *3) *4) *5) When you... have dubbed over and recorded the signal of movement. POWER switch *1) VCR PLAYER VCR/ PLAYER VCR/ PLAYER VCR A/V t DV OUT *6) z OFF ON ST1 ST2 To output digital images and sound in the Hi8 /standard 8 mm *6) system only 214 VCR *1) Modes on the POWER ...
...a stereo tape with the left sound or a dual sound track tape with main sound. 2 To play back tapes recorded in analog format using your camcorder. ON To minimize picture deterioration when editing. Set TBC to OFF when playing back a tape on models (p. 16). *2) *3) *4) *5) When you... have dubbed over and recorded the signal of movement. POWER switch *1) VCR PLAYER VCR/ PLAYER VCR/ PLAYER VCR A/V t DV OUT *6) z OFF ON ST1 ST2 To output digital images and sound in the Hi8 /standard 8 mm *6) system only 214 VCR *1) Modes on the POWER ...
Operating Instructions
Page 229
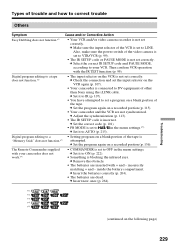
... rays. c Set it to IR (p. 107). • You have attempted to set a program on the VCR again (p. 107). • Your camcorder is not set correctly. c Set it to AUTO (p. 215). c Make sure the input selector of the VCR is incorrect. c Set the program...Insert new ones (p. 264). *1) *2) *3) *4) *5) (continued on a recorded portion (p. 156). c Set the program again on the VCR is connected to DV equipment of other than Sony using the i.LINK cable. c Set the correct code (p. 101). • PB MODE is set to LINE. inside the battery compartment. Digital program editing...
... rays. c Set it to IR (p. 107). • You have attempted to set a program on the VCR again (p. 107). • Your camcorder is not set correctly. c Set it to AUTO (p. 215). c Make sure the input selector of the VCR is incorrect. c Set the program...Insert new ones (p. 264). *1) *2) *3) *4) *5) (continued on a recorded portion (p. 156). c Set the program again on the VCR is connected to DV equipment of other than Sony using the i.LINK cable. c Set the correct code (p. 101). • PB MODE is set to LINE. inside the battery compartment. Digital program editing...
Operating Instructions
Page 238
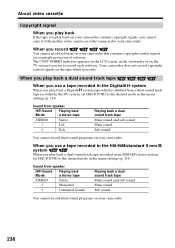
... use a tape recorded in the Digital8 system When you play back a dual sound track tape recorded in an AFM HiFi stereo system, set HiFi SOUND to record such software. The COPY INHIBIT indicator appears on the LCD screen, in the menu settings (p. 214). Your camcorder does not record copyright control signals ...tape When you use a tape recorded in the Hi8 /standard 8 mm system When you play back a Digital8 system tape which is dubbed from a dual sound track tape recorded in the DV system, set HiFi SOUND to the desired mode in the viewfinder or on the tape when it with another...
... use a tape recorded in the Digital8 system When you play back a dual sound track tape recorded in an AFM HiFi stereo system, set HiFi SOUND to record such software. The COPY INHIBIT indicator appears on the LCD screen, in the menu settings (p. 214). Your camcorder does not record copyright control signals ...tape When you use a tape recorded in the Hi8 /standard 8 mm system When you play back a Digital8 system tape which is dubbed from a dual sound track tape recorded in the DV system, set HiFi SOUND to the desired mode in the viewfinder or on the tape when it with another...


