Operating Instructions
Page 182
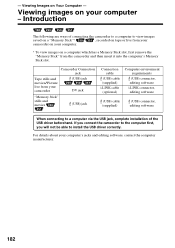
...(optional) Computer environment requirements (USB) connector, editing software i.LINK connector, editing software (USB) cable (supplied) (USB) connector, editing software When connecting to a computer via the USB jack, complete installation of connecting the camcorder to a computer to install the USB driver correctly. ...first remove the "Memory Stick" from the camcorder and then insert it into the computer's Memory Stick slot. For details about your computer - Viewing Images on your computer's jacks and editing software, contact the computer manufacturer. 182 Viewing images ...
...(optional) Computer environment requirements (USB) connector, editing software i.LINK connector, editing software (USB) cable (supplied) (USB) connector, editing software When connecting to a computer via the USB jack, complete installation of connecting the camcorder to a computer to install the USB driver correctly. ...first remove the "Memory Stick" from the camcorder and then insert it into the computer's Memory Stick slot. For details about your computer - Viewing Images on your computer's jacks and editing software, contact the computer manufacturer. 182 Viewing images ...
Operating Instructions
Page 184
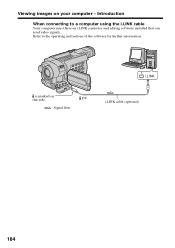
DV : Signal flow i.LINK cable (optional) 184 i.LINK is marked on your computer - Viewing images on this side. Introduction When connecting to the operating instructions of the software for further information. Refer to a computer using the i.LINK cable Your computer must have an i.LINK connector and editing software installed that can read video signals.
DV : Signal flow i.LINK cable (optional) 184 i.LINK is marked on your computer - Viewing images on this side. Introduction When connecting to the operating instructions of the software for further information. Refer to a computer using the i.LINK cable Your computer must have an i.LINK connector and editing software installed that can read video signals.
Operating Instructions
Page 186
... Stick" in your computer - When connecting with your computer Communications between your camcorder and your computer when the USB cable was formatted from Suspend, Resume, or Sleep. 186 Software •Depending on your application software, the file size may increase when you open a still image file. &#... floppy disk adaptor for Memory Stick or a PC card adaptor for the recommended operating environment. Notes on using retouching software from your computer to open the file. Viewing images on your camcorder was connected. •Do not compress the data on the "Memory Stick."
... Stick" in your computer - When connecting with your computer Communications between your camcorder and your computer when the USB cable was formatted from Suspend, Resume, or Sleep. 186 Software •Depending on your application software, the file size may increase when you open a still image file. &#... floppy disk adaptor for Memory Stick or a PC card adaptor for the recommended operating environment. Notes on using retouching software from your computer to open the file. Viewing images on your camcorder was connected. •Do not compress the data on the "Memory Stick."
Operating Instructions
Page 187
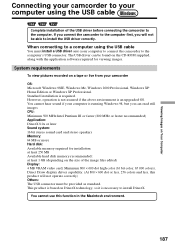
...Available memory required for viewing images. Viewing Images on Your Computer Connecting your camcorder to your computer using the USB cable You must be found on the CD-ROM supplied, along with the application software required for installation: at least 250 MB Available hard disk memory recommended: ...at least 1 GB (depending on the size of the USB driver before connecting the camcorder to the computer's USB connector. When connecting to a...
...Available memory required for viewing images. Viewing Images on Your Computer Connecting your camcorder to your computer using the USB cable You must be found on the CD-ROM supplied, along with the application software required for installation: at least 250 MB Available hard disk memory recommended: ...at least 1 GB (depending on the size of the USB driver before connecting the camcorder to the computer's USB connector. When connecting to a...

Operating Instructions
Page 189
..." (CD-ROM Drive). (3) Select "Handycam" on page 194. 189 Click (5) Follow the on-screen messages to "Making the computer recognize the camcorder." Note If you are using Windows 2000, log in the CD-ROM drive of your computer. If you are using Windows XP, log in with... registered. Click The title screen appears. (4) Move the cursor to "USB Driver" and click. The application software starts up. Viewing Images on Your Computer Connecting your camcorder to your computer using the USB cable Installing the USB driver Start the following operation without connecting the USB cable...
..." (CD-ROM Drive). (3) Select "Handycam" on page 194. 189 Click (5) Follow the on-screen messages to "Making the computer recognize the camcorder." Note If you are using Windows 2000, log in the CD-ROM drive of your computer. If you are using Windows XP, log in with... registered. Click The title screen appears. (4) Move the cursor to "USB Driver" and click. The application software starts up. Viewing Images on Your Computer Connecting your camcorder to your computer using the USB cable Installing the USB driver Start the following operation without connecting the USB cable...
Operating Instructions
Page 190
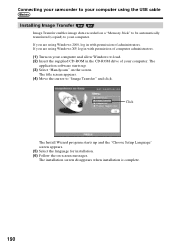
.... (4) Move the cursor to your computer. If you are using Windows XP, log in the CD-ROM drive of administrators. The application software starts up and the "Choose Setup Language" screen appears. (5) Select the language for installation. (6) Follow the on your computer and allow Windows to... load. (2) Insert the supplied CD-ROM in with permission of your computer. Connecting your camcorder to your computer using the USB cable Installing Image Transfer Image Transfer enables image data recorded on the screen. If you are using Windows...
.... (4) Move the cursor to your computer. If you are using Windows XP, log in the CD-ROM drive of administrators. The application software starts up and the "Choose Setup Language" screen appears. (5) Select the language for installation. (6) Follow the on your computer and allow Windows to... load. (2) Insert the supplied CD-ROM in with permission of your computer. Connecting your camcorder to your computer using the USB cable Installing Image Transfer Image Transfer enables image data recorded on the screen. If you are using Windows...
Operating Instructions
Page 191
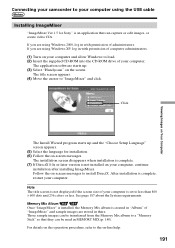
... images, or create video CDs. For details on the operation procedure, refer to the on the screen. The application software starts up and the "Choose Setup Language" screen appears. (5) Select the language for Sony" is an application that they can be transferred from the Memory Mix album to "ImageMixer" and click. The... and allow Windows to load. (2) Insert the supplied CD-ROM into the CD-ROM drive of your computer. Viewing Images on Your Computer Connecting your camcorder to your computer, continue installation after installing ImageMixer.
... images, or create video CDs. For details on the operation procedure, refer to the on the screen. The application software starts up and the "Choose Setup Language" screen appears. (5) Select the language for Sony" is an application that they can be transferred from the Memory Mix album to "ImageMixer" and click. The... and allow Windows to load. (2) Insert the supplied CD-ROM into the CD-ROM drive of your computer. Viewing Images on Your Computer Connecting your camcorder to your computer, continue installation after installing ImageMixer.
Operating Instructions
Page 205
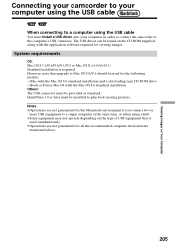
...and a slot loading type CD-ROM drive - The USB driver can be found on the CD-ROM supplied, along with the application software required for all the recommended computer environments mentioned above. 205 Notes •Operations are not guaranteed for the Macintosh environment if you connect...pictures. QuickTime 3.0 or later must install a USB driver onto your computer in order to connect the camcorder to the computer's USB connector. Viewing Images on Your Computer Connecting your camcorder to your computer using the USB cable When connecting to a computer using a hub. •Some ...
...and a slot loading type CD-ROM drive - The USB driver can be found on the CD-ROM supplied, along with the application software required for all the recommended computer environments mentioned above. 205 Notes •Operations are not guaranteed for the Macintosh environment if you connect...pictures. QuickTime 3.0 or later must install a USB driver onto your computer in order to connect the camcorder to the computer's USB connector. Viewing Images on Your Computer Connecting your camcorder to your computer using the USB cable When connecting to a computer using a hub. •Some ...
Operating Instructions
Page 206
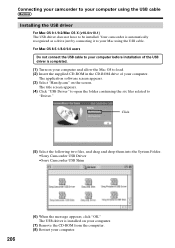
... to "Driver." Click (5) Select the following two files, and drag and drop them into the System Folder. •Sony Camcorder USB Driver •Sony Camcorder USB Shim 206 (6) When the message appears, click "OK." The application software screen appears. (3) Select "Handycam" on your computer. (7) Remove the CD-ROM from the computer. (8) Restart your computer. Your...
... to "Driver." Click (5) Select the following two files, and drag and drop them into the System Folder. •Sony Camcorder USB Driver •Sony Camcorder USB Shim 206 (6) When the message appears, click "OK." The application software screen appears. (3) Select "Handycam" on your computer. (7) Remove the CD-ROM from the computer. (8) Restart your computer. Your...

Operating Instructions
Page 208
...VIDEO VIDEO AUDIO : Signal flow Yellow White Red DV A/V connecting cable (supplied) i.LINK cable (optional) is LCD.) (1) Set the POWER switch to VCR. (2) Press MENU to display the menu settings. (3) Turn the ... You can capture images and sound from an analog video unit on your computer and the software you are using . For details on how to capture images, refer to ON (p. 214...playback on the analog video unit. (5) Start procedures for capturing images and sound on your camcorder. i.LINK After capturing images and sound Stop capturing procedures on the analog video unit. 208 ...
...VIDEO VIDEO AUDIO : Signal flow Yellow White Red DV A/V connecting cable (supplied) i.LINK cable (optional) is LCD.) (1) Set the POWER switch to VCR. (2) Press MENU to display the menu settings. (3) Turn the ... You can capture images and sound from an analog video unit on your computer and the software you are using . For details on how to capture images, refer to ON (p. 214...playback on the analog video unit. (5) Start procedures for capturing images and sound on your camcorder. i.LINK After capturing images and sound Stop capturing procedures on the analog video unit. 208 ...
Operating Instructions
Page 209
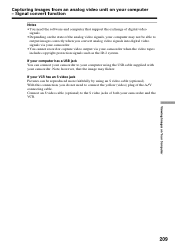
... cable supplied with your computer may flicker. Signal convert function Notes •You need to output images correctly when you do not need the software and computer that the image may not be reproduced more faithfully by using an S video cable (optional). Note, however, that support the ...exchange of digital video signals. •Depending on your camcorder and the VCR. 209 If your computer has a USB jack You can be able to connect the yellow (video) plug of the analog video ...
... cable supplied with your computer may flicker. Signal convert function Notes •You need to output images correctly when you do not need the software and computer that the image may not be reproduced more faithfully by using an S video cable (optional). Note, however, that support the ...exchange of digital video signals. •Depending on your camcorder and the VCR. 209 If your computer has a USB jack You can be able to connect the yellow (video) plug of the analog video ...
Operating Instructions
Page 238
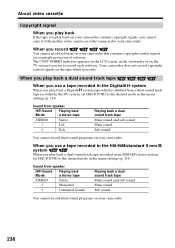
... copyright control signals on the tape when it with another video camera recorder connected to your camcorder. When you use a tape recorded in the Digital8 system When you play back a Digital8 system tape which is dubbed from speaker HiFi Sound Mode Playing back a stereo tape STEREO ...mode in the Hi8 /standard 8 mm system When you record You cannot record software on your camcorder that contains copyright control signals for copyright protection of software. The COPY INHIBIT indicator appears on the LCD screen, in the menu settings (p. 214). Sound from speaker HiFi Sound Mode ...
... copyright control signals on the tape when it with another video camera recorder connected to your camcorder. When you use a tape recorded in the Digital8 system When you play back a Digital8 system tape which is dubbed from speaker HiFi Sound Mode Playing back a stereo tape STEREO ...mode in the Hi8 /standard 8 mm system When you record You cannot record software on your camcorder that contains copyright control signals for copyright protection of software. The COPY INHIBIT indicator appears on the LCD screen, in the menu settings (p. 214). Sound from speaker HiFi Sound Mode ...

Operating Instructions
Page 245
... the computer. Before connecting this unit is already installed on how to dub when this unit to a computer, make sure that application software supported by Sony (e.g. Required i.LINK cable Use the Sony i.LINK 4-pin-to other i.LINK (DV) compatible non-video equipment made by this unit is connected to -4-pin cable (during DV...
... the computer. Before connecting this unit is already installed on how to dub when this unit to a computer, make sure that application software supported by Sony (e.g. Required i.LINK cable Use the Sony i.LINK 4-pin-to other i.LINK (DV) compatible non-video equipment made by this unit is connected to -4-pin cable (during DV...


