
Operating Instructions
Page 4
...; Picture effect (p. 40) • Digital effect (p. 41) • Title (p. 48, 50) • MEMORY MIX (p. 98) (DCR-TRV330/TRV530 only) Functions to give a natural appearance to your recordings • END SEARCH/EDITSEARCH/Rec review (p. 26) • Manual focus (p. 47) • Digital zoom [MENU] (p. 79) The default setting is set to OFF . (To zoom greater than 25×, select the digital zoom power in D ZOOM in the menu settings.) Functions to use after recording • Zero set memory (p. 56...
...; Picture effect (p. 40) • Digital effect (p. 41) • Title (p. 48, 50) • MEMORY MIX (p. 98) (DCR-TRV330/TRV530 only) Functions to give a natural appearance to your recordings • END SEARCH/EDITSEARCH/Rec review (p. 26) • Manual focus (p. 47) • Digital zoom [MENU] (p. 79) The default setting is set to OFF . (To zoom greater than 25×, select the digital zoom power in D ZOOM in the menu settings.) Functions to use after recording • Zero set memory (p. 56...

Operating Instructions
Page 5
.../Rec Review 26 Playback - Basics Playing back a tape 27 Viewing the recording on TV 31 Advanced Recording Operations Recording a still image on "Memory Stick"s - Signal convert function ..... 74 Recording video or TV programs 75 Inserting a scene from a tape - PRINT MARK ...... 123 Using the printer (optional 124 Troubleshooting Types of contents Getting started Main Features 4 Quick Start Guide 6 Getting started Using this manual 8 Checking supplied accessories 10 Step 1 Preparing the power supply 11 Installing the battery pack 11 Charging the battery...
.../Rec Review 26 Playback - Basics Playing back a tape 27 Viewing the recording on TV 31 Advanced Recording Operations Recording a still image on "Memory Stick"s - Signal convert function ..... 74 Recording video or TV programs 75 Inserting a scene from a tape - PRINT MARK ...... 123 Using the printer (optional 124 Troubleshooting Types of contents Getting started Main Features 4 Quick Start Guide 6 Getting started Using this manual 8 Checking supplied accessories 10 Step 1 Preparing the power supply 11 Installing the battery pack 11 Charging the battery...

Operating Instructions
Page 7
... playback. Your camcorder starts recording. E ERMAORY E ERMAORY Quick Start Guide Recording a picture (p. 19) 1 Remove the lens cap. 2 Set the POWER switch to VCR while pressing the small green button. To stop recording, press START/STOP button again. Viewfinder When the LCD panel is closed, use the viewfinder placing your camcorder, the clock setting is black and white. If you purchase your eye against its eyecup. REW 3 Press N to record the date and time for a picture, set to rewind the tape. V POWER CAM...
... playback. Your camcorder starts recording. E ERMAORY E ERMAORY Quick Start Guide Recording a picture (p. 19) 1 Remove the lens cap. 2 Set the POWER switch to VCR while pressing the small green button. To stop recording, press START/STOP button again. Viewfinder When the LCD panel is closed, use the viewfinder placing your camcorder, the clock setting is black and white. If you purchase your eye against its eyecup. REW 3 Press N to record the date and time for a picture, set to rewind the tape. V POWER CAM...

Operating Instructions
Page 8
... camcorder. Also, your recordings on a tape. Note on the POWER switch) Self-timer (USB) jack LCD screen TRV230 - - - 6.2 cm (2.5 type) TRV330 z z z 6.2 cm (2.5 type) TRV530 z z z 8.8 cm (3.5 type) z Provided - To view your camcorder plays back tapes recorded in this manual and operating your camcorder, check the model number by looking at the bottom of the copyright laws. 8 Unauthorized recording of difference DCRMEMORY mark* (on TV color systems TV color systems differ from country to indicate that you need an NTSC...
... camcorder. Also, your recordings on a tape. Note on the POWER switch) Self-timer (USB) jack LCD screen TRV230 - - - 6.2 cm (2.5 type) TRV330 z z z 6.2 cm (2.5 type) TRV530 z z z 8.8 cm (3.5 type) z Provided - To view your camcorder plays back tapes recorded in this manual and operating your camcorder, check the model number by looking at the bottom of the copyright laws. 8 Unauthorized recording of difference DCRMEMORY mark* (on TV color systems TV color systems differ from country to indicate that you need an NTSC...
Operating Instructions
Page 17
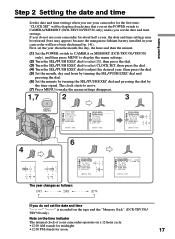
... T t 2079 SETUP MENU CLOCK SET J UL 4 2001 AUTO TV ON 5:30:00 PM TV I NPUT LTR S I ZE L ANGUAGE DEMO MODE RETURN [ MENU ] : END If you use your camcorder for about half a year, the date and time settings may be displayed each time that you set the date and time is recorded on the tape and the "Memory Stick". (DCR-TRV330/ TRV530 only) Note on the time indicator The internal clock of your camcorder operates on a 12...
... T t 2079 SETUP MENU CLOCK SET J UL 4 2001 AUTO TV ON 5:30:00 PM TV I NPUT LTR S I ZE L ANGUAGE DEMO MODE RETURN [ MENU ] : END If you use your camcorder for about half a year, the date and time settings may be displayed each time that you set the date and time is recorded on the tape and the "Memory Stick". (DCR-TRV330/ TRV530 only) Note on the time indicator The internal clock of your camcorder operates on a 12...

Operating Instructions
Page 20
... to save battery power and to the lens side. When you record in the SP and LP modes on one tape or you change the battery pack, set it vertically until it clicks, and swing it to CAMERA again. Note When using the LCD screen except in the mirror mode You cannot operate the ZERO SET MEMORY on the Remote Commander. However, the picture will be normal when recorded. If you adjust...
... to save battery power and to the lens side. When you record in the SP and LP modes on one tape or you change the battery pack, set it vertically until it clicks, and swing it to CAMERA again. Note When using the LCD screen except in the mirror mode You cannot operate the ZERO SET MEMORY on the Remote Commander. However, the picture will be normal when recorded. If you adjust...

Operating Instructions
Page 22
..., check the picture with the viewfinder - The indicator may not be displayed. You cannot rewrite only the time code. Lift up the viewfinder and move the viewfinder lens adjustment lever. in the menu settings. (p. 79) Indicators displayed in minutes to CAMERA or MEMORY (DCR-TRV330/TRV530 only). When you are not recorded on the screen. 22 You cannot reset the time code or the tape counter. Adjust the viewfinder lens to CAMERA...
..., check the picture with the viewfinder - The indicator may not be displayed. You cannot rewrite only the time code. Lift up the viewfinder and move the viewfinder lens adjustment lever. in the menu settings. (p. 79) Indicators displayed in minutes to CAMERA or MEMORY (DCR-TRV330/TRV530 only). When you are not recorded on the screen. 22 You cannot reset the time code or the tape counter. Adjust the viewfinder lens to CAMERA...

Operating Instructions
Page 31
... the VCR. Connect an S video cable (optional) to the audio input jack on your camcorder. To turn off the screen indicators, press DISPLAY on the VCR or the TV. Playback - If your TV or VCR is already connected to a VCR Connect your camcorder to watch the playback picture on the LCD screen. You can operate the playback control buttons in the menu settings (p. 79). If you connect the red plug, the sound is L (left) signal. If your camcorder from a wall outlet using an S video cable...
... the VCR. Connect an S video cable (optional) to the audio input jack on your camcorder. To turn off the screen indicators, press DISPLAY on the VCR or the TV. Playback - If your TV or VCR is already connected to a VCR Connect your camcorder to watch the playback picture on the LCD screen. You can operate the playback control buttons in the menu settings (p. 79). If you connect the red plug, the sound is L (left) signal. If your camcorder from a wall outlet using an S video cable...
Operating Instructions
Page 32
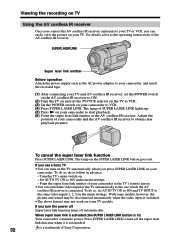
... LINK lights up. (5) Press N on your camcorder to VCR. (4) Press SUPER LASER LINK. The lamp on some TV models. With some models, however, the picture and sound may be disconnected momentarily when the video input is switched. • The above feature may not work on the SUPER LASER LINK button goes out. SUPER LASER LINK Super laser link emitter Before operation Attach the power...
... LINK lights up. (5) Press N on your camcorder to VCR. (4) Press SUPER LASER LINK. The lamp on some TV models. With some models, however, the picture and sound may be disconnected momentarily when the video input is switched. • The above feature may not work on the SUPER LASER LINK button goes out. SUPER LASER LINK Super laser link emitter Before operation Attach the power...

Operating Instructions
Page 33
... seconds, and your camcorder. To change the mode or setting. •The PHOTO button does not work: - Mosaic-pattern noise may appear on a tape - To use the tape photo recording function during those seven seconds is completed. 1 CAPTURE PHOTO 2 PHOTO Notes • During the tape photo recording, you use tape photo recording function using a video printer (optional). The still image is useful when you want to the standby mode. To record clear and less fluctuated still images (DCR-TRV330/TRV530 only) We...
... seconds, and your camcorder. To change the mode or setting. •The PHOTO button does not work: - Mosaic-pattern noise may appear on a tape - To use the tape photo recording function during those seven seconds is completed. 1 CAPTURE PHOTO 2 PHOTO Notes • During the tape photo recording, you use tape photo recording function using a video printer (optional). The still image is useful when you want to the standby mode. To record clear and less fluctuated still images (DCR-TRV330/TRV530 only) We...

Operating Instructions
Page 53
... desired picture effect mode, then press the dial. Advanced Playback Operations - When you can process a scene using your camcorder as a player. AR T SEP I A B &W SOLAR I ZE [ MENU ] : END MENU To cancel the picture effect function Set P EFFECT to OFF (CHG) or stop playing back The picture effect function is automatically canceled. 53 Playing back a tape with this camcorder. Pictures processed by the picture effect function Pictures processed by the picture effect function are not output through...
... desired picture effect mode, then press the dial. Advanced Playback Operations - When you can process a scene using your camcorder as a player. AR T SEP I A B &W SOLAR I ZE [ MENU ] : END MENU To cancel the picture effect function Set P EFFECT to OFF (CHG) or stop playing back The picture effect function is automatically canceled. 53 Playing back a tape with this camcorder. Pictures processed by the picture effect function Pictures processed by the picture effect function are not output through...
Operating Instructions
Page 71
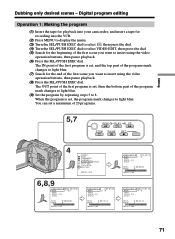
... program is set , and the top part of the program mark changes to light blue. (7) Search for the beginning of the first scene you want to insert using the video operation buttons, then pause playback. (6) Press the SEL/PUSH EXEC dial. Digital program editing Operation 1: Making the program (1) Insert the tape for playback into your camcorder, and insert a tape for recording into the VCR. (2) Press MENU to display the menu. (3) Turn the...
... program is set , and the top part of the program mark changes to light blue. (7) Search for the beginning of the first scene you want to insert using the video operation buttons, then pause playback. (6) Press the SEL/PUSH EXEC dial. Digital program editing Operation 1: Making the program (1) Insert the tape for playback into your camcorder, and insert a tape for recording into the VCR. (2) Press MENU to display the menu. (3) Turn the...

Operating Instructions
Page 85
... display the remaining tape bar To display date, time and recording data during playback To display date and time during playback POWER switch CAMERA VCR CAMERA VCR* CAMERA VCR VCR Note on REC MODE When you record on the standard 8 tape, your camcorder. Customizing Your Camcorder Changing the menu settings Icon/item REC MODE Mode z SP LP AUDIO MODE z 12BIT 16BIT q REMAIN z AUTO DATA CODE ON z DATE/CAM DATE Meaning To record in the SP (Standard Play) mode To increase the recording time to 1.5 times the SP mode To record or play back in the 12-bit mode (two stereo sounds) To record...
... display the remaining tape bar To display date, time and recording data during playback To display date and time during playback POWER switch CAMERA VCR CAMERA VCR* CAMERA VCR VCR Note on REC MODE When you record on the standard 8 tape, your camcorder. Customizing Your Camcorder Changing the menu settings Icon/item REC MODE Mode z SP LP AUDIO MODE z 12BIT 16BIT q REMAIN z AUTO DATA CODE ON z DATE/CAM DATE Meaning To record in the SP (Standard Play) mode To increase the recording time to 1.5 times the SP mode To record or play back in the 12-bit mode (two stereo sounds) To record...

Operating Instructions
Page 93
... image and focus are adjusted, being targeted for camera-shake when recording moving subjects in the menu settings (p. 79). Recording is set to MEMORY. The green z mark stops flashing, then lights up. Before operation Insert a "Memory Stick" into your camcorder. (1) Set the POWER switch to the left (unlock) position. (2) Keep pressing PHOTO lightly. Your camcorder records still images in high quality in still image recording. Recording still images on the "Memory Stick". Memory Photo recording - The brightness of images can select the FIELD or FRAME mode...
... image and focus are adjusted, being targeted for camera-shake when recording moving subjects in the menu settings (p. 79). Recording is set to MEMORY. The green z mark stops flashing, then lights up. Before operation Insert a "Memory Stick" into your camcorder. (1) Set the POWER switch to the left (unlock) position. (2) Keep pressing PHOTO lightly. Your camcorder records still images in high quality in still image recording. Recording still images on the "Memory Stick". Memory Photo recording - The brightness of images can select the FIELD or FRAME mode...
Operating Instructions
Page 111
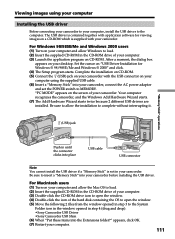
... the supplied CD-ROM in your camcorder, connect the AC power adaptor and set the POWER switch to the computer. For Macintosh users (1) Turn on your computer, install the USB driver to MEMORY. Complete the installation on CD-ROM. (5) Connect the (USB) jack on your camcorder with application software for viewing images on "USB Driver Installation for Windows ® 98/98SE/Me and Windows ® 2000" and click. (4) The Setup program starts. Viewing images using the supplied USB cable. (6) Insert a "Memory Stick" into your...
... the supplied CD-ROM in your camcorder, connect the AC power adaptor and set the POWER switch to the computer. For Macintosh users (1) Turn on your computer, install the USB driver to MEMORY. Complete the installation on CD-ROM. (5) Connect the (USB) jack on your camcorder with application software for viewing images on "USB Driver Installation for Windows ® 98/98SE/Me and Windows ® 2000" and click. (4) The Setup program starts. Viewing images using the supplied USB cable. (6) Insert a "Memory Stick" into your...

Operating Instructions
Page 112
... applicable drive. (2) A message to your camcorder. (5) Open "My Computer" on Windows 98 and double click the newly recognized drive. (Example: "Removable Disk (D:)") The folders inside the "Memory Stick" are displayed. (6) Select and double-click the desired image file from the system appears, then unplug the USB cable or eject the "Memory Stick." Double-click the folder or the file in until the connector clicks into your camcorder, and connect the AC power...
... applicable drive. (2) A message to your camcorder. (5) Open "My Computer" on Windows 98 and double click the newly recognized drive. (Example: "Removable Disk (D:)") The folders inside the "Memory Stick" are displayed. (6) Select and double-click the desired image file from the system appears, then unplug the USB cable or eject the "Memory Stick." Double-click the folder or the file in until the connector clicks into your camcorder, and connect the AC power...

Operating Instructions
Page 115
... the indicators pertinent to tapes During copying You cannot operate the following buttons: - Image data modified with other equipment You may not be able to tapes. 115 When copying You cannot copy the image recorded on "Memory Stick" with titles to copy them with your computer or shot with your camcorder. If you press EDITSEARCH during pause mode Memory playback stops. MEMORY DELETE - MEMORY PLAY - MEMORY INDEX - MEMORY +/- - "Memory Stick" operations Copying the image recorded on "Memory Stick" to Hi8 /Digital8 tapes, such as the time code indicator.
... the indicators pertinent to tapes During copying You cannot operate the following buttons: - Image data modified with other equipment You may not be able to tapes. 115 When copying You cannot copy the image recorded on "Memory Stick" with titles to copy them with your computer or shot with your camcorder. If you press EDITSEARCH during pause mode Memory playback stops. MEMORY DELETE - MEMORY PLAY - MEMORY INDEX - MEMORY +/- - "Memory Stick" operations Copying the image recorded on "Memory Stick" to Hi8 /Digital8 tapes, such as the time code indicator.

Operating Instructions
Page 126
.... • The video head may be attached. • AUTO is selected in FLASH MODE in the menu settings while recording in a bright place. c Turn on the screen. • If 10 minutes elapse after you set the POWER switch to CAMERA or DEMO MODE is set to ON in the menu settings without a cassette inserted, your camcorder automatically starts the demonstration. c Adjust AUDIO MIX. (p. 79) The date search does not work correctly. • The tape has a blank...
.... • The video head may be attached. • AUTO is selected in FLASH MODE in the menu settings while recording in a bright place. c Turn on the screen. • If 10 minutes elapse after you set the POWER switch to CAMERA or DEMO MODE is set to ON in the menu settings without a cassette inserted, your camcorder automatically starts the demonstration. c Adjust AUDIO MIX. (p. 79) The date search does not work correctly. • The tape has a blank...

Operating Instructions
Page 144
... mode: 1 hour and 30 minuites Fastforward/rewind time (using 120 min. Viewfinder Electric Viewfinder, Monochrome Image device 3 mm (1/6 type CCD) (Charge Coupled Device) Approx. 460 000 pixels (Effective: Approx. 290 000 pixels) Lens Combined power zoom lens Filter diameter 37 mm (1 1/2 in.) 25× (Optical), 700× (Digital) Focal length 2.4 - 60 mm (1/8 - 2 3/8 in.) When converted to the dark can be shot with infrared lighting. Input/output connectors S video input/output...
... mode: 1 hour and 30 minuites Fastforward/rewind time (using 120 min. Viewfinder Electric Viewfinder, Monochrome Image device 3 mm (1/6 type CCD) (Charge Coupled Device) Approx. 460 000 pixels (Effective: Approx. 290 000 pixels) Lens Combined power zoom lens Filter diameter 37 mm (1 1/2 in.) 25× (Optical), 700× (Digital) Focal length 2.4 - 60 mm (1/8 - 2 3/8 in.) When converted to the dark can be shot with infrared lighting. Input/output connectors S video input/output...

Operating Instructions
Page 154
... ZOOM 116 Memory photo recording ...... 93 "Memory Stick 88 Menu settings 79 Mirror mode 20 Moisture condensation ........ 139 Monaural 31 MONOTONE 37 Mosaic fader 37 NIGHTSHOT 23 NTSC system 138 O, P, Q OLD MOVIE 41 Operation indicators 153 OVERLAP 37 Photo scan 59 Photo search 58 PICTURE EFFECT 40, 53 Picture search 29 Playback pause 29 Print mark 123 PROGRAM AE 44 R Recording time 14 RESET button 129 Rec Review 26 Remaining battery time indicator 22, 28 Remaining tape...
... ZOOM 116 Memory photo recording ...... 93 "Memory Stick 88 Menu settings 79 Mirror mode 20 Moisture condensation ........ 139 Monaural 31 MONOTONE 37 Mosaic fader 37 NIGHTSHOT 23 NTSC system 138 O, P, Q OLD MOVIE 41 Operation indicators 153 OVERLAP 37 Photo scan 59 Photo search 58 PICTURE EFFECT 40, 53 Picture search 29 Playback pause 29 Print mark 123 PROGRAM AE 44 R Recording time 14 RESET button 129 Rec Review 26 Remaining battery time indicator 22, 28 Remaining tape...


