Operating Instructions
Page 12
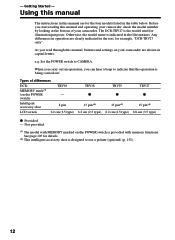
... settings on your camcorder. TRV16 MEMORY mark*1) (on the POWER switch is the model used for illustration purposes. The DCR-TRV27 is provided with memory functions. e.g. See page 105 for details. *2) This intelligent accessory shoe is designed to indicate that the operation is indicated in the text, for the four models listed in capital letters. Using this manual The instructions in this manual and operating your camcorder, check the model number...
... settings on your camcorder. TRV16 MEMORY mark*1) (on the POWER switch is the model used for illustration purposes. The DCR-TRV27 is provided with memory functions. e.g. See page 105 for details. *2) This intelligent accessory shoe is designed to indicate that the operation is indicated in the text, for the four models listed in capital letters. Using this manual The instructions in this manual and operating your camcorder, check the model number...

Operating Instructions
Page 29
... CAMERA, VCR or MEMORY (except DCR-TRV16). Set the POWER switch to make the menu settings disappear. 2 LCD/VF SET LCD BRIGHT MENU [MENU] : END LCD screen backlight You can change the brightness of the backlight. The viewfinder lens adjustment lever Viewfinder backlight You can change the brightness of the backlight. Turn the SEL/PUSH EXEC dial to select LCD BRIGHT in in the menu settings when using the battery pack (p. 178). Adjusting the viewfinder If you record pictures...
... CAMERA, VCR or MEMORY (except DCR-TRV16). Set the POWER switch to make the menu settings disappear. 2 LCD/VF SET LCD BRIGHT MENU [MENU] : END LCD screen backlight You can change the brightness of the backlight. The viewfinder lens adjustment lever Viewfinder backlight You can change the brightness of the backlight. Turn the SEL/PUSH EXEC dial to select LCD BRIGHT in in the menu settings when using the battery pack (p. 178). Adjusting the viewfinder If you record pictures...
Operating Instructions
Page 42
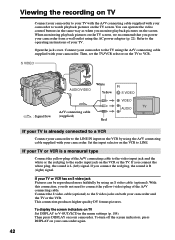
.... Set the input selector on the VCR to VCR. If you monitor playback pictures on the screen. Refer to the operating instructions of the A/V connecting cable. Viewing the recording on TV Connect your camcorder to your TV with the A/V connecting cable supplied with your camcorder. S VIDEO : Signal flow AUDIO/VIDEO White Yellow IN S VIDEO VIDEO A/V connecting cable (supplied) Red AUDIO If your TV is a monaural type Connect the yellow plug of the A/V connecting cable to the video input jack and the white or the red plug to V-OUT/LCD...
.... Set the input selector on the VCR to VCR. If you monitor playback pictures on the screen. Refer to the operating instructions of the A/V connecting cable. Viewing the recording on TV Connect your camcorder to your TV with the A/V connecting cable supplied with your camcorder. S VIDEO : Signal flow AUDIO/VIDEO White Yellow IN S VIDEO VIDEO A/V connecting cable (supplied) Red AUDIO If your TV is a monaural type Connect the yellow plug of the A/V connecting cable to the video input jack and the white or the red plug to V-OUT/LCD...

Operating Instructions
Page 46
The sound during those seven seconds is completed. 2 PHOTO 3 CAPTURE PHOTO Recording images with self-timer (except DCR-TRV16) (1) Set PHOTO REC in to TAPE in the menu settings (p. 177). (except DCR-TRV16) (2) Keep pressing PHOTO lightly until recording is also recorded. Recording does not start yet. The still image is displayed on the screen until a still image appears. The picture becomes still image and the CAPTURE indicator appears. Recording still images on the screen is recorded for about 765 images in...
The sound during those seven seconds is completed. 2 PHOTO 3 CAPTURE PHOTO Recording images with self-timer (except DCR-TRV16) (1) Set PHOTO REC in to TAPE in the menu settings (p. 177). (except DCR-TRV16) (2) Keep pressing PHOTO lightly until recording is also recorded. Recording does not start yet. The still image is displayed on the screen until a still image appears. The picture becomes still image and the CAPTURE indicator appears. Recording still images on the screen is recorded for about 765 images in...

Operating Instructions
Page 79
... your camcorder. 2 Turn the power of the connected VCR on, then set its power switch to the remote sensor on your VCR, then press the dial. When you connect using the VCR, send the control signal by infrared rays to VCR/VTR. 3 Press MENU. When you connect a video camera recorder, set the input selector to VCR on the VCR. Select VIDEO EDIT in "About IR SETUP code." (p. 80) Editing 3 OTHERS DATA CODE BEEP COMMANDER DISPLAY VIDEO EDIT READY RETURN [MENU] : END MENU OTHERS DATA CODE...
... your camcorder. 2 Turn the power of the connected VCR on, then set its power switch to the remote sensor on your VCR, then press the dial. When you connect using the VCR, send the control signal by infrared rays to VCR/VTR. 3 Press MENU. When you connect a video camera recorder, set the input selector to VCR on the VCR. Select VIDEO EDIT in "About IR SETUP code." (p. 80) Editing 3 OTHERS DATA CODE BEEP COMMANDER DISPLAY VIDEO EDIT READY RETURN [MENU] : END MENU OTHERS DATA CODE...
Operating Instructions
Page 83
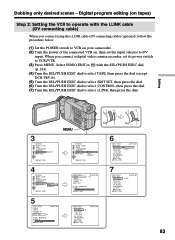
... connect using the i.LINK cable (DV connecting cable) (optional), follow the procedure below. (1) Set the POWER switch to VCR on your camcorder. (2) Turn the power of the connected VCR on, then set its power switch to DV input. LINK ADJ TEST "CUT-IN" "CUT-OUT" IR SETUP PAUSEMODE IR TEST RETURN [MENU] : END 83 Editing 3 OTHERS DATA CODE BEEP COMMANDER DISPLAY VIDEO EDIT READY RETURN [MENU] : END MENU OTHERS DATA CODE BEEP COMMANDER DISPLAY VIDEO EDIT RETURN RETURN TAPE MEMORY [MENU] : END 4 OTHERS DATA CODE...
... connect using the i.LINK cable (DV connecting cable) (optional), follow the procedure below. (1) Set the POWER switch to VCR on your camcorder. (2) Turn the power of the connected VCR on, then set its power switch to DV input. LINK ADJ TEST "CUT-IN" "CUT-OUT" IR SETUP PAUSEMODE IR TEST RETURN [MENU] : END 83 Editing 3 OTHERS DATA CODE BEEP COMMANDER DISPLAY VIDEO EDIT READY RETURN [MENU] : END MENU OTHERS DATA CODE BEEP COMMANDER DISPLAY VIDEO EDIT RETURN RETURN TAPE MEMORY [MENU] : END 4 OTHERS DATA CODE...

Operating Instructions
Page 117
CAPTURE appears on the "Memory Stick." The image displayed on the screen will be recorded on the screen. Also, do not turn the power off, eject a "Memory Stick". Otherwise, image data may become damaged. Recording an image from the tape freezes. Before operation •Insert a recorded tape into your camcorder. •Insert a "Memory Stick" into your camcorder. To change from the image selected to VCR. (2) Press N. Moving picture recorded on the screen The inserted "Memory Stick" is automatically set to 640 × 480. Check the format of...
CAPTURE appears on the "Memory Stick." The image displayed on the screen will be recorded on the screen. Also, do not turn the power off, eject a "Memory Stick". Otherwise, image data may become damaged. Recording an image from the tape freezes. Before operation •Insert a recorded tape into your camcorder. •Insert a "Memory Stick" into your camcorder. To change from the image selected to VCR. (2) Press N. Moving picture recorded on the screen The inserted "Memory Stick" is automatically set to 640 × 480. Check the format of...

Operating Instructions
Page 135
... 4/15 640 STD PHOTO BUTTON [PHOTO] : START [MENU] : END MENU To stop copying Press MENU or x. PHOTO SAVE - PHOTO BUTTON appears on the screen, and copying stops. Before operation •Insert a recorded tape into your camcorder and rewind the tape. •Insert a "Memory Stick" into your camcorder. (1) Set the POWER switch to VCR. (2) Press MENU to display the menu. When the "Memory Stick" becomes full MEMORY FULL appears on the screen. (3) Press PHOTO deeper. Except DCR-TRV16 Using the search function, you can automatically capture only still images from step...
... 4/15 640 STD PHOTO BUTTON [PHOTO] : START [MENU] : END MENU To stop copying Press MENU or x. PHOTO SAVE - PHOTO BUTTON appears on the screen, and copying stops. Before operation •Insert a recorded tape into your camcorder and rewind the tape. •Insert a "Memory Stick" into your camcorder. (1) Set the POWER switch to VCR. (2) Press MENU to display the menu. When the "Memory Stick" becomes full MEMORY FULL appears on the screen. (3) Press PHOTO deeper. Except DCR-TRV16 Using the search function, you can automatically capture only still images from step...
Operating Instructions
Page 159
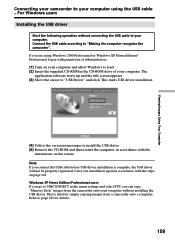
...-screen messages to page 183 for simply copying images from the camcorder onto your computer using Windows 2000 Professional or Windows XP Home Edition/ Professional, log in with permission of Administrators. (1) Turn on your computer and allow Windows to load. (2) Insert the supplied CD-ROM in the CD-ROM drive of your computer. For Windows users Installing the USB driver Start the following operation without installing the USB driver. If you connect the USB cable...
...-screen messages to page 183 for simply copying images from the camcorder onto your computer using Windows 2000 Professional or Windows XP Home Edition/ Professional, log in with permission of Administrators. (1) Turn on your computer and allow Windows to load. (2) Insert the supplied CD-ROM in the CD-ROM drive of your computer. For Windows users Installing the USB driver Start the following operation without installing the USB driver. If you connect the USB cable...
Operating Instructions
Page 161
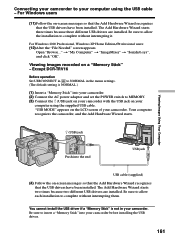
... computer using the supplied USB cable. For Windows 2000 Professional, Windows XP Home Edition/Professional users: (12) After the "File Needed" screen appears. Open "Browse..." Viewing images recorded on the LCD screen of your computer using the USB cable - Be sure to allow the installation to complete without interrupting it. Viewing Images Using Your Computer (USB) jack Push into your camcorder. (2) Connect the AC power adaptor and set the POWER switch to NORMAL in your camcorder with the USB jack on -screen messages...
... computer using the supplied USB cable. For Windows 2000 Professional, Windows XP Home Edition/Professional users: (12) After the "File Needed" screen appears. Open "Browse..." Viewing images recorded on the LCD screen of your computer using the USB cable - Be sure to allow the installation to complete without interrupting it. Viewing Images Using Your Computer (USB) jack Push into your camcorder. (2) Connect the AC power adaptor and set the POWER switch to NORMAL in your camcorder with the USB jack on -screen messages...
Operating Instructions
Page 162
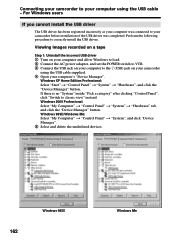
... clicking "Control Panel", click "Switch to correctly install the USB driver. Connecting your camcorder to your computer using the USB cable supplied. 4 Open your computer's "Device Manager". Viewing images recorded on a tape Step 1: Uninstall the incorrect USB driver 1 Turn on your computer and allow Windows to load. 2 Connect the AC power adaptor, and set the POWER switch to VCR. 3 Connect the USB jack on your computer to the (USB) jack on your camcorder before installation of the USB driver was connected to your camcorder using the USB cable -
... clicking "Control Panel", click "Switch to correctly install the USB driver. Connecting your camcorder to your computer using the USB cable supplied. 4 Open your computer's "Device Manager". Viewing images recorded on a tape Step 1: Uninstall the incorrect USB driver 1 Turn on your computer and allow Windows to load. 2 Connect the AC power adaptor, and set the POWER switch to VCR. 3 Connect the USB jack on your computer to the (USB) jack on your camcorder before installation of the USB driver was connected to your camcorder using the USB cable -
Operating Instructions
Page 164
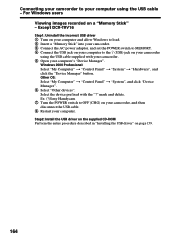
...", and click the "Device Manager" button. Step2: Install the USB driver on the supplied CD-ROM Perform the entire procedure described in "Installing the USB driver" on your camcorder using the USB cable - Except DCR-TRV16 Step1: Uninstall the incorrect USB driver 1 Turn on your computer and allow Windows to load. 2 Insert a "Memory Stick" into your camcorder. 3 Connect the AC power adaptor, and set the POWER switch to MEMORY. 4 Connect the USB jack on your computer's "Device Manager". For Windows users Viewing images recorded on a "Memory Stick" -
...", and click the "Device Manager" button. Step2: Install the USB driver on the supplied CD-ROM Perform the entire procedure described in "Installing the USB driver" on your camcorder using the USB cable - Except DCR-TRV16 Step1: Uninstall the incorrect USB driver 1 Turn on your computer and allow Windows to load. 2 Insert a "Memory Stick" into your camcorder. 3 Connect the AC power adaptor, and set the POWER switch to MEMORY. 4 Connect the USB jack on your computer's "Device Manager". For Windows users Viewing images recorded on a "Memory Stick" -

Operating Instructions
Page 165
For Windows users Capturing images with "PIXELA ImageMixer Ver.1.0 for Sony" You need to install the USB driver and "PIXELA ImageMixer" to view images recorded on a tape with your camcorder. (3) Set the POWER switch to VCR. The title screen is displayed. (6) Select . For Windows XP Home Edition/Professional, you must be authorized as Administrators. Select USB STREAM in to load. (2) Connect the AC power adaptor, and insert a tape into your computer - Viewing Images Using Your Computer The "PIXELA ImageMixer...
For Windows users Capturing images with "PIXELA ImageMixer Ver.1.0 for Sony" You need to install the USB driver and "PIXELA ImageMixer" to view images recorded on a tape with your camcorder. (3) Set the POWER switch to VCR. The title screen is displayed. (6) Select . For Windows XP Home Edition/Professional, you must be authorized as Administrators. Select USB STREAM in to load. (2) Connect the AC power adaptor, and insert a tape into your computer - Viewing Images Using Your Computer The "PIXELA ImageMixer...
Operating Instructions
Page 169
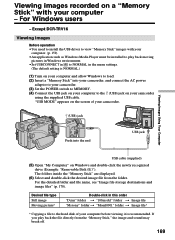
..." folder t Image file* * Copying a file to the hard disk of your computer before viewing it is NORMAL.) (1) Turn on your computer and allow Windows to load. (2) Insert a "Memory Stick" into the end USB jack Viewing Images Using Your Computer USB cable (supplied) (5) Open "My Computer" on the screen of your computer - For Windows users - If you play back moving pictures in Windows environment. •Set USBCONNECT in to play back the file directly from the folder. Viewing images recorded on a "Memory Stick" with...
..." folder t Image file* * Copying a file to the hard disk of your computer before viewing it is NORMAL.) (1) Turn on your computer and allow Windows to load. (2) Insert a "Memory Stick" into the end USB jack Viewing Images Using Your Computer USB cable (supplied) (5) Open "My Computer" on the screen of your computer - For Windows users - If you play back moving pictures in Windows environment. •Set USBCONNECT in to play back the file directly from the folder. Viewing images recorded on a "Memory Stick" with...
Operating Instructions
Page 173
... installed to OFF (CHG). 173 Alternatively, select the "Memory Stick" icon by clicking on your camcorder is recommended. Disconnect the USB cable and remove the "Memory Stick" or set the POWER switch to play back the file directly from the "Memory Stick," the image and sound may break off. Make sure that the access lamp of your computer using the supplied USB cable. "USB MODE" appears on the screen of your computer, then unplug the USB cable, eject the "Memory Stick...
... installed to OFF (CHG). 173 Alternatively, select the "Memory Stick" icon by clicking on your camcorder is recommended. Disconnect the USB cable and remove the "Memory Stick" or set the POWER switch to play back the file directly from the "Memory Stick," the image and sound may break off. Make sure that the access lamp of your computer using the supplied USB cable. "USB MODE" appears on the screen of your computer, then unplug the USB cable, eject the "Memory Stick...
Operating Instructions
Page 174
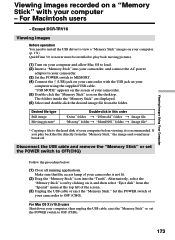
... your camcorder. If your computer has a USB jack You can connect using a USB cable, but images may contain noise or incorrect colors. •You cannot record or capture the video output via your computer and the software you are using . For details on how to capture images, refer to ON in to the instruction manuals of your computer. Before operation Set DISPLAY in to LCD in the menu settings. (The default setting is LCD.) (1) Set the POWER switch to VCR. (2) Set...
... your camcorder. If your computer has a USB jack You can connect using a USB cable, but images may contain noise or incorrect colors. •You cannot record or capture the video output via your computer and the software you are using . For details on how to capture images, refer to ON in to the instruction manuals of your computer. Before operation Set DISPLAY in to LCD in the menu settings. (The default setting is LCD.) (1) Set the POWER switch to VCR. (2) Set...

Operating Instructions
Page 176
...: MANUAL SET CAMERA SET VCR SET LCD/VF SET MEMORY SET (except DCR-TRV16) PRINT SET (except DCR-TRV16) CM SET TAPE SET SETUP MENU OTHERS Selecting the mode setting of the POWER switch. N.S.LIGHT AUTO SHTR z ON OFF z ON To fire the flash before recording to reduce the red-eye phenomenon To make the flash level higher than normal Normal setting To make the menu display disappear Press MENU. Changing the menu settings To make the flash level lower than normal To adjust the white balance (p. 48) To use the NightShot Light function...
...: MANUAL SET CAMERA SET VCR SET LCD/VF SET MEMORY SET (except DCR-TRV16) PRINT SET (except DCR-TRV16) CM SET TAPE SET SETUP MENU OTHERS Selecting the mode setting of the POWER switch. N.S.LIGHT AUTO SHTR z ON OFF z ON To fire the flash before recording to reduce the red-eye phenomenon To make the flash level higher than normal Normal setting To make the menu display disappear Press MENU. Changing the menu settings To make the flash level lower than normal To adjust the white balance (p. 48) To use the NightShot Light function...
Operating Instructions
Page 190
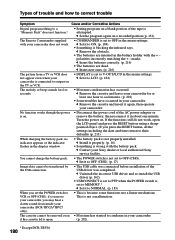
... new ones. (p. 216) The picture from inside your camcorder. The cassette cannot be transferred by the USB connection. • The USB cable was connected before installation of the USB driver was completed. This is set to OFF in your camcorder (DCR-TRV25/TRV27 only). • This is because some functions use a linear mechanism. The Remote Commander supplied with the battery pack. Turn the power on a recorded portion (p. 132). c Set it to NORMAL. (p. 183...
... new ones. (p. 216) The picture from inside your camcorder. The cassette cannot be transferred by the USB connection. • The USB cable was connected before installation of the USB driver was completed. This is set to OFF in your camcorder (DCR-TRV25/TRV27 only). • This is because some functions use a linear mechanism. The Remote Commander supplied with the battery pack. Turn the power on a recorded portion (p. 132). c Set it to NORMAL. (p. 183...
Operating Instructions
Page 207
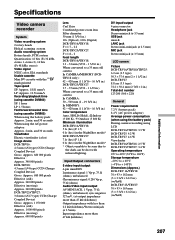
... seconds When using the battery pack: Approx. 2 min. Specifications Video camera recorder System Video recording system 2 rotary heads Helical scanning system Audio recording system Rotary heads, PCM system Quantization: 12 bits (Fs 32 kHz, stereo 1, stereo 2), 16 bits (Fs 48 kHz, stereo) Video signal NTSC color, EIA standards Usable cassette Mini DV cassette with the mark printed Tape speed SP: Approx. 18.81 mm/s LP: Approx. 12.56 mm/s Recording/playback time (using cassette DVM60...
... seconds When using the battery pack: Approx. 2 min. Specifications Video camera recorder System Video recording system 2 rotary heads Helical scanning system Audio recording system Rotary heads, PCM system Quantization: 12 bits (Fs 32 kHz, stereo 1, stereo 2), 16 bits (Fs 48 kHz, stereo) Video signal NTSC color, EIA standards Usable cassette Mini DV cassette with the mark printed Tape speed SP: Approx. 18.81 mm/s LP: Approx. 12.56 mm/s Recording/playback time (using cassette DVM60...
Operating Instructions
Page 219
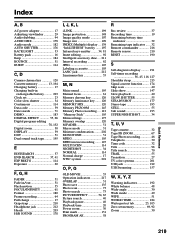
... 114 Normal charge 17 NTSC system 201 O, P, Q OLD MOVIE 55 Operation indicators 217 OVERLAP 51 Photo save 135 Photo scan 73 Photo search 73 PICTURE EFFECT 54, 65 Picture search 40 Playback pause 40 Playback time 20 Power zoom 30 Print mark 151 PROGRAM AE 58 R Rec review 37 Recording time 19 Remaining battery time indicator 32 Remaining tape indicator ...... 32 Remote commander 216 Remote sensor 210 RESET 190 S Self-diagnosis display .......... 191 Self-timer recording 36, 45...
... 114 Normal charge 17 NTSC system 201 O, P, Q OLD MOVIE 55 Operation indicators 217 OVERLAP 51 Photo save 135 Photo scan 73 Photo search 73 PICTURE EFFECT 54, 65 Picture search 40 Playback pause 40 Playback time 20 Power zoom 30 Print mark 151 PROGRAM AE 58 R Rec review 37 Recording time 19 Remaining battery time indicator 32 Remaining tape indicator ...... 32 Remote commander 216 Remote sensor 210 RESET 190 S Self-diagnosis display .......... 191 Self-timer recording 36, 45...


