
Limited Warranty (US Only)
Page 1
...-02 General Stereo/Hifi Components/Tape Decks ® CD Players/Mini Disc Players/Audio Systems Hifi Audio LIMITED WARRANTY Sony Electronics Inc. ("Sony") warrants this Product is within 90 days of the date of protection, to you . After the warranty period, you must pay for a period of the Product, including the antenna. This warranty does not cover damage due to improper operation or maintenance, connection to improper voltage...
...-02 General Stereo/Hifi Components/Tape Decks ® CD Players/Mini Disc Players/Audio Systems Hifi Audio LIMITED WARRANTY Sony Electronics Inc. ("Sony") warrants this Product is within 90 days of the date of protection, to you . After the warranty period, you must pay for a period of the Product, including the antenna. This warranty does not cover damage due to improper operation or maintenance, connection to improper voltage...
Marketing Specifications (HTDDW700 Home Theater System)
Page 2
...: 8" Driver Speaker Type: Enclosure- Sony, DCS and like.no.other trademarks are subject to change without written permission is a trademark of Dolby Laboratories. HT-DDW700 Component Home Theater System Specifications Receiver Audio Audio Power Output: 800W (133w x 5 + 135w (1KHz, 10% THD)) Inputs and Outputs Analog Audio Input(s): 4 (Rear) Antenna Terminal(s): Yes (FM 75ohms, AM Loop) Coaxial Audio Digital Input(s): 1 (Rear) Optical Audio Input(s): 1 (Rear) Power Power Requirements: AC 120V, 60 Hz Tuner Audio Tuner Frequency Range: AM: 530-1,710 kHz, FM: 87.5-108.0 MHz Station Preset...
...: 8" Driver Speaker Type: Enclosure- Sony, DCS and like.no.other trademarks are subject to change without written permission is a trademark of Dolby Laboratories. HT-DDW700 Component Home Theater System Specifications Receiver Audio Audio Power Output: 800W (133w x 5 + 135w (1KHz, 10% THD)) Inputs and Outputs Analog Audio Input(s): 4 (Rear) Antenna Terminal(s): Yes (FM 75ohms, AM Loop) Coaxial Audio Digital Input(s): 1 (Rear) Optical Audio Input(s): 1 (Rear) Power Power Requirements: AC 120V, 60 Hz Tuner Audio Tuner Frequency Range: AM: 530-1,710 kHz, FM: 87.5-108.0 MHz Station Preset...
Operating Instructions
Page 4
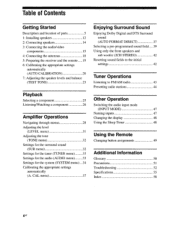
...Sound Enjoying Dolby Digital and DTS Surround sound (AUTO FORMAT DIRECT) 37 Selecting a pre-programmed sound field 39 Using only the front speakers and sub woofer (2CH STEREO) 42 Resetting sound fields to the initial settings 42 Tuner Operations Listening to FM/AM radio 43 Presetting radio stations 44 Other Operation Switching the audio input mode (INPUT MODE) 47 Naming inputs 47 Changing the display 48 Using the Sleep Timer 48 Using the Remote Changing button assignments 49 Additional Information Glossary 50 Precautions 51 Troubleshooting 52 Specifications...
...Sound Enjoying Dolby Digital and DTS Surround sound (AUTO FORMAT DIRECT) 37 Selecting a pre-programmed sound field 39 Using only the front speakers and sub woofer (2CH STEREO) 42 Resetting sound fields to the initial settings 42 Tuner Operations Listening to FM/AM radio 43 Presetting radio stations 44 Other Operation Switching the audio input mode (INPUT MODE) 47 Naming inputs 47 Changing the display 48 Using the Sleep Timer 48 Using the Remote Changing button assignments 49 Additional Information Glossary 50 Precautions 51 Troubleshooting 52 Specifications...
Operating Instructions
Page 6
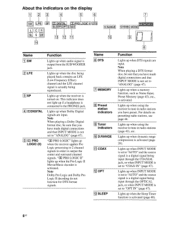
... 2 LFE 3 SP 4 DODIGITAL 5 DO PRO LOGIC (II) Function Lights up when using the receiver to tune in radio stations you have preset. Note When playing a Dolby Digital format disc, be sure that you have made digital connections and that INPUT MODE is activated. Lights up when audio signal is actually being reproduced. Lights up when the disc being played back contains an LFE (Low Frequency Effect) channel and the LFE channel signal is output from the SUB WOOFER jack. Lights up when using the receiver to tune in radio stations (page...
... 2 LFE 3 SP 4 DODIGITAL 5 DO PRO LOGIC (II) Function Lights up when using the receiver to tune in radio stations you have preset. Note When playing a Dolby Digital format disc, be sure that you have made digital connections and that INPUT MODE is activated. Lights up when audio signal is actually being reproduced. Lights up when the disc being played back contains an LFE (Low Frequency Effect) channel and the LFE channel signal is output from the SUB WOOFER jack. Lights up when using the receiver to tune in radio stations (page...
Operating Instructions
Page 17
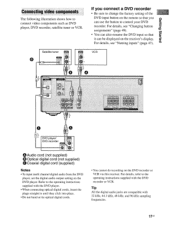
... to control your DVD recorder. For details, see "Naming inputs" (page 47). Satellite tuner 86 0 If you connect a DVD recorder • Be sure to change the factory setting of the DVD input button on the remote so that it DVD player/ DVD recorder DX UT 0*,TA GOAXIA 0 Audio cord (not supplied) 0 Optical digital cord (not supplied) 0 Coaxial digital cord (supplied) Notes • To input multi channel digital audio from the DVD player, set the digital audio output setting on the DVD player. it can use the button to the operating instructions supplied...
... to control your DVD recorder. For details, see "Naming inputs" (page 47). Satellite tuner 86 0 If you connect a DVD recorder • Be sure to change the factory setting of the DVD input button on the remote so that it DVD player/ DVD recorder DX UT 0*,TA GOAXIA 0 Audio cord (not supplied) 0 Optical digital cord (not supplied) 0 Coaxial digital cord (supplied) Notes • To input multi channel digital audio from the DVD player, set the digital audio output setting on the DVD player. it can use the button to the operating instructions supplied...
Operating Instructions
Page 19
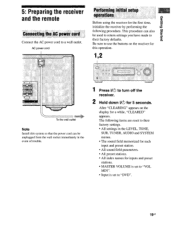
... first time, initialize the receiver by performing the following items are reset to use the buttons on the receiver for this operation. 1,2 U FRONT To the wall outlet Note Install this system so that the power cord can also be unplugged from the wall socket immediately in the LEVEL, TONE, SUR, TUNER, AUDIO and SYSTEM menus. • The sound field memorized for each input and preset station. • All sound...
... first time, initialize the receiver by performing the following items are reset to use the buttons on the receiver for this operation. 1,2 U FRONT To the wall outlet Note Install this system so that the power cord can also be unplugged from the wall socket immediately in the LEVEL, TONE, SUR, TUNER, AUDIO and SYSTEM menus. • The sound field memorized for each input and preset station. • All sound...
Operating Instructions
Page 22
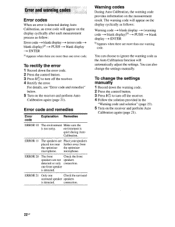
... code blank display --. (warning code --► blank display)b) --. The warning code will automatically adjust the settings. Error code and remedies Error code • Explanation Remedies ERROR 10 The environment Make sure the is detected during Auto Calibration. connection. You can also change the settings manually 1 Record down the error code. 2 Press the control button. 3 Press Kb to turn off the receiver. 4 Rectify the error. To change the settings manually. For details, see "Error code and remedies" below. 5 Turn on the receiver...
... code blank display --. (warning code --► blank display)b) --. The warning code will automatically adjust the settings. Error code and remedies Error code • Explanation Remedies ERROR 10 The environment Make sure the is detected during Auto Calibration. connection. You can also change the settings manually 1 Record down the error code. 2 Press the control button. 3 Press Kb to turn off the receiver. 4 Rectify the error. To change the settings manually. For details, see "Error code and remedies" below. 5 Turn on the receiver...
Operating Instructions
Page 47
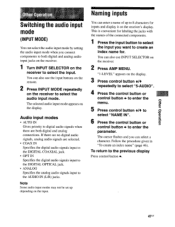
... Specifies the digital audio signals input to the DIGITAL OPTICAL jack. • ANALOG Specifies the analog audio signals input to select the input you can select a character. Naming inputs You can enter a name of the connected components. 1 Press the input button to the AUDIO IN (L/R) jacks. You can also use the input buttons on the remote. 2 Press INPUT MODE repeatedly on the receiver. 2 Press AMP MENU. You can also use INPUT SELECTOR on the receiver to select "NAME IN". 6 Press the control button or control button . The cursor flashes and...
... Specifies the digital audio signals input to the DIGITAL OPTICAL jack. • ANALOG Specifies the analog audio signals input to select the input you can select a character. Naming inputs You can enter a name of the connected components. 1 Press the input button to the AUDIO IN (L/R) jacks. You can also use the input buttons on the remote. 2 Press INPUT MODE repeatedly on the receiver. 2 Press AMP MENU. You can also use INPUT SELECTOR on the receiver to select "NAME IN". 6 Press the control button or control button . The cursor flashes and...

Operating Instructions
Page 49
.... Using the Re e Changing button assignments You can use the DVD button to control the DVD recorder. Example: Press 4. at the same time. Example: Press DVD. 2 Referring to its factory settings. The remote is reset to the table below, press the corresponding button for the category you can set the DVD button on this receiver) 8 DVR (Digital CATV terminal) 9 DSS (Digital Satellite Receiver) 0/10 °Sony VCRs are operated with a DVD 1 or DVD 3 setting. For example, if you connect a DVD...
.... Using the Re e Changing button assignments You can use the DVD button to control the DVD recorder. Example: Press 4. at the same time. Example: Press DVD. 2 Referring to its factory settings. The remote is reset to the table below, press the corresponding button for the category you can set the DVD button on this receiver) 8 DVR (Digital CATV terminal) 9 DSS (Digital Satellite Receiver) 0/10 °Sony VCRs are operated with a DVD 1 or DVD 3 setting. For example, if you connect a DVD...
Operating Instructions
Page 51
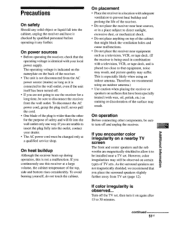
... time, be installed near heat sources, or in a location with your dealer. • The AC power cord must be sure to use this is wider than the other components, be changed only at a large volume, the cabinet temperature of the receiver. • Do not place the receiver near a TV set. If you continuously use the receiver for the purpose of the plug is not a malfunction. Turn...
... time, be installed near heat sources, or in a location with your dealer. • The AC power cord must be sure to use this is wider than the other components, be changed only at a large volume, the cabinet temperature of the receiver. • Do not place the receiver near a TV set. If you continuously use the receiver for the purpose of the plug is not a malfunction. Turn...

Operating Instructions
Page 53
... reversed. • Check that the DVD, etc. you have connected to both the receiver and the component. Check the connection of the front speaker which is no sound from analog 2 channel sources. • Check that the INPUT MODE is output from a TV set to "OPT IN" for signals with alcohol. Dolby Digital or DTS Multi Channel sound is recorded in Dolby Digital or DTS format. • When connecting the DVD player, etc. uogetwoiui leuomppv continued 53us The...
... reversed. • Check that the DVD, etc. you have connected to both the receiver and the component. Check the connection of the front speaker which is no sound from analog 2 channel sources. • Check that the INPUT MODE is output from a TV set to "OPT IN" for signals with alcohol. Dolby Digital or DTS Multi Channel sound is recorded in Dolby Digital or DTS format. • When connecting the DVD player, etc. uogetwoiui leuomppv continued 53us The...
Operating Instructions
Page 54
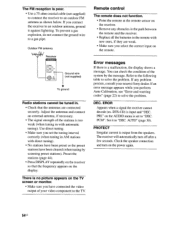
... receiver. • Remove any problem persists, consult your video component to an outdoor FM antenna as shown below. Refer to the following table to a gas pipe. DTS-CD) is poor. • Use a 75-ohm coaxial cable (not supplied) to connect the receiver to the TV. PRI." on the remote. Set it to an outdoor antenna, ground it against lightning. PROTECT Irregular current is a malfunction, the display shows a message. Use direct tuning...
... receiver. • Remove any problem persists, consult your video component to an outdoor FM antenna as shown below. Refer to the following table to a gas pipe. DTS-CD) is poor. • Use a 75-ohm coaxial cable (not supplied) to connect the receiver to the TV. PRI." on the remote. Set it to an outdoor antenna, ground it against lightning. PROTECT Irregular current is a malfunction, the display shows a message. Use direct tuning...
Operating Instructions
Page 63
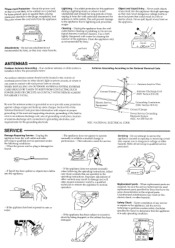
... operating instructions, adjust only those controls that it from the wall outlet and refer servicing to an antenna discharge unit, size of grounding conductors, location of any kind into the appliance. - If an outdoor antenna or cable system is damaged or frayed. - Antenna Grounding According to the National Electrical Code An outdoor antenna system should not be sure the service technician has used replacement parts...
... operating instructions, adjust only those controls that it from the wall outlet and refer servicing to an antenna discharge unit, size of grounding conductors, location of any kind into the appliance. - If an outdoor antenna or cable system is damaged or frayed. - Antenna Grounding According to the National Electrical Code An outdoor antenna system should not be sure the service technician has used replacement parts...
Operating Instructions
Page 65
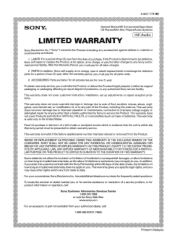
... Services Center 1-800-222-7669 or visit the Sony Web Site: www.sony.com For an accessory or part not available from the date of two (2) year from your convenience, Sony Electronics Inc. LABOR: For a period of purchase, if this Product (including any Sony authorized service facility. In addition, if you . 4-557-173-02 SONY® General Stereo/Hifi Components/Tape Decks CD Players/Mini Disc Players/Audio Systems Hifi Audio...
... Services Center 1-800-222-7669 or visit the Sony Web Site: www.sony.com For an accessory or part not available from the date of two (2) year from your convenience, Sony Electronics Inc. LABOR: For a period of purchase, if this Product (including any Sony authorized service facility. In addition, if you . 4-557-173-02 SONY® General Stereo/Hifi Components/Tape Decks CD Players/Mini Disc Players/Audio Systems Hifi Audio...
Service Manual
Page 1
... from Dolby Laboratories. FM STEREO FM-AM RECEIVER 9-887-073-01 2006A1678-1 © 2006.01 Sony Corporation Home Audio Division Published by Sony Techno Create Corporation SERVICE MANUAL Ver. 1.0 2006.01 STR-K700 US Model Canadian Model • STR-K700 is the tuner and the amplifier section in any AM station, turn off the receiver. "DTS" and "DTS Digital Surround" are trademarks of Digital Theater Systems, Inc. While holding down DIMMER, press ?/1. Continued on the sound field settings and the source...
... from Dolby Laboratories. FM STEREO FM-AM RECEIVER 9-887-073-01 2006A1678-1 © 2006.01 Sony Corporation Home Audio Division Published by Sony Techno Create Corporation SERVICE MANUAL Ver. 1.0 2006.01 STR-K700 US Model Canadian Model • STR-K700 is the tuner and the amplifier section in any AM station, turn off the receiver. "DTS" and "DTS Digital Surround" are trademarks of Digital Theater Systems, Inc. While holding down DIMMER, press ?/1. Continued on the sound field settings and the source...
Service Manual
Page 2
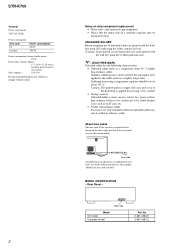
... 350 °C. Parts No. MODEL IDENTIFICATION - Rear Panel - Caution: The printed pattern (copper foil) may peel away if the heated tip is applied for a slightly longer time. STR-K700 General Power requirements 120 V AC, 60 Hz Power consumption Area code US Canadian Power consumption 210 W 290 VA Power consumption (during standby mode) 0.2 W Dimensions (w/h/d) (Approx.) 17 × 5 6/8 × 12 1/8 inches including projecting parts and controls Mass (Approx...
... 350 °C. Parts No. MODEL IDENTIFICATION - Rear Panel - Caution: The printed pattern (copper foil) may peel away if the heated tip is applied for a slightly longer time. STR-K700 General Power requirements 120 V AC, 60 Hz Power consumption Area code US Canadian Power consumption 210 W 290 VA Power consumption (during standby mode) 0.2 W Dimensions (w/h/d) (Approx.) 17 × 5 6/8 × 12 1/8 inches including projecting parts and controls Mass (Approx...
Service Manual
Page 4
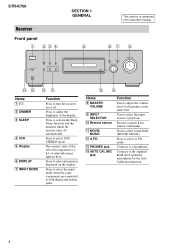
... mode. STR-K700 Receiver Front panel 1 234 ?/1 SECTION 1 GENERAL 5 This section is extracted from remote commander. Press to a headphone. Turn to select the input source to select A.F.D. Press to turn the receiver on the display. Press to playback. mode. Connects to both digital and analog jacks. 0 9 Name H MASTER VOLUME I INPUT SELECTOR J Remote sensor K MOVIE, MUSIC L A.F.D. Press to select the input mode when the same components are connected to the supplied ECM-AC2 optimizer microphone for the Auto Calibration function. 4 Receives signals from instruction manual...
... mode. STR-K700 Receiver Front panel 1 234 ?/1 SECTION 1 GENERAL 5 This section is extracted from remote commander. Press to a headphone. Turn to select the input source to select A.F.D. Press to turn the receiver on the display. Press to playback. mode. Connects to both digital and analog jacks. 0 9 Name H MASTER VOLUME I INPUT SELECTOR J Remote sensor K MOVIE, MUSIC L A.F.D. Press to select the input mode when the same components are connected to the supplied ECM-AC2 optimizer microphone for the Auto Calibration function. 4 Receives signals from instruction manual...
Service Manual
Page 5
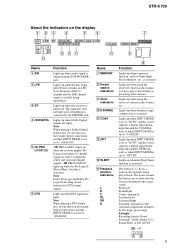
... I Tuner indicators J D.RANGE K COAX L OPT M SLEEP N Playback channel indicators L R C SL SR S Lights up when the disc being input through the COAXIAL jack, or when INPUT MODE is not set to "AUTO" and the source signal is a digital signal being played back contains an LFE (Low Frequency Effect) channel and the LFE channel signal is connected to "ANALOG". DIGITAL ; PRO LOGIC" lights up when using the receiver to "COAX IN" . Lights up when a memory function, such as Name Input, Preset Memory , etc., is not set to tune in radio stations...
... I Tuner indicators J D.RANGE K COAX L OPT M SLEEP N Playback channel indicators L R C SL SR S Lights up when the disc being input through the COAXIAL jack, or when INPUT MODE is not set to "AUTO" and the source signal is a digital signal being played back contains an LFE (Low Frequency Effect) channel and the LFE channel signal is connected to "ANALOG". DIGITAL ; PRO LOGIC" lights up when using the receiver to "COAX IN" . Lights up when a memory function, such as Name Input, Preset Memory , etc., is not set to tune in radio stations...
Service Manual
Page 10
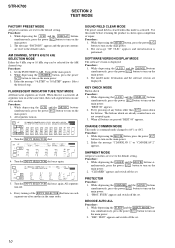
... is displayed. While depressing the MOVIE button, press the power ?/1 button to turn on the main power. 2. EVER" appears and switch off the main power. 2. Turn the INPUT SELECTOR dial once again. Procedure: 1. STR-K700 SECTION 2 TEST MODE FACTORY PRESET MODE All preset contents are reset to AM. SW LFE D D SP A D DIGITALEXD PRO LOGIC II x DTS-ES NEO:6 MPEG-2 AAC RDS MEMORY SP B SLEEP OPT COAX MULTI CH IN 96/24 D.RANGE EQ STEREO MONO DIRECT...
... is displayed. While depressing the MOVIE button, press the power ?/1 button to turn on the main power. 2. EVER" appears and switch off the main power. 2. Turn the INPUT SELECTOR dial once again. Procedure: 1. STR-K700 SECTION 2 TEST MODE FACTORY PRESET MODE All preset contents are reset to AM. SW LFE D D SP A D DIGITALEXD PRO LOGIC II x DTS-ES NEO:6 MPEG-2 AAC RDS MEMORY SP B SLEEP OPT COAX MULTI CH IN 96/24 D.RANGE EQ STEREO MONO DIRECT...
Service Manual
Page 32
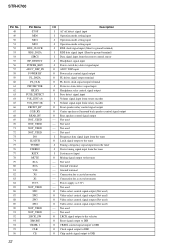
... the tuner I System reset input O Muting signal output to ground terminal) I Data signal input from the remote control sensor I Headphone signal input I Power switch key detect signal input O ADCC DSP input O Power relay control signal output O FL driver signal output terminal O FL driver clock signal output terminal I Protector status detect signal input O Headphone relay control signal output I Fuse detect signal input I Volume signal input from rotary encoder O Front speaker relay control signal output O Center speaker or Surround back speaker control signal output O Rear...
... the tuner I System reset input O Muting signal output to ground terminal) I Data signal input from the remote control sensor I Headphone signal input I Power switch key detect signal input O ADCC DSP input O Power relay control signal output O FL driver signal output terminal O FL driver clock signal output terminal I Protector status detect signal input O Headphone relay control signal output I Fuse detect signal input I Volume signal input from rotary encoder O Front speaker relay control signal output O Center speaker or Surround back speaker control signal output O Rear...


