Marketing Specifications (HTDDW700 Home Theater System)
Page 2
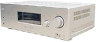
...sony.com/dn Sony Electronics Inc. • 16530 Via Esprillo • San Diego, CA 92127 • 1-800-222-7669 • www.sony.com Last Updated: 04/04/2006 Sony... of their respective owners. HT-DDW700 Component Home Theater System Specifications Receiver Audio Audio Power Output: 800W (133w x 5 + 135w (1KHz, 10% THD)) Inputs and ...20 FM Tuner Type: AM, FM Front Speaker Speaker Speaker Type: Enclosure- Bass Reflex (Ported) Speaker Terminal Type: Direct wire Audio Impedance: 6 ohms Dimensions Weight: Center Speaker:1 lb, 2 oz (0.5kg) Front Speaker: 1 lb, 5 oz (0.6kg) Surround Speaker...
...sony.com/dn Sony Electronics Inc. • 16530 Via Esprillo • San Diego, CA 92127 • 1-800-222-7669 • www.sony.com Last Updated: 04/04/2006 Sony... of their respective owners. HT-DDW700 Component Home Theater System Specifications Receiver Audio Audio Power Output: 800W (133w x 5 + 135w (1KHz, 10% THD)) Inputs and ...20 FM Tuner Type: AM, FM Front Speaker Speaker Speaker Type: Enclosure- Bass Reflex (Ported) Speaker Terminal Type: Direct wire Audio Impedance: 6 ohms Dimensions Weight: Center Speaker:1 lb, 2 oz (0.5kg) Front Speaker: 1 lb, 5 oz (0.6kg) Surround Speaker...
Operating Instructions
Page 3
...", "Pro Logic" and the double-D symbol are trademarks of Dolby Laboratories. ** "DTS" and "DTS Digital Surround" are registered trademarks of : • Receiver STR-K700 • Speaker system - This receiver incorporates Dolby* Digital and Pro Logic Surround and the DTS** Digital Surround System. • Manufactured under license from Dolby Laboratories. About This Manual • The instructions in this...
...", "Pro Logic" and the double-D symbol are trademarks of Dolby Laboratories. ** "DTS" and "DTS Digital Surround" are registered trademarks of : • Receiver STR-K700 • Speaker system - This receiver incorporates Dolby* Digital and Pro Logic Surround and the DTS** Digital Surround System. • Manufactured under license from Dolby Laboratories. About This Manual • The instructions in this...
Operating Instructions
Page 4
... parts 5 1: Installing speakers 12 2: Connecting speakers 14 3: Connecting the audio/video components 15 4: Connecting the antennas 18 5: Preparing the receiver and the remote 19 6: Calibrating the appropriate settings automatically (AUTO CALIBRATION) 20 7: Adjusting the speaker levels and balance (TEST TONE) 23... Digital and DTS Surround sound (AUTO FORMAT DIRECT) 37 Selecting a pre-programmed sound field 39 Using only the front speakers and sub woofer (2CH STEREO) 42 Resetting sound fields to the initial settings 42 Tuner Operations Listening to FM/AM radio 43 ...
... parts 5 1: Installing speakers 12 2: Connecting speakers 14 3: Connecting the audio/video components 15 4: Connecting the antennas 18 5: Preparing the receiver and the remote 19 6: Calibrating the appropriate settings automatically (AUTO CALIBRATION) 20 7: Adjusting the speaker levels and balance (TEST TONE) 23... Digital and DTS Surround sound (AUTO FORMAT DIRECT) 37 Selecting a pre-programmed sound field 39 Using only the front speakers and sub woofer (2CH STEREO) 42 Resetting sound fields to the initial settings 42 Tuner Operations Listening to FM/AM radio 43 ...
Operating Instructions
Page 6
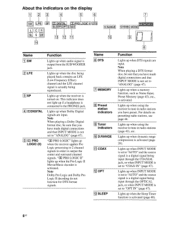
... Effect) channel and the LFE channel signal is connected to the PHONES jack Lights up when the receiver applies Pro Logic processing to 2 channel signals in order to output the center and surround channel signals. "00 PRO LOGIC" lights up when Dolby Digital signals are input. Lights up when... is output from the SUB WOOFER jack. sus About the indicators on the display 1 4 15 LFE L C R SL SR 14 SLEEP roTTCOAX 113 MEMORY D.RANGEI STEREO MON 10 191 ••• Name 1 SW 2 LFE 3 SP 4 DODIGITAL 5 DO PRO LOGIC (II) Function Lights up when DTS signals are input....
... Effect) channel and the LFE channel signal is connected to the PHONES jack Lights up when the receiver applies Pro Logic processing to 2 channel signals in order to output the center and surround channel signals. "00 PRO LOGIC" lights up when Dolby Digital signals are input. Lights up when... is output from the SUB WOOFER jack. sus About the indicators on the display 1 4 15 LFE L C R SL SR 14 SLEEP roTTCOAX 113 MEMORY D.RANGEI STEREO MON 10 191 ••• Name 1 SW 2 LFE 3 SP 4 DODIGITAL 5 DO PRO LOGIC (II) Function Lights up when DTS signals are input....
Operating Instructions
Page 7
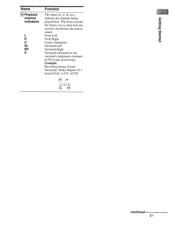
pepels Bugle° Name 1141 Playback channel indicators L R C SL SR S Function The letters (L, C, R, etc.) indicate the channels being played back. AUTO SW LFE [ c I SL SRI continued 7US The boxes around the letters vary to show how the receiver downmixes the source sound. Front Left Front Right Center (monaural) Surround Left Surround Right Surround (monaural or the surround components obtained by Pro Logic processing) Example: Recording format (Front/ Surround): Dolby Digital 3/2.1 Sound Field: A.F.D.
pepels Bugle° Name 1141 Playback channel indicators L R C SL SR S Function The letters (L, C, R, etc.) indicate the channels being played back. AUTO SW LFE [ c I SL SRI continued 7US The boxes around the letters vary to show how the receiver downmixes the source sound. Front Left Front Right Center (monaural) Surround Left Surround Right Surround (monaural or the surround components obtained by Pro Logic processing) Example: Recording format (Front/ Surround): Dolby Digital 3/2.1 Sound Field: A.F.D.

Operating Instructions
Page 12
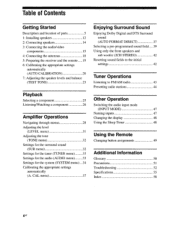
1: Installing speakers To fully enjoy theater-like multi channel surround sound requires five speakers (two front speakers, a center speaker, and two surround speakers) and a sub woofer (5.1 channel). For details, refer to prevent vibration or movement as shown in certain ...countries). Installing the speakers on a flat surface Before you want. A Front speaker (L) B Front speaker (R) ElCenter speaker D Surround speaker (L) ['Surround speaker (R) ©Sub woofer Tip Since the sub woofer does not emit highly directional signals, you can place it wherever you install ...
1: Installing speakers To fully enjoy theater-like multi channel surround sound requires five speakers (two front speakers, a center speaker, and two surround speakers) and a sub woofer (5.1 channel). For details, refer to prevent vibration or movement as shown in certain ...countries). Installing the speakers on a flat surface Before you want. A Front speaker (L) B Front speaker (R) ElCenter speaker D Surround speaker (L) ['Surround speaker (R) ©Sub woofer Tip Since the sub woofer does not emit highly directional signals, you can place it wherever you install ...
Operating Instructions
Page 13
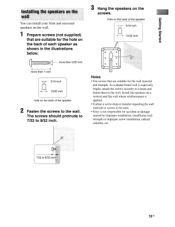
... vertical and flat wall where reinforcement is applied. • Contact a screw shop or installer regarding the wall material or screws to be used. • Sony is especially fragile, attach the screws securely to a beam and fasten them to the wall. As a plaster board wall is not responsible for accident or...etc. 7/32 to the wall. Install the speakers on the screws. papeis Bumee Installing the speakers on the wall You can install your front and surround speakers on the wall. 1 Prepare screws (not supplied) that are suitable for the hole on the back of each speaker as shown in the...
... vertical and flat wall where reinforcement is applied. • Contact a screw shop or installer regarding the wall material or screws to be used. • Sony is especially fragile, attach the screws securely to a beam and fasten them to the wall. As a plaster board wall is not responsible for accident or...etc. 7/32 to the wall. Install the speakers on the screws. papeis Bumee Installing the speakers on the wall You can install your front and surround speakers on the wall. 1 Prepare screws (not supplied) that are suitable for the hole on the back of each speaker as shown in the...
Operating Instructions
Page 14
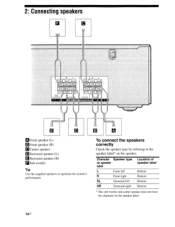
Character Speaker type on speaker label L Front left R Front right SL Surround left SR Surround right mottoB Location of speaker label Bottom Bottom Bottom * The sub woofer and center speaker does not have the character on the speaker. 2: Connecting speakers SUt D B A Front speaker (L) B Front speaker (R) El Center speaker D Surround speaker (L) ['Surround speaker (R) rdSub woofer Tip Use the supplied speakers to the speaker label* on the speaker label. 14us To connect the speakers correctly Check the speaker type by referring to optimize the system's performance.
Character Speaker type on speaker label L Front left R Front right SL Surround left SR Surround right mottoB Location of speaker label Bottom Bottom Bottom * The sub woofer and center speaker does not have the character on the speaker. 2: Connecting speakers SUt D B A Front speaker (L) B Front speaker (R) El Center speaker D Surround speaker (L) ['Surround speaker (R) rdSub woofer Tip Use the supplied speakers to the speaker label* on the speaker label. 14us To connect the speakers correctly Check the speaker type by referring to optimize the system's performance.
Operating Instructions
Page 18
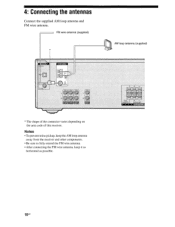
AM loop antenna (supplied) SUB WOOFER L SURROUND 18us 4: Connecting the antennas Connect the supplied AM loop antenna and FM wire antenna. Notes • To prevent noise pickup, keep the AM loop antenna away from the receiver and other components. • Be sure to fully extend the FM wire antenna. • After connecting the FM wire antenna, keep it as horizontal as possible. FM wire antenna (supplied) * • DIGITAL CAL : •M ?h, COgIAL .SCW,AL La L O FjP10 I R 0 .1JIO VIDEO 1 * The shape of the connector varies depending on the area code of this receiver.
AM loop antenna (supplied) SUB WOOFER L SURROUND 18us 4: Connecting the antennas Connect the supplied AM loop antenna and FM wire antenna. Notes • To prevent noise pickup, keep the AM loop antenna away from the receiver and other components. • Be sure to fully extend the FM wire antenna. • After connecting the FM wire antenna, keep it as horizontal as possible. FM wire antenna (supplied) * • DIGITAL CAL : •M ?h, COgIAL .SCW,AL La L O FjP10 I R 0 .1JIO VIDEO 1 * The shape of the connector varies depending on the area code of this receiver.
Operating Instructions
Page 22
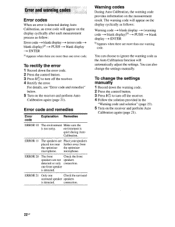
ENTER °Appears when there are more than one Check the surround surround speaker speakers is detected. environment is quiet during Auto Calibration, an error code will appear on the display cyclically after each measurement process as follow:.... To rectify the error 1 Record down the warning code. 2 Press the control button. 3 Press l/(!) to turn off the receiver. 4 Rectify the error. For details, see "Error code and remedies" below. 5 Turn on the receiver and perform Auto Calibration again (page 21). 22us To change the settings manually. Error code and remedies Error...
ENTER °Appears when there are more than one Check the surround surround speaker speakers is detected. environment is quiet during Auto Calibration, an error code will appear on the display cyclically after each measurement process as follow:.... To rectify the error 1 Record down the warning code. 2 Press the control button. 3 Press l/(!) to turn off the receiver. 4 Rectify the error. For details, see "Error code and remedies" below. 5 Turn on the receiver and perform Auto Calibration again (page 21). 22us To change the settings manually. Error code and remedies Error...
Operating Instructions
Page 23
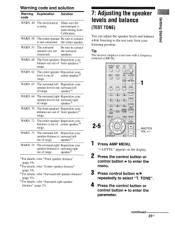
...from your speaker level is out of range. Tip The receiver employs a test tone with a frequency centered at 800 Hz. the center speaker. speaker.° WARN. 64 The surround right Reposition your listening position. e) For details, refer "Surround left out of center speaker.d) range. RETURN/EAT 1 ...ANU O 2CH A.F.D. WARN. 50 The center speaker Be sure to enter the parameter. MOVIE MUSIC (_) CD DUAL MOHO CD 'C:2j 'CU FM MOD: >I0/• Ps D,SAP MEMORY MO MENU =~„.0Ls MUTING 2-5 MASTER VOL +1- papels Bumap Warning code and solution Warning Explanation Solution...
...from your speaker level is out of range. Tip The receiver employs a test tone with a frequency centered at 800 Hz. the center speaker. speaker.° WARN. 64 The surround right Reposition your listening position. e) For details, refer "Surround left out of center speaker.d) range. RETURN/EAT 1 ...ANU O 2CH A.F.D. WARN. 50 The center speaker Be sure to enter the parameter. MOVIE MUSIC (_) CD DUAL MOHO CD 'C:2j 'CU FM MOD: >I0/• Ps D,SAP MEMORY MO MENU =~„.0Ls MUTING 2-5 MASTER VOL +1- papels Bumap Warning code and solution Warning Explanation Solution...
Operating Instructions
Page 24
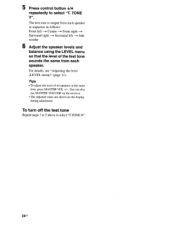
... same time, press MASTER VOL +/-. For details, see "Adjusting the level (LEVEL menu)" (page 31). Surround left -. You can also use MASTER VOLUME on the receiver. • The adjusted value are shown on the display during adjustment. Surround right ---. Tips • To adjust the level of the test tone sounds the same from...
... same time, press MASTER VOL +/-. For details, see "Adjusting the level (LEVEL menu)" (page 31). Surround left -. You can also use MASTER VOLUME on the receiver. • The adjusted value are shown on the display during adjustment. Surround right ---. Tips • To adjust the level of the test tone sounds the same from...
Operating Instructions
Page 29
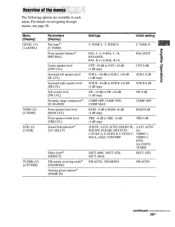
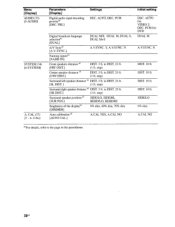
...) [4-TUNER] Parameters [Display] Test tone° [T. R +1 to BAL. SELCT] Effect level") [EFFECT] FM station receiving modem [FM MODE] Naming preset stations° [NAME IN] Settings Initial setting T. TONE N BAL. STD, EFCT. suoReJedo ...Jagfifty Overview of the menus The following options are available in each menu. TONE] Front speaker balance') [FRT BAL] Center speaker level [CNT LVL] Surround left speaker level [SL LVL] Surround...
...) [4-TUNER] Parameters [Display] Test tone° [T. R +1 to BAL. SELCT] Effect level") [EFFECT] FM station receiving modem [FM MODE] Naming preset stations° [NAME IN] Settings Initial setting T. TONE N BAL. STD, EFCT. suoReJedo ...Jagfifty Overview of the menus The following options are available in each menu. TONE] Front speaker balance') [FRT BAL] Center speaker level [CNT LVL] Surround left speaker level [SL LVL] Surround...
Operating Instructions
Page 30
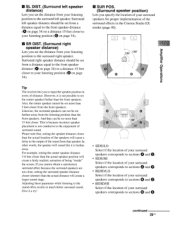
... speakers distance a) [FRT DIST.] DIST. 3 ft. to the page in the parentheses. 300s step) Surround right speaker distance a) DIST. 3 ft. AUTO, DEC. step) Surround left speaker distance a) DIST. 3 ft. to DIST. 23 ft. [SL DIST. ] (1 ft. step) Surround speaker position a) [SUR POS.] SIDE/LO, SIDE/HI, BEHD/LO, BEHD/HI Brightness of the...
... speakers distance a) [FRT DIST.] DIST. 3 ft. to the page in the parentheses. 300s step) Surround right speaker distance a) DIST. 3 ft. AUTO, DEC. step) Surround left speaker distance a) DIST. 3 ft. to DIST. 23 ft. [SL DIST. ] (1 ft. step) Surround speaker position a) [SUR POS.] SIDE/LO, SIDE/HI, BEHD/LO, BEHD/HI Brightness of the...
Operating Instructions
Page 31
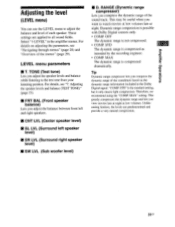
... range and lets you adjust the balance between front left and right speakers. ■ CNT LVL (Center speaker level) ■ SL LVL (Surround left speaker level) ■ SR LVL (Surround right speaker level) ■ SW LVL (Sub woofer level) ■ D. For details on the dynamic range information included in the amplifier menus...
... range and lets you adjust the balance between front left and right speakers. ■ CNT LVL (Center speaker level) ■ SL LVL (Surround left speaker level) ■ SR LVL (Surround right speaker level) ■ SW LVL (Sub woofer level) ■ D. For details on the dynamic range information included in the amplifier menus...
Operating Instructions
Page 32
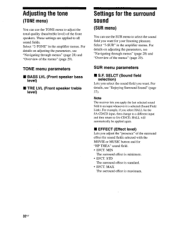
..." sound field. • EFCT. For details, see "Navigating through menus" (page 28) and "Overview of the menus" (page 29). MIN The surround effect is selected (Sound Field Link). For details on adjusting the parameters, see "Navigating through menus" (page 28) and "Overview of the menus" (page... 29). Note The receiver lets you apply the last selected sound field to an input whenever it is minimum. • EFCT. MAX The surround effect is standard. • EFCT. Select "3-SUR" in the amplifier menus. SUR menu parameters...
..." sound field. • EFCT. For details, see "Navigating through menus" (page 28) and "Overview of the menus" (page 29). MIN The surround effect is selected (Sound Field Link). For details on adjusting the parameters, see "Navigating through menus" (page 28) and "Overview of the menus" (page... 29). Note The receiver lets you apply the last selected sound field to an input whenever it is minimum. • EFCT. MAX The surround effect is standard. • EFCT. Select "3-SUR" in the amplifier menus. SUR menu parameters...
Operating Instructions
Page 35
...position (0 on page 34). ■ SR DIST. (Surround right speaker distance) Lets you set the distance from your surround speakers for proper implementation of the surround effects in the Cinema Studio EX modes (page 40). 100 120' Tip The receiver lets you to input the speaker position in terms of... being "inside" the screen. Please note that, setting the speaker distance closer than the front speakers. Adjusting these parameter while listening to the surround left speaker distance should be set from...
...position (0 on page 34). ■ SR DIST. (Surround right speaker distance) Lets you set the distance from your surround speakers for proper implementation of the surround effects in the Cinema Studio EX modes (page 40). 100 120' Tip The receiver lets you to input the speaker position in terms of... being "inside" the screen. Please note that, setting the speaker distance closer than the front speakers. Adjusting these parameter while listening to the surround left speaker distance should be set from...
Operating Instructions
Page 36
...are located high above the listening position, even if they are pointing toward the listener from the surround speakers and the sound of the listening position, the surround effects become unclear unless set to the immediate left and right of the front speakers. Nevertheless, ... environment has many variables, such as wall reflections, and you playback multi channel surround encoded software and select the setting that provides a good sense of spaciousness and that the surround speakers would be located behind the listening position, but presentation remains fairly consistent even...
...are located high above the listening position, even if they are pointing toward the listener from the surround speakers and the sound of the listening position, the surround effects become unclear unless set to the immediate left and right of the front speakers. Nevertheless, ... environment has many variables, such as wall reflections, and you playback multi channel surround encoded software and select the setting that provides a good sense of spaciousness and that the surround speakers would be located behind the listening position, but presentation remains fairly consistent even...
Operating Instructions
Page 37
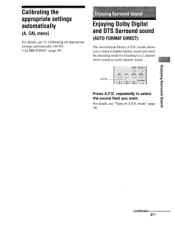
Enjoying Dolby Digital and DTS Surround sound (AUTO FORMAT DIRECT) The Auto Format Direct (A.F.D.) mode allows you to listen to higher fidelity sound and select the decoding mode for listening to ... DUAL MONO Press A.F.D. For details, see "6: Calibrating the appropriate settings automatically (AUTO CALIBRATION)" (page 20). CAL menu) For details, see "Types of A.F.D. repeatedly to a 2 channel stereo sound as multi channel sound. mode" (page 38). Calibrating the appropriate settings automatically (A.
Enjoying Dolby Digital and DTS Surround sound (AUTO FORMAT DIRECT) The Auto Format Direct (A.F.D.) mode allows you to listen to higher fidelity sound and select the decoding mode for listening to ... DUAL MONO Press A.F.D. For details, see "6: Calibrating the appropriate settings automatically (AUTO CALIBRATION)" (page 20). CAL menu) For details, see "Types of A.F.D. repeatedly to a 2 channel stereo sound as multi channel sound. mode" (page 38). Calibrating the appropriate settings automatically (A.
Operating Instructions
Page 38
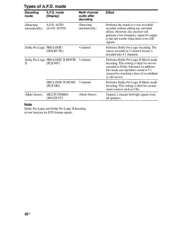
... Logic II Movie mode decoding. This setting is ideal for normal stereo sources such as it was recorded/ encoded without adding any surround effects. Performs Dolby Pro Logic decoding. Outputs 2 channel left/right signals from all speakers. 38US In addition, this receiver will generate a low frequency signal for watching videos of A.F.D. mode Decoding...
... Logic II Movie mode decoding. This setting is ideal for normal stereo sources such as it was recorded/ encoded without adding any surround effects. Performs Dolby Pro Logic decoding. Outputs 2 channel left/right signals from all speakers. 38US In addition, this receiver will generate a low frequency signal for watching videos of A.F.D. mode Decoding...


