Marketing Specifications (HTDDW700 Home Theater System)
Page 1
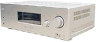
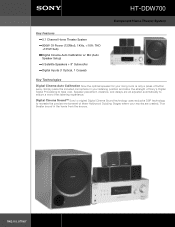
HT-DDW700 Component Home Theater System Key Features 5.1 Channel Home Theater System 800W Of Power (133Wx5, 1KHz,
HT-DDW700 Component Home Theater System Key Features 5.1 Channel Home Theater System 800W Of Power (133Wx5, 1KHz,
Marketing Specifications (HTDDW700 Home Theater System)
Page 2
.../15" (90 x 95 x 95mm) Surround Speaker: 3 6/11 x 3 11/15 x 3 11/15" (90 x 95 x 95mm) UPC Code: 027242683990 ©2006 Sony Electronics Inc. Dolby, Dolby Digital, ProLogic are property of Digital Theater Systems, L.P. HT-DDW700 Component Home Theater System Specifications Receiver Audio Audio Power Output: 800W (133w x 5...: AC 120V, 60 Hz Tuner Audio Tuner Frequency Range: AM: 530-1,710 kHz, FM: 87.5-108.0 MHz Station Preset(s): 10 AM, 20 FM Tuner Type: AM, FM Front Speaker Speaker Speaker Type: Enclosure- Reproduction in whole or in part without notice. Nonmetric weights and measures ...
.../15" (90 x 95 x 95mm) Surround Speaker: 3 6/11 x 3 11/15 x 3 11/15" (90 x 95 x 95mm) UPC Code: 027242683990 ©2006 Sony Electronics Inc. Dolby, Dolby Digital, ProLogic are property of Digital Theater Systems, L.P. HT-DDW700 Component Home Theater System Specifications Receiver Audio Audio Power Output: 800W (133w x 5...: AC 120V, 60 Hz Tuner Audio Tuner Frequency Range: AM: 530-1,710 kHz, FM: 87.5-108.0 MHz Station Preset(s): 10 AM, 20 FM Tuner Type: AM, FM Front Speaker Speaker Speaker Type: Enclosure- Reproduction in whole or in part without notice. Nonmetric weights and measures ...
Operating Instructions
Page 3
... woofer SS-WP700 About area codes The area code of the receiver you purchased is used for example, "Models of Digital Theater Systems, Inc. 3US Surround speakers SS-SRP700 - In this manual, models of area code U...according to the area code, are clearly indicated in the text, for illustration purposes unless stated otherwise. This receiver incorporates Dolby* Digital and Pro Logic Surround and the DTS** Digital Surround System. • Manufactured under ... ** "DTS" and "DTS Digital Surround" are for example, "Models of : • Receiver STR-K700 • Speaker system -
... woofer SS-WP700 About area codes The area code of the receiver you purchased is used for example, "Models of Digital Theater Systems, Inc. 3US Surround speakers SS-SRP700 - In this manual, models of area code U...according to the area code, are clearly indicated in the text, for illustration purposes unless stated otherwise. This receiver incorporates Dolby* Digital and Pro Logic Surround and the DTS** Digital Surround System. • Manufactured under ... ** "DTS" and "DTS Digital Surround" are for example, "Models of : • Receiver STR-K700 • Speaker system -
Operating Instructions
Page 4
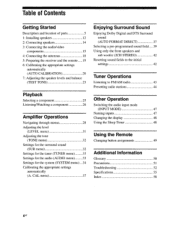
... Selecting a pre-programmed sound field 39 Using only the front speakers and sub woofer (2CH STEREO) 42 Resetting sound fields to the initial settings 42 Tuner Operations Listening to FM/AM radio 43 Presetting radio stations 44 Other Operation Switching the... Table of Contents Getting Started Description and location of parts 5 1: Installing speakers 12 2: Connecting speakers 14 3: Connecting the audio/video components 15 4: Connecting the antennas 18 5: Preparing the receiver and the remote 19 6: Calibrating the appropriate settings automatically (AUTO CALIBRATION)...
... Selecting a pre-programmed sound field 39 Using only the front speakers and sub woofer (2CH STEREO) 42 Resetting sound fields to the initial settings 42 Tuner Operations Listening to FM/AM radio 43 Presetting radio stations 44 Other Operation Switching the... Table of Contents Getting Started Description and location of parts 5 1: Installing speakers 12 2: Connecting speakers 14 3: Connecting the audio/video components 15 4: Connecting the antennas 18 5: Preparing the receiver and the remote 19 6: Calibrating the appropriate settings automatically (AUTO CALIBRATION)...

Operating Instructions
Page 5
Press to select sound fields (MOVIE, MUSIC) (page 39). Press to select 2CH STEREO mode (page 34). Connects to both digital and analog jacks (page 47). Press to adjust ... continued 51.1S Press to activate the Sleep Timer function and the duration which the receiver turns off (page 19, 26, 27, 42, 56). Turn to select the input source to a headphone (page 40... jack 14 AUTO CAL MIC jack Function Turn to select A.F.D. Press to adjust the volume level of all speakers at the same time (page 19, 24, 25, 26, 27). Press to select information displayed on or off automatically (page...
Press to select sound fields (MOVIE, MUSIC) (page 39). Press to select 2CH STEREO mode (page 34). Connects to both digital and analog jacks (page 47). Press to adjust ... continued 51.1S Press to activate the Sleep Timer function and the duration which the receiver turns off (page 19, 26, 27, 42, 56). Turn to select the input source to a headphone (page 40... jack 14 AUTO CAL MIC jack Function Turn to select A.F.D. Press to adjust the volume level of all speakers at the same time (page 19, 24, 25, 26, 27). Press to select information displayed on or off automatically (page...
Operating Instructions
Page 8
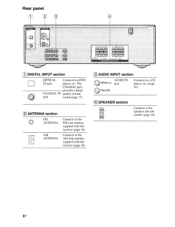
Connects to the AM loop antenna supplied with this receiver (page 18). 3 AUDIO INPUT section AUDIO IN O White (L) jack O Red (R) Connects to a CD player, etc. (page 16). 141 SPEAKER section Connects to the speakers and sub woofer (page 14). Bus Rear panel [ 1 t" C DIGITAL INPUT section OPTICAL Connects to the FM wire antenna supplied with this receiver (page 18). The COAXIAL jack provides a better COAXIAL IN quality of loud jack sound (page 17). 2 ANTENNA section FM 0 ANTENNA AM ANTENNA Connects to a DVD IN jack player, etc.
Connects to the AM loop antenna supplied with this receiver (page 18). 3 AUDIO INPUT section AUDIO IN O White (L) jack O Red (R) Connects to a CD player, etc. (page 16). 141 SPEAKER section Connects to the speakers and sub woofer (page 14). Bus Rear panel [ 1 t" C DIGITAL INPUT section OPTICAL Connects to the FM wire antenna supplied with this receiver (page 18). The COAXIAL jack provides a better COAXIAL IN quality of loud jack sound (page 17). 2 ANTENNA section FM 0 ANTENNA AM ANTENNA Connects to a DVD IN jack player, etc.
Operating Instructions
Page 10
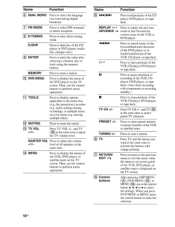
.... 13 TV VOL +*/- When you want at the same time. MASTER VOL Press to perform menu operations. level of all speakers at the same time to activate the buttons with components in the forward/backward direction of the DVD player or to fastforward/rewind...button to enter the selection. 10us Then, use the control buttons to adjust the volume +*/- audio settings during digital broadcast. 7 FM MODE Press to select FM monaural or stereo reception. 8 D.TUNING Press to enter direct tuning mode. erasing multiple titles). 1121 MUTING Press to the entire disc (e.g. REPLAY ...
.... 13 TV VOL +*/- When you want at the same time. MASTER VOL Press to perform menu operations. level of all speakers at the same time to activate the buttons with components in the forward/backward direction of the DVD player or to fastforward/rewind...button to enter the selection. 10us Then, use the control buttons to adjust the volume +*/- audio settings during digital broadcast. 7 FM MODE Press to select FM monaural or stereo reception. 8 D.TUNING Press to enter direct tuning mode. erasing multiple titles). 1121 MUTING Press to the entire disc (e.g. REPLAY ...

Operating Instructions
Page 12
... fully enjoy theater-like multi channel surround sound requires five speakers (two front speakers, a center speaker, and two surround speakers) and a sub woofer (5.1 channel). Installing the speakers on the speaker stand For greater flexibility in positioning the speakers, use the optional WS-FV11 or WS-FV1OD speaker stand (available only in the illustration below. For details, refer to...
... fully enjoy theater-like multi channel surround sound requires five speakers (two front speakers, a center speaker, and two surround speakers) and a sub woofer (5.1 channel). Installing the speakers on the speaker stand For greater flexibility in positioning the speakers, use the optional WS-FV11 or WS-FV1OD speaker stand (available only in the illustration below. For details, refer to...
Operating Instructions
Page 13
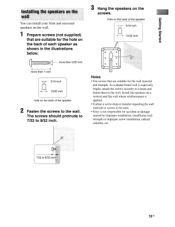
...regarding the wall material or screws to be used. • Sony is especially fragile, attach the screws securely to a beam and fasten them to the wall. papeis Bumee Installing the speakers on the wall You can install your front and surround speakers on the wall. 1 Prepare screws (not supplied) that are...illustrations below. (11111\1111\111> more than 5/32 inch more than 1 inch 3/16 inch 13/32 inch Hole on the back of the speaker 3/16 inch 13/32 inch Notes • Use screws that are suitable for accident or damage caused by improper installation, insufficient wall strength or ...
...regarding the wall material or screws to be used. • Sony is especially fragile, attach the screws securely to a beam and fasten them to the wall. papeis Bumee Installing the speakers on the wall You can install your front and surround speakers on the wall. 1 Prepare screws (not supplied) that are...illustrations below. (11111\1111\111> more than 5/32 inch more than 1 inch 3/16 inch 13/32 inch Hole on the back of the speaker 3/16 inch 13/32 inch Notes • Use screws that are suitable for accident or damage caused by improper installation, insufficient wall strength or ...
Operating Instructions
Page 14
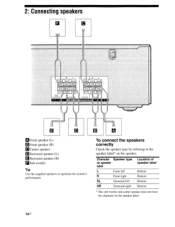
To connect the speakers correctly Check the speaker type by referring to optimize the system's performance. 2: Connecting speakers SUt D B A Front speaker (L) B Front speaker (R) El Center speaker D Surround speaker (L) ['Surround speaker (R) rdSub woofer Tip Use the supplied speakers to the speaker label* on the speaker label. 14us Character Speaker type on speaker label L Front left R Front right SL Surround left SR Surround right mottoB Location of speaker label Bottom Bottom Bottom * The sub woofer and center speaker does not have the character on the speaker.
To connect the speakers correctly Check the speaker type by referring to optimize the system's performance. 2: Connecting speakers SUt D B A Front speaker (L) B Front speaker (R) El Center speaker D Surround speaker (L) ['Surround speaker (R) rdSub woofer Tip Use the supplied speakers to the speaker label* on the speaker label. 14us Character Speaker type on speaker label L Front left R Front right SL Surround left SR Surround right mottoB Location of speaker label Bottom Bottom Bottom * The sub woofer and center speaker does not have the character on the speaker.
Operating Instructions
Page 20
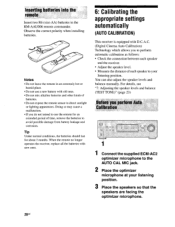
... settings automatically (AUTO CALIBRATION) This receiver is equipped with old ones. • Do not mix alkaline batteries and other kinds of batteries. • Do not expose the remote sensor to your listening position. 3 Place the speakers so that the speakers are facing the optimizer microphone. 20us... (TEST TONE)" (page 23) Before you to perform automatic calibration as follows: • Check the connection between each speaker and the receiver. • Adjust the speaker level. • Measure the distance of time, remove the batteries to the AUTO CAL MIC jack. 2 Place the optimizer...
... settings automatically (AUTO CALIBRATION) This receiver is equipped with old ones. • Do not mix alkaline batteries and other kinds of batteries. • Do not expose the remote sensor to your listening position. 3 Place the speakers so that the speakers are facing the optimizer microphone. 20us... (TEST TONE)" (page 23) Before you to perform automatic calibration as follows: • Check the connection between each speaker and the receiver. • Adjust the speaker level. • Measure the distance of time, remove the batteries to the AUTO CAL MIC jack. 2 Place the optimizer...

Operating Instructions
Page 21
...more accurate measurement. Press 1/(!), input buttons or MUTING. - Press AUTO CAL again. 21us Measurement for Environment noise level Speaker connection Speaker level Speaker distance Display NOISE.CHK MEASURE and SP DET. appears alternately* MEASURE and GAIN appears alternately* MEASURE and DISTANCE appears alternately*...; You cannot select Auto Calibration when the headphone is because test signals are registered. LMON C(-3- ) Dr 1493° FM MODE switch Input buttons Control button cl >10/. Change the volume level. - Tips • When Auto Calibration starts: Stand...
...more accurate measurement. Press 1/(!), input buttons or MUTING. - Press AUTO CAL again. 21us Measurement for Environment noise level Speaker connection Speaker level Speaker distance Display NOISE.CHK MEASURE and SP DET. appears alternately* MEASURE and GAIN appears alternately* MEASURE and DISTANCE appears alternately*...; You cannot select Auto Calibration when the headphone is because test signals are registered. LMON C(-3- ) Dr 1493° FM MODE switch Input buttons Control button cl >10/. Change the volume level. - Tips • When Auto Calibration starts: Stand...
Operating Instructions
Page 22
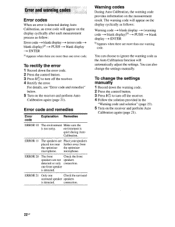
... each measurement process as follows: Warning code blank display --. (warning code --► blank display)b) --. You can choose to turn off the receiver. 4 Rectify the error. one Check the surround surround speaker speakers is detected. To change the settings manually. ENTER °Appears when there are more than one error code. microphone. connection. Warning...
... each measurement process as follows: Warning code blank display --. (warning code --► blank display)b) --. You can choose to turn off the receiver. 4 Rectify the error. one Check the surround surround speaker speakers is detected. To change the settings manually. ENTER °Appears when there are more than one error code. microphone. connection. Warning...
Operating Instructions
Page 23
... sure to connect is quiet during Auto Calibration. Tip The receiver employs a test tone with a frequency centered at 800 Hz. Make sure the environment is not connected. the center speaker. MOVIE MUSIC (_) CD DUAL MOHO CD 'C:2j 'CU FM MOD: >I0/• Ps D,SAP MEMORY MO MENU =~„.0Ls MUTING 2-5 MASTER VOL +1- papels...
... sure to connect is quiet during Auto Calibration. Tip The receiver employs a test tone with a frequency centered at 800 Hz. Make sure the environment is not connected. the center speaker. MOVIE MUSIC (_) CD DUAL MOHO CD 'C:2j 'CU FM MOD: >I0/• Ps D,SAP MEMORY MO MENU =~„.0Ls MUTING 2-5 MASTER VOL +1- papels...
Operating Instructions
Page 24
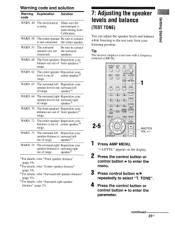
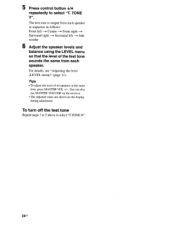
... sequence as follows: Front left ---. Surround left -. Sub woofer 6 Adjust the speaker levels and balance using the LEVEL menu so that the level of all speakers at the same time, press MASTER VOL +/-. To turn off the test tone Repeat steps 1 to 5 above to select "T. For ... (page 31). Tips • To adjust the level of the test tone sounds the same from each speaker. Center ---. Front right ---. Surround right ---. You can also use MASTER VOLUME on the receiver. • The adjusted value are shown on the display during adjustment. 5 Press control button +1+ repeatedly ...
... sequence as follows: Front left ---. Surround left -. Sub woofer 6 Adjust the speaker levels and balance using the LEVEL menu so that the level of all speakers at the same time, press MASTER VOL +/-. To turn off the test tone Repeat steps 1 to 5 above to select "T. For ... (page 31). Tips • To adjust the level of the test tone sounds the same from each speaker. Center ---. Front right ---. Surround right ---. You can also use MASTER VOLUME on the receiver. • The adjusted value are shown on the display during adjustment. 5 Press control button +1+ repeatedly ...
Operating Instructions
Page 25
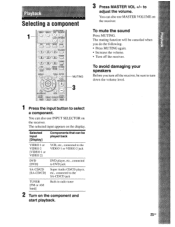
...Press MUTING. You can also use MASTER VOLUME on the receiver. to select a component. The selected input appears on the component and start playback. 25 US You can also use INPUT SELECTOR on the receiver. To avoid damaging your speakers Before you do the following. • Press MUTING again.... • Increase the volume. • Turn off the receiver, be sure to the SA-CD/CD jack TUNER [FM or AM band] Built-in radio tuner ...
...Press MUTING. You can also use MASTER VOLUME on the receiver. to select a component. The selected input appears on the component and start playback. 25 US You can also use INPUT SELECTOR on the receiver. To avoid damaging your speakers Before you do the following. • Press MUTING again.... • Increase the volume. • Turn off the receiver, be sure to the SA-CD/CD jack TUNER [FM or AM band] Built-in radio tuner ...

Operating Instructions
Page 26
.../CD. Refer to the Super Audio CD/CD, eject the disc and turn off the receiver and Super Audio CD player/ CD player. 260s Refer to the sound that was recorded in the 2 channel format from all speakers (multi channel). Listening/Watching a component Listening to a Super Audio CD/CD 1'r 2 3 O... o 8 5 3 !!) Notes • The operation is described for a Sony Super Audio CD player. • Refer to suit the music. You ...
.../CD. Refer to the Super Audio CD/CD, eject the disc and turn off the receiver and Super Audio CD player/ CD player. 260s Refer to the sound that was recorded in the 2 channel format from all speakers (multi channel). Listening/Watching a component Listening to a Super Audio CD/CD 1'r 2 3 O... o 8 5 3 !!) Notes • The operation is described for a Sony Super Audio CD player. • Refer to suit the music. You ...
Operating Instructions
Page 29
...[SW LVL] Dynamic range compressor° [D. TONE Y, T. L +1 to BAL. MAX EFCT. STD FM AUTO, FM MONO FM AUTO continued 29us RANGE] Front speaker bass level [BASS LVL] Front speaker treble level [TRE LVL] Sound field selection° [S.F. R +1 to BAL. MIN, EFCT. suoReJedo ... TONE (32) [2-TONE] SUR (32) [3-SUR] TUNER (33) [4-TUNER] Parameters [Display] Test tone° [T. SELCT] Effect level") [EFFECT] FM station receiving modem [FM MODE] Naming preset stations° [NAME IN] Settings Initial setting T. MAX COMP. OFF BASS -6 dB to BASS +6 dB (1 dB step) BASS 0 ...
...[SW LVL] Dynamic range compressor° [D. TONE Y, T. L +1 to BAL. MAX EFCT. STD FM AUTO, FM MONO FM AUTO continued 29us RANGE] Front speaker bass level [BASS LVL] Front speaker treble level [TRE LVL] Sound field selection° [S.F. R +1 to BAL. MIN, EFCT. suoReJedo ... TONE (32) [2-TONE] SUR (32) [3-SUR] TUNER (33) [4-TUNER] Parameters [Display] Test tone° [T. SELCT] Effect level") [EFFECT] FM station receiving modem [FM MODE] Naming preset stations° [NAME IN] Settings Initial setting T. MAX COMP. OFF BASS -6 dB to BASS +6 dB (1 dB step) BASS 0 ...
Operating Instructions
Page 30
...to DIST. 23 ft. [SR DIST.] (1 ft. AUTO for : DVD DUAL M A.V.SYNC. DIST. 10 ft. N Naming inputs° [NAME IN] Front speakers distance a) [FRT DIST.] DIST. 3 ft. step) Surround speaker position a) [SUR POS.] SIDE/LO, SIDE/HI, BEHD/LO, BEHD/HI Brightness of the display° [DIMMER] 0% dim, 40% dim, 70% dim... a) DIST. 3 ft. DIST. 10 ft. to the page in the parentheses. 300s PCM for : VIDEO 2; PRI.] Settings DEC. step) Center speaker distance a) [CNT DIST.] DIST. 3 ft. SIDE/LO 0% dim A.CAL NO a)For details, refer to DIST. 23 ft. (1 ft. to DIST. 23 ft. [SL DIST. ] (1 ...
...to DIST. 23 ft. [SR DIST.] (1 ft. AUTO for : DVD DUAL M A.V.SYNC. DIST. 10 ft. N Naming inputs° [NAME IN] Front speakers distance a) [FRT DIST.] DIST. 3 ft. step) Surround speaker position a) [SUR POS.] SIDE/LO, SIDE/HI, BEHD/LO, BEHD/HI Brightness of the display° [DIMMER] 0% dim, 40% dim, 70% dim... a) DIST. 3 ft. DIST. 10 ft. to the page in the parentheses. 300s PCM for : VIDEO 2; PRI.] Settings DEC. step) Center speaker distance a) [CNT DIST.] DIST. 3 ft. SIDE/LO 0% dim A.CAL NO a)For details, refer to DIST. 23 ft. (1 ft. to DIST. 23 ft. [SL DIST. ] (1 ...
Operating Instructions
Page 31
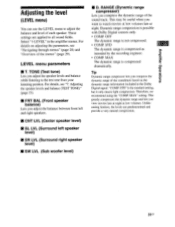
...T. STD" is compressed as intended by the recording engineer. • COMP. Tip Dynamic range compressor lets you compress the dynamic range of each speaker. Therefore, we recommend using the "COMP. For details, see "Navigating through menus" (page 28) and "Overview of the menus" (page ...fields. This may be useful when you adjust the balance between front left and right speakers. ■ CNT LVL (Center speaker level) ■ SL LVL (Surround left speaker level) ■ SR LVL (Surround right speaker level) ■ SW LVL (Sub woofer level) ■ D. This greatly compresses...
...T. STD" is compressed as intended by the recording engineer. • COMP. Tip Dynamic range compressor lets you compress the dynamic range of each speaker. Therefore, we recommend using the "COMP. For details, see "Navigating through menus" (page 28) and "Overview of the menus" (page ...fields. This may be useful when you adjust the balance between front left and right speakers. ■ CNT LVL (Center speaker level) ■ SL LVL (Surround left speaker level) ■ SR LVL (Surround right speaker level) ■ SW LVL (Sub woofer level) ■ D. This greatly compresses...


