Limited Warranty (ES Products)
Page 1
.... This warranty gives you specific legal rights, and you must take the Product, or deliver the Product freight prepaid, in exchange for defective parts for service assistance or resolution of the Product, including the antenna. 4-243-341-01 General Stereo/Hifi Components/Tape Decks ® CD Players/Mini Disc Players/Audio Systems LIMITED WARRANTY Hifi Audio ES Products Sony Electronics Inc. ("Sony") warrants this Product is within 90 days of...
.... This warranty gives you specific legal rights, and you must take the Product, or deliver the Product freight prepaid, in exchange for defective parts for service assistance or resolution of the Product, including the antenna. 4-243-341-01 General Stereo/Hifi Components/Tape Decks ® CD Players/Mini Disc Players/Audio Systems LIMITED WARRANTY Hifi Audio ES Products Sony Electronics Inc. ("Sony") warrants this Product is within 90 days of...
Primary User Manual
Page 1
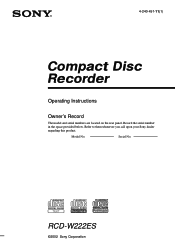
Model No. Serial No. 4-240-491-11(1) Compact Disc Recorder Operating Instructions Owner's Record The model and serial numbers are located on the rear panel. Record the serial number in the space provided below. Refer to them whenever you call upon your Sony dealer regarding this product. RCD-W222ES ©2002 Sony Corporation
Model No. Serial No. 4-240-491-11(1) Compact Disc Recorder Operating Instructions Owner's Record The model and serial numbers are located on the rear panel. Record the serial number in the space provided below. Refer to them whenever you call upon your Sony dealer regarding this product. RCD-W222ES ©2002 Sony Corporation
Primary User Manual
Page 2
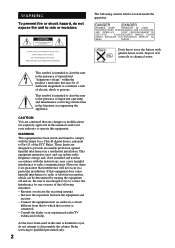
... important operating and maintenance (servicing) instructions in the literature accompanying the appliance. This symbol is intended to alert the user to the presence of uninsulated "dangerous voltage" within the product's enclosure that any changes or modifications not expressly approved in this manual could void your authority to which can radiate radio frequency energy and, if not installed and used in a residential installation...
... important operating and maintenance (servicing) instructions in the literature accompanying the appliance. This symbol is intended to alert the user to the presence of uninsulated "dangerous voltage" within the product's enclosure that any changes or modifications not expressly approved in this manual could void your authority to which can radiate radio frequency energy and, if not installed and used in a residential installation...
Primary User Manual
Page 4
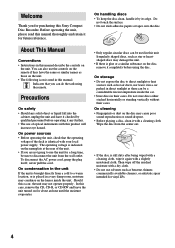
... names as star or heartshaped discs may not operate properly. You can also use the controls on the disc, remove it completely before operating it in a car parked in temperature inside the unit. To disconnect the AC power cord, grasp the plug itself; Should this product will increase eye hazard. On handling discs • To keep the disc clean, handle it for vinyl LPs...
... names as star or heartshaped discs may not operate properly. You can also use the controls on the disc, remove it completely before operating it in a car parked in temperature inside the unit. To disconnect the AC power cord, grasp the plug itself; Should this product will increase eye hazard. On handling discs • To keep the disc clean, handle it for vinyl LPs...

Primary User Manual
Page 7
.... Optical digital cord (not supplied) This Unit Can Use the Following Discs The unit can use will not work in DECK B.) When you may not be able to play it in some CD players), including home, car, and portable models. (An unfinalized disc can be used). 7 RW recording section), and CD-RW compatible players. Audio CD-RW Discs with this logo are recordable, and also re-writable. Getting Started Connecting the unit to a digital component Connect a component...
.... Optical digital cord (not supplied) This Unit Can Use the Following Discs The unit can use will not work in DECK B.) When you may not be able to play it in some CD players), including home, car, and portable models. (An unfinalized disc can be used). 7 RW recording section), and CD-RW compatible players. Audio CD-RW Discs with this logo are recordable, and also re-writable. Getting Started Connecting the unit to a digital component Connect a component...
Primary User Manual
Page 8
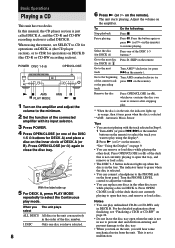
... PLAY MODE repeatedly to select the track you will hear some mechanical noise from entering and prevent damage to the disc tray. • When you turn on the unit, you want to remove after stopping play using the remote, set SELECT to CD for operations on DECK A (the CD player section), or to CDR for DECK A) and place a disc on the amplifier and adjust the volume to the next disc Press D. POWER DISC 1-5 A OPEN...
... PLAY MODE repeatedly to select the track you will hear some mechanical noise from entering and prevent damage to the disc tray. • When you turn on the unit, you want to remove after stopping play using the remote, set SELECT to CD for operations on DECK A (the CD player section), or to CDR for DECK A) and place a disc on the amplifier and adjust the volume to the next disc Press D. POWER DISC 1-5 A OPEN...

Primary User Manual
Page 9
... the disc using the remote, set SELECT to CDR for DECK B CD TEXT TOC DECK B CD TEXT CD - The information appears as follows: DECK A The total track number and total playing time CD TEXT DECK A TOC DISC CD TEXT CD - continued 9 Basic Operations RW DISC DISC Detailed display for DECK B DECK A/DECK B divided display CD TEXT DECK A TOC DECK B CD TEXT CD - Z Press SCROLL on DECK B. Display while the unit is stopped. Each time you press the button...
... the disc using the remote, set SELECT to CDR for DECK B CD TEXT TOC DECK B CD TEXT CD - The information appears as follows: DECK A The total track number and total playing time CD TEXT DECK A TOC DISC CD TEXT CD - continued 9 Basic Operations RW DISC DISC Detailed display for DECK B DECK A/DECK B divided display CD TEXT DECK A TOC DECK B CD TEXT CD - Z Press SCROLL on DECK B. Display while the unit is stopped. Each time you press the button...

Primary User Manual
Page 12
... track number you want to play . When you find the track number or track name, and press N (or H on the remote). Before using the number buttons Z You can locate a particular point in a track during operation. SELECT m/M To locate a point Do the following : The next or succeeding tracks During playback, turn AMS of a track, turn AMS (or press number or track ./> on the remote repeatedly) name directly until you find the point. A specific track In stop mode, turn...
... track number you want to play . When you find the track number or track name, and press N (or H on the remote). Before using the number buttons Z You can locate a particular point in a track during operation. SELECT m/M To locate a point Do the following : The next or succeeding tracks During playback, turn AMS of a track, turn AMS (or press number or track ./> on the remote repeatedly) name directly until you find the point. A specific track In stop mode, turn...

Primary User Manual
Page 18
... to use the disc that has not been recorded. ("Blank Disc" appears in Synchro-Recording. • If Repeat Play has been set to 70 characters each, and 40 tracks per disc). Notes • You cannot pause recording in the display when you must finalize the disc. High speed recording changes to CDR. POWER DISC 1-5 A OPEN/CLOSE CD SYNCHRO NORMAL N x SELECT CD SYNCHRO H NORMAL x 18 When using the remote, set , Shuffle play mode, and finalizes the disc. Normal Synchro-Recording...
... to use the disc that has not been recorded. ("Blank Disc" appears in Synchro-Recording. • If Repeat Play has been set to 70 characters each, and 40 tracks per disc). Notes • You cannot pause recording in the display when you must finalize the disc. High speed recording changes to CDR. POWER DISC 1-5 A OPEN/CLOSE CD SYNCHRO NORMAL N x SELECT CD SYNCHRO H NORMAL x 18 When using the remote, set , Shuffle play mode, and finalizes the disc. Normal Synchro-Recording...

Primary User Manual
Page 19
... a recordable CD-R or CD-RW on page 18. 2 Press CD SYNCHRO HIGH repeatedly to CDR. Recording/Editing With the label side up "TOC Reading" appears. You cannot monitor the recorded signal while recording. When using the remote, set SELECT to select the recording type, "NORM SYNC" or "MAKE DISC." CD SYNCHRO HIGH N x SELECT CD SYNCHRO HIGH H x 1 Do Steps 1 to 3 of DECK A and place a CD on the disc tray. 1 Press POWER. 2 Press OPEN...
... a recordable CD-R or CD-RW on page 18. 2 Press CD SYNCHRO HIGH repeatedly to CDR. Recording/Editing With the label side up "TOC Reading" appears. You cannot monitor the recorded signal while recording. When using the remote, set SELECT to select the recording type, "NORM SYNC" or "MAKE DISC." CD SYNCHRO HIGH N x SELECT CD SYNCHRO HIGH H x 1 Do Steps 1 to 3 of DECK A and place a CD on the disc tray. 1 Press POWER. 2 Press OPEN...

Primary User Manual
Page 20
... recording, you record from the end of the disc before stopping the recording. The track must be played on the remote). 7 Start playing the sound source you must finalize the disc. To prevent this case, use analog recording through Turn on the remote). Or use Synchro-Recording. • This unit uses the Serial Copy Management System, which allows only first-generation digital copies to CDR. • After recording, you want to record. Press OPEN...
... recording, you record from the end of the disc before stopping the recording. The track must be played on the remote). 7 Start playing the sound source you must finalize the disc. To prevent this case, use analog recording through Turn on the remote). Or use Synchro-Recording. • This unit uses the Serial Copy Management System, which allows only first-generation digital copies to CDR. • After recording, you want to record. Press OPEN...
Primary User Manual
Page 22
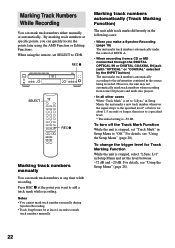
... information contained in Setup Menu and set SELECT to add a track mark while recording. For details, see "Using the Setup Menu" (page 28). However, the unit may not automatically mark track numbers when recording from a CD or MD connected through the DIGITAL OPTICAL IN or DIGITAL COAXIAL IN jack (with "OPTICAL" or "COAXIAL" selected by the INPUT button) The unit marks track numbers automatically according to mark track numbers manually. To change the trigger...
... information contained in Setup Menu and set SELECT to add a track mark while recording. For details, see "Using the Setup Menu" (page 28). However, the unit may not automatically mark track numbers when recording from a CD or MD connected through the DIGITAL OPTICAL IN or DIGITAL COAXIAL IN jack (with "OPTICAL" or "COAXIAL" selected by the INPUT button) The unit marks track numbers automatically according to mark track numbers manually. To change the trigger...
Primary User Manual
Page 23
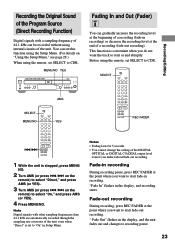
... for 5 seconds. • You cannot change the setting of the DIGITAL OPTICAL or DIGITAL COAXIAL output level even if you want to start fade-in recording) or decrease the recording level at the end of a recording (fade-out recording). Recording/Editing Recording the Original Sound of the Program Source (Direct Recording Function) Digital signals with other sampling frequencies than 44.1 kHz are automatically recorded through the sampling rate converter of...
... for 5 seconds. • You cannot change the setting of the DIGITAL OPTICAL or DIGITAL COAXIAL output level even if you want to start fade-in recording) or decrease the recording level at the end of a recording (fade-out recording). Recording/Editing Recording the Original Sound of the Program Source (Direct Recording Function) Digital signals with other sampling frequencies than 44.1 kHz are automatically recorded through the sampling rate converter of...

Primary User Manual
Page 26
... track/disc before you label the track name, select the track number. 5 Press YES. When using the remote, set SELECT to CDR. SELECT MENU/NO ./> m/M NAME EDIT/ SELECT YES Letter/number/ symbol buttons CLEAR x 1 Place a CD-R or CD-RW disc that has not been finalized in the middle of the erasing process. When you label the disc name, select "Disc," and when you remove the disc or turn...
... track/disc before you label the track name, select the track number. 5 Press YES. When using the remote, set SELECT to CDR. SELECT MENU/NO ./> m/M NAME EDIT/ SELECT YES Letter/number/ symbol buttons CLEAR x 1 Place a CD-R or CD-RW disc that has not been finalized in the middle of the erasing process. When you label the disc name, select "Disc," and when you remove the disc or turn...

Primary User Manual
Page 28
... remote) to select the setup item, and press AMS (or YES). 3 Turn AMS (or press ./> on the remote) to set the item, and press AMS (or YES). 4 Press MENU/NO. On/Off (On) Direct Sets the Direct Recording Function (page 23). On/Off (Off) Text Save Records the CD text automatically at Make-Disc SynchroRecording (page 18). Coaxial Lvl Adjusts the input level from the DIGITAL OPTICAL IN jack...
... remote) to select the setup item, and press AMS (or YES). 3 Turn AMS (or press ./> on the remote) to set the item, and press AMS (or YES). 4 Press MENU/NO. On/Off (On) Direct Sets the Direct Recording Function (page 23). On/Off (Off) Text Save Records the CD text automatically at Make-Disc SynchroRecording (page 18). Coaxial Lvl Adjusts the input level from the DIGITAL OPTICAL IN jack...

Primary User Manual
Page 29
... CD. There is no title. PMA: Program Memory Area A disc's information is operating. 29 Or you program a new track, erase the current program and restart a new program procedure. The FADE IN REC function is over. • Turn AMS counterclockwise (or press . The unit does not memorize the Setup Menu settings or the previous playback state. There is not enough time left on the remote). or m on the CD-R/CD...
... CD. There is no title. PMA: Program Memory Area A disc's information is operating. 29 Or you program a new track, erase the current program and restart a new program procedure. The FADE IN REC function is over. • Turn AMS counterclockwise (or press . The unit does not memorize the Setup Menu settings or the previous playback state. There is not enough time left on the remote). or m on the CD-R/CD...

Primary User Manual
Page 30
... the display. The sound source you record from DECK A. (The recording mode is automatically changed to analog recording.) If this message is displayed momentarily, this case, check the following table. During recording of a digital sound source, the connecting cable has been disconnected or the player of the sound source has turned off. • Connect the cable or turn on the digital player. This is because, DECK B is not normal. • Replace the disc with...
... the display. The sound source you record from DECK A. (The recording mode is automatically changed to analog recording.) If this message is displayed momentarily, this case, check the following table. During recording of a digital sound source, the connecting cable has been disconnected or the player of the sound source has turned off. • Connect the cable or turn on the digital player. This is because, DECK B is not normal. • Replace the disc with...
Primary User Manual
Page 31
... a power failure or the AC power cord has been disconnected during recording. After you remedy the problem. Data recorded to turn on . • Replace the CD-R or CD-RW with the label side up. • Moisture has formed inside the unit. Other No sound is output. • Make the connections properly (page 6). • Operate the amplifier properly. • When using the INPUT button (page 20). • The recording level...
... a power failure or the AC power cord has been disconnected during recording. After you remedy the problem. Data recorded to turn on . • Replace the CD-R or CD-RW with the label side up. • Moisture has formed inside the unit. Other No sound is output. • Make the connections properly (page 6). • Operate the amplifier properly. • When using the INPUT button (page 20). • The recording level...

Specifications with Key Features
Page 1
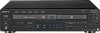
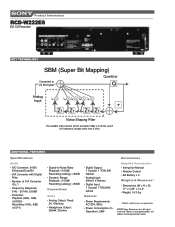
... Playback/Record Section Construction • Super Bit Mapping Processor • 4x High Speed Copy • High Speed Finalizing • Optical and Coaxial Digital Inputs and Outputs • Digital Recording Volume Level Adjustment • CD Text Entry • Headphone Jack with Volume Control • 2 Mode Repeat (Track/Disc) • Remote Commander® Remote Control • Twin R-Core Power Transformer • Aluminum Front Panel Design • Gold Plated Audio Terminals • 24 Bit D/A and A/D Converters Product Information RCD-W222ES...
... Playback/Record Section Construction • Super Bit Mapping Processor • 4x High Speed Copy • High Speed Finalizing • Optical and Coaxial Digital Inputs and Outputs • Digital Recording Volume Level Adjustment • CD Text Entry • Headphone Jack with Volume Control • 2 Mode Repeat (Track/Disc) • Remote Commander® Remote Control • Twin R-Core Power Transformer • Aluminum Front Panel Design • Gold Plated Audio Terminals • 24 Bit D/A and A/D Converters Product Information RCD-W222ES...
Specifications with Key Features
Page 2
...; Frequency Response: 5 Hz - 20 kHz ±0.5dB • Distortion: Playback (1kHz, 0dB) 90dB • Dynamic Range: Playback: >100dB Recording (analog): >90dB Connections Audio • Analog Output, Fixed: 2V, 47kohms • Headphone Output: 28mW, 32ohms • Digital Output: 1 Coaxial, 1 TOSLINK Optical • Analog Input: 500mV, 47kohms • Digital Input: 1 Coaxial, 1TOSLINK optical General • Power Requirements: AC120V, 60Hz • Power Consumption (in Operation): 29W Accessories Supplied Accessories • Instruction Manual • Remote Control • AA Battery...
...; Frequency Response: 5 Hz - 20 kHz ±0.5dB • Distortion: Playback (1kHz, 0dB) 90dB • Dynamic Range: Playback: >100dB Recording (analog): >90dB Connections Audio • Analog Output, Fixed: 2V, 47kohms • Headphone Output: 28mW, 32ohms • Digital Output: 1 Coaxial, 1 TOSLINK Optical • Analog Input: 500mV, 47kohms • Digital Input: 1 Coaxial, 1TOSLINK optical General • Power Requirements: AC120V, 60Hz • Power Consumption (in Operation): 29W Accessories Supplied Accessories • Instruction Manual • Remote Control • AA Battery...


