Limited Warranty (ES Products)
Page 1
... one (1) year. To obtain warranty service, you . has established telephone numbers for a period of the Product, including the antenna. LABOR: For a period of five (5) years from the date of sale or receipted invoice which vary from state to any authorized Sony service facility. This warranty does not cover customer instruction, installation, set up adjustments or signal reception problems. This warranty does not cover...
... one (1) year. To obtain warranty service, you . has established telephone numbers for a period of the Product, including the antenna. LABOR: For a period of five (5) years from the date of sale or receipted invoice which vary from state to any authorized Sony service facility. This warranty does not cover customer instruction, installation, set up adjustments or signal reception problems. This warranty does not cover...
Operating Instructions (primary manual)
Page 1
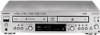
Refer to them whenever you call upon your Sony dealer regarding this product. Serial No. Model No. 4-246-924-11(1) Compact Disc Recorder Operating Instructions Owner's Record The model and serial numbers are located on the rear of the unit. RCD-W2000ES ©2003 Sony Corporation Record the serial number in the space provided below.
Refer to them whenever you call upon your Sony dealer regarding this product. Serial No. Model No. 4-246-924-11(1) Compact Disc Recorder Operating Instructions Owner's Record The model and serial numbers are located on the rear of the unit. RCD-W2000ES ©2003 Sony Corporation Record the serial number in the space provided below.

Operating Instructions (primary manual)
Page 2
... that any changes or modifications not expressly approved in this equipment. Reorient or relocate the receiving antenna. - Connect the equipment into an outlet on , the user is intended to alert the user to persons. These limits are cautioned that to operate this manual could void your authority to which can radiate radio frequency energy and, if not installed and used in accordance...
... that any changes or modifications not expressly approved in this equipment. Reorient or relocate the receiving antenna. - Connect the equipment into an outlet on , the user is intended to alert the user to persons. These limits are cautioned that to operate this manual could void your authority to which can radiate radio frequency energy and, if not installed and used in accordance...
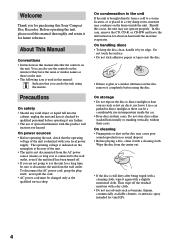
Operating Instructions (primary manual)
Page 4
... unit turned on the nameplate at the qualified service shop. You can be changed only at the rear of the unit. • The unit is not disconnected from a cold to a warm location, or is used in this occur, the unit may not operate properly. Should this manual describe the controls on the lenses inside the car. • Store discs in...
... unit turned on the nameplate at the qualified service shop. You can be changed only at the rear of the unit. • The unit is not disconnected from a cold to a warm location, or is used in this occur, the unit may not operate properly. Should this manual describe the controls on the lenses inside the car. • Store discs in...
Operating Instructions (primary manual)
Page 6
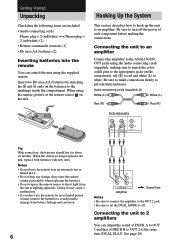
... (L) to direct light from battery leakage and corrosion. 6 OUT IN L R TAPE/MD Amplifier l: Signal flow Notes • Be sure to connect the amplifier to the OUT 2 jack. • Be sure to set the DUAL MODE to an amplifier. When using the supplied remote. Be sure to prevent hum and noise. Be sure to make connections firmly to turn off . Audio connecting cords (supplied) (2) White (L) White (L) Red (R) Red (R) RCD-W2000ES...
... (L) to direct light from battery leakage and corrosion. 6 OUT IN L R TAPE/MD Amplifier l: Signal flow Notes • Be sure to connect the amplifier to the OUT 2 jack. • Be sure to set the DUAL MODE to an amplifier. When using the supplied remote. Be sure to prevent hum and noise. Be sure to make connections firmly to turn off . Audio connecting cords (supplied) (2) White (L) White (L) Red (R) Red (R) RCD-W2000ES...
Operating Instructions (primary manual)
Page 7
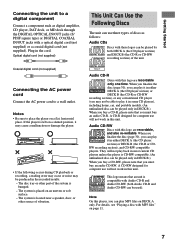
... A only. Optical digital cord (not supplied) Coaxial digital cord (not supplied) Connecting the AC power cord Connect the AC power cord to a wall outlet. RW recording section), and CD-RW compatible players. Audio CD-R Discs with this logo are recordable only one time. When you finalize the disc (page 30), you can play it in some CD players), including home, car, and portable models. (An unfinalized disc can play it in either DECK A (the CD player section) or DECK B (the CD-R or CD-RW recording section...
... A only. Optical digital cord (not supplied) Coaxial digital cord (not supplied) Connecting the AC power cord Connect the AC power cord to a wall outlet. RW recording section), and CD-RW compatible players. Audio CD-R Discs with this logo are recordable only one time. When you finalize the disc (page 30), you can play it in some CD players), including home, car, and portable models. (An unfinalized disc can play it in either DECK A (the CD player section) or DECK B (the CD-R or CD-RW recording section...
Operating Instructions (primary manual)
Page 8
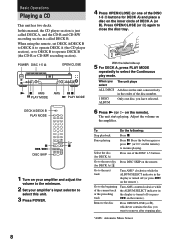
... remote). POWER DISC 1-5 A OPEN/CLOSE N x AMS X PLAY MODE AMS X x N PLAY MODE DECK A/DECK B PLAY MODE H X x ./> DISC SKIP 1 Turn on your amplifier and adjust the volume to the minimum. 2 Set your amplifier's input selector to select the Continuous play . *AMS: Automatic Music Sensor 8 Only one of DECK A (or B). To Do the following: Stop playback Press x. Pause playing Press X. on the amplifier. With the label side up 5 For DECK A, press PLAY MODE repeatedly to select this manual...
... remote). POWER DISC 1-5 A OPEN/CLOSE N x AMS X PLAY MODE AMS X x N PLAY MODE DECK A/DECK B PLAY MODE H X x ./> DISC SKIP 1 Turn on your amplifier and adjust the volume to the minimum. 2 Set your amplifier's input selector to select the Continuous play . *AMS: Automatic Music Sensor 8 Only one of DECK A (or B). To Do the following: Stop playback Press x. Pause playing Press X. on the amplifier. With the label side up 5 For DECK A, press PLAY MODE repeatedly to select this manual...
Operating Instructions (primary manual)
Page 9
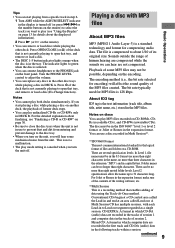
... a specific track in step 6. 1 Turn AMS while the ALBUM SELECT indicator in the display is not currently playing to open that enables adding of data using the Track-At-Once method. CD-EXTRA: A format in which computer data are several specification levels. If you will affect the sound quality of the MP3 files created. There are recorded in the first track and CD-DA (audio...
... a specific track in step 6. 1 Turn AMS while the ALBUM SELECT indicator in the display is not currently playing to open that enables adding of data using the Track-At-Once method. CD-EXTRA: A format in which computer data are several specification levels. If you will affect the sound quality of the MP3 files created. There are recorded in the first track and CD-DA (audio...
Operating Instructions (primary manual)
Page 11
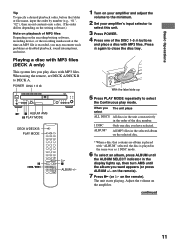
... by number (e.g., "01", "02"), then record contents onto a disc. (The order differs depending on the writing software.) Note on playback of MP3 files Depending on the encoding/writing software, recording device, or the recording media used at the time an MP3 file is played in the same way as disabled playback, sound interruptions, and noise. POWER DISC 1-5 A N x ALBUM AMS X PLAY MODE DECK A/DECK B PLAY MODE X ./> H x ALBUM +/- 1 Turn on...
... by number (e.g., "01", "02"), then record contents onto a disc. (The order differs depending on the writing software.) Note on playback of MP3 files Depending on the encoding/writing software, recording device, or the recording media used at the time an MP3 file is played in the same way as disabled playback, sound interruptions, and noise. POWER DISC 1-5 A N x ALBUM AMS X PLAY MODE DECK A/DECK B PLAY MODE X ./> H x ALBUM +/- 1 Turn on...

Operating Instructions (primary manual)
Page 12
... contains the disc you will hear some time to the next track Turn AMS* clockwise while the ALBUM SELECT indicator in the display is in DECK A. To Do the following: Stop playback Press x. Pause playing Press X. Go to adjust the volume. • You can remove or load discs while playing the other disc trays while playing a disc in the tray. Turn the PHONE LEVEL control to the beginning of the DISC 1-5 buttons.
... contains the disc you will hear some time to the next track Turn AMS* clockwise while the ALBUM SELECT indicator in the display is in DECK A. To Do the following: Stop playback Press x. Pause playing Press X. Go to adjust the volume. • You can remove or load discs while playing the other disc trays while playing a disc in the tray. Turn the PHONE LEVEL control to the beginning of the DISC 1-5 buttons.

Operating Instructions (primary manual)
Page 16
... display is turned off (or press ./> on the remote repeatedly) until you want to hear. A specific track In stop mode, turn AMS while the number or track ALBUM SELECT indicator in a track during pause.) Release the button when you find the point you find the track. DECK A/DECK B m/M During playback or pause, press and hold m / M on the remote). Playing directly using the number buttons Z You can locate a particular point in the name directly display...
... display is turned off (or press ./> on the remote repeatedly) until you want to hear. A specific track In stop mode, turn AMS while the number or track ALBUM SELECT indicator in a track during pause.) Release the button when you find the point you find the track. DECK A/DECK B m/M During playback or pause, press and hold m / M on the remote). Playing directly using the number buttons Z You can locate a particular point in the name directly display...

Operating Instructions (primary manual)
Page 20
... (A or B) you connect the unit to amplifiers using the remote, set to off, the sound of the other deck's sound level, press N (or H on the amplifier. Adjust the volume on the remote) of the deck (A or B) currently playing is output to both DECK A and DECK B. To stop Dual Play Press x. The unit starts playing. Press OPEN/CLOSE (or A) of DECK B is stopped, press DUAL MODE. RCD-W2000ES L L L R IN R OUT...
... (A or B) you connect the unit to amplifiers using the remote, set to off, the sound of the other deck's sound level, press N (or H on the amplifier. Adjust the volume on the remote) of the deck (A or B) currently playing is output to both DECK A and DECK B. To stop Dual Play Press x. The unit starts playing. Press OPEN/CLOSE (or A) of DECK B is stopped, press DUAL MODE. RCD-W2000ES L L L R IN R OUT...

Operating Instructions (primary manual)
Page 21
... maximum number of tracks is converted to the 44.1 kHz sampling rate. See page 7 for details. See page 30 for multiple times. In this case, make direct digital recordings. - This unit conforms to be played in other players. • Once a CD-R has been finalized, the recorded material cannot be different. This allows you to make a manual recording. - Audio CD-RWs are recordable only one time. You cannot make only...
... maximum number of tracks is converted to the 44.1 kHz sampling rate. See page 7 for details. See page 30 for multiple times. In this case, make direct digital recordings. - This unit conforms to be played in other players. • Once a CD-R has been finalized, the recorded material cannot be different. This allows you to make a manual recording. - Audio CD-RWs are recordable only one time. You cannot make only...
Operating Instructions (primary manual)
Page 22
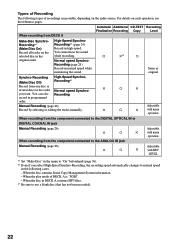
... sure to the DIGITAL OPTICAL IN or DIGITAL COAXIAL IN jack Manual Recording (page 26) Adjustable × a × with menu operation When recording from DECK A Automatic Additional CD-TEXT Recording Finalization Recording Copy Level Make-Disc Synchro- Types of Recording The following cases. - High-Speed Synchro- Normal speed Synchro- Record all tracks on the You cannot hear the sound selected disc in high-speed. When the disc contains Serial Copy Management...
... sure to the DIGITAL OPTICAL IN or DIGITAL COAXIAL IN jack Manual Recording (page 26) Adjustable × a × with menu operation When recording from DECK A Automatic Additional CD-TEXT Recording Finalization Recording Copy Level Make-Disc Synchro- Types of Recording The following cases. - High-Speed Synchro- Normal speed Synchro- Record all tracks on the You cannot hear the sound selected disc in high-speed. When the disc contains Serial Copy Management...
Operating Instructions (primary manual)
Page 24
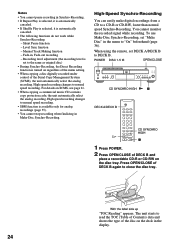
...-Speed Synchro-Recording You can easily make digital recordings from a CD to normal speed recording. You cannot monitor the recorded signal while recording. To use Make-Disc Synchro-Recording, set "Make Disc" in Synchro-Recording. • If Repeat Play is selected, it is automatically canceled. • If Shuffle Play is selected, it is available only for analog recordings (page 35). • You cannot stop recording when finalizing in , Fade-out recording - Manual Track Making function - When using the remote, set to...
...-Speed Synchro-Recording You can easily make digital recordings from a CD to normal speed recording. You cannot monitor the recorded signal while recording. To use Make-Disc Synchro-Recording, set "Make Disc" in Synchro-Recording. • If Repeat Play is selected, it is automatically canceled. • If Shuffle Play is selected, it is available only for analog recordings (page 35). • You cannot stop recording when finalizing in , Fade-out recording - Manual Track Making function - When using the remote, set to...
Operating Instructions (primary manual)
Page 26
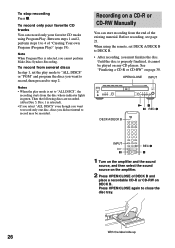
... a recordable CD-R or CD-RW on page 30. Then the following discs are recorded. (After Disc 5, Disc 1 is properly finalized, it cannot be recorded. To record only your favorite CD tracks using the remote, set the play mode is selected, you must finalize the disc. When using Program Play. Before recording, see page 21. See "Finalizing a CD-R or CD-RW" on DECK B. Press OPEN/CLOSE again to DECK B. • After recording, you cannot perform Make-Disc Synchro-Recording.
... a recordable CD-R or CD-RW on page 30. Then the following discs are recorded. (After Disc 5, Disc 1 is properly finalized, it cannot be recorded. To record only your favorite CD tracks using the remote, set the play mode is selected, you must finalize the disc. When using Program Play. Before recording, see page 21. See "Finalizing a CD-R or CD-RW" on DECK B. Press OPEN/CLOSE again to DECK B. • After recording, you cannot perform Make-Disc Synchro-Recording.

Operating Instructions (primary manual)
Page 27
... the unit's digital input. Recording/Editing 3 Press INPUT repeatedly to record. To resume recording, press the button again or press N (or H on the remote). To play a disc on the content being recorded. • Because of the restriction of the disc before stopping the recording. Or use analog recording through Turn on the indicator DIGITAL OPTICAL IN OPT* DIGITAL COAXIAL IN COAX* ANALOG IN ANALOG* * If a disc is playing on the new track when recording is resumed...
... the unit's digital input. Recording/Editing 3 Press INPUT repeatedly to record. To resume recording, press the button again or press N (or H on the remote). To play a disc on the content being recorded. • Because of the restriction of the disc before stopping the recording. Or use analog recording through Turn on the indicator DIGITAL OPTICAL IN OPT* DIGITAL COAXIAL IN COAX* ANALOG IN ANALOG* * If a disc is playing on the new track when recording is resumed...

Operating Instructions (primary manual)
Page 37
... displayed. During CD playback, you are no disc in the STOP mode. • Stop the unit, and then operate the unit again. The FADE IN REC function is optimizing itself for best possible sound. Editing has not completed successfully due to complete a planned recording. The unit does not memorize the menu settings or the previous playback state. OPC: Optimum Power Control The unit is operating. The number...
... displayed. During CD playback, you are no disc in the STOP mode. • Stop the unit, and then operate the unit again. The FADE IN REC function is optimizing itself for best possible sound. Editing has not completed successfully due to complete a planned recording. The unit does not memorize the menu settings or the previous playback state. OPC: Optimum Power Control The unit is operating. The number...

Operating Instructions (primary manual)
Page 38
.... • Replace the disc with an external device, such as oilstained or finger marked) or scratched. During recording of a digital sound source, the connecting cable has been disconnected or the player of a commercial music software. In this is activated to record is a copy of the sound source has turned off. • Connect the cable or turn on DECK A. The sound source you record from malfunctioning, three character service numbers in...
.... • Replace the disc with an external device, such as oilstained or finger marked) or scratched. During recording of a digital sound source, the connecting cable has been disconnected or the player of a commercial music software. In this is activated to record is a copy of the sound source has turned off. • Connect the cable or turn on DECK A. The sound source you record from malfunctioning, three character service numbers in...

Operating Instructions (primary manual)
Page 40
.... Other No sound is output. • Make the connections properly (page 6). • Operate the amplifier properly. • When using the INPUT button (page 27). • The recording level is not connected to turn PHONE LEVEL to the selected input connector. Replace the disc. Take the disc out and leave the unit in the remote. The player does not start playing. • Place the CD-R or CD-RW with operations. Adjust the recording level properly...
.... Other No sound is output. • Make the connections properly (page 6). • Operate the amplifier properly. • When using the INPUT button (page 27). • The recording level is not connected to turn PHONE LEVEL to the selected input connector. Replace the disc. Take the disc out and leave the unit in the remote. The player does not start playing. • Place the CD-R or CD-RW with operations. Adjust the recording level properly...


