
Camera Operations Guide
Page 3
... the instructions, may call upon your camcorder (p. 128). The supplied interface cable must accept any changes or modifications not expressly approved in a particular installation. You can use only mini DV cassettes in the space provided below is for a digital device pursuant to a malfunction of "Memory Stick" you can be copyrighted. The mark is encouraged to try to the following measures: - Record the serial number in...
... the instructions, may call upon your camcorder (p. 128). The supplied interface cable must accept any changes or modifications not expressly approved in a particular installation. You can use only mini DV cassettes in the space provided below is for a digital device pursuant to a malfunction of "Memory Stick" you can be copyrighted. The mark is encouraged to try to the following measures: - Record the serial number in...

Camera Operations Guide
Page 18
... recording time using the viewfinder. Playing time Approximate number of minutes available when you use a fully charged battery pack at 25°C (77°F). You can check the battery's current charge level and its current remaining recording time both during charging or when the power is turned off. 1 Set the POWER switch to view it for about 20 seconds. Keep the button pressed to OFF (CHG). 2 Open the LCD panel. 3 Press DISPLAY/BATT INFO. C Approximate possible recording time using...
... recording time using the viewfinder. Playing time Approximate number of minutes available when you use a fully charged battery pack at 25°C (77°F). You can check the battery's current charge level and its current remaining recording time both during charging or when the power is turned off. 1 Set the POWER switch to view it for about 20 seconds. Keep the button pressed to OFF (CHG). 2 Open the LCD panel. 3 Press DISPLAY/BATT INFO. C Approximate possible recording time using...
Camera Operations Guide
Page 26
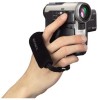
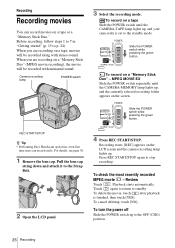
... are recording on a tape Slide the POWER switch until the CAMERA-MEMORY lamp lights up . To record on a tape, movies will be recorded along with monaural sound. To delete the movie, touch after playback is set to the OFF (CHG) position. 26 Recording For details, see page 36. 1 Remove the lens cap. REC START/STOP z Tip • Performing Easy Handycam operation, even first time users can record movies on a "Memory Stick Duo" (MPEG movie recording), the movie will be recorded with stereo sound. Review Touch...
... are recording on a tape Slide the POWER switch until the CAMERA-MEMORY lamp lights up . To record on a tape, movies will be recorded along with monaural sound. To delete the movie, touch after playback is set to the OFF (CHG) position. 26 Recording For details, see page 36. 1 Remove the lens cap. REC START/STOP z Tip • Performing Easy Handycam operation, even first time users can record movies on a "Memory Stick Duo" (MPEG movie recording), the movie will be recorded with stereo sound. Review Touch...
Camera Operations Guide
Page 28
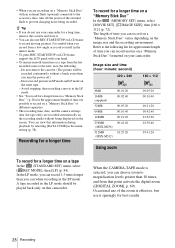
... can view this camcorder. You can record on a "Memory Stick Duo" varies depending on a tape In the (STANDARD SET) menu, select [ REC MODE], then [LP] (p. 84). Occasional use of different capacities. • The recording time, date, and the camera settings data (for approximate length of time you can record 1.5 times longer than 10 times, and from the last recorded scene to magnification levels greater than you turn off .) - Do not remove the cassette. (The picture will be played...
... can view this camcorder. You can record on a "Memory Stick Duo" varies depending on a tape In the (STANDARD SET) menu, select [ REC MODE], then [LP] (p. 84). Occasional use of different capacities. • The recording time, date, and the camera settings data (for approximate length of time you can record 1.5 times longer than 10 times, and from the last recorded scene to magnification levels greater than you turn off .) - Do not remove the cassette. (The picture will be played...

Camera Operations Guide
Page 32
... FINE 30 P-MENU * The number of the CAMERA-TAPE mode. 32 Recording To turn the power off Slide the POWER switch up . Recording does not start at that can view this point. The selected recording folder is heard. The number of images that can record 3 to 32 images continuously in a time interval of disappear, the image is recorded. • The recording time, date, and the camera settings data are adjusted. To record still images continuously - The indicator stops flashing. When bars...
... FINE 30 P-MENU * The number of the CAMERA-TAPE mode. 32 Recording To turn the power off Slide the POWER switch up . Recording does not start at that can view this point. The selected recording folder is heard. The number of images that can record 3 to 32 images continuously in a time interval of disappear, the image is recorded. • The recording time, date, and the camera settings data are adjusted. To record still images continuously - The indicator stops flashing. When bars...
Camera Operations Guide
Page 34
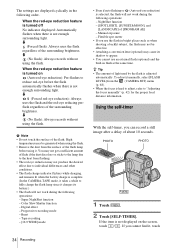
... can record a still image after a delay of about 10 seconds. When the red-eye reduction feature is turned on the screen, touch / . Burst - PHOTO PHOTO 1 Touch . 2 Touch [SELF-TIMER]. Color Slow Shutter function - When the red-eye reduction feature is turned off No indicator displayed: Automatically flashes when there is not enough surrounding light. Tape recording - [16:9 WIDE] mode • Even if auto flashing or (Auto red-eye reduction) is complete. (In the CAMERA-TAPE mode...
... can record a still image after a delay of about 10 seconds. When the red-eye reduction feature is turned on the screen, touch / . Burst - PHOTO PHOTO 1 Touch . 2 Touch [SELF-TIMER]. Color Slow Shutter function - When the red-eye reduction feature is turned off No indicator displayed: Automatically flashes when there is not enough surrounding light. Tape recording - [16:9 WIDE] mode • Even if auto flashing or (Auto red-eye reduction) is complete. (In the CAMERA-TAPE mode...

Camera Operations Guide
Page 36
... Handycam operation, most of the camera settings are set to stop recording. The EASY lights up . Press REC START/STOP again to automatic mode, only basic functions become available, and screen font size increases for easy viewing. Even first time users can record movies on a "Memory Stick Duo," see page 26 (MPEG MOVIE EX). 1 Remove the lens cap. Recording with ease - b Note • You cannot turn the power off during: - Before recording, follow steps 1 to 7 in blue. Camera recording lamp PHOTO 2 Open...
... Handycam operation, most of the camera settings are set to stop recording. The EASY lights up . Press REC START/STOP again to automatic mode, only basic functions become available, and screen font size increases for easy viewing. Even first time users can record movies on a "Memory Stick Duo," see page 26 (MPEG MOVIE EX). 1 Remove the lens cap. Recording with ease - b Note • You cannot turn the power off during: - Before recording, follow steps 1 to 7 in blue. Camera recording lamp PHOTO 2 Open...
Camera Operations Guide
Page 42
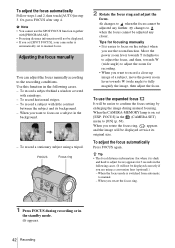
... the image, then adjust the focus. When the focus mode is dark and hard to adjust focus) appears for 3 seconds in the (CAMERA SET) menu to focus on , set to manual. - Or, press FOCUS after step 4. To record a subject behind a window covered with little contrast between the subject and its original size. Adjusting the focus manually You can adjust the focus manually according to when the focus cannot be displayed. • If you use the zoom function. To record a subject...
... the image, then adjust the focus. When the focus mode is dark and hard to adjust focus) appears for 3 seconds in the (CAMERA SET) menu to focus on , set to manual. - Or, press FOCUS after step 4. To record a subject behind a window covered with little contrast between the subject and its original size. Adjusting the focus manually You can adjust the focus manually according to when the focus cannot be displayed. • If you use the zoom function. To record a subject...

Camera Operations Guide
Page 44
.... The recorded image appears on the "Memory Stick Duo" - Color Slow Shutter function - The fader indicator stops flashing and disappears when the fade is finished. Self-timer - Still image Movie 6 Touch (previous)/ (next) to select the still image to be superimposed and a tape in from still image on the thumbnail screen. [FLASH] (Flash Motion) You can fade in your camcorder. 2 Slide the POWER switch to select the CAMERA-TAPE mode. 3 Touch . 4 Touch [MENU]. 5 Select (PICT. Using special...
.... The recorded image appears on the "Memory Stick Duo" - Color Slow Shutter function - The fader indicator stops flashing and disappears when the fade is finished. Self-timer - Still image Movie 6 Touch (previous)/ (next) to select the still image to be superimposed and a tape in from still image on the thumbnail screen. [FLASH] (Flash Motion) You can fade in your camcorder. 2 Slide the POWER switch to select the CAMERA-TAPE mode. 3 Touch . 4 Touch [MENU]. 5 Select (PICT. Using special...

Camera Operations Guide
Page 71
... on the "Memory Stick Duo" you are using. 1 Select [NORMAL], [HIGH SPEED] or [EXP. The screen shows the items you have space for fewer than 3 images remaining on the MEMORY SET menu. BRKTG] mode on the power mode of images are recorded as long as you are pressing PHOTO fully. BURST/QUALITY/IMAGE SIZE/ALL ERASE/NEW FOLDER, etc. You can adjust vary depending on the LCD screen, connect your camcorder to see...
... on the "Memory Stick Duo" you are using. 1 Select [NORMAL], [HIGH SPEED] or [EXP. The screen shows the items you have space for fewer than 3 images remaining on the MEMORY SET menu. BRKTG] mode on the power mode of images are recorded as long as you are pressing PHOTO fully. BURST/QUALITY/IMAGE SIZE/ALL ERASE/NEW FOLDER, etc. You can adjust vary depending on the LCD screen, connect your camcorder to see...

Camera Operations Guide
Page 79
... those described below. - When a cassette or "Memory Stick Duo" is set to [5 min] when the camcorder is useful to ON. REC-STL This function is used on the battery pack, the power will shoot a still image at a selected interval and record it on a "Memory Stick Duo" in about 10 minutes. GON OFF Select to use [DEMO MODE]. INT. stops flashing and the interval photo recording starts. To record still images on a "Memory Stick Duo." [a] [a] [a] [b] [b] a: Shooting time b: Interval 1 Touch . 2 Select...
... those described below. - When a cassette or "Memory Stick Duo" is set to [5 min] when the camcorder is useful to ON. REC-STL This function is used on the battery pack, the power will shoot a still image at a selected interval and record it on a "Memory Stick Duo" in about 10 minutes. GON OFF Select to use [DEMO MODE]. INT. stops flashing and the interval photo recording starts. To record still images on a "Memory Stick Duo." [a] [a] [a] [b] [b] a: Shooting time b: Interval 1 Touch . 2 Select...
Camera Operations Guide
Page 103
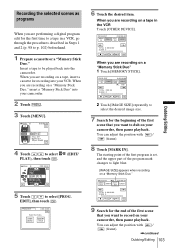
... the VCR Touch [OTHER DEVICE]. When you are recording on a tape, insert a cassette for the beginning of the program mark changes to dub on a "Memory Stick Duo," insert a "Memory Stick Duo" into your camcorder, then pause playback. PROG. PROG. When you are recording on your camcorder. 2 Touch . 3 Touch [MENU]. 60min 0:00:00:00 MEMORY SET STILL SET MOVIE SET ALL ERASE OK 4 Touch / to be played back into your camcorder, then pause playback. You can adjust the...
... the VCR Touch [OTHER DEVICE]. When you are recording on a tape, insert a cassette for the beginning of the program mark changes to dub on a "Memory Stick Duo," insert a "Memory Stick Duo" into your camcorder, then pause playback. PROG. PROG. When you are recording on your camcorder. 2 Touch . 3 Touch [MENU]. 60min 0:00:00:00 MEMORY SET STILL SET MOVIE SET ALL ERASE OK 4 Touch / to be played back into your camcorder, then pause playback. You can adjust the...

Camera Operations Guide
Page 104
... correctly. • When you cannot operate the device correctly using it to light blue. To erase programs 1 Follow steps 1 to 6 in the picture set as programs" (p. 103), then touch [UNDO]. 2 Touch [DEL 1MARK] to delete the last set the [IR SETUP] code. 14Touch [EXEC]. If there is ejected. The ending point of the tape. To save a program without using an i.LINK cable connection, select [IR] in step...
... correctly. • When you cannot operate the device correctly using it to light blue. To erase programs 1 Follow steps 1 to 6 in the picture set as programs" (p. 103), then touch [UNDO]. 2 Touch [DEL 1MARK] to delete the last set the [IR SETUP] code. 14Touch [EXEC]. If there is ejected. The ending point of the tape. To save a program without using an i.LINK cable connection, select [IR] in step...

Camera Operations Guide
Page 111
... (previous image)/ (next image). 2 Touch , then [COPIES]. 3 Select the number of models that are not PictBridge compatible. • You cannot connect your Handycam Station to be displayed. COPIES 1 DATE/TIME OFF b Note • We cannot guarantee the operation of copies to a printer using the supplied USB cable, then set to ON. You can set a maximum of 20 copies of your camcorder to the printer if [USB-PLY/EDT] in the menu settings is complete...
... (previous image)/ (next image). 2 Touch , then [COPIES]. 3 Select the number of models that are not PictBridge compatible. • You cannot connect your Handycam Station to be displayed. COPIES 1 DATE/TIME OFF b Note • We cannot guarantee the operation of copies to a printer using the supplied USB cable, then set to ON. You can set a maximum of 20 copies of your camcorder to the printer if [USB-PLY/EDT] in the menu settings is complete...

Camera Operations Guide
Page 117
... recording stops/ [Smooth interval rec discontinued due to [ON] in the (EDIT/PLAY) menu. (p. 81) • There is a blank section in the (STANDARD SET) menu. (p. 84) cTurn up the volume. (p. 50) cOn the (STANDARD SET) menu, adjust [AUDIO MIX] from the beginning. cUse a Sony mini DV cassette. The displayed pictures are using a cassette without Cassette Memory. (p. 127) • The cassette is being played. • The data code on a tape with the recording date displayed on the screen. cClean the head using the cleaning cassette...
... recording stops/ [Smooth interval rec discontinued due to [ON] in the (EDIT/PLAY) menu. (p. 81) • There is a blank section in the (STANDARD SET) menu. (p. 84) cTurn up the volume. (p. 50) cOn the (STANDARD SET) menu, adjust [AUDIO MIX] from the beginning. cUse a Sony mini DV cassette. The displayed pictures are using a cassette without Cassette Memory. (p. 127) • The cassette is being played. • The data code on a tape with the recording date displayed on the screen. cClean the head using the cleaning cassette...

Camera Operations Guide
Page 118
... device with a 4ch microphone (4CH MIC REC). Cannot format the "Memory Stick Duo." is not a malfunction. Image data cannot be deleted. cWhen you have edited the data on the picture. (p. 108) • The maximum number of pictures that you pressed tape has also been recorded on the screen. Noises appear and on the REC START/STOP during tape playback. cSet the POWER switch to OFF. • Image data cannot be played back if you have modified files...
... device with a 4ch microphone (4CH MIC REC). Cannot format the "Memory Stick Duo." is not a malfunction. Image data cannot be deleted. cWhen you have edited the data on the picture. (p. 108) • The maximum number of pictures that you pressed tape has also been recorded on the screen. Noises appear and on the REC START/STOP during tape playback. cSet the POWER switch to OFF. • Image data cannot be played back if you have modified files...

Camera Operations Guide
Page 129
..., such as a car parked outside in the following locations. - Notes on the "Memory Stick Duo" (while the access lamp is recommended you eject the "Memory Stick Duo," turn the power off on your camcorder, or remove the battery pack for replacement while your camcorder. - MOV00001: This file name appears on the "Memory Stick Duo" with the terminal. • Do not bend, drop or apply strong force...
..., such as a car parked outside in the following locations. - Notes on the "Memory Stick Duo" (while the access lamp is recommended you eject the "Memory Stick Duo," turn the power off on your camcorder, or remove the battery pack for replacement while your camcorder. - MOV00001: This file name appears on the "Memory Stick Duo" with the terminal. • Do not bend, drop or apply strong force...

Camera Operations Guide
Page 134
... camcorder is played back. • If the following problem occurs, clean the video heads for about 1 hour). Video head • When the video head becomes dirty, you use your camcorder in a humid place as it is recommended you cannot record pictures normally, or distorted picture or sound is used in a hot and humid place. LCD screen • Do not add excessive pressure on the screen during the operation. 1 Slide the POWER switch up . Use a cleaning cassette...
... camcorder is played back. • If the following problem occurs, clean the video heads for about 1 hour). Video head • When the video head becomes dirty, you use your camcorder in a humid place as it is recommended you cannot record pictures normally, or distorted picture or sound is used in a hot and humid place. LCD screen • Do not add excessive pressure on the screen during the operation. 1 Slide the POWER switch up . Use a cleaning cassette...

Camera Operations Guide
Page 136
... time (using a DVM60 cassette) Approx. 2 min 40 s Viewfinder Electric viewfinder (color) Image device 5.9 mm (1/3 type) CCD (Charge Coupled Device) Gross: Approx. 3 310 000 pixels Effective (still): Approx. 3 050 000 pixels Effective (movie): Approx. 2 050 000 pixels Lens Carl Zeiss Vario-Sonnar T* Combined power zoom lens Filter diameter: 30 mm (1 3/16 in this format can have additional information such as your camcorder's setting information at the time of the finder lens...
... time (using a DVM60 cassette) Approx. 2 min 40 s Viewfinder Electric viewfinder (color) Image device 5.9 mm (1/3 type) CCD (Charge Coupled Device) Gross: Approx. 3 310 000 pixels Effective (still): Approx. 3 050 000 pixels Effective (movie): Approx. 2 050 000 pixels Lens Carl Zeiss Vario-Sonnar T* Combined power zoom lens Filter diameter: 30 mm (1 3/16 in this format can have additional information such as your camcorder's setting information at the time of the finder lens...
Camera Operations Guide
Page 147
... 135 Remote Commander 144 C CALIBRATION 134 Camera Chroma key (CAM T M CHROMA 46 Camera settings data display 58 Cassette 22 Cassette Memory .........3, 127 Cassette Memory Search (SEARCH 48, 61, 62, 81 Charging the battery Battery pack 16 Pre-installed button-type battery 135 Cinematic Effect (CINEMA EFECT 44 Clock set (CLOCK SET 21, 89 Color Slow Shutter (COLOR SLOW S 41 Customizing Personal Menu 90 D Data code (DATA CODE 58, 87 Date search 62 Date/time 58 Delayed Motion Effect (DELAY MOTION) ... 44 Delete Deleting pictures....... 107 DEMO MODE 79 Digital convert function...
... 135 Remote Commander 144 C CALIBRATION 134 Camera Chroma key (CAM T M CHROMA 46 Camera settings data display 58 Cassette 22 Cassette Memory .........3, 127 Cassette Memory Search (SEARCH 48, 61, 62, 81 Charging the battery Battery pack 16 Pre-installed button-type battery 135 Cinematic Effect (CINEMA EFECT 44 Clock set (CLOCK SET 21, 89 Color Slow Shutter (COLOR SLOW S 41 Customizing Personal Menu 90 D Data code (DATA CODE 58, 87 Date search 62 Date/time 58 Delayed Motion Effect (DELAY MOTION) ... 44 Delete Deleting pictures....... 107 DEMO MODE 79 Digital convert function...


