Warranty Card
Page 1
... or exclusions may have other than a facility authorized by Sony to state. To obtain warranty service, you must take the Product, or deliver the Product freight prepaid, in either its option, at your expense. 3. This warranty does not cover customer instruction, installation, set up adjustments or signal reception problems. This warranty does not cover cosmetic damage or damage due to acts...
... or exclusions may have other than a facility authorized by Sony to state. To obtain warranty service, you must take the Product, or deliver the Product freight prepaid, in either its option, at your expense. 3. This warranty does not cover customer instruction, installation, set up adjustments or signal reception problems. This warranty does not cover cosmetic damage or damage due to acts...
Operating Instructions
Page 3
... using TV games, computers, and similar products with hooks. This equipment generates, uses, and can cause the imprint of station logos onto the TV screen. You are designed to provide reasonable protection against harmful interference in a residential installation. The menu and illustrations shown are trademarks of Sony Corporation. Safety ❑ Operate the TV only on Caption Vision This television receiver provides display of television closed captioning...
... using TV games, computers, and similar products with hooks. This equipment generates, uses, and can cause the imprint of station logos onto the TV screen. You are designed to provide reasonable protection against harmful interference in a residential installation. The menu and illustrations shown are trademarks of Sony Corporation. Safety ❑ Operate the TV only on Caption Vision This television receiver provides display of television closed captioning...
Operating Instructions
Page 4
... set is normal for the specific model of TV. Do not use and servicing of the set . If a snapping or popping sound from overheating, these instructions completely, and keep this can result in the installation, use liquid cleaners or aerosol cleaners. It is equipped with a polarized AC power cord plug (a plug having a third pin for long periods of time, unplug it is a safety feature. Use a cloth lightly...
... set is normal for the specific model of TV. Do not use and servicing of the set . If a snapping or popping sound from overheating, these instructions completely, and keep this can result in the installation, use liquid cleaners or aerosol cleaners. It is equipped with a polarized AC power cord plug (a plug having a third pin for long periods of time, unplug it is a safety feature. Use a cloth lightly...
Operating Instructions
Page 5
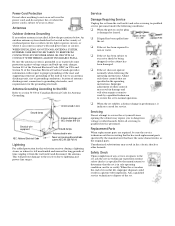
... an antenna discharge unit, size of grounding conductors, location of the lead-in fire, electric shock or other hazards. Be sure the antenna system is grounded so as the original parts. Adjust only those controls that the set is in damage and will prevent damage to the receiver due to qualified service personnel. Replacement Parts When replacement parts are specified in a picture tube implosion. Power-Cord Protection...
... an antenna discharge unit, size of grounding conductors, location of the lead-in fire, electric shock or other hazards. Be sure the antenna system is grounded so as the original parts. Adjust only those controls that the set is in damage and will prevent damage to the receiver due to qualified service personnel. Replacement Parts When replacement parts are specified in a picture tube implosion. Power-Cord Protection...
Operating Instructions
Page 7
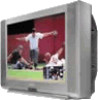
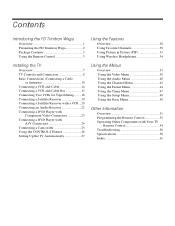
...the FD Trinitron Wega 2 Package Contents 3 Using the Remote Control 3 Using the Features Overview 29 Using Favorite Channels 30 Using Picture in Picture (PIP 31 Using Wireless Headphones 34 Installing the TV Overview 7 TV Controls and Connectors 8 Basic Connections (Connecting a Cable or Antenna 10 Connecting a VCR and Cable 14 Connecting a VCR and Cable Box 15 Connecting Two VCRs for Tape Editing .........18 Connecting a Satellite Receiver 19 Connecting a Satellite Receiver with a VCR ...20 Connecting an Audio Receiver 22 Connecting a DVD Player with Component Video Connectors...
...the FD Trinitron Wega 2 Package Contents 3 Using the Remote Control 3 Using the Features Overview 29 Using Favorite Channels 30 Using Picture in Picture (PIP 31 Using Wireless Headphones 34 Installing the TV Overview 7 TV Controls and Connectors 8 Basic Connections (Connecting a Cable or Antenna 10 Connecting a VCR and Cable 14 Connecting a VCR and Cable Box 15 Connecting Two VCRs for Tape Editing .........18 Connecting a Satellite Receiver 19 Connecting a Satellite Receiver with a VCR ...20 Connecting an Audio Receiver 22 Connecting a DVD Player with Component Video Connectors...
Operating Instructions
Page 10
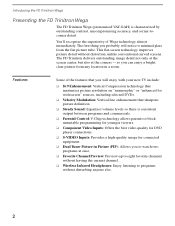
.... ❑ Steady Sound: Equalizes volume levels so there is consistent output between programs and commercials. ❑ Parental Control: V-Chip technology allows parents to block unsuitable programming for younger viewers. ❑ Component Video Inputs: Offers the best video quality for DVD player connections. ❑ S-VIDEO Inputs: Provides a high-quality image for connected equipment. ❑ Dual Tuner Picture in a room. so you to programs without distortion, unlike conventional curved screens. Features Some of Wega technology almost...
.... ❑ Steady Sound: Equalizes volume levels so there is consistent output between programs and commercials. ❑ Parental Control: V-Chip technology allows parents to block unsuitable programming for younger viewers. ❑ Component Video Inputs: Offers the best video quality for DVD player connections. ❑ S-VIDEO Inputs: Provides a high-quality image for connected equipment. ❑ Dual Tuner Picture in a room. so you to programs without distortion, unlike conventional curved screens. Features Some of Wega technology almost...
Operating Instructions
Page 12
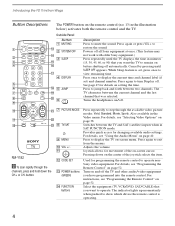
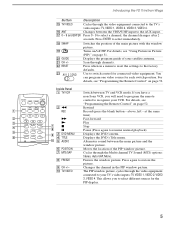
... z To scan rapidly through the available video picture modes: Vivid, Standard, Movie, Sports. qs CODE SET qd POWER buttons (GREEN) qf FUNCTION buttons Press repeatedly to mute the sound. Also available in SAT FUNCTION mode. For details, see "Programming the Remote Control" on page 52. Used for details on setting the time. 6 qk 5 JUMP Press to display the current time and channel label (if set , press once to qj view remaining time 4 DISPLAY Press once...
... z To scan rapidly through the available video picture modes: Vivid, Standard, Movie, Sports. qs CODE SET qd POWER buttons (GREEN) qf FUNCTION buttons Press repeatedly to mute the sound. Also available in SAT FUNCTION mode. For details, see "Programming the Remote Control" on page 52. Used for details on setting the time. 6 qk 5 JUMP Press to display the current time and channel label (if set , press once to qj view remaining time 4 DISPLAY Press once...
Operating Instructions
Page 13
... a menu to reset the settings to switch control for connected video equipment. Use to the factory defaults. If you have a non-Sony VCR, you to select different sources for each switch position. at the same time) 2 M Fast-forward 3 N Play 4 7 x Stop 8 X Pause (Press again to select immediately. Changes the channel in Picture (PIP)" on page 52. Introducing the FD Trinitron Wega Button qg TV/VIDEO qh ANT qj 0 - 9 and ENTER qk SWAP ql w; Displays the program guide...
... a menu to reset the settings to switch control for connected video equipment. Use to the factory defaults. If you have a non-Sony VCR, you to select different sources for each switch position. at the same time) 2 M Fast-forward 3 N Play 4 7 x Stop 8 X Pause (Press again to select immediately. Changes the channel in Picture (PIP)" on page 52. Introducing the FD Trinitron Wega Button qg TV/VIDEO qh ANT qj 0 - 9 and ENTER qk SWAP ql w; Displays the program guide...

Operating Instructions
Page 15
... Connecting a VCR and Cable Box 15 Connecting Two VCRs for setting up your TV. Use caution when removing the AC plug from the hooks. 7 Gently slide the cord in the upward direction without removing the cord from the two lower hooks. Installing the TV Overview This chapter includes illustrated instructions for Tape Editing 18 Connecting a Satellite Receiver 19 Connecting a Satellite Receiver with a VCR 20 Connecting an Audio Receiver 22 Connecting a DVD Player with Component Video 23 Connectors Connecting a DVD Player...
... Connecting a VCR and Cable Box 15 Connecting Two VCRs for setting up your TV. Use caution when removing the AC plug from the hooks. 7 Gently slide the cord in the upward direction without removing the cord from the two lower hooks. Installing the TV Overview This chapter includes illustrated instructions for Tape Editing 18 Connecting a Satellite Receiver 19 Connecting a Satellite Receiver with a VCR 20 Connecting an Audio Receiver 22 Connecting a DVD Player with Component Video 23 Connectors Connecting a DVD Player...
Operating Instructions
Page 19
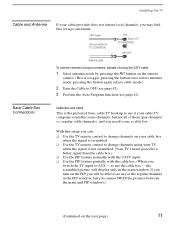
... cable box when the signal is scrambled. ❑ Use the TV remote control to change channels using the CATV cable 1 Select antenna mode by pressing the ANT button on the remote control. (This is not scrambled. (Your TV's tuner provides a better signal than the cable box.) ❑ Use the PIP feature normally with the CATV input. ❑ Use the PIP feature partially with the cable box. (When you switch the TV input to use a cable box. CATV cable (No connection to use the cable box - Basic Cable Box Connections Cable Box...
... cable box when the signal is scrambled. ❑ Use the TV remote control to change channels using the CATV cable 1 Select antenna mode by pressing the ANT button on the remote control. (This is not scrambled. (Your TV's tuner provides a better signal than the cable box.) ❑ Use the PIP feature normally with the CATV input. ❑ Use the PIP feature partially with the cable box. (When you switch the TV input to use a cable box. CATV cable (No connection to use the cable box - Basic Cable Box Connections Cable Box...
Operating Instructions
Page 20
... buttons on the remote control to switch cable box channels. For details, see "Programming the Remote Control" on page 52.) Then use the TV's Channel Fix feature to the cable box's IN jack. Installing the TV 12 (Continued from regular cable ❑ Press the ANT button on the TV remote control. (This is a toggle: pressing the button once selects the cable box; The Channel Fix feature is under the Channel menu. Cable box IN 75-ohm coaxial cable (not supplied) AUX Rear...
... buttons on the remote control to switch cable box channels. For details, see "Programming the Remote Control" on page 52.) Then use the TV's Channel Fix feature to the cable box's IN jack. Installing the TV 12 (Continued from regular cable ❑ Press the ANT button on the TV remote control. (This is a toggle: pressing the button once selects the cable box; The Channel Fix feature is under the Channel menu. Cable box IN 75-ohm coaxial cable (not supplied) AUX Rear...
Operating Instructions
Page 22
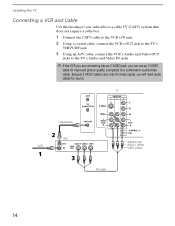
Because S VIDEO cables carry only the video signal, you can use an S VIDEO cable for sound. TV CATV Coaxial cable VCR A/V cable AUDIO-R (red) AUDIO-L (white) VIDEO (yellow) 14 Installing the TV Connecting a VCR and Cable Use this hookup if you subscribe to a cable TV (CATV) system that does not require a cable box. 1 Connect the CATV cable to the VCR's IN jack. 2 Using a coaxial cable, connect the VCR's OUT jack to the TV's VHF/UHF jack. 3 Using an A/V cable, connect the...
Because S VIDEO cables carry only the video signal, you can use an S VIDEO cable for sound. TV CATV Coaxial cable VCR A/V cable AUDIO-R (red) AUDIO-L (white) VIDEO (yellow) 14 Installing the TV Connecting a VCR and Cable Use this hookup if you subscribe to a cable TV (CATV) system that does not require a cable box. 1 Connect the CATV cable to the VCR's IN jack. 2 Using a coaxial cable, connect the VCR's OUT jack to the TV's VHF/UHF jack. 3 Using an A/V cable, connect the...
Operating Instructions
Page 35
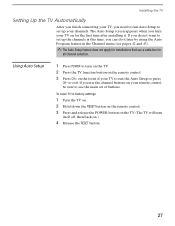
... installations that use the main set up your channels. Installing the TV Setting Up the TV Automatically After you finish connecting your TV, you need to run the Auto Setup or press CH- If you turn itself off, then back on your remote control, be sure to exit. To reset TV to factory settings 1 Turn the TV on. 2 Hold down the RESET button on the remote control. 3 Press and release the POWER button...
... installations that use the main set up your channels. Installing the TV Setting Up the TV Automatically After you finish connecting your TV, you need to run the Auto Setup or press CH- If you turn itself off, then back on your remote control, be sure to exit. To reset TV to factory settings 1 Turn the TV on. 2 Hold down the RESET button on the remote control. 3 Press and release the POWER button...
Operating Instructions
Page 52
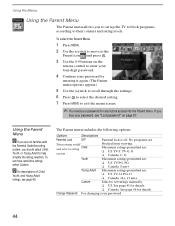
... to the Parent icon and press . 3 Use the 0-9 buttons on /off . Using the Menus Using the Parent Menu The Parent menu allows you to set ratings manually. ❏ US: See page 45 for details. ❏ Canada: See page 46 for any future access into the Parent menu. If you are Turn ratings on the remote control to enter your four-digit password. 4 Confirm your password for details. No programs are not...
... to the Parent icon and press . 3 Use the 0-9 buttons on /off . Using the Menus Using the Parent Menu The Parent menu allows you to set ratings manually. ❏ US: See page 45 for details. ❏ Canada: See page 46 for any future access into the Parent menu. If you are Turn ratings on the remote control to enter your four-digit password. 4 Confirm your password for details. No programs are not...
Operating Instructions
Page 64
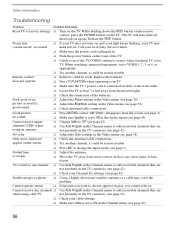
...) when operating your TV may solve the problem. Good picture, ❏ Press MUTING so that are not presently in the Channel menu to add receivable channels that "MUTING" disappears from the screen (see page 38). it . TV is plugged in the Channel menu (see page 38). ❏ Check antenna/cable connections. Call your local Sony Service Center. ❏ Make sure the power cord is fixed to one channel ❏ Use Auto Program in...
...) when operating your TV may solve the problem. Good picture, ❏ Press MUTING so that are not presently in the Channel menu to add receivable channels that "MUTING" disappears from the screen (see page 38). it . TV is plugged in the Channel menu (see page 38). ❏ Check antenna/cable connections. Call your local Sony Service Center. ❏ Make sure the power cord is fixed to one channel ❏ Use Auto Program in...
Operating Instructions
Page 65
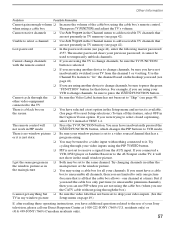
... select closed captioning, select CC1 instead of TEXT 1-4. one picture (because that is a black box on page 49.) If, after reading these operating instructions, you are not presently in the Channel menu to change channels ❏ If you are using a cable box for that has a or it cannot be tuned to a video input with the remote control button is just static program airing. ❏ You may be sure to the use PIP...
... select closed captioning, select CC1 instead of TEXT 1-4. one picture (because that is a black box on page 49.) If, after reading these operating instructions, you are not presently in the Channel menu to change channels ❏ If you are using a cable box for that has a or it cannot be tuned to a video input with the remote control button is just static program airing. ❏ You may be sure to the use PIP...
Operating Instructions
Page 66
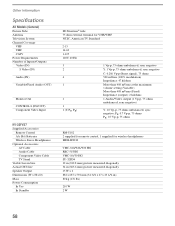
... negative; Other Information Specifications All Models (General) Picture Tube Antenna Television System Channel Coverage VHF UHF CATV Power Requirements Number of Inputs/Outputs Video (IN) S Video (IN) Audio (IN) Variable/Fixed Audio (OUT) Monitor Out CONTROL-S (IN/OUT) Component Video Input KV-32FV27 Supplied Accessories Remote Control AA (R6) Batteries Wireless Stereo Headphones Optional Accessories AV Cable Audio Cable Component Video Cable TV Stand Visible Screen Size Actual CRT Size Speaker Output Dimensions (W x H x D) Mass Power Consumption In Use In Standby FD Trinitron® tube 75...
... negative; Other Information Specifications All Models (General) Picture Tube Antenna Television System Channel Coverage VHF UHF CATV Power Requirements Number of Inputs/Outputs Video (IN) S Video (IN) Audio (IN) Variable/Fixed Audio (OUT) Monitor Out CONTROL-S (IN/OUT) Component Video Input KV-32FV27 Supplied Accessories Remote Control AA (R6) Batteries Wireless Stereo Headphones Optional Accessories AV Cable Audio Cable Component Video Cable TV Stand Visible Screen Size Actual CRT Size Speaker Output Dimensions (W x H x D) Mass Power Consumption In Use In Standby FD Trinitron® tube 75...

Operating Instructions
Page 69
... channels from 43 Channel menu 37, 42 Channel Setup menu 42 Channel Skip/Add 43 channels creating labels 43 setting up 27 closed caption modes 48 Code Set Button 4, 52 color temperature, adjusting 39 color, adjusting 38 Connecting: Audio Receiver 22 Cable or antenna 10-13 Cable box 11-13 Camcorder 25 DVD player 23, 24 Satellite receiver 19 VCR 14-18 VCR with satellite receiver 20 Contents of box 3 CONTROL S 26 Controls and connections 8 Converter 12 D Demo, menus 49 Display button 4 turning off 4 DVD player using with component video connectors, connecting 23 E Enhanced picture resolution...
... channels from 43 Channel menu 37, 42 Channel Setup menu 42 Channel Skip/Add 43 channels creating labels 43 setting up 27 closed caption modes 48 Code Set Button 4, 52 color temperature, adjusting 39 color, adjusting 38 Connecting: Audio Receiver 22 Cable or antenna 10-13 Cable box 11-13 Camcorder 25 DVD player 23, 24 Satellite receiver 19 VCR 14-18 VCR with satellite receiver 20 Contents of box 3 CONTROL S 26 Controls and connections 8 Converter 12 D Demo, menus 49 Display button 4 turning off 4 DVD player using with component video connectors, connecting 23 E Enhanced picture resolution...
Operating Instructions
Page 70
...4 62 P Parent menu 37, 44 parental control, described 2 password changing 44 picture contrast, adjusting 38 picture definition, adjusting 39 Picture in Picture (PIP), using 31 picture, adjusting 50 Picture Mode 4 Picture size, adjusting in PIP 32 power cord, removing from holder 7 presetting channels 42 problems, troubleshooting 56-57 R ratings, setting 44-45 ratings, viewing blocked programs 45, 46 Rear panel controls and connections 8-9 remote control described 4-5 inserting batteries 3 programming 52 Remote control, buttons inside cover 5 Remote control, operating other components with VCR...
...4 62 P Parent menu 37, 44 parental control, described 2 password changing 44 picture contrast, adjusting 38 picture definition, adjusting 39 Picture in Picture (PIP), using 31 picture, adjusting 50 Picture Mode 4 Picture size, adjusting in PIP 32 power cord, removing from holder 7 presetting channels 42 problems, troubleshooting 56-57 R ratings, setting 44-45 ratings, viewing blocked programs 45, 46 Rear panel controls and connections 8-9 remote control described 4-5 inserting batteries 3 programming 52 Remote control, buttons inside cover 5 Remote control, operating other components with VCR...
Operating Instructions
Page 71
... Sleep timer/button 4 sound effect (3-D), adjusting 40, 50 speakers turning on/off 41 using external speakers 41 specifications 58-59 Standby/Stereo LED 40 Steady Sound adjusting 40 described 2 T tape-to-tape editing 18 tilt, correcting 49 Time set current 47 set daylight saving 47 Timer LED 47 menu 37, 47 Timer setting 47 treble, adjusting 40 troubleshooting 56-57 TV function button 4 TV power button 4 TV/VIDEO button 5 V VCR connecting two, for tape editing 18 using with TV remote control 54 with cable box, connecting 15...
... Sleep timer/button 4 sound effect (3-D), adjusting 40, 50 speakers turning on/off 41 using external speakers 41 specifications 58-59 Standby/Stereo LED 40 Steady Sound adjusting 40 described 2 T tape-to-tape editing 18 tilt, correcting 49 Time set current 47 set daylight saving 47 Timer LED 47 menu 37, 47 Timer setting 47 treble, adjusting 40 troubleshooting 56-57 TV function button 4 TV power button 4 TV/VIDEO button 5 V VCR connecting two, for tape editing 18 using with TV remote control 54 with cable box, connecting 15...


