
Operating Instructions
Page 2
..., service marks, or certification marks of HDMI Licensing, LLC. and/or its subsidiaries. Blu-ray Disc is a trademark of Energy. It meets strict energy efficiency guidelines set by Gemstar-TV Guide International, Inc. Changes to them whenever you call upon such changed settings, the power consumption may exceed the limits required for the 40, 46 and 52 inch BRAVIA KDL-XBR9 series models with screen size measured...
..., service marks, or certification marks of HDMI Licensing, LLC. and/or its subsidiaries. Blu-ray Disc is a trademark of Energy. It meets strict energy efficiency guidelines set by Gemstar-TV Guide International, Inc. Changes to them whenever you call upon such changed settings, the power consumption may exceed the limits required for the 40, 46 and 52 inch BRAVIA KDL-XBR9 series models with screen size measured...

Operating Instructions
Page 3
... Getting Started Setting Up Your TV 6 Using a Wall-Mount Bracket 7 Locating Inputs and Outputs 8 Connecting the TV 10 Connecting Internet & DLNA Certified™ Networks 13 Connecting Other Equipment 14 Bundling the Connecting Cables 15 Installing the TV Against a Wall or Enclosed Area 15 Securing the TV 16 Running Initial Setup 18 Operating the TV Using the Remote Control 19 Remote Control Button Description 20 TV Controls and Indicators 23 Programming the Remote Control 24 Manufacturer's Code List 25 Using Other Equipment with Your Remote Control 27 Remote Control Backlight...
... Getting Started Setting Up Your TV 6 Using a Wall-Mount Bracket 7 Locating Inputs and Outputs 8 Connecting the TV 10 Connecting Internet & DLNA Certified™ Networks 13 Connecting Other Equipment 14 Bundling the Connecting Cables 15 Installing the TV Against a Wall or Enclosed Area 15 Securing the TV 16 Running Initial Setup 18 Operating the TV Using the Remote Control 19 Remote Control Button Description 20 TV Controls and Indicators 23 Programming the Remote Control 24 Manufacturer's Code List 25 Using Other Equipment with Your Remote Control 27 Remote Control Backlight...

Operating Instructions
Page 5
Product Support Preferences Settings Picture & Display Sound Channel & Inputs Network TV 5 Displayed here is Photo USB (page 33). ➢ Central Location for quick and easy access (page 37). BRAVIA Internet Widgets allow you access to TV settings, photo, music, video, TV channel listings, and more (page 29). Displayed here is Widgets (page 35). ➢ Digital Media Accessibility: Use the Photo, Music, and Video Category icons to access photo, music, and video files from the Internet to access local weather, news, and much more from...
Product Support Preferences Settings Picture & Display Sound Channel & Inputs Network TV 5 Displayed here is Photo USB (page 33). ➢ Central Location for quick and easy access (page 37). BRAVIA Internet Widgets allow you access to TV settings, photo, music, video, TV channel listings, and more (page 29). Displayed here is Widgets (page 35). ➢ Digital Media Accessibility: Use the Photo, Music, and Video Category icons to access photo, music, and video files from the Internet to access local weather, news, and much more from...

Operating Instructions
Page 6
... poor picture and/or poor color. You will need a Phillips screwdriver and the supplied screws to a warm area. The designated Sony wall-mount bracket model and TV stand model name(s) are packaged with a detached Table-Top Stand so you will need to direct illumination or sunlight. • Avoid installing the TV in a room with the adequate number of Operating Instructions. Be sure to consider the following while setting up your TV to a wall. larger size TVs...
... poor picture and/or poor color. You will need a Phillips screwdriver and the supplied screws to a warm area. The designated Sony wall-mount bracket model and TV stand model name(s) are packaged with a detached Table-Top Stand so you will need to direct illumination or sunlight. • Avoid installing the TV in a room with the adequate number of Operating Instructions. Be sure to consider the following while setting up your TV to a wall. larger size TVs...

Operating Instructions
Page 7
... the TV's weight. • Be sure to use the screws supplied with the Wall-Mount Bracket for your TV model. When you use the screws that are mounting the 52 inch model to a wall, remove the Table-Top Stand. You may result in internal damage to the TV set or cause it to fall, etc. 8-12 mm M6 screw (supplied with the Wall-Mount Bracket) Mounting Hook Rear of your TV should be sure to the TV. Prepare the TV for the Table-Top Stand...
... the TV's weight. • Be sure to use the screws supplied with the Wall-Mount Bracket for your TV model. When you use the screws that are mounting the 52 inch model to a wall, remove the Table-Top Stand. You may result in internal damage to the TV set or cause it to fall, etc. 8-12 mm M6 screw (supplied with the Wall-Mount Bracket) Mounting Hook Rear of your TV should be sure to the TV. Prepare the TV for the Table-Top Stand...
Operating Instructions
Page 8
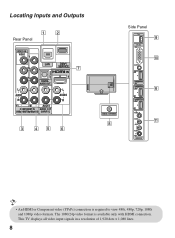
... video input signals in a resolution of 1,920 dots × 1,080 lines. 8 The 1080/24p video format is required to view 480i, 480p, 720p, 1080i and 1080p video formats. Locating Inputs and Outputs 12 Rear Panel VIDEO IN VIDEO Y LAN PB PR DIGITAL AUDIO OUT L AUDIO R 1 2 AUDIO COMPONENT IN AUDIO OUT (1080p/1080i/720p/480p/480i) (VAR/FIX) (OPTICAL) 7 IN 1 L AUDIO R 3 45 6 CABLE / ANTENNA 8 Side Panel PC IN RGB 9 AUDIO 2 0 IN IN 3 IN 4 S VIDEO VIDEO L (MONO) AUDIO R 2 VIDEO IN 6 qa • An HDMI or Component video (YPBPR) connection...
... video input signals in a resolution of 1,920 dots × 1,080 lines. 8 The 1080/24p video format is required to view 480i, 480p, 720p, 1080i and 1080p video formats. Locating Inputs and Outputs 12 Rear Panel VIDEO IN VIDEO Y LAN PB PR DIGITAL AUDIO OUT L AUDIO R 1 2 AUDIO COMPONENT IN AUDIO OUT (1080p/1080i/720p/480p/480i) (VAR/FIX) (OPTICAL) 7 IN 1 L AUDIO R 3 45 6 CABLE / ANTENNA 8 Side Panel PC IN RGB 9 AUDIO 2 0 IN IN 3 IN 4 S VIDEO VIDEO L (MONO) AUDIO R 2 VIDEO IN 6 qa • An HDMI or Component video (YPBPR) connection...
Operating Instructions
Page 9
.... For component connection, use audio (L/R) for audio signals. You can be used , connect the adapter to the optical audio input of Dolby Laboratories. 9 Equipment using a DVI connection also requires an additional audio connection using an Ethernet cable. To manually set -top box, DVD player, and A/V receiver. For some Apple Macintosh computers, it may need to -HDMI cable or adapter (not supplied). If an adapter is used as composite video input (VIDEO 1) or as a set the input type, press HOME, select Settings, then Channels & Inputs, then select Video/Component...
.... For component connection, use audio (L/R) for audio signals. You can be used , connect the adapter to the optical audio input of Dolby Laboratories. 9 Equipment using a DVI connection also requires an additional audio connection using an Ethernet cable. To manually set -top box, DVD player, and A/V receiver. For some Apple Macintosh computers, it may need to -HDMI cable or adapter (not supplied). If an adapter is used as composite video input (VIDEO 1) or as a set the input type, press HOME, select Settings, then Channels & Inputs, then select Video/Component...
Operating Instructions
Page 12
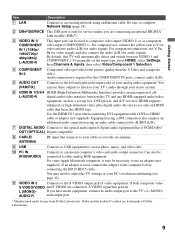
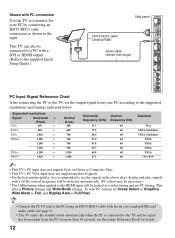
This TV can also be connected to a PC with a DVI or HDMI output. (Refer to the supplied Quick Setup Guide.) Side panel PC IN RGB HD15-HD15 cable (analog RGB) AUDIO 2 Audio cable IN (stereo mini plugs) IN 3 IN 4 S VIDEO VIDEO L (MONO) AUDIO R 2 VIDEO IN PC Input Signal Reference Chart After connecting the PC to the TV, set Scene Select to Graphics, Wide Mode to Full, and Display Area to Full Pixel. • Connect the PC IN jack...
This TV can also be connected to a PC with a DVI or HDMI output. (Refer to the supplied Quick Setup Guide.) Side panel PC IN RGB HD15-HD15 cable (analog RGB) AUDIO 2 Audio cable IN (stereo mini plugs) IN 3 IN 4 S VIDEO VIDEO L (MONO) AUDIO R 2 VIDEO IN PC Input Signal Reference Chart After connecting the PC to the TV, set Scene Select to Graphics, Wide Mode to Full, and Display Area to Full Pixel. • Connect the PC IN jack...
Operating Instructions
Page 18
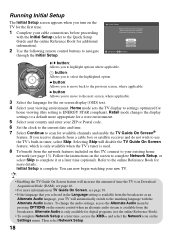
... you receive channels from the broadcaster. Bienvenue! Running Initial Setup The Initial Setup screen appears when you turn on the TV for the first time. 1 Complete your cable connections before proceeding with the Alternate Audio feature. Home mode sets the TV display to settings optimized for additional information). 2 Use the following remote control buttons to complete it at a later time, access the XMB™ and select the Network icon on the Settings menu. Follow the instructions...
... you receive channels from the broadcaster. Bienvenue! Running Initial Setup The Initial Setup screen appears when you turn on the TV for the first time. 1 Complete your cable connections before proceeding with the Alternate Audio feature. Home mode sets the TV display to settings optimized for additional information). 2 Use the following remote control buttons to complete it at a later time, access the XMB™ and select the Network icon on the Settings menu. Follow the instructions...
Operating Instructions
Page 20
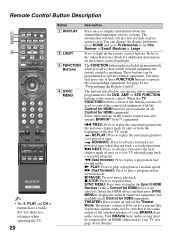
...: Press to play a program at a normal speed. These buttons can operate video equipment programmed to play a program in fast forward mode. N PLAY: Press to the DVD, AMP, or STB FUNCTION buttons of time. x STOP: Press to pause playback. SYNC MENU: Press once to set period of the remote control. Remote Control Button Description 1 2 3 4 DISPLAY LIGHT POWER TV POWER DVD AMP STB TV FUNCTION PREV REPLAY ADVANCE NEXT PLAY SYNC MENU PAUSE STOP THEATER SCENE CC WIDE VIDEO WIDGETS BRAVIA INTERNET VOL MUTING...
...: Press to play a program at a normal speed. These buttons can operate video equipment programmed to play a program in fast forward mode. N PLAY: Press to the DVD, AMP, or STB FUNCTION buttons of time. x STOP: Press to pause playback. SYNC MENU: Press once to set period of the remote control. Remote Control Button Description 1 2 3 4 DISPLAY LIGHT POWER TV POWER DVD AMP STB TV FUNCTION PREV REPLAY ADVANCE NEXT PLAY SYNC MENU PAUSE STOP THEATER SCENE CC WIDE VIDEO WIDGETS BRAVIA INTERNET VOL MUTING...

Operating Instructions
Page 22
... V/v/B/b to turn Closed Captions (CC) on, off, or automatically display CC when sound is muted. The Options menu items vary based on the screen, press again to display the BRAVIA Internet Widgets. To scan quickly through channels, press and hold down either +/-. DISPLAY LIGHT POWER TV POWER DVD AMP STB TV FUNCTION PREV REPLAY ADVANCE NEXT PLAY SYNC MENU PAUSE STOP THEATER SCENE CC WIDE VIDEO WIDGETS BRAVIA INTERNET Button ws CC wd BRAVIA INTERNET WIDGETS wf INPUT wg V/v/B/b ws...
... V/v/B/b to turn Closed Captions (CC) on, off, or automatically display CC when sound is muted. The Options menu items vary based on the screen, press again to display the BRAVIA Internet Widgets. To scan quickly through channels, press and hold down either +/-. DISPLAY LIGHT POWER TV POWER DVD AMP STB TV FUNCTION PREV REPLAY ADVANCE NEXT PLAY SYNC MENU PAUSE STOP THEATER SCENE CC WIDE VIDEO WIDGETS BRAVIA INTERNET Button ws CC wd BRAVIA INTERNET WIDGETS wf INPUT wg V/v/B/b ws...
Operating Instructions
Page 23
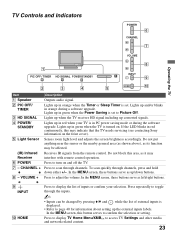
... the TV needs servicing (see contacting Sony information on the front cover). TV Controls and Indicators POWER 6 CHANNEL 7 Operating the TV VOLUME 1 PIC OFF / TIMER HD SIGNAL POWER/STANDBY 8 INPUT 9 2 3 4 HOME q; 5 Item 1 Speaker 2 PIC OFF/ TIMER 3 HD SIGNAL 4 POWER/ STANDBY 5 Light Sensor (IR) Infrared Receiver 6 POWER 7 - Lights up in green when the TV is displayed. • Refer to display the list of external inputs is turned on and off the TV. Receives IR signals from the remote control. In the MENU screen, this button serves to access TV Settings and other media and...
... the TV needs servicing (see contacting Sony information on the front cover). TV Controls and Indicators POWER 6 CHANNEL 7 Operating the TV VOLUME 1 PIC OFF / TIMER HD SIGNAL POWER/STANDBY 8 INPUT 9 2 3 4 HOME q; 5 Item 1 Speaker 2 PIC OFF/ TIMER 3 HD SIGNAL 4 POWER/ STANDBY 5 Light Sensor (IR) Infrared Receiver 6 POWER 7 - Lights up in green when the TV is displayed. • Refer to display the list of external inputs is turned on and off the TV. Receives IR signals from the remote control. In the MENU screen, this button serves to access TV Settings and other media and...
Operating Instructions
Page 30
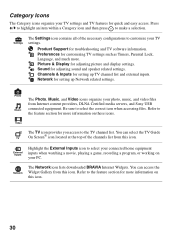
... on these icons. Network for adjusting picture and display settings. Video The TV icon provides you access to select the correct icon when accessing files. Network The Network icon lists downloaded BRAVIA Internet Widgets. Picture & Display for setting up TV channel list and external inputs. Photo The Photo, Music, and Video icons organize your TV settings. Be sure to the TV channel list. Channels & Inputs for troubleshooting and TV software information. Refer to the feature section for customizing TV settings such as Timers, Parental Lock, Language, and much...
... on these icons. Network for adjusting picture and display settings. Video The TV icon provides you access to select the correct icon when accessing files. Network The Network icon lists downloaded BRAVIA Internet Widgets. Picture & Display for setting up TV channel list and external inputs. Photo The Photo, Music, and Video icons organize your TV settings. Be sure to the TV channel list. Channels & Inputs for troubleshooting and TV software information. Refer to the feature section for customizing TV settings such as Timers, Parental Lock, Language, and much...
Operating Instructions
Page 32
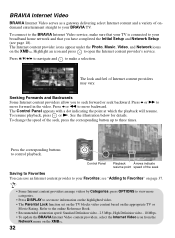
... Initial Setup and Network Setup (see more information on the highlighted video. • The Parental Lock function set on the TV blocks video content based on the XMB™. To resume playback, press or N. see "Adding to the online Reference Book. • Recommended connection speed: Standard Definition video - 2.5 Mbps, High Definition video - 10 Mbps. • To update the BRAVIA Internet Video content providers, select the Internet Video icon from the Network menu...
... Initial Setup and Network Setup (see more information on the highlighted video. • The Parental Lock function set on the TV blocks video content based on the XMB™. To resume playback, press or N. see "Adding to the online Reference Book. • Recommended connection speed: Standard Definition video - 2.5 Mbps, High Definition video - 10 Mbps. • To update the BRAVIA Internet Video content providers, select the Internet Video icon from the Network menu...

Operating Instructions
Page 39
... channel using the OPTIONS button while watching your program, your favorite channel will be able to set up Guide settings or profiles: Guide Information Screen, Guide Settings, Profile Settings, Reset Guide, Edit Channels, Update TV Listings, Select Channel Lineup. see page 46. • Refer to the online Reference Book for Program Information Source then select the Broadcaster option. • Enabling the TV Guide On Screen feature will increase the amount of time the TV is highlighted Info Box describes...
... channel using the OPTIONS button while watching your program, your favorite channel will be able to set up Guide settings or profiles: Guide Information Screen, Guide Settings, Profile Settings, Reset Guide, Edit Channels, Update TV Listings, Select Channel Lineup. see page 46. • Refer to the online Reference Book for Program Information Source then select the Broadcaster option. • Enabling the TV Guide On Screen feature will increase the amount of time the TV is highlighted Info Box describes...
Operating Instructions
Page 40
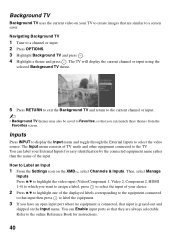
... select the input of the displayed labels corresponding to the equipment connected to that input is grayed-out and skipped on the Input menu. Picture Adjustments Sound Adjustments Background TV Motionflow Speakers Add to Favorites 5 Press RETURN to exit the Background TV and return to the current channel or input. ~ • Background TV themes may also be saved to a screen saver. Press V/v to highlight the video input (Video/Component 1, Video 2, Component 2, HDMI 1-4) to which...
... select the input of the displayed labels corresponding to the equipment connected to that input is grayed-out and skipped on the Input menu. Picture Adjustments Sound Adjustments Background TV Motionflow Speakers Add to Favorites 5 Press RETURN to exit the Background TV and return to the current channel or input. ~ • Background TV themes may also be saved to a screen saver. Press V/v to highlight the video input (Video/Component 1, Video 2, Component 2, HDMI 1-4) to which...
Operating Instructions
Page 43
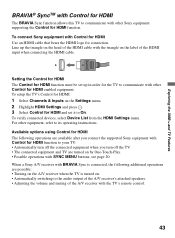
... operating instructions. Line up in order for the TV to the audio output of the A/V receiver's attached speakers. • Adjusting the volume and muting of the HDMI cable with Control for HDMI Use an HDMI cable that bears the HDMI logo for connection. To setup the TV's Control for HDMI: 1 Select Channels & Inputs on the Settings menu. 2 Highlight HDMI Settings and press . 3 Select Control for HDMI and set up the triangle on the head of the A/V receiver with the TV's remote control. 43 For other Sony...
... operating instructions. Line up in order for the TV to the audio output of the A/V receiver's attached speakers. • Adjusting the volume and muting of the HDMI cable with Control for HDMI Use an HDMI cable that bears the HDMI logo for connection. To setup the TV's Control for HDMI: 1 Select Channels & Inputs on the Settings menu. 2 Highlight HDMI Settings and press . 3 Select Control for HDMI and set up the triangle on the head of the A/V receiver with the TV's remote control. 43 For other Sony...

Operating Instructions
Page 44
Troubleshooting Many problems with picture and sound quality are related to the Quick Setup Guide provided for sample connections. If you need further assistance. 44 Contact Sony if you have forgotten your remote control; refer to improper cable connection; This password clears your previous password and allows you have accidentally pressed the MUTING button on a stable surface to Care for cleaning. • Do not plug in the TV into the...
Troubleshooting Many problems with picture and sound quality are related to the Quick Setup Guide provided for sample connections. If you need further assistance. 44 Contact Sony if you have forgotten your remote control; refer to improper cable connection; This password clears your previous password and allows you have accidentally pressed the MUTING button on a stable surface to Care for cleaning. • Do not plug in the TV into the...

Operating Instructions
Page 46
... Input Signal Reference Chart on its stock. • Design and specifications are subject to change without stand (kg) 17.2 20.6 25.9 (lb.) 37.9 45.4 57.1 Supplied accessories Remote control RM-YD029 (1) / AC power cord (1) / Size AA batteries (2) / Cable clamper (1 attached to the Table-Top Stand) / Operating Instruction Manual (1) / Quick Setup Guide (1) / Warranty Card (1) / Safety and Regulatory Booklet (1) / Attaching the Table-Top Stand (1) / Screws (4) (except KDL-52XBR9) Optional accessories Connecting cables / Support Belt Kit / Wall-Mount Bracket: see page 45 * Download...
... Input Signal Reference Chart on its stock. • Design and specifications are subject to change without stand (kg) 17.2 20.6 25.9 (lb.) 37.9 45.4 57.1 Supplied accessories Remote control RM-YD029 (1) / AC power cord (1) / Size AA batteries (2) / Cable clamper (1 attached to the Table-Top Stand) / Operating Instruction Manual (1) / Quick Setup Guide (1) / Warranty Card (1) / Safety and Regulatory Booklet (1) / Attaching the Table-Top Stand (1) / Screws (4) (except KDL-52XBR9) Optional accessories Connecting cables / Support Belt Kit / Wall-Mount Bracket: see page 45 * Download...
Operating Instructions
Page 47
...TIMER LED 23 POWER button 21, 23 POWER/STANDBY LED 23 Programming the Remote Control 24 R RETURN button 21 S S VIDEO jack 8, 9 SCENE button 21 Speaker 23 T Troubleshooting 44 U USB 8, 9 V VIDEO/AUDIO (L/R) jacks, described 8, 9 VOL +/- button 21, 23 W WIDE button 21 Y YELLOW, BLUE, RED, GREEN buttons 21 47 Other Information Index 0-9 buttons 21 A AUDIO OUT jack, described 8, 9 Auto Program 18 B Background TV 40 BD/DVD MENU button 21 BD/DVD TOP MENU button 21 BRAVIA INTERNET VIDEO button 21 BRAVIA INTERNET WIDGETS button 22 BRAVIA Sync buttons 20 C CABLE/ANTENNA input, described 8, 9 CC button...
...TIMER LED 23 POWER button 21, 23 POWER/STANDBY LED 23 Programming the Remote Control 24 R RETURN button 21 S S VIDEO jack 8, 9 SCENE button 21 Speaker 23 T Troubleshooting 44 U USB 8, 9 V VIDEO/AUDIO (L/R) jacks, described 8, 9 VOL +/- button 21, 23 W WIDE button 21 Y YELLOW, BLUE, RED, GREEN buttons 21 47 Other Information Index 0-9 buttons 21 A AUDIO OUT jack, described 8, 9 Auto Program 18 B Background TV 40 BD/DVD MENU button 21 BD/DVD TOP MENU button 21 BRAVIA INTERNET VIDEO button 21 BRAVIA INTERNET WIDGETS button 22 BRAVIA Sync buttons 20 C CABLE/ANTENNA input, described 8, 9 CC button...


