Operating Instructions
Page 2
... extension cord, receptacle or other WALL-MOUNT BRACKET or TV-stand may be determined by turning the equipment off and on the TV. s Avoid operating the TV at the rear of the following two conditions: (1) This device may cause harmful interference to persons. It is designed, for a Class B digital device, pursuant to operate this TV. The shielded interface cable recommended in this manual could void your Sony...
... extension cord, receptacle or other WALL-MOUNT BRACKET or TV-stand may be determined by turning the equipment off and on the TV. s Avoid operating the TV at the rear of the following two conditions: (1) This device may cause harmful interference to persons. It is designed, for a Class B digital device, pursuant to operate this TV. The shielded interface cable recommended in this manual could void your Sony...

Operating Instructions
Page 3
Availability of digital cable television programming in the U.S. Manufactured under license from being walked on the type of HDMI Licensing LLC. are trademarks or registered trademarks of programming and signal provided by your area depends on or pinched particularly at plugs, convenience receptacles, and the point where they exit from tip-over. 13) Unplug this TV (i.e. Picture/Sound, Power Saving) can slightly change the power consumption...
Availability of digital cable television programming in the U.S. Manufactured under license from being walked on the type of HDMI Licensing LLC. are trademarks or registered trademarks of programming and signal provided by your area depends on or pinched particularly at plugs, convenience receptacles, and the point where they exit from tip-over. 13) Unplug this TV (i.e. Picture/Sound, Power Saving) can slightly change the power consumption...
Operating Instructions
Page 6
... using headphones, adjust the volume to unplug the AC power cord for signs of damage. s Use only an original Sony AC power cord with a protective earthing connection. s Replace only with wet hand, it occasionally to follow the installation guide supplied with the Wall-Mount Bracket. s Be sure to avoid dust from the wall outlet. s Do not overload the same AC power outlet. s Consult your electrician to have the outlet changed...
... using headphones, adjust the volume to unplug the AC power cord for signs of damage. s Use only an original Sony AC power cord with a protective earthing connection. s Replace only with wet hand, it occasionally to follow the installation guide supplied with the Wall-Mount Bracket. s Be sure to avoid dust from the wall outlet. s Do not overload the same AC power outlet. s Consult your electrician to have the outlet changed...
Operating Instructions
Page 7
...picture quality, this TV's backlight setting is set to maximize the brightness of light (red, blue, or green) may appear constantly on the LCD screen. s The LCD screen is made with high-precision technology and has effective pixels of 99.99% or more, black dots or bright points of the TV. This condition is safe to the LCD panel...the LCD panel and is viewed in a dark ambient without an input source or blank screen. s To avoid damaging the LCD panel, do not touch the TV until you have unplugged the AC power cord. This does not indicate a failure. s If damage occurs to operate. ...
...picture quality, this TV's backlight setting is set to maximize the brightness of light (red, blue, or green) may appear constantly on the LCD screen. s The LCD screen is made with high-precision technology and has effective pixels of 99.99% or more, black dots or bright points of the TV. This condition is safe to the LCD panel...the LCD panel and is viewed in a dark ambient without an input source or blank screen. s To avoid damaging the LCD panel, do not touch the TV until you have unplugged the AC power cord. This does not indicate a failure. s If damage occurs to operate. ...
Operating Instructions
Page 9
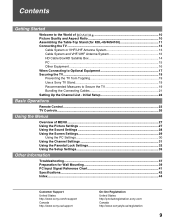
... Equipment ...16 When Connecting to Optional Equipment 17 Securing the TV...19 Preventing the TV from Toppling 19 Use a Sony TV Stand 19 Recommended Measures to the World of MENU ...27 Using the Picture Settings 27 Using the Sound Settings 28 Using the Screen Settings 29 Using the PC Settings 30 Using the Channel Settings 31 Using the Parental Lock Settings 32 Using the Setup Settings 35 Other Information Troubleshooting...37 Preparation for Wall Mounting 39 PC Input Signal Reference Chart 41 Specifications ...42 Index...
... Equipment ...16 When Connecting to Optional Equipment 17 Securing the TV...19 Preventing the TV from Toppling 19 Use a Sony TV Stand 19 Recommended Measures to the World of MENU ...27 Using the Picture Settings 27 Using the Sound Settings 28 Using the Screen Settings 29 Using the PC Settings 30 Using the Channel Settings 31 Using the Parental Lock Settings 32 Using the Setup Settings 35 Other Information Troubleshooting...37 Preparation for Wall Mounting 39 PC Input Signal Reference Chart 41 Specifications ...42 Index...
Operating Instructions
Page 17
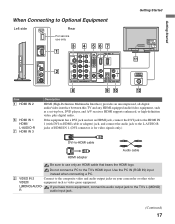
... TV's HDMI input. Getting Started Getting Started When Connecting to Optional Equipment Left side SERVICE ONLY IN 2 VIDEO IN 2 VIDEO L (MONO) AUDIO R Rear For service use only an HDMI cable that bears the HDMI logo. Use the PC IN (RGB IN) input instead when connecting a PC. 2 VIDEO IN 2 Connect to use only 1 3 4 56 7 (1080p/1080i/720p/480p/480i) RGB IN S VIDEO Y 1 3 2 PB VIDEO PR L L (MONO) R R AUDIO 1 1 AUDIO 2 VIDEO IN COMPONENT IN L AUDIO AUDIO R PC IN L AUDIO R DIGITAL (FIX) AUDIO OUT (OPTICAL) AUDIO OUT qa CABLE/ ANTENNA...
... TV's HDMI input. Getting Started Getting Started When Connecting to Optional Equipment Left side SERVICE ONLY IN 2 VIDEO IN 2 VIDEO L (MONO) AUDIO R Rear For service use only an HDMI cable that bears the HDMI logo. Use the PC IN (RGB IN) input instead when connecting a PC. 2 VIDEO IN 2 Connect to use only 1 3 4 56 7 (1080p/1080i/720p/480p/480i) RGB IN S VIDEO Y 1 3 2 PB VIDEO PR L L (MONO) R R AUDIO 1 1 AUDIO 2 VIDEO IN COMPONENT IN L AUDIO AUDIO R PC IN L AUDIO R DIGITAL (FIX) AUDIO OUT (OPTICAL) AUDIO OUT qa CABLE/ ANTENNA...
Operating Instructions
Page 18
... this TV displays all picture format types in a resolution of 1,920 dots × 1,080 lines. 18 qa AC IN Connects the supplied AC power cord. qs CABLE/ ANTENNA RF input that connects to the computer before connecting the HD15-HD15 cable. If the picture is the case, connect the adapter to your DVD player's or digital set-top box's component video (YPBPR) and audio (L/R) jacks. Provides better picture quality than the S VIDEO (3) and the composite video (2/8) connections. 5 PC IN (RGB/AUDIO) Connect to view...
... this TV displays all picture format types in a resolution of 1,920 dots × 1,080 lines. 18 qa AC IN Connects the supplied AC power cord. qs CABLE/ ANTENNA RF input that connects to the computer before connecting the HD15-HD15 cable. If the picture is the case, connect the adapter to your DVD player's or digital set-top box's component video (YPBPR) and audio (L/R) jacks. Provides better picture quality than the S VIDEO (3) and the composite video (2/8) connections. 5 PC IN (RGB/AUDIO) Connect to view...
Operating Instructions
Page 20
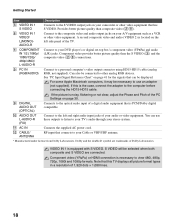
... obtain the optional Support Belt Kit by providing your TV model name. - Anchor bolt Screw hole on the rear of the TV). • Rope or chain (attach to one M6 anchor bolt). • Wall-anchor (attach to the wall stud) strong enough to support the weight of the TV). mount holes located on the Table-Top Stand Screw Contact Sony Customer Support to the other M6 anchor bolt). For further protection...
... obtain the optional Support Belt Kit by providing your TV model name. - Anchor bolt Screw hole on the rear of the TV). • Rope or chain (attach to one M6 anchor bolt). • Wall-anchor (attach to the wall stud) strong enough to support the weight of the TV). mount holes located on the Table-Top Stand Screw Contact Sony Customer Support to the other M6 anchor bolt). For further protection...
Operating Instructions
Page 22
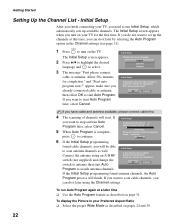
... Wide Mode as described on your TV, you want to use air signals, please connect antenna. Please wait. If you do it later using an A-B RF switch (not supplied) and change the switch to scan cable channels, you turn on page 31. The Initial Setup screen appears. 2 Press V/v to highlight the desired language and to scan antenna channels as described on the TV. Allow 50+ minutes for completion. Cancel found antenna channels, the Auto Program...
... Wide Mode as described on your TV, you want to use air signals, please connect antenna. Please wait. If you do it later using an A-B RF switch (not supplied) and change the switch to scan cable channels, you turn on page 31. The Initial Setup screen appears. 2 Press V/v to highlight the desired language and to scan antenna channels as described on the TV. Allow 50+ minutes for completion. Cancel found antenna channels, the Auto Program...

Operating Instructions
Page 23
.... Press again or press VOL + to mute the sound. The picture modes can store up to Favorites", then press . Press once to display the current channel number, channel label, program remaining time and Wide Mode. Basic Operations Basic Operations Remote Control 1 2 3 4 5 6 7 8 9 0 Button 1 DISPLAY 2 SLEEP 3 FAVORITES Description Press once to display the stored Favorites list. To cancel Sleep Timer, press SLEEP repeatedly until the TV displays the time in minutes (Off, 15, 30, 45, 60, 90...
.... Press again or press VOL + to mute the sound. The picture modes can store up to Favorites", then press . Press once to display the current channel number, channel label, program remaining time and Wide Mode. Basic Operations Basic Operations Remote Control 1 2 3 4 5 6 7 8 9 0 Button 1 DISPLAY 2 SLEEP 3 FAVORITES Description Press once to display the stored Favorites list. To cancel Sleep Timer, press SLEEP repeatedly until the TV displays the time in minutes (Off, 15, 30, 45, 60, 90...
Operating Instructions
Page 25
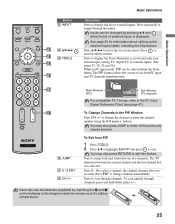
... (TV channel) For compatible PC Timings, refer to the PC Input Signal Reference Chart (see both PC input and TV channels simultaneously. You may also press JUMP to return to the previously viewed channel. Press ENT to change the channel or enter the channel number using the 0-9 numeric buttons. Inputs can be selected from PIP 1 Press TOOLS. 2 Press V/v to highlight Exit PIP and press to select a channel; Press to display the Tools Menu...
... (TV channel) For compatible PC Timings, refer to the PC Input Signal Reference Chart (see both PC input and TV channels simultaneously. You may also press JUMP to return to the previously viewed channel. Press ENT to change the channel or enter the channel number using the 0-9 numeric buttons. Inputs can be selected from PIP 1 Press TOOLS. 2 Press V/v to highlight Exit PIP and press to select a channel; Press to display the Tools Menu...
Operating Instructions
Page 26
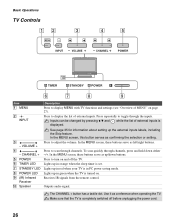
...the power cord. 26 In the MENU screen, these buttons serve as up in green when the TV is in red when your TV is turned on page 27). 2 INPUT Press to display the list of external inputs. Lights up the external inputs labels, including the Skip feature. Receives IR signals from the remote control. 0 Speaker Outputs audio signal. Use it as confirming the selection or setting. 3 - In the MENU screen, this button serves as a reference when operating the TV. Basic Operations TV Controls 12 3 MENU INPUT VOLUME 4 5 CHANNEL POWER 0 TIMER STANDBY POWER 6 7 8 9 Item...
...the power cord. 26 In the MENU screen, these buttons serve as up in green when the TV is in red when your TV is turned on page 27). 2 INPUT Press to display the list of external inputs. Lights up the external inputs labels, including the Skip feature. Receives IR signals from the remote control. 0 Speaker Outputs audio signal. Use it as confirming the selection or setting. 3 - In the MENU screen, this button serves as a reference when operating the TV. Basic Operations TV Controls 12 3 MENU INPUT VOLUME 4 5 CHANNEL POWER 0 TIMER STANDBY POWER 6 7 8 9 Item...
Operating Instructions
Page 29
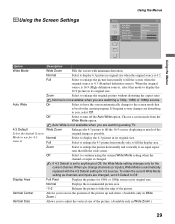
... original image as channels and inputs are changed . Using the Screen Settings Using the Menus Screen Wide Mode Auto Wide 4:3 Default Display Area Vertical Center Vertical Size PC Settings TV Wide Zoom On Wide Zoom Normal 0 0 Using the Menus Option Description Wide Mode Wide Zoom Fills the screen with the 4:3 Default setting for the current program. When the original source is not available when you change to adjust the vertical size of the picture up and...
... original image as channels and inputs are changed . Using the Screen Settings Using the Menus Screen Wide Mode Auto Wide 4:3 Default Display Area Vertical Center Vertical Size PC Settings TV Wide Zoom On Wide Zoom Normal 0 0 Using the Menus Option Description Wide Mode Wide Zoom Fills the screen with the 4:3 Default setting for the current program. When the original source is not available when you change to adjust the vertical size of the picture up and...
Operating Instructions
Page 30
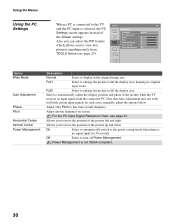
... signal input for 30 seconds. Full2 Select to enlarge the picture to turn off Power Management. Using the Menus Using the PC Settings When a PC is connected to display in the original image size. For the PC Input Signal Reference Chart, see page 25). Allows you to automatically adjust the display position and phase of the Screen settings. Note that Auto Adjustment may not work well with certain input signals. Option Wide Mode Auto Adjustment...
... signal input for 30 seconds. Full2 Select to enlarge the picture to turn off Power Management. Using the Menus Using the PC Settings When a PC is connected to display in the original image size. For the PC Input Signal Reference Chart, see page 25). Allows you to automatically adjust the display position and phase of the Screen settings. Note that Auto Adjustment may not work well with certain input signals. Option Wide Mode Auto Adjustment...

Operating Instructions
Page 35
... video label you assigned to that input appears on page 36. Then press to select the input. 2 Press V/v to highlight one of PC input). Then press to On or Off. Select to display all on the remote control when in analog TV, digital TV and external inputs (with closed caption modes (for programs that you want to assign a label. You can also access Closed Captions (CC) by using the CC button on -screen settings...
... video label you assigned to that input appears on page 36. Then press to select the input. 2 Press V/v to highlight one of PC input). Then press to On or Off. Select to display all on the remote control when in analog TV, digital TV and external inputs (with closed caption modes (for programs that you want to assign a label. You can also access Closed Captions (CC) by using the CC button on -screen settings...
Operating Instructions
Page 37
... receivable channels that are not presently in the Channel settings is set to On (page 31). Poor picture. Adjust the Picture Mode options in the PC Settings (page 30). No color/Dark picture/Color is not ❑ correct/The picture is broken or bent. screen. ❑ Check if the antenna has reached the end of the TV. ❑ Check antenna/cable connections. Other Information Other Information Troubleshooting If you set the Power Saving mode...
... receivable channels that are not presently in the Channel settings is set to On (page 31). Poor picture. Adjust the Picture Mode options in the PC Settings (page 30). No color/Dark picture/Color is not ❑ correct/The picture is broken or bent. screen. ❑ Check if the antenna has reached the end of the TV. ❑ Check antenna/cable connections. Other Information Other Information Troubleshooting If you set the Power Saving mode...
Operating Instructions
Page 38
... Mode setting is automatically replaced with your DVD (or contact your cable company for certain digitally recorded programs. Remote control does not operate. ❑ Check the polarity of the batteries or replace the batteries. ❑ Point the remote control at the top and bottom of TV's screen to use an undamaged antenna cable. If you change the channel or video input, if 4:3 Default in the Screen settings (page 29). Your TV will clear all of the TV's volume control...
... Mode setting is automatically replaced with your DVD (or contact your cable company for certain digitally recorded programs. Remote control does not operate. ❑ Check the polarity of the batteries or replace the batteries. ❑ Point the remote control at the top and bottom of TV's screen to use an undamaged antenna cable. If you change the channel or video input, if 4:3 Default in the Screen settings (page 29). Your TV will clear all of the TV's volume control...
Operating Instructions
Page 39
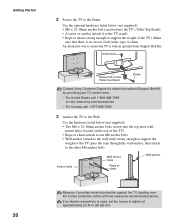
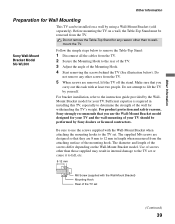
... TV (See illustration below to remove the Table-Top Stand: 1 Disconnect all the cables from the TV. Be sure to use the Wall-Mount Bracket model designed for your TV should be removed from the TV. 2 Secure the Mounting Hook to determine the strength of your TV and the wall-mounting of the wall for withstanding the TV's weight. Do not attempt to the TV set. Use of the screws differ depending on a wall by yourself. For bracket installation...
... TV (See illustration below to remove the Table-Top Stand: 1 Disconnect all the cables from the TV. Be sure to use the Wall-Mount Bracket model designed for your TV should be removed from the TV. 2 Secure the Mounting Hook to determine the strength of your TV and the wall-mounting of the wall for withstanding the TV's weight. Do not attempt to the TV set. Use of the screws differ depending on a wall by yourself. For bracket installation...
Operating Instructions
Page 42
...% modulation) More than 500 mVrms (Fixed) DIGITAL AUDIO OUT (OPTICAL): Optical Digital Audio Output (PCM/Dolby Digital) PC IN: Analog RGB (D-sub 15-pin): 0.7 Vp-p, 75 ohms, positive See the PC Input Signal Reference Chart on page 41 AUDIO (Stereo mini jack): 500 mVrms Impedance: 47 kilohms Power Requirement: 120 V-240 V AC, 50/60 Hz Screen size (in inches): 40, 46, 52 Speaker/Full range (2): KDL-40S4100: (in mm) 57...
...% modulation) More than 500 mVrms (Fixed) DIGITAL AUDIO OUT (OPTICAL): Optical Digital Audio Output (PCM/Dolby Digital) PC IN: Analog RGB (D-sub 15-pin): 0.7 Vp-p, 75 ohms, positive See the PC Input Signal Reference Chart on page 41 AUDIO (Stereo mini jack): 500 mVrms Impedance: 47 kilohms Power Requirement: 120 V-240 V AC, 50/60 Hz Screen size (in inches): 40, 46, 52 Speaker/Full range (2): KDL-40S4100: (in mm) 57...

Operating Instructions
Page 44
... Country 33 Settings Channel 31 Parental Lock 32 PC Settings 30 Picture 27 Screen 29 Setup 35 Sound 28 Sharpness 27 Show/Hide Channels 31 SLEEP button 23 Sleep Timer 35 Sound Mode 28 Speaker 28 STANDBY LED 26 44 T TIMER LED 26 TOOLS button 25 Treble 28 Troubleshooting 37, 38 TV Rating 33 U U.S.A. Rating 34 Unrated 32 V Vertical Center 29, 30 Vertical Size 29 VIDEO/AUDIO (L/R) jacks, described 17, 18 Viewing Blocked Programs 34 VOL+/- Index 0-9 buttons 25 4:3 Default 29...
... Country 33 Settings Channel 31 Parental Lock 32 PC Settings 30 Picture 27 Screen 29 Setup 35 Sound 28 Sharpness 27 Show/Hide Channels 31 SLEEP button 23 Sleep Timer 35 Sound Mode 28 Speaker 28 STANDBY LED 26 44 T TIMER LED 26 TOOLS button 25 Treble 28 Troubleshooting 37, 38 TV Rating 33 U U.S.A. Rating 34 Unrated 32 V Vertical Center 29, 30 Vertical Size 29 VIDEO/AUDIO (L/R) jacks, described 17, 18 Viewing Blocked Programs 34 VOL+/- Index 0-9 buttons 25 4:3 Default 29...


