Operating Instructions
Page 2
... FCC Rules. Sony TV Model No. s Use the AC power cord specified by qualified service personnel before turning on 120 - 240 V AC. s For details concerning safety precautions, see "Important Safety Instructions" on the cord. Record these numbers in your cable service provider. Refer to them whenever you to receive unscrambled digital cable television programming via subscription service to comply with the following measures: s Reorient or relocate the receiving antenna. NOTIFICATION This...
... FCC Rules. Sony TV Model No. s Use the AC power cord specified by qualified service personnel before turning on 120 - 240 V AC. s For details concerning safety precautions, see "Important Safety Instructions" on the cord. Record these numbers in your cable service provider. Refer to them whenever you to receive unscrambled digital cable television programming via subscription service to comply with the following measures: s Reorient or relocate the receiving antenna. NOTIFICATION This...

Operating Instructions
Page 3
... through TV Home Menu on XMB 27 TV Setting Description 28 Product Support 28 Clock/Timers Settings 28 Picture Settings 28 Sound Settings 30 Screen Settings 31 Video Options Settings 32 Audio Options Settings 33 Channel Settings 33 CC Closed Captions (CC) Settings 34 Parental Lock Settings 35 External Inputs Settings 37 HDMI Settings 37 General Settings 38 Initial Setup 38 Other Information Troubleshooting 39 Specifications 42 Index 44 Quick Setup Guide (separate volume) Provides a variety of optional equipment connection diagrams. Customer Support http://www.sony.com...
... through TV Home Menu on XMB 27 TV Setting Description 28 Product Support 28 Clock/Timers Settings 28 Picture Settings 28 Sound Settings 30 Screen Settings 31 Video Options Settings 32 Audio Options Settings 33 Channel Settings 33 CC Closed Captions (CC) Settings 34 Parental Lock Settings 35 External Inputs Settings 37 HDMI Settings 37 General Settings 38 Initial Setup 38 Other Information Troubleshooting 39 Specifications 42 Index 44 Quick Setup Guide (separate volume) Provides a variety of optional equipment connection diagrams. Customer Support http://www.sony.com...
Operating Instructions
Page 5
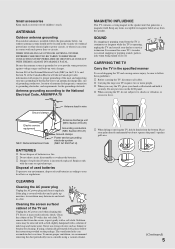
... the speaker unit that generates a magnetic field. Ground clamps Antenna lead-in wire Electric service equipment NEC: National Electrical Code Antenna discharge unit (NEC Section 810-20) Grounding conductors (NEC Section 810-21) Ground clamps Power service grounding electrode system (NEC Art 250 Part H) BATTERIES s Do not dispose of the TV with the same or equivalent type. If the plug is...
... the speaker unit that generates a magnetic field. Ground clamps Antenna lead-in wire Electric service equipment NEC: National Electrical Code Antenna discharge unit (NEC Section 810-20) Grounding conductors (NEC Section 810-21) Ground clamps Power service grounding electrode system (NEC Art 250 Part H) BATTERIES s Do not dispose of the TV with the same or equivalent type. If the plug is...
Operating Instructions
Page 10
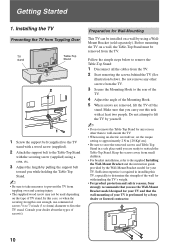
... (supplied) to the TV stand with a wood screw (supplied). 2 Attach the support belt to the Table-Top Stand with at least two people. Make sure that the wall-mounting of the wall for Wall-Mounting This TV can be installed on a wall, the Table-Top Stand must be used depending on the type of the Mounting Hook. 5 When screws are ready to the TV stand. In this TV, especially to the supplied Installing the Wall-Mount Bracket and the instruction guide provided by a Sony...
... (supplied) to the TV stand with a wood screw (supplied). 2 Attach the support belt to the Table-Top Stand with at least two people. Make sure that the wall-mounting of the wall for Wall-Mounting This TV can be installed on a wall, the Table-Top Stand must be used depending on the type of the Mounting Hook. 5 When screws are ready to the TV stand. In this TV, especially to the supplied Installing the Wall-Mount Bracket and the instruction guide provided by a Sony...
Operating Instructions
Page 13
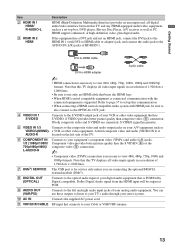
... formats. A third composite video and audio (VIDEO IN 2) is PCM/Dolby Digital compatible. Component video provides better picture quality than composite video (5) connection. qa VHF/UHF/CABLE RF input that connects to your stereo system. 0 AC IN Connects the supplied AC power cord. Refer to page 37 to set -top box, DVD player, Blu-ray Disc Player, A/V receiver as well as PC. a VCR or other video equipment that has S VIDEO. Getting Started Item 2 HDMI IN 1 HDMI/ R-AUDIO-L 3 HDMI IN 2 HDMI Description HDMI...
... formats. A third composite video and audio (VIDEO IN 2) is PCM/Dolby Digital compatible. Component video provides better picture quality than composite video (5) connection. qa VHF/UHF/CABLE RF input that connects to your stereo system. 0 AC IN Connects the supplied AC power cord. Refer to page 37 to set -top box, DVD player, Blu-ray Disc Player, A/V receiver as well as PC. a VCR or other video equipment that has S VIDEO. Getting Started Item 2 HDMI IN 1 HDMI/ R-AUDIO-L 3 HDMI IN 2 HDMI Description HDMI...

Operating Instructions
Page 18
... respective HDMI input. • Automatically turn on equipment listed under the External Inputs on attaching position. 18 Only Sony equipment with Your TV Once the supported equipment is connected, the following additional operations are available: • Turn off the equipment automatically when you turn the HDMI Control On. See page 37 on . • Automatically switching to the audio output of the A/V receiver's attached speakers. • Adjusting the volume and muting of the cable...
... respective HDMI input. • Automatically turn on equipment listed under the External Inputs on attaching position. 18 Only Sony equipment with Your TV Once the supported equipment is connected, the following additional operations are available: • Turn off the equipment automatically when you turn the HDMI Control On. See page 37 on . • Automatically switching to the audio output of the A/V receiver's attached speakers. • Adjusting the volume and muting of the cable...
Operating Instructions
Page 19
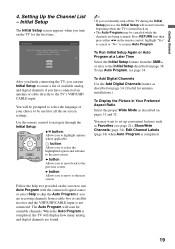
... TV for digital channels. button: Allows you to the TV's VHF/UHF/ CABLE input. B button: Allows you accidentally turn on . • The Auto Program may want to resume Auto Program. Follow the help text provided on the remote control, highlight "Yes" to cancel or "No" to set up convenient features such as default audio for the first time. Press RETURN first then press either B/b on the screen to run Auto Program with the connected signal source...
... TV for digital channels. button: Allows you to the TV's VHF/UHF/ CABLE input. B button: Allows you accidentally turn on . • The Auto Program may want to resume Auto Program. Follow the help text provided on the remote control, highlight "Yes" to cancel or "No" to set up convenient features such as default audio for the first time. Press RETURN first then press either B/b on the screen to run Auto Program with the connected signal source...

Operating Instructions
Page 25
... live television program. 25 Using the TV Features Using P&P Feature This TV comes with Skip applied will not appear in the list of External Inputs (see page 37 for Component 1/2 in P&P mode, use the B/b button to swap the highlight between the main window and sub window. • 1080p signal cannot be used. • Closed Caption (CC) of the following inputs: TV channels, Video, Component or HDMI. 2 Press V/v to highlight P&P, and press to display the...
... live television program. 25 Using the TV Features Using P&P Feature This TV comes with Skip applied will not appear in the list of External Inputs (see page 37 for Component 1/2 in P&P mode, use the B/b button to swap the highlight between the main window and sub window. • 1080p signal cannot be used. • Closed Caption (CC) of the following inputs: TV channels, Video, Component or HDMI. 2 Press V/v to highlight P&P, and press to display the...

Operating Instructions
Page 27
.../Timers (page 28) Picture (page 28) Sound (page 30) Screen (page 31) Video Options (page 32) Audio Options (page 33) Channel (page 33) CC Closed Captions (CC) (page 34) Parental Lock (page 35) External Inputs (page 37) HDMI Settings (page 37) General (page 38) Initial Setup (page 38) 4 5 6 RETURN HOME Press when desired item is highlighted. Navigating through TV Home Menu on XMB™ 1 HOME Press HOME to display...
.../Timers (page 28) Picture (page 28) Sound (page 30) Screen (page 31) Video Options (page 32) Audio Options (page 33) Channel (page 33) CC Closed Captions (CC) (page 34) Parental Lock (page 35) External Inputs (page 37) HDMI Settings (page 37) General (page 38) Initial Setup (page 38) 4 5 6 RETURN HOME Press when desired item is highlighted. Navigating through TV Home Menu on XMB™ 1 HOME Press HOME to display...
Operating Instructions
Page 28
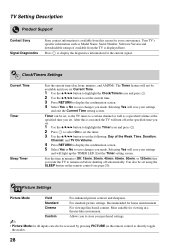
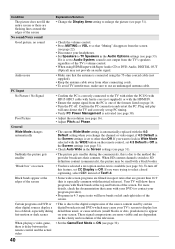
... preferred settings. ~ • Picture Mode for all inputs can be available until you set Current Time. 1 Use the V/v/B/b button to highlight the Clock/Timers icon and press . 2 Use the V/v/B/b button to set the current time. 3 Press RETURN to display the confirmation screen. 4 Select Yes or No to save your settings and will save changes you to display the diagnostics information for home entertainment. Cinema For viewing film-based content. Your TV's specific...
... preferred settings. ~ • Picture Mode for all inputs can be available until you set Current Time. 1 Use the V/v/B/b button to highlight the Clock/Timers icon and press . 2 Use the V/v/B/b button to set the current time. 3 Press RETURN to display the confirmation screen. 4 Select Yes or No to save your settings and will save changes you to display the diagnostics information for home entertainment. Cinema For viewing film-based content. Your TV's specific...
Operating Instructions
Page 31
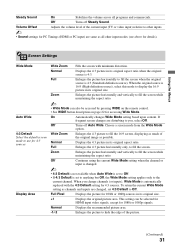
... on the remote control. • See WIDE button description on page 22 for accessing Wide Mode. Using the Menus Steady Sound On Stabilizes the volume across all other inputs. ~ • Sound settings for PC Timings (HDMI or PC input) are same as all programs and commercials. Off Turns off Auto Wide. Full Enlarges the picture horizontally to display the 16:9 picture in its original size. If frequent screen changes are changed . ~ • 4:3 Default is not...
... on the remote control. • See WIDE button description on page 22 for accessing Wide Mode. Using the Menus Steady Sound On Stabilizes the volume across all other inputs. ~ • Sound settings for PC Timings (HDMI or PC input) are same as all programs and commercials. Off Turns off Auto Wide. Full Enlarges the picture horizontally to display the 16:9 picture in its original size. If frequent screen changes are changed . ~ • 4:3 Default is not...
Operating Instructions
Page 33
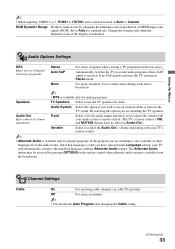
... HDMI input color signals (RGB). Using the Menus ~ • When inputting VIDEO 1 to the matching language with the Alternate Audio feature. By selecting this option if you to adjust the volume with your TV will automatically switch to 3, ITU601 or ITU709 can be accessed by changing the luminance tone reproduction of volume adjustment Fixed Select to fix the audio output and allow you wish to Auto for standard use an external audio system for digital programs...
... HDMI input color signals (RGB). Using the Menus ~ • When inputting VIDEO 1 to the matching language with the Alternate Audio feature. By selecting this option if you to adjust the volume with your TV will automatically switch to 3, ITU601 or ITU709 can be accessed by changing the luminance tone reproduction of volume adjustment Fixed Select to fix the audio output and allow you wish to Auto for standard use an external audio system for digital programs...
Operating Instructions
Page 34
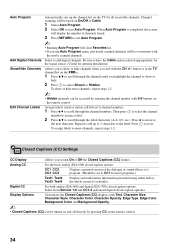
button or in the TV channel list on the XMB™. 1 Press V/v to scroll through the channel numbers. Repeat to add up the channel list on the remote control. 34 Analog CC For the basic analog (EIA-608) closed caption options). Select from Service 1-6 and CC1-4 (advanced digital closed caption options. Press b to move to scroll through the label characters (A-Z, 0-9, etc.). Press to set to CC1 for antenna installation) Allows you to...
button or in the TV channel list on the XMB™. 1 Press V/v to scroll through the channel numbers. Repeat to add up the channel list on the remote control. 34 Analog CC For the basic analog (EIA-608) closed caption options). Select from Service 1-6 and CC1-4 (advanced digital closed caption options. Press b to move to scroll through the label characters (A-Z, 0-9, etc.). Press to set to CC1 for antenna installation) Allows you to...
Operating Instructions
Page 35
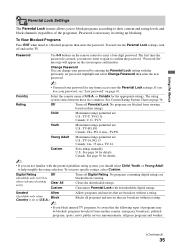
... you lose your password for the appropriate ratings. To set when to confirm the password. Customizes Parental Lock with the parental guideline rating system, you are blocked from viewing based on the remote control to a blocked program, then enter the password. Blocks all programs and movies that are blocked from viewing. Password Use 0-9 buttons on their content and rating levels and block channels (regardless of the programs). Country Select...
... you lose your password for the appropriate ratings. To set when to confirm the password. Customizes Parental Lock with the parental guideline rating system, you are blocked from viewing based on the remote control to a blocked program, then enter the password. Blocks all programs and movies that are blocked from viewing. Password Use 0-9 buttons on their content and rating levels and block channels (regardless of the programs). Country Select...
Operating Instructions
Page 38
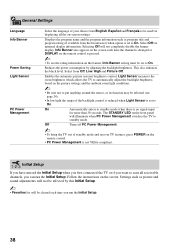
.... Settings such as picture and sound adjustments will be used for displaying all receivable channels, you run the Initial Setup. Selecting Off will illuminate when PC Power Management switches the TV to standby mode. Select from English, Español and Français to automatically adjust the backlight brightness based on -screen settings. Light Sensor measures the room brightness which allows the TV to be cleared each time the channel is changed or DISPLAY...
.... Settings such as picture and sound adjustments will be used for displaying all receivable channels, you run the Initial Setup. Selecting Off will illuminate when PC Power Management switches the TV to standby mode. Select from English, Español and Français to automatically adjust the backlight brightness based on -screen settings. Light Sensor measures the room brightness which allows the TV to be cleared each time the channel is changed or DISPLAY...

Operating Instructions
Page 39
...). No picture from some video sources • Check the connection between the optional video equipment and the TV. • Press INPUT on the remote control (see page 38). See Quick Setup Guide (supplied) to display the best possible picture for your desired input from other connecting cords. • To avoid TV interference, make sure that signal. TV is set to On (see page 33). Cannot receive or select channels • Perform Auto Program to add receivable channels that are...
...). No picture from some video sources • Check the connection between the optional video equipment and the TV. • Press INPUT on the remote control (see page 38). See Quick Setup Guide (supplied) to display the best possible picture for your desired input from other connecting cords. • To avoid TV interference, make sure that signal. TV is set to On (see page 33). Cannot receive or select channels • Perform Auto Program to add receivable channels that are...
Operating Instructions
Page 40
... the screen. When playing a video game, there is set to Off. Black bands appear at the top and bottom of detail, especially during the commercials, this feature, set up PC timing. • Verify PC Power Management is connected using the 75-ohm coaxial cable (not supplied). • Keep the antenna cable away from the TV's speakers regardless of the TV's volume control. • When using HDMI input with the HDMI IN. • Ensure the output signal...
... the screen. When playing a video game, there is set to Off. Black bands appear at the top and bottom of detail, especially during the commercials, this feature, set up PC timing. • Verify PC Power Management is connected using the 75-ohm coaxial cable (not supplied). • Keep the antenna cable away from the TV's speakers regardless of the TV's volume control. • When using HDMI input with the HDMI IN. • Ensure the output signal...
Operating Instructions
Page 44
... 32 Setting up channels 19 Settings Audio Options 33 Channel 33 Clock/Timers 28 Closed Captions (CC) 34 External Inputs 37 General 38 HDMI Settings 37 Initial Setup 38 Parental Lock 35 Picture 28 Product Support 28 Screen 31 Sound 30 Video Options 32 Sharpness 29 Show/Hide Channels 34 Signal Diagnostics 28 SLEEP button 20 Sleep Timer 28 Sound Booster 30 Sound Mode 30 Speaker 24 Speakers 33 STANDBY LED 24 Steady Sound 31 Surround 30 T THEATER button 20 Timer 28 Treble 30 Troubleshooting 39-41 TV Auto Power...
... 32 Setting up channels 19 Settings Audio Options 33 Channel 33 Clock/Timers 28 Closed Captions (CC) 34 External Inputs 37 General 38 HDMI Settings 37 Initial Setup 38 Parental Lock 35 Picture 28 Product Support 28 Screen 31 Sound 30 Video Options 32 Sharpness 29 Show/Hide Channels 34 Signal Diagnostics 28 SLEEP button 20 Sleep Timer 28 Sound Booster 30 Sound Mode 30 Speaker 24 Speakers 33 STANDBY LED 24 Steady Sound 31 Surround 30 T THEATER button 20 Timer 28 Treble 30 Troubleshooting 39-41 TV Auto Power...
Service Manual
Page 5
... approximations. Supplied Accessories Remote Commander RM-YD014 Two Size AA (R6) Batteries 75-ohm coaxial cable AC Power Cord HD15-HD15 Cable Suport Belt (Lock Assy, Rudder) Securing Screw, and Wood Screw (See Bag Assy, Rudder Lock in the Accessories and Packing section of the Electrical Parts List in this manual.) Cable Holder (1 attached to the TV) Operating Instructions Quick Setup Guide Warranty Card Optional Accessories Headphones Plug Adaptor Connecting Cables Wall-Mount Bracket SU-WL500 TV-Stand RHT-G800...
... approximations. Supplied Accessories Remote Commander RM-YD014 Two Size AA (R6) Batteries 75-ohm coaxial cable AC Power Cord HD15-HD15 Cable Suport Belt (Lock Assy, Rudder) Securing Screw, and Wood Screw (See Bag Assy, Rudder Lock in the Accessories and Packing section of the Electrical Parts List in this manual.) Cable Holder (1 attached to the TV) Operating Instructions Quick Setup Guide Warranty Card Optional Accessories Headphones Plug Adaptor Connecting Cables Wall-Mount Bracket SU-WL500 TV-Stand RHT-G800...
Service Manual
Page 78
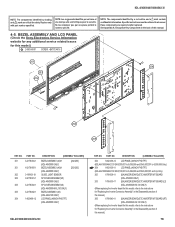
... ! BEZEL ASSEMBLY AND LCD PANEL (Check the Sony Electronics Service Information website for any additional service related issues for safety. PART NO. 201 X-2178-004-1 201 X-2178-005-1 202 3-198-631-01 203 X-2178-581-1 203 X-2178-582-1 203 X-2178-802-1 204 1-802-488-12 DESCRIPTION [ASSEMBLY INCLUDES] BEZEL ASSEMBLY (40)H (KDL-40V3000 ONLY) BEZEL ASSEMBLY (46)H (KDL-46V3000 ONLY) GUIDE, LIGHT SENSOR SP COVER ASSEMBLY(40) (KDL-40V3000 ONLY...
... ! BEZEL ASSEMBLY AND LCD PANEL (Check the Sony Electronics Service Information website for any additional service related issues for safety. PART NO. 201 X-2178-004-1 201 X-2178-005-1 202 3-198-631-01 203 X-2178-581-1 203 X-2178-582-1 203 X-2178-802-1 204 1-802-488-12 DESCRIPTION [ASSEMBLY INCLUDES] BEZEL ASSEMBLY (40)H (KDL-40V3000 ONLY) BEZEL ASSEMBLY (46)H (KDL-46V3000 ONLY) GUIDE, LIGHT SENSOR SP COVER ASSEMBLY(40) (KDL-40V3000 ONLY...


