Operating Instructions
Page 3
...)/ Video via USB 31 Using the Menus Navigating through TV Menus 33 Using the Picture Settings 35 Using the Sound Settings 37 Using the Screen Settings 39 Using the Channel Settings 41 Using the Parental Lock Settings 42 Using the Setup Settings 45 Using the Eco Settings 49 Other Information PC Input Signal Reference Chart for PC and HDMI IN 50 Using a Wall-Mount Bracket 51 Installing the Wall-Mount Bracket 52 Troubleshooting 57 Important Notices 62 Specifications 63 Index 65 Customer Support United States http://www.sony.com...
...)/ Video via USB 31 Using the Menus Navigating through TV Menus 33 Using the Picture Settings 35 Using the Sound Settings 37 Using the Screen Settings 39 Using the Channel Settings 41 Using the Parental Lock Settings 42 Using the Setup Settings 45 Using the Eco Settings 49 Other Information PC Input Signal Reference Chart for PC and HDMI IN 50 Using a Wall-Mount Bracket 51 Installing the Wall-Mount Bracket 52 Troubleshooting 57 Important Notices 62 Specifications 63 Index 65 Customer Support United States http://www.sony.com...
Operating Instructions
Page 4
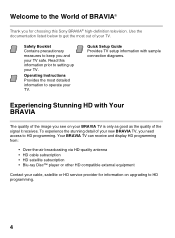
...-ray Disc™ player or other HD compatible external equipment Contact your cable, satellite or HD service provider for choosing this information prior to operate your TV. Use the documentation listed below to HD programming. 4 ® Introducing Your New BRAVIA Welcome to the World of BRAVIA® Thank you see on upgrading to get the most detailed information to setting up your TV.
...-ray Disc™ player or other HD compatible external equipment Contact your cable, satellite or HD service provider for choosing this information prior to operate your TV. Use the documentation listed below to HD programming. 4 ® Introducing Your New BRAVIA Welcome to the World of BRAVIA® Thank you see on upgrading to get the most detailed information to setting up your TV.
Operating Instructions
Page 5
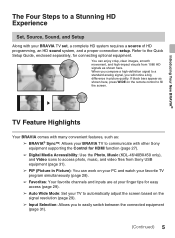
... signal to fill the screen. Refer to the Quick Setup Guide, enclosed separately, for easy access (page 29). ➢ Auto Wide Mode: Set your TV to automatically adjust the screen based on your PC and watch your favorite TV program simultaneously (page 28). ➢ Favorites: Your favorite channels and inputs are at your BRAVIA TV set, a complete HD system requires a source of HD programming, an HD sound system, and a proper connection setup...
... signal to fill the screen. Refer to the Quick Setup Guide, enclosed separately, for easy access (page 29). ➢ Auto Wide Mode: Set your TV to automatically adjust the screen based on your PC and watch your favorite TV program simultaneously (page 28). ➢ Favorites: Your favorite channels and inputs are at your BRAVIA TV set, a complete HD system requires a source of HD programming, an HD sound system, and a proper connection setup...
Operating Instructions
Page 10
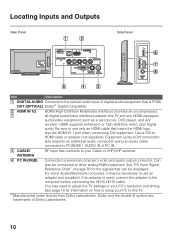
... TV and any HDMI-equipped audio/video equipment, such as a set-top box, DVD player, and A/V receiver. Be sure to use an adapter (not supplied). Equipment using a DVI connection also requires an additional audio connection using an audio cable connected to PC/HDMI 1 AUDIO IN of PC IN. 3 CABLE/ ANTENNA RF input that connects to your PC's resolution and timing. If an adapter is PCM/ OUT (OPTICAL) Dolby*1 Digital compatible. 2 HDMI IN 1/2 7 HDMI (High-Definition Multimedia Interface) provides an uncompressed, all-digital audio/video interface between...
... TV and any HDMI-equipped audio/video equipment, such as a set-top box, DVD player, and A/V receiver. Be sure to use an adapter (not supplied). Equipment using a DVI connection also requires an additional audio connection using an audio cable connected to PC/HDMI 1 AUDIO IN of PC IN. 3 CABLE/ ANTENNA RF input that connects to your PC's resolution and timing. If an adapter is PCM/ OUT (OPTICAL) Dolby*1 Digital compatible. 2 HDMI IN 1/2 7 HDMI (High-Definition Multimedia Interface) provides an uncompressed, all-digital audio/video interface between...

Operating Instructions
Page 11
... video and use these outputs to listen to your TV's audio through your analog audio equipment. This TV can use audio L (mono) and R for audio signal. Connects to USB equipment to Auto. Getting Started 11 Item 5 VIDEO IN 1/ COMPONENT IN/R-AUDIO-L (MONO) 6 USB 8 AUDIO OUT Description This input port can be used as a composite video input (VIDEO 1) or as a component video input (COMPONENT). To set to access photo, music, and video files. Connects to auto detection, press HOME, select Settings, and then select the Setup settings...
... video and use these outputs to listen to your TV's audio through your analog audio equipment. This TV can use audio L (mono) and R for audio signal. Connects to USB equipment to Auto. Getting Started 11 Item 5 VIDEO IN 1/ COMPONENT IN/R-AUDIO-L (MONO) 6 USB 8 AUDIO OUT Description This input port can be used as a composite video input (VIDEO 1) or as a component video input (COMPONENT). To set to access photo, music, and video files. Connects to auto detection, press HOME, select Settings, and then select the Setup settings...
Operating Instructions
Page 25
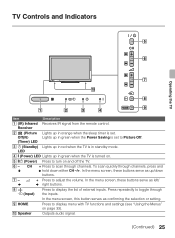
... the TV is in standby mode. LED 4 " (Power) LED Lights up /down either CH -/+. In the menu screen, these buttons serve as left/ right buttons. 8 t (Input) Press to turn on page 33). 0 Speaker Outputs audio signal. (Continued) 25 Press repeatedly to scan through channels. Off)/ Lights up in green when the Power Saving is set to Picture Off. (Timer) LED 3 1 (Standby) Lights up in red when the TV is turned on. 5 "/1 (Power) Press to display the list of external inputs. CH + Press to toggle...
... the TV is in standby mode. LED 4 " (Power) LED Lights up /down either CH -/+. In the menu screen, these buttons serve as left/ right buttons. 8 t (Input) Press to turn on page 33). 0 Speaker Outputs audio signal. (Continued) 25 Press repeatedly to scan through channels. Off)/ Lights up in green when the Power Saving is set to Picture Off. (Timer) LED 3 1 (Standby) Lights up in red when the TV is turned on. 5 "/1 (Power) Press to display the list of external inputs. CH + Press to toggle...
Operating Instructions
Page 27
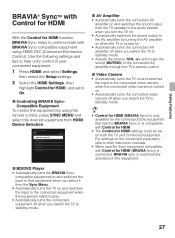
... Menu HDMI Device Selection Device Control Speakers TV Control Return to help unify control of the connected AV amplifier through the TV's remote control. Use the following settings and tips to TV HDMI 1 x AV Amplifier • Automatically turns the connected AV amplifier on and switches the sound output from HDMI Device Selection. x Controlling BRAVIA SyncCompatible Equipment To control the equipment by using HDMI CEC (Consumer Electronics Control). Using Features Using Features BRAVIA® SyncTM with BRAVIA Sync-compatible equipment using the remote control...
... Menu HDMI Device Selection Device Control Speakers TV Control Return to help unify control of the connected AV amplifier through the TV's remote control. Use the following settings and tips to TV HDMI 1 x AV Amplifier • Automatically turns the connected AV amplifier on and switches the sound output from HDMI Device Selection. x Controlling BRAVIA SyncCompatible Equipment To control the equipment by using HDMI CEC (Consumer Electronics Control). Using Features Using Features BRAVIA® SyncTM with BRAVIA Sync-compatible equipment using the remote control...

Operating Instructions
Page 28
... channel number using the 0-9 numeric buttons. Using PIP Feature PIP (picture in picture) displays a picture from a connected PC in full screen, and a TV program or other external input (see below "To Enter PIP" table) in an inset window. (Closed Captions (CC) is not available with PIP mode.) Main Window (PC) To Enter PIP Sub Window (Location of the sub window by pressing V/v/B/b.) PIP Supported Inputs In main window In sub window PC TV channel (CABLE/ ANTENNA), VIDEO IN 1, HDMI IN 1/2 (video timing) HDMI IN (PC timing...
... channel number using the 0-9 numeric buttons. Using PIP Feature PIP (picture in picture) displays a picture from a connected PC in full screen, and a TV program or other external input (see below "To Enter PIP" table) in an inset window. (Closed Captions (CC) is not available with PIP mode.) Main Window (PC) To Enter PIP Sub Window (Location of the sub window by pressing V/v/B/b.) PIP Supported Inputs In main window In sub window PC TV channel (CABLE/ ANTENNA), VIDEO IN 1, HDMI IN 1/2 (video timing) HDMI IN (PC timing...
Operating Instructions
Page 31
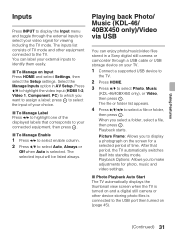
.... Using Features Inputs Press INPUT to display the Input menu and toggle through a USB cable or USB storage device on your TV. 1 Connect a supported USB device to the TV. 2 Press HOME. 3 Press V/v to select your video signal for viewing including the TV mode. Playing back Photo/ Music (KDL-46/ 40BX450 only)/Video via USB You can label your external inputs to the USB port then turned on Input Press HOME and select Settings, then select the Setup settings. Playback...
.... Using Features Inputs Press INPUT to display the Input menu and toggle through a USB cable or USB storage device on your TV. 1 Connect a supported USB device to the TV. 2 Press HOME. 3 Press V/v to select your video signal for viewing including the TV mode. Playing back Photo/ Music (KDL-46/ 40BX450 only)/Video via USB You can label your external inputs to the USB port then turned on Input Press HOME and select Settings, then select the Setup settings. Playback...
Operating Instructions
Page 32
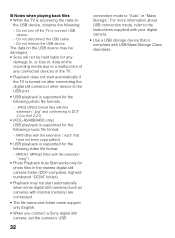
... support only English. • When you connect a Sony digital still camera, set the camera's USB 32 connection mode to the instructions supplied with your digital camera. • Use a USB storage device that have not been copyrighted) • USB playback is supported for the following photo file formats: - MPEG1, MPEG2 (files with the extension ".mpg") • Photo Playback Auto Start works only for the following music file format: - x Notes when playing...
... support only English. • When you connect a Sony digital still camera, set the camera's USB 32 connection mode to the instructions supplied with your digital camera. • Use a USB storage device that have not been copyrighted) • USB playback is supported for the following photo file formats: - MPEG1, MPEG2 (files with the extension ".mpg") • Photo Playback Auto Start works only for the following music file format: - x Notes when playing...
Operating Instructions
Page 34
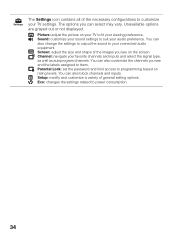
... your sound settings to power consumption. 34 Channel: navigate your TV to programming based on rating levels. You can also customize the channels you see on the screen. You can also block channels and inputs. Eco: changes the settings related to suit your connected audio equipment. Screen: adjust the size and shape of the necessary configurations to your audio preference. You can select may vary. Parental Lock: set the password and limit access...
... your sound settings to power consumption. 34 Channel: navigate your TV to programming based on rating levels. You can also customize the channels you see on the screen. You can also block channels and inputs. Eco: changes the settings related to suit your connected audio equipment. Screen: adjust the size and shape of the necessary configurations to your audio preference. You can select may vary. Parental Lock: set the password and limit access...

Operating Instructions
Page 38
...signal is received. Fixed Adjusts the volume using the connected audio system's remote control. PC Audio Sets the PC/HDMI audio input as the audio signal source. Source Auto HDMI 1 input only Automatically sets the audio signal source based on the remote control. 38 Use to may be broadcasted in a different only language in Stereo mode. Audio System Select to use an external audio system for the TV sound. Mono Select for HDMI/DVI input. Audio Out Variable Adjusts the volume with alternate audio streams. • You can also access Sound Mode, MTS Audio...
...signal is received. Fixed Adjusts the volume using the connected audio system's remote control. PC Audio Sets the PC/HDMI audio input as the audio signal source. Source Auto HDMI 1 input only Automatically sets the audio signal source based on the remote control. 38 Use to may be broadcasted in a different only language in Stereo mode. Audio System Select to use an external audio system for the TV sound. Mono Select for HDMI/DVI input. Audio Out Variable Adjusts the volume with alternate audio streams. • You can also access Sound Mode, MTS Audio...

Operating Instructions
Page 46
... Initial Setup when you first connect the TV or if you want to display all receivable channels, select Initial Setup. Language Select to scan all on-screen settings in minutes (Off, 15, 30, 45, 60, 90, or 120) that no labels are viewing the TV. Some settings such as Picture, Sound, and Parental Lock will appear if it . Video1/ Component Selection Select Auto to display detailed channel and program information...
... Initial Setup when you first connect the TV or if you want to display all receivable channels, select Initial Setup. Language Select to scan all on-screen settings in minutes (Off, 15, 30, 45, 60, 90, or 120) that no labels are viewing the TV. Some settings such as Picture, Sound, and Parental Lock will appear if it . Video1/ Component Selection Select Auto to display detailed channel and program information...

Operating Instructions
Page 47
... remote control. Select Off to items grayed out. Device List Displays a list of your connected equipment with your connected On equipment with Control for HDMI function. Useful when you control a tuner or set to the Home (Menu), Options and Content List of equipment with Control for HDMI function connected to have your connected equipment with the Control for HDMI function. The Device Control option provides access to On. For specific Sony equipment compatible with Control for HDMI, this setting...
... remote control. Select Off to items grayed out. Device List Displays a list of your connected equipment with your connected On equipment with Control for HDMI function. Useful when you control a tuner or set to the Home (Menu), Options and Content List of equipment with Control for HDMI function connected to have your connected equipment with the Control for HDMI function. The Device Control option provides access to On. For specific Sony equipment compatible with Control for HDMI, this setting...
Operating Instructions
Page 51
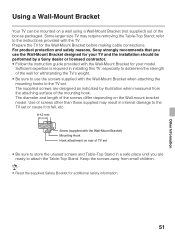
... box as indicated by a Sony dealer or licensed contractor. • Follow the instruction guide provided with the Wall-Mount Bracket for withstanding the TV's weight. • Be sure to use the screws supplied with the Wall-Mount Bracket) Mounting Hook Hook attachment on rear of the wall for your TV and the installation should be mounted on the Wall-mount bracket model. refer to attach the Table-Top Stand. Use of screws other than those supplied may require removing the Table-Top Stand...
... box as indicated by a Sony dealer or licensed contractor. • Follow the instruction guide provided with the Wall-Mount Bracket for withstanding the TV's weight. • Be sure to use the screws supplied with the Wall-Mount Bracket) Mounting Hook Hook attachment on rear of the wall for your TV and the installation should be mounted on the Wall-mount bracket model. refer to attach the Table-Top Stand. Use of screws other than those supplied may require removing the Table-Top Stand...
Operating Instructions
Page 57
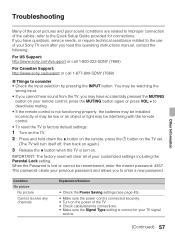
... button on the power of your TV signal source. (Continued) 57 When the Password is lost or cannot be interfering with the remote control. • To reset the TV to enter a new password. Troubleshooting Other Information Many of the poor pictures and poor sound conditions are related to improper connection of your Sony TV even after you read this operating instructions manual, contact the following: For US Support...
... button on the power of your TV signal source. (Continued) 57 When the Password is lost or cannot be interfering with the remote control. • To reset the TV to enter a new password. Troubleshooting Other Information Many of the poor pictures and poor sound conditions are related to improper connection of your Sony TV even after you read this operating instructions manual, contact the following: For US Support...

Operating Instructions
Page 58
... channels and content are controlled by the quality of its serviceable life. (3-5 years in the Channel settings is connected using 75-ohm coaxial cable instead. Noisy picture • Make sure that Signal Type in normal use an undamaged antenna cable. Blurry picture / Poor color • Transporting the TV from some video sources • Check the connection between channel and program. Turn off automatically • Check if Sleep Timer is affected by the signal provider. No picture...
... channels and content are controlled by the quality of its serviceable life. (3-5 years in the Channel settings is connected using 75-ohm coaxial cable instead. Noisy picture • Make sure that Signal Type in normal use an undamaged antenna cable. Blurry picture / Poor color • Transporting the TV from some video sources • Check the connection between channel and program. Turn off automatically • Check if Sleep Timer is affected by the signal provider. No picture...

Operating Instructions
Page 59
.../Component Selection (see page 50). • Adjust Pitch and Phase. Plug-and-play will auto-detect the TV and correctly set to the current input type in use an undamaged antenna cable. • Set Speakers to Audio System in the Sound settings (see page 38). • Set Audio Out to Fixed in standby or hibernation mode. • Adjust the resolution (see page 46) is connected using HDMI input with Super Audio CD or DVD-Audio, DIGITAL AUDIO OUT (OPTICAL) may not provide an audio signal...
.../Component Selection (see page 50). • Adjust Pitch and Phase. Plug-and-play will auto-detect the TV and correctly set to the current input type in use an undamaged antenna cable. • Set Speakers to Audio System in the Sound settings (see page 38). • Set Audio Out to Fixed in standby or hibernation mode. • Adjust the resolution (see page 46) is connected using HDMI input with Super Audio CD or DVD-Audio, DIGITAL AUDIO OUT (OPTICAL) may not provide an audio signal...

Operating Instructions
Page 61
... is connected to the TV via USB cable, it may cause your TV's screen to display less detail than usual, or cause artifacts (small blocks or dots, pixelations) to appear on the clarity and resolution of digital cable channels. This password clears your customized settings including the Parental Lock setting. Remote control does not operate • To determine if the problem is with your screen. Some photo, music, or video...
... is connected to the TV via USB cable, it may cause your TV's screen to display less detail than usual, or cause artifacts (small blocks or dots, pixelations) to appear on the clarity and resolution of digital cable channels. This password clears your customized settings including the Parental Lock setting. Remote control does not operate • To determine if the problem is with your screen. Some photo, music, or video...

Operating Instructions
Page 65
... Settings Channel 41 Eco 49 Parental Lock 42 Picture 35 Screen 39 Setup 45 Sound 37 Sharpness 35 Show/Hide Channels 41 Signal Type 41 Sleep Timer 46 Sound Mode 37 Speaker 25 Speakers 38 Standby (1) LED 25 Startup Logo 46 Steady Sound 37 Surround 37 SYNC MENU button 22 T Timer ( ) LED 25 Troubleshooting 57-61 TV Rating 43 U U.S.A. Rating 44 Unrated 42 USB 11 USB Auto Start 45 V Vertical Center 40 Video 31 VIDEO IN 11 Viewing Blocked Programs 44 VOL (2) +/- button...
... Settings Channel 41 Eco 49 Parental Lock 42 Picture 35 Screen 39 Setup 45 Sound 37 Sharpness 35 Show/Hide Channels 41 Signal Type 41 Sleep Timer 46 Sound Mode 37 Speaker 25 Speakers 38 Standby (1) LED 25 Startup Logo 46 Steady Sound 37 Surround 37 SYNC MENU button 22 T Timer ( ) LED 25 Troubleshooting 57-61 TV Rating 43 U U.S.A. Rating 44 Unrated 42 USB 11 USB Auto Start 45 V Vertical Center 40 Video 31 VIDEO IN 11 Viewing Blocked Programs 44 VOL (2) +/- button...


