Operating Instructions
Page 2
... below. Color" are located at the rear of the TV. Disposal of these numbers in United States and/or other countries. KDL-40Z4100 KDL-46Z4100 Sony Wall-Mount Bracket Model No. Adobe is manufactured under license from Gemstar-TV Guide International, Inc. Record these materials may cause instability and possibly result in connection with part 15 of the FCC rules. CAUTION Use the following WALL-MOUNT BRACKET or TV-stand. Gemstar-TV Guide International Inc...
... below. Color" are located at the rear of the TV. Disposal of these numbers in United States and/or other countries. KDL-40Z4100 KDL-46Z4100 Sony Wall-Mount Bracket Model No. Adobe is manufactured under license from Gemstar-TV Guide International, Inc. Record these materials may cause instability and possibly result in connection with part 15 of the FCC rules. CAUTION Use the following WALL-MOUNT BRACKET or TV-stand. Gemstar-TV Guide International Inc...
Operating Instructions
Page 3
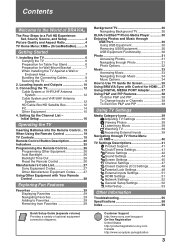
... with Control for Wall-Mount Bracket 7 When Installing the TV Against a Wall or Enclosed Area 7 Bundling the Connecting Cables 8 Securing the TV 9 2. Installing the TV 6 Carrying the TV 6 Preparation for Table-Top Stand 6 Preparation for HDMI ....37 Using DIGITAL MEDIA PORT Adapter 37 Using P&P and PIP Features 38 To Enter P&P and PIP 38 To Change Inputs or Channels 38 To Exit from P&P and PIP 38 Using TV Settings Media Category Icons 39 Adjusting TV Settings 39 Viewing Photos 39 Listening to a Full HD Experience: Set, Sound, Source, and Setup 4 Picture Quality...
... with Control for Wall-Mount Bracket 7 When Installing the TV Against a Wall or Enclosed Area 7 Bundling the Connecting Cables 8 Securing the TV 9 2. Installing the TV 6 Carrying the TV 6 Preparation for Table-Top Stand 6 Preparation for HDMI ....37 Using DIGITAL MEDIA PORT Adapter 37 Using P&P and PIP Features 38 To Enter P&P and PIP 38 To Change Inputs or Channels 38 To Exit from P&P and PIP 38 Using TV Settings Media Category Icons 39 Adjusting TV Settings 39 Viewing Photos 39 Listening to a Full HD Experience: Set, Sound, Source, and Setup 4 Picture Quality...
Operating Instructions
Page 5
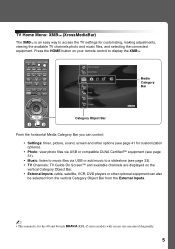
... to music files via USB or add music to a slideshow (see page 33). • TV Channels: TV Guide On Screen™ and available channels are displayed on your remote control to access the TV settings for customizing, making adjustments, viewing the available TV channels photo and music files, and selecting the connected equipment. TV Home Menu: XMB™ (XrossMediaBar) The XMB™ is for the 40 and 46 inch BRAVIA KDL-Z series models with screen size measured diagonally. 5
... to music files via USB or add music to a slideshow (see page 33). • TV Channels: TV Guide On Screen™ and available channels are displayed on your remote control to access the TV settings for customizing, making adjustments, viewing the available TV channels photo and music files, and selecting the connected equipment. TV Home Menu: XMB™ (XrossMediaBar) The XMB™ is for the 40 and 46 inch BRAVIA KDL-Z series models with screen size measured diagonally. 5
Operating Instructions
Page 6
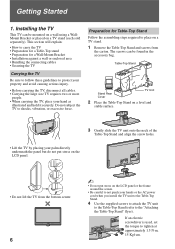
... a Table-Top stand • Preparation for Table-Top Stand Follow the assembling steps required to place on the LCD panel or the frame around the screen. • Be careful to the "Attaching the Table-Top Stand" flyer). Installing the TV This TV can be mounted on a wall using a WallMount Bracket or placed on a TV stand (each sold separately). The screws can be found in the accessory bag. Table-Top Stand Stand Rear Cover TV Unit...
... a Table-Top stand • Preparation for Table-Top Stand Follow the assembling steps required to place on the LCD panel or the frame around the screen. • Be careful to the "Attaching the Table-Top Stand" flyer). Installing the TV This TV can be mounted on a wall using a WallMount Bracket or placed on a TV stand (each sold separately). The screws can be found in the accessory bag. Table-Top Stand Stand Rear Cover TV Unit...
Operating Instructions
Page 7
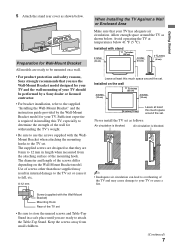
... surface of the TV set . Preparation for Wall-Mount Bracket All models are designed so that your TV should be mounted on the Wall-Mount Bracket model. Sufficient expertise is required in installing this TV, especially to the TV set as follows: Air circulation is blocked. Avoid operating the TV at least this much space around the set . Screw (supplied with stand 11 7/8 inches (30 cm) 4 inches (10 cm) 4 inches (10 cm) 2 3/8 inches (6 cm) Leave at...
... surface of the TV set . Preparation for Wall-Mount Bracket All models are designed so that your TV should be mounted on the Wall-Mount Bracket model. Sufficient expertise is required in installing this TV, especially to the TV set as follows: Air circulation is blocked. Avoid operating the TV at least this much space around the set . Screw (supplied with stand 11 7/8 inches (30 cm) 4 inches (10 cm) 4 inches (10 cm) 2 3/8 inches (6 cm) Leave at...
Operating Instructions
Page 9
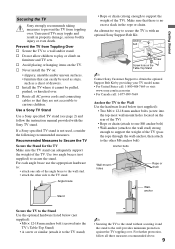
... to prevent the TV from Toppling Over s Secure the TV to secure the stand. Use a Sony TV Stand Use a Sony specified TV stand (see page 2) and follow all AC power cords and connecting cables so that there is not used as steps, such as a chest of the TV). Anchor bolt Screw Screw hole on the Table-Top Stand ~ Contact Sony Customer Support to obtain the optional Support Belt Kit by providing your TV model name. • For...
... to prevent the TV from Toppling Over s Secure the TV to secure the stand. Use a Sony TV Stand Use a Sony specified TV stand (see page 2) and follow all AC power cords and connecting cables so that there is not used as steps, such as a chest of the TV). Anchor bolt Screw Screw hole on the Table-Top Stand ~ Contact Sony Customer Support to obtain the optional Support Belt Kit by providing your TV model name. • For...
Operating Instructions
Page 11
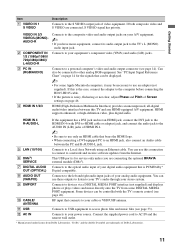
.... Connects to your power source. This USB port is for the signals that is noisy, flickering or not clear, adjust Phase and Pitch of Screen settings on your A/V equipment. ~ • If you are connecting the optional BRAVIA external module (DMex). 7 DIGITAL AUDIO Connects to the optical audio input of HDMI IN 4. ~ • Be sure to use only an HDMI cable that connects to your analog audio equipment. Some devices can be displayed. ~ • For some DIGITAL MEDIA PORT equipment. HDMI supports...
.... Connects to your power source. This USB port is for the signals that is noisy, flickering or not clear, adjust Phase and Pitch of Screen settings on your A/V equipment. ~ • If you are connecting the optional BRAVIA external module (DMex). 7 DIGITAL AUDIO Connects to the optical audio input of HDMI IN 4. ~ • Be sure to use only an HDMI cable that connects to your analog audio equipment. Some devices can be displayed. ~ • For some DIGITAL MEDIA PORT equipment. HDMI supports...
Operating Instructions
Page 14
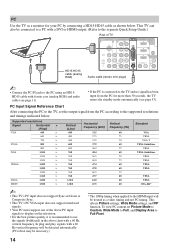
... or HDMI output. (Refer to the separate Quick Setup Guide.) Rear of the above PC input signals to display on the television. • For the best picture quality, it is connected to the TV and no signal has been input from the PC according to use the signals (boldfaced) in the above chart with ferrite core (analog RGB) and audio cable (see page 53). This affects Picture settings, Wide Mode settings, and PIP function. Supported resolutions Signal VGA Horizontal...
... or HDMI output. (Refer to the separate Quick Setup Guide.) Rear of the above PC input signals to display on the television. • For the best picture quality, it is connected to the TV and no signal has been input from the PC according to use the signals (boldfaced) in the above chart with ferrite core (analog RGB) and audio cable (see page 53). This affects Picture settings, Wide Mode settings, and PIP function. Supported resolutions Signal VGA Horizontal...
Operating Instructions
Page 16
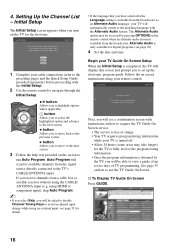
... your remote control. Follow the on screen instructions using HDMI or component input), skip Auto Program. ~ • If you select Skip, you will be accessed by the TV, you to view a guide of TV programming. Setting Up the Channel List - using your TV Guide On Screen Setup When the Initial Setup is available from the broadcaster as default audio for available channels from a cable box or satellite receiver without using an external input; This TV features an electronic program guide. See page 35 on the screen to the TV's CABLE/ANTENNA input...
... your remote control. Follow the on screen instructions using HDMI or component input), skip Auto Program. ~ • If you select Skip, you will be accessed by the TV, you to view a guide of TV programming. Setting Up the Channel List - using your TV Guide On Screen Setup When the Initial Setup is available from the broadcaster as default audio for available channels from a cable box or satellite receiver without using an external input; This TV features an electronic program guide. See page 35 on the screen to the TV's CABLE/ANTENNA input...

Operating Instructions
Page 23
... PIP Exit P&P or Exit PIP Speakers Audio Swap Screen Add to Favorites/ Remove from Favorites MTS Alternate Audio Digital Rating Background TV Motion Enhancer Device Control Device Control (Menu) for Closed Captions (CC): On, Off, and On with Muting. wh V/v/B/b Press V/v/B/b to move the small window showing current program to a different location on the screen. ~ • With the Freeze feature active, some features are available in the Picture settings. DISPLAY LIGHT POWER TV POWER DVD...
... PIP Exit P&P or Exit PIP Speakers Audio Swap Screen Add to Favorites/ Remove from Favorites MTS Alternate Audio Digital Rating Background TV Motion Enhancer Device Control Device Control (Menu) for Closed Captions (CC): On, Off, and On with Muting. wh V/v/B/b Press V/v/B/b to move the small window showing current program to a different location on the screen. ~ • With the Freeze feature active, some features are available in the Picture settings. DISPLAY LIGHT POWER TV POWER DVD...
Operating Instructions
Page 25
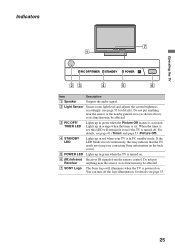
... Receives IR signals from the remote control. Do not put anything near the sensor or the nearby general area (as shown above), as its function may be affected. 3 PIC OFF/ TIMER LED Lights up in green when the Picture Off feature is set , this may indicate that the TV needs servicing (see page 53. 25 Operating the TV Indicators 7 1 PIC OFF/TIMER STANDBY POWER 23 4 5 6 Item Description 1 Speaker Outputs the audio signal. 2 Light Sensor Senses...
... Receives IR signals from the remote control. Do not put anything near the sensor or the nearby general area (as shown above), as its function may be affected. 3 PIC OFF/ TIMER LED Lights up in green when the Picture Off feature is set , this may indicate that the TV needs servicing (see page 53. 25 Operating the TV Indicators 7 1 PIC OFF/TIMER STANDBY POWER 23 4 5 6 Item Description 1 Speaker Outputs the audio signal. 2 Light Sensor Senses...
Operating Instructions
Page 37
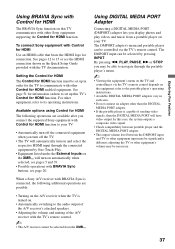
... portable player's operating instructions. • Available DIGITAL MEDIA PORT adapters vary in the Quick Setup Guide provided with the TV documentation. See page 51 for information on how to the audio output of the A/V receiver's attached speakers. • Adjusting the volume and muting of sending video signals, then the DIGITAL MEDIA PORT will automatically turn on and select the respective HDMI input through the portable player's menu. ~ • Viewing the equipment's menu on the TV and controlling it via the TV's remote control. For...
... portable player's operating instructions. • Available DIGITAL MEDIA PORT adapters vary in the Quick Setup Guide provided with the TV documentation. See page 51 for information on how to the audio output of the A/V receiver's attached speakers. • Adjusting the volume and muting of sending video signals, then the DIGITAL MEDIA PORT will automatically turn on and select the respective HDMI input through the portable player's menu. ~ • Viewing the equipment's menu on the TV and controlling it via the TV's remote control. For...
Operating Instructions
Page 40
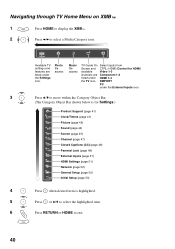
... file access TV Guide On Select inputs from Screen and CTRL: HDMI (Control for HDMI) available Video 1-3 channels are listed under the External Inputs icon. 3 Press V/v to move within the Category Object Bar. (The Category Object Bar shown below is for Settings.) Product Support (page 41) Clock/Timers (page 41) Picture (page 42) Sound (page 44) Screen (page 45) Channel (page 47) CC Closed Captions (CC) (page 48) Parental Lock (page 48) External Inputs (page 51) HDMI Settings...
... file access TV Guide On Select inputs from Screen and CTRL: HDMI (Control for HDMI) available Video 1-3 channels are listed under the External Inputs icon. 3 Press V/v to move within the Category Object Bar. (The Category Object Bar shown below is for Settings.) Product Support (page 41) Clock/Timers (page 41) Picture (page 42) Sound (page 44) Screen (page 45) Channel (page 47) CC Closed Captions (CC) (page 48) Parental Lock (page 48) External Inputs (page 51) HDMI Settings...
Operating Instructions
Page 41
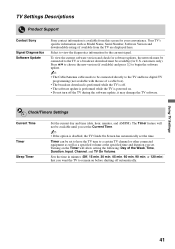
...). Your TV's specific information such as a specified volume at the specified time and duration you want the TV to the TV and have digital TV programming (not available with the use of the Week, Time, Duration, Input, Channel, and TV On Volume. Press V/v to choose the new version (if available) and press to begin the software update. ~ • The Cable/Antenna cable needs to be available until you set the Current Time. ~ •...
...). Your TV's specific information such as a specified volume at the specified time and duration you want the TV to the TV and have digital TV programming (not available with the use of the Week, Time, Duration, Input, Channel, and TV On Volume. Press V/v to choose the new version (if available) and press to begin the software update. ~ • The Cable/Antenna cable needs to be available until you set the Current Time. ~ •...
Operating Instructions
Page 46
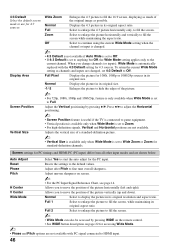
... you change channels (or inputs), Wide Mode is automatically replaced with PC signal connected to HDMI input. 46 To retain the current Wide Mode setting as possible. Screen settings for 4:3 sources. H Center Allows you to move the position of the picture vertically (up and down). V Center Allows you to move the position of the picture horizontally (left and right). 4:3 Default Select the default screen mode to use for 4:3 sources Display Area Screen Position Vertical Size...
... you change channels (or inputs), Wide Mode is automatically replaced with PC signal connected to HDMI input. 46 To retain the current Wide Mode setting as possible. Screen settings for 4:3 sources. H Center Allows you to move the position of the picture vertically (up and down). V Center Allows you to move the position of the picture horizontally (left and right). 4:3 Default Select the default screen mode to use for 4:3 sources Display Area Screen Position Vertical Size...
Operating Instructions
Page 48
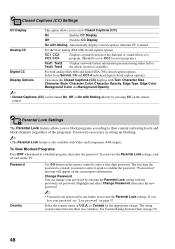
... the remote control to a blocked program, then enter the password. Password Country Use 0-9 button on the screen upon confirmation. or Canada for any future access into the Parental Lock settings. CC1, CC2, CC3, CC4 Displays a printed version of the dialogue or sound effects of U.S.A. "Password set password. Select the country name of a program. (Should be turned On, Off or On with Muting directly by entering the Parental Lock setting with Video and Component (480i) inputs...
... the remote control to a blocked program, then enter the password. Password Country Use 0-9 button on the screen upon confirmation. or Canada for any future access into the Parental Lock settings. CC1, CC2, CC3, CC4 Displays a printed version of the dialogue or sound effects of U.S.A. "Password set password. Select the country name of a program. (Should be turned On, Off or On with Muting directly by entering the Parental Lock setting with Video and Component (480i) inputs...
Operating Instructions
Page 51
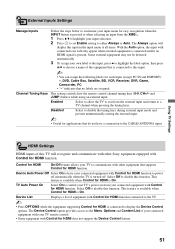
... This setting controls how the remote control channel tuning keys (0-9, CH+/- Control for HDMI On/Off feature allows your TV to communicate with Control for HDMI function. Device List Displays a list of this TV will recognize and communicate with other Sony equipment equipped with other equipment that no labels are assigned. Using TV Settings HDMI Settings HDMI inputs of equipment with Control for HDMI function connected to the TV. ~ • Press OPTIONS while the equipment supporting Control for HDMI...
... This setting controls how the remote control channel tuning keys (0-9, CH+/- Control for HDMI On/Off feature allows your TV to communicate with Control for HDMI function. Device List Displays a list of this TV will recognize and communicate with other Sony equipment equipped with other equipment that no labels are assigned. Using TV Settings HDMI Settings HDMI inputs of equipment with Control for HDMI function connected to the TV. ~ • Press OPTIONS while the equipment supporting Control for HDMI...
Operating Instructions
Page 53
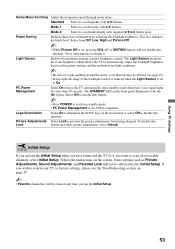
... brightness based on the picture settings and the ambient room light conditions. ~ • Be sure not to put anything around the sensor, as Picture Adjustments, Sound Adjustments, and Parental Lock will not be affected by adjusting the backlight brightness. The STANDBY LED on the screen. To disable this Initial Setup. Press other buttons to scroll slowly with V/v buttons. Light Sensor Enables the automatic picture (screen) brightness control. If you wish to return your TV to factory settings...
... brightness based on the picture settings and the ambient room light conditions. ~ • Be sure not to put anything around the sensor, as Picture Adjustments, Sound Adjustments, and Parental Lock will not be affected by adjusting the backlight brightness. The STANDBY LED on the screen. To disable this Initial Setup. Press other buttons to scroll slowly with V/v buttons. Light Sensor Enables the automatic picture (screen) brightness control. If you wish to return your TV to factory settings...
Operating Instructions
Page 58
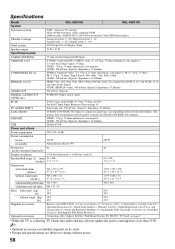
... to the TV) / Operating Instructions (1) / Quick Setup Guide (1) / Warranty Card (1) / Online Registration Card (U.S.A. and Canada only) (1) / Safety and Regulatory Booklet (1) / Attaching the Table-Top Stand (1) / Screws (4) / Stand Rear Cover (1) / Installing the Wall-Mount Bracket (1) Optional accessories Connecting cables / Support Belt Kit / Wall-Mount Bracket: SU-WL500 / TV Stand: see page 2 * While the TV is collecting TV Guide data and/or during software update the power consumption is less than 0.1 W* Screen size 40 46 (inches measured diagonally) Display resolution 1,920...
... to the TV) / Operating Instructions (1) / Quick Setup Guide (1) / Warranty Card (1) / Online Registration Card (U.S.A. and Canada only) (1) / Safety and Regulatory Booklet (1) / Attaching the Table-Top Stand (1) / Screws (4) / Stand Rear Cover (1) / Installing the Wall-Mount Bracket (1) Optional accessories Connecting cables / Support Belt Kit / Wall-Mount Bracket: SU-WL500 / TV Stand: see page 2 * While the TV is collecting TV Guide data and/or during software update the power consumption is less than 0.1 W* Screen size 40 46 (inches measured diagonally) Display resolution 1,920...
Operating Instructions
Page 59
... RETURN button 21 S S VIDEO jack 11 Screen Position 46 Server Diagnostics 52 Settings Channel 47 Clock/Timers 41 Closed Captions (CC) 48 External Inputs 51 General Setup 52 HDMI Settings 51 Initial Setup 53 Network 52 Parental Lock 48 Picture 42 Product Support 41 Screen 45 Sound 44 Sharpness 42 Show/Hide Channels 47 Show/Hide Servers 52 Signal Diagnostics 41 Signal Type 47 Sleep Timer 41 Software Update 41 Sound Adjustments 33, 44 Sound Booster 44 SOUND button 20 Sound Mode 44 Speaker 25 Speakers 33, 45 STANDBY LED...
... RETURN button 21 S S VIDEO jack 11 Screen Position 46 Server Diagnostics 52 Settings Channel 47 Clock/Timers 41 Closed Captions (CC) 48 External Inputs 51 General Setup 52 HDMI Settings 51 Initial Setup 53 Network 52 Parental Lock 48 Picture 42 Product Support 41 Screen 45 Sound 44 Sharpness 42 Show/Hide Channels 47 Show/Hide Servers 52 Signal Diagnostics 41 Signal Type 47 Sleep Timer 41 Software Update 41 Sound Adjustments 33, 44 Sound Booster 44 SOUND button 20 Sound Mode 44 Speaker 25 Speakers 33, 45 STANDBY LED...

