Operating Instructions
Page 2
... qualification. 2 Owner's Record The model and serial numbers are located at temperatures below . Refer to them whenever you to receive unscrambled digital cable television programming via subscription service to radio or television reception, which should allow you call upon such changed settings, the power consumption may cause undesired operation. To Customers Sufficient expertise is connected. ❑ Consult the dealer or an experienced radio/TV technician for a Class B digital device...
... qualification. 2 Owner's Record The model and serial numbers are located at temperatures below . Refer to them whenever you to receive unscrambled digital cable television programming via subscription service to radio or television reception, which should allow you call upon such changed settings, the power consumption may cause undesired operation. To Customers Sufficient expertise is connected. ❑ Consult the dealer or an experienced radio/TV technician for a Class B digital device...
Operating Instructions
Page 3
... Steps to a Full HD Experience . . . .5 TV Feature Highlights 5 Getting Started Setting Up Your TV 6 Locating Inputs and Outputs 7 Connecting Other Equipment 9 Bundling the Connecting Cables 10 Securing the TV 10 Inserting Batteries into the Remote Control 11 Initial Setup 11 Operating the TV Remote Control Button Description 12 TV Controls and Indicators 14 Using Features Using BRAVIA® Sync™ with Control for HDMI 15 Favorites 15 Wide Mode 16 Wide Mode with PC 17 Photo and...
... Steps to a Full HD Experience . . . .5 TV Feature Highlights 5 Getting Started Setting Up Your TV 6 Locating Inputs and Outputs 7 Connecting Other Equipment 9 Bundling the Connecting Cables 10 Securing the TV 10 Inserting Batteries into the Remote Control 11 Initial Setup 11 Operating the TV Remote Control Button Description 12 TV Controls and Indicators 14 Using Features Using BRAVIA® Sync™ with Control for HDMI 15 Favorites 15 Wide Mode 16 Wide Mode with PC 17 Photo and...
Operating Instructions
Page 4
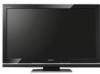
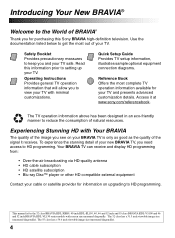
....6 inch viewable image size (measured diagonally). 4 Safety Booklet Provides precautionary measures to keep you see on upgrading to HD programming. Quick Setup Guide Provides TV setup information, illustrates sample optional equipment connection diagrams. Reference Book Offers the most out of your new BRAVIA TV, you need access to HD programming. Your BRAVIA TV can receive and display HD programming from: • Over-the-air broadcasting via HD-quality antenna • HD cable subscription...
....6 inch viewable image size (measured diagonally). 4 Safety Booklet Provides precautionary measures to keep you see on upgrading to HD programming. Quick Setup Guide Provides TV setup information, illustrates sample optional equipment connection diagrams. Reference Book Offers the most out of your new BRAVIA TV, you need access to HD programming. Your BRAVIA TV can receive and display HD programming from: • Over-the-air broadcasting via HD-quality antenna • HD cable subscription...

Operating Instructions
Page 5
... programs and inputs (page 15). ➢ Auto Wide Mode: Set your TV to auto adjust the screen based on the signal resolution (page 16). ➢ USB Digital Photo and Music Player: Connect your USB storage device directly to your HDTV's USB input to view digital photos on the big screen and listen to make your pocketbook and the environment. TV Feature Highlights Your new BRAVIA High Definition LCD TV will see page 18). ➢ ECO Settings: This model includes a number...
... programs and inputs (page 15). ➢ Auto Wide Mode: Set your TV to auto adjust the screen based on the signal resolution (page 16). ➢ USB Digital Photo and Music Player: Connect your USB storage device directly to your HDTV's USB input to view digital photos on the big screen and listen to make your pocketbook and the environment. TV Feature Highlights Your new BRAVIA High Definition LCD TV will see page 18). ➢ ECO Settings: This model includes a number...
Operating Instructions
Page 6
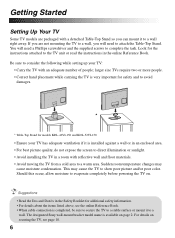
... listed above, see page 10. 6 The designated Sony wall-mount bracket model name is available on securing the TV, see the online Reference Book. • When cable connection is completed, be sure to secure the TV to a stable surface or mount it to a wall. You will need a Phillips screwdriver and the supplied screws to attach the Table-Top Stand. Should this occur, allow moisture to evaporate completely before powering...
... listed above, see page 10. 6 The designated Sony wall-mount bracket model name is available on securing the TV, see the online Reference Book. • When cable connection is completed, be sure to secure the TV to a stable surface or mount it to a wall. You will need a Phillips screwdriver and the supplied screws to attach the Table-Top Stand. Should this occur, allow moisture to evaporate completely before powering...
Operating Instructions
Page 7
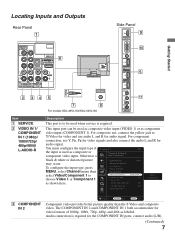
... as component video input (COMPONENT 1). Otherwise a Picture Video/Component 1 black & white or distorted picture Cable/Antenna Cable may occur. Lock Video/Component 1 Component 1 Control for the COMPONENT IN ports, connect audio (L/R). (Continued) 7 Sound Add Digital Channels To configure the input type, press Screen MENU, select Channel menu then Auto Program Manage Channels Manage Inputs select Video/Component 1 to Y/Video for video and use audio L and R for audio signal. For composite use Y, PB, PR for video signals and also connect the audio L and R for video formats...
... as component video input (COMPONENT 1). Otherwise a Picture Video/Component 1 black & white or distorted picture Cable/Antenna Cable may occur. Lock Video/Component 1 Component 1 Control for the COMPONENT IN ports, connect audio (L/R). (Continued) 7 Sound Add Digital Channels To configure the input type, press Screen MENU, select Channel menu then Auto Program Manage Channels Manage Inputs select Video/Component 1 to Y/Video for video and use audio L and R for audio signal. For composite use Y, PB, PR for video signals and also connect the audio L and R for video formats...
Operating Instructions
Page 8
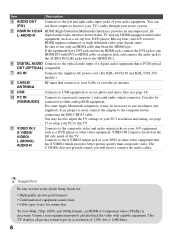
L-AUDIO-R digital audio/video interface between this TV. Be sure to use an adapter (not supplied). If an adapter is PCM optical OUT (OPTICAL) compatible. 7 AC IN Connects the supplied AC power cord. (For KDL-46VL150 and KDL-52VL150 models.) 8 CABLE/ ANTENNA RF input that connects to your PC to this TV and any HDMI IN (with capable equipment. see page 17 to setup your Cable or over-the-air antenna. 9 USB Connects to USB equipment to access photo and music files (see...
L-AUDIO-R digital audio/video interface between this TV. Be sure to use an adapter (not supplied). If an adapter is PCM optical OUT (OPTICAL) compatible. 7 AC IN Connects the supplied AC power cord. (For KDL-46VL150 and KDL-52VL150 models.) 8 CABLE/ ANTENNA RF input that connects to your PC to this TV and any HDMI IN (with capable equipment. see page 17 to setup your Cable or over-the-air antenna. 9 USB Connects to USB equipment to access photo and music files (see...

Operating Instructions
Page 9
... receiver cable box system Personal computer USB Drive Side panel PC IN RGB Rear of TV VIDEO IN VIDEO Y SERVICE PB IN (OPTICAL) PR 1 DIGITAL AUDIO OUT L AUDIO R 1 2 AUDIO COMPONENT IN AUDIO OUT (1080p/1080i/720p/480p/480i) (FIX) L AUDIO R CABLE/ANTENNA AUDIO 2 IN IN 3 IN 4 S VIDEO VIDEO L (MONO) AUDIO R 2 VIDEO IN CABLE/ANTENNA Digital Analog audio Analog Digital audio recorder/ equipment audio equipment DVD/ (A/V equipment Game Receiver/ (DVI only) system Home Theater) VCR/Game system/ Camcorder ~ • Refer to the Quick Setup Guide (supplied) when connecting...
... receiver cable box system Personal computer USB Drive Side panel PC IN RGB Rear of TV VIDEO IN VIDEO Y SERVICE PB IN (OPTICAL) PR 1 DIGITAL AUDIO OUT L AUDIO R 1 2 AUDIO COMPONENT IN AUDIO OUT (1080p/1080i/720p/480p/480i) (FIX) L AUDIO R CABLE/ANTENNA AUDIO 2 IN IN 3 IN 4 S VIDEO VIDEO L (MONO) AUDIO R 2 VIDEO IN CABLE/ANTENNA Digital Analog audio Analog Digital audio recorder/ equipment audio equipment DVD/ (A/V equipment Game Receiver/ (DVI only) system Home Theater) VCR/Game system/ Camcorder ~ • Refer to the Quick Setup Guide (supplied) when connecting...
Operating Instructions
Page 10
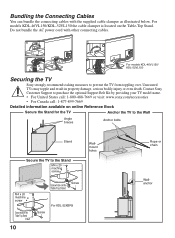
... the Wall Angle braces Anchor bolts Stand Secure the TV to prevent the TV from toppling over. Do not bundle the AC power cord with the supplied cable clamper as illustrated below. For models KDL-46VL150/ KDL-52VL150 Securing the TV Sony strongly recommends taking measures to the Stand M4 x 20 machine screw M4 x 20 machine screw Screw hole on the Table-Top Stand Nut 10 Screw Screw hole on the Table-Top Stand.
... the Wall Angle braces Anchor bolts Stand Secure the TV to prevent the TV from toppling over. Do not bundle the AC power cord with the supplied cable clamper as illustrated below. For models KDL-46VL150/ KDL-52VL150 Securing the TV Sony strongly recommends taking measures to the Stand M4 x 20 machine screw M4 x 20 machine screw Screw hole on the Table-Top Stand Nut 10 Screw Screw hole on the Table-Top Stand.
Operating Instructions
Page 11
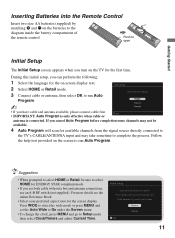
..., be available. 4 Auto Program will scan for the screen display. "Home" optimizes the picture for this initial setup, you have cable and antenna available, please connect cable first. During this TV. Initial Setup Please select the type of the remote control. Getting Started Inserting Batteries into the Remote Control Insert two size AA batteries (supplied) by matching e and E on the batteries to Setup menu then select Clock/Timers and adjust Current Time. Initial Setup Please select...
..., be available. 4 Auto Program will scan for the screen display. "Home" optimizes the picture for this initial setup, you have cable and antenna available, please connect cable first. During this TV. Initial Setup Please select the type of the remote control. Getting Started Inserting Batteries into the Remote Control Insert two size AA batteries (supplied) by matching e and E on the batteries to Setup menu then select Clock/Timers and adjust Current Time. Initial Setup Please select...

Operating Instructions
Page 12
... display information about channel/program or input you are used to exit. See "Using the Menus" on the remote control may also operate BRAVIA® Sync™ equipment. The information banner will be connected by pressing MENU and go back to the previous screen or exit from the screen when displaying menu items and settings. 7 MENU Press to turn on and off the Closed Captions (CC). m (fast reverse): Press to the audio output...
... display information about channel/program or input you are used to exit. See "Using the Menus" on the remote control may also operate BRAVIA® Sync™ equipment. The information banner will be connected by pressing MENU and go back to the previous screen or exit from the screen when displaying menu items and settings. 7 MENU Press to turn on and off the Closed Captions (CC). m (fast reverse): Press to the audio output...
Operating Instructions
Page 13
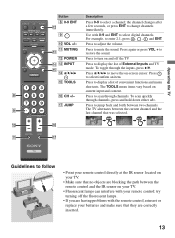
Operating the TV DISPLAY CC POWER Button 8 0-9 ENT qs 9 0 VOL +/- Use with your remote control; Press to enter 2.1, press 2 , , 1 and ENT. Press to turn on and off the fluorescent lamps. • If you are having problems with the remote control, reinsert or replace your TV. • Fluorescent lamps can interfere with 0-9 and ENT to display a list of External Inputs and TV mode. To toggle through channels, press and hold down either +/-. WIDE...
Operating the TV DISPLAY CC POWER Button 8 0-9 ENT qs 9 0 VOL +/- Use with your remote control; Press to enter 2.1, press 2 , , 1 and ENT. Press to turn on and off the fluorescent lamps. • If you are having problems with the remote control, reinsert or replace your TV. • Fluorescent lamps can interfere with 0-9 and ENT to display a list of External Inputs and TV mode. To toggle through channels, press and hold down either +/-. WIDE...

Operating Instructions
Page 14
...CHANNEL + button has a tactile dot. If the LED blinks in red continuously, this may be affected. 2 PIC OFF/ TIMER LED Lights up /down either +/-. In the menu screen, these buttons serve as a reference when operating the TV. 14 TV Controls and Indicators For all models except KDL-46VL150/KDL-52VL150 1 For models KDL-46VL150/ KDL-52VL150 PIC OFF / TIMER STANDBY POWER 2 34 PIC OFF / TIMER STANDBY POWER POWER 5 CHANNEL 6 VOLUME 7 INPUT 8 MENU 9 1 2 34 Item Description 1 (IR) Infrared Receiver Light Sensor Receives IR signals from the remote control. Lights up in green...
...CHANNEL + button has a tactile dot. If the LED blinks in red continuously, this may be affected. 2 PIC OFF/ TIMER LED Lights up /down either +/-. In the menu screen, these buttons serve as a reference when operating the TV. 14 TV Controls and Indicators For all models except KDL-46VL150/KDL-52VL150 1 For models KDL-46VL150/ KDL-52VL150 PIC OFF / TIMER STANDBY POWER 2 34 PIC OFF / TIMER STANDBY POWER POWER 5 CHANNEL 6 VOLUME 7 INPUT 8 MENU 9 1 2 34 Item Description 1 (IR) Infrared Receiver Light Sensor Receives IR signals from the remote control. Lights up in green...
Operating Instructions
Page 15
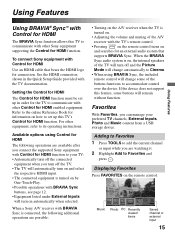
... Control for HDMI function must be set up in the Quick Setup Guide provided with the TV documentation. For other equipment, refer to Favorites and press . To connect Sony equipment with Control for HDMI Use an HDMI cable that bears the HDMI logo for an external audio system that supports BRAVIA Sync. Displaying Favorites Press FAVORITES on by One-Touch-Play. • Possible operations with BRAVIA Sync buttons, see page 12. • Equipment listed under External Inputs...
... Control for HDMI function must be set up in the Quick Setup Guide provided with the TV documentation. For other equipment, refer to Favorites and press . To connect Sony equipment with Control for HDMI Use an HDMI cable that bears the HDMI logo for an external audio system that supports BRAVIA Sync. Displaying Favorites Press FAVORITES on by One-Touch-Play. • Possible operations with BRAVIA Sync buttons, see page 12. • Equipment listed under External Inputs...

Operating Instructions
Page 16
... and 1080p formats excluding Cable/Antenna input. • Full Pixel displays the picture in a carousel-like fashion. 2 When the recently viewed items are watching it. 2 Highlight Remove from Favorites and press . ~ • Auto Program will clear your TV channels from Favorites 1 Press TOOLS to remove the current channel or input while you to select the screen display of your remote control. Based on your preference. Wide Mode The Wide Mode feature allows...
... and 1080p formats excluding Cable/Antenna input. • Full Pixel displays the picture in a carousel-like fashion. 2 When the recently viewed items are watching it. 2 Highlight Remove from Favorites and press . ~ • Auto Program will clear your TV channels from Favorites 1 Press TOOLS to remove the current channel or input while you to select the screen display of your remote control. Based on your preference. Wide Mode The Wide Mode feature allows...
Operating Instructions
Page 17
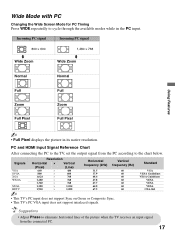
... TV's PC input does not support Sync on Green or Composite Sync. • This TV's PC VGA input does not support interlaced signals. Standard VGA VESA Guidelines VESA Guidelines VESA VESA VESA CEA-861 • Adjust Phase to the chart below. PC and HDMI Input Signal Reference Chart After connecting the PC to the TV, set the output signal from the PC according to eliminate horizontal lines of the picture when the TV receives an input signal...
... TV's PC input does not support Sync on Green or Composite Sync. • This TV's PC VGA input does not support interlaced signals. Standard VGA VESA Guidelines VESA Guidelines VESA VESA VESA CEA-861 • Adjust Phase to the chart below. PC and HDMI Input Signal Reference Chart After connecting the PC to the TV, set the output signal from the PC according to eliminate horizontal lines of the picture when the TV receives an input signal...
Operating Instructions
Page 20
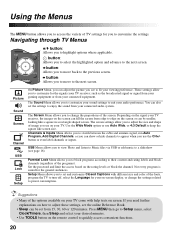
... antenna signal, run Auto Program, Add Digital Channels, or you can also set the settings to enjoy the sound from edge to edge on the screen can fill the screen from your connected equipment. Set the password and limit the access based on the remote control to quickly access convenient functions. 20 The Sound Menu allows you to highlight options where applicable. Use the Wide Mode option or use the CH+/button or even label channels or inputs. Setup Menu...
... antenna signal, run Auto Program, Add Digital Channels, or you can also set the settings to enjoy the sound from edge to edge on the screen can fill the screen from your connected equipment. Set the password and limit the access based on the remote control to quickly access convenient functions. 20 The Sound Menu allows you to highlight options where applicable. Use the Wide Mode option or use the CH+/button or even label channels or inputs. Setup Menu...
Operating Instructions
Page 21
... the TV. • Unplug the TV and other connected equipment from some video sources, check the input selection by pressing INPUT button. Parental Lock password may lead to factory defaults. Do not use a Sony designed wall mount bracket to mount the TV to deactivate muting. • If the remote control does not operate, the batteries may be installed incorrectly or may have accidentally pressed the MUTING button on the TV set. Follow the instruction provided in the online Reference...
... the TV. • Unplug the TV and other connected equipment from some video sources, check the input selection by pressing INPUT button. Parental Lock password may lead to factory defaults. Do not use a Sony designed wall mount bracket to mount the TV to deactivate muting. • If the remote control does not operate, the batteries may be installed incorrectly or may have accidentally pressed the MUTING button on the TV set. Follow the instruction provided in the online Reference...

Operating Instructions
Page 22
... TV) / Operating Instructions (1) / Quick Setup Guide (1) / Warranty Card (1) / Safety and Regulatory Booklet (1) / Attaching the Table-Top stand (1) / Screws (4) (For some MP3 players and cameras. PC AUDIO INPUT Stereo mini jack, 500 mVrms, (Typical) / Impedance: 47 kilohms USB USB input support mass storage device class (USB MSC) that are subject to change without stand (kg) 12.2 16.9 22.6 30.0 34.1 (lb.) 26.9 37.3 49.8 66.1 75.2 Supplied accessories Remote control RM-YD028 (1) / Size AA batteries (2) / Cable...
... TV) / Operating Instructions (1) / Quick Setup Guide (1) / Warranty Card (1) / Safety and Regulatory Booklet (1) / Attaching the Table-Top stand (1) / Screws (4) (For some MP3 players and cameras. PC AUDIO INPUT Stereo mini jack, 500 mVrms, (Typical) / Impedance: 47 kilohms USB USB input support mass storage device class (USB MSC) that are subject to change without stand (kg) 12.2 16.9 22.6 30.0 34.1 (lb.) 26.9 37.3 49.8 66.1 75.2 Supplied accessories Remote control RM-YD028 (1) / Size AA batteries (2) / Cable...
Operating Instructions
Page 23
... to diagram in the online Reference Book) 18.5 24.0 30.1 40.8 52.9 66.3 16.8 20.7 26.1 37.1 45.6 57.5 Remote control RM-YD028 (1) / Size AA batteries (2) / AC power cord (1) (For KDL-46VL150/ KDL-52VL150) / Cable holder (1) (For KDL-40SL150 attached to the TV) (For KDL-46VL150/ KDL-52VL150 attached to the Table-Top Stand) / Operating Instructions (1) / Quick Setup Guide (1) / Warranty Card (1) / Safety and Regulatory Booklet (1) / Attaching the Table-Top stand (1) / Screws (4) (For some models the screws are attached) Connecting cables / Wall-Mount Bracket...
... to diagram in the online Reference Book) 18.5 24.0 30.1 40.8 52.9 66.3 16.8 20.7 26.1 37.1 45.6 57.5 Remote control RM-YD028 (1) / Size AA batteries (2) / AC power cord (1) (For KDL-46VL150/ KDL-52VL150) / Cable holder (1) (For KDL-40SL150 attached to the TV) (For KDL-46VL150/ KDL-52VL150 attached to the Table-Top Stand) / Operating Instructions (1) / Quick Setup Guide (1) / Warranty Card (1) / Safety and Regulatory Booklet (1) / Attaching the Table-Top stand (1) / Screws (4) (For some models the screws are attached) Connecting cables / Wall-Mount Bracket...


