Safety and Regulatory Booklet
Page 3
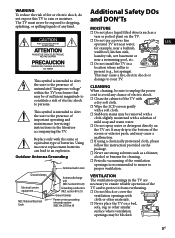
...Do not use a power line operated TV set . WARNING To reduce the risk of fire or electric shock, do not expose this TV to dripping, Additional Safety DOs and DON'Ts splashing, or spilling liquids of any chance of electric shock. ☐ Clean the cabinet of the screen or exterior parts, and ... your TV. the user to the presence of uninsulated "dangerous voltage" within the TV's enclosure that may be removed with a cloth slightly moistened with the same or equivalent type of batteries. with a soft cloth. ☐ Stubborn stains may be sure to unplug the power cord to avoid any kind...
...Do not use a power line operated TV set . WARNING To reduce the risk of fire or electric shock, do not expose this TV to dripping, Additional Safety DOs and DON'Ts splashing, or spilling liquids of any chance of electric shock. ☐ Clean the cabinet of the screen or exterior parts, and ... your TV. the user to the presence of uninsulated "dangerous voltage" within the TV's enclosure that may be removed with a cloth slightly moistened with the same or equivalent type of batteries. with a soft cloth. ☐ Stubborn stains may be sure to unplug the power cord to avoid any kind...
Warranty
Page 2
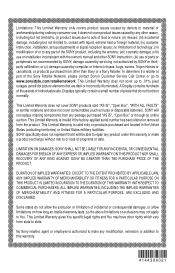
... up adjustments or signal reception issues; (v) limitations of technology; (vi) modification of or to , contact with the owner's manual and other SONY instruction; (ix) use ; This Limited Warranty is invalid if the factory-applied serial number has been altered or removed from any part of the SONY product, including the antenna; (vii) cosmetic damage; (viii) use or installation inconsistent with liquid, extreme heat or foreign material; (iv) customer instruction, installation, set...
... up adjustments or signal reception issues; (v) limitations of technology; (vi) modification of or to , contact with the owner's manual and other SONY instruction; (ix) use ; This Limited Warranty is invalid if the factory-applied serial number has been altered or removed from any part of the SONY product, including the antenna; (vii) cosmetic damage; (viii) use or installation inconsistent with liquid, extreme heat or foreign material; (iv) customer instruction, installation, set...

Child Safety: It Makes A Difference How and Where You Use Your Flat Panel Display
Page 1
... not designed to be mounted to safely install your flat panel display, contact your purchase! WALL MOUNTING: IF YOU DECIDE TO WALL MOUNT YOUR FLAT PANEL DISPLAY, ALWAYS: • Use a mount that has been recommended by the display manufacturer and/or listed by the display and wall mount manufacturers. • If you have any doubts about your ability to walls with furniture and television sets. • Don't place flat panel displays on a "larger than life" flat panel display.
... not designed to be mounted to safely install your flat panel display, contact your purchase! WALL MOUNTING: IF YOU DECIDE TO WALL MOUNT YOUR FLAT PANEL DISPLAY, ALWAYS: • Use a mount that has been recommended by the display manufacturer and/or listed by the display and wall mount manufacturers. • If you have any doubts about your ability to walls with furniture and television sets. • Don't place flat panel displays on a "larger than life" flat panel display.

Correction Page - Using the menus (Instuction Manual page 35)
Page 1
... power off automatically. Auto Shut Off Select On to scan all on this function. Diagnostics Initial Setup If you missed the Initial Setup when you first connected the TV or if you would like the TV to display all receivable channels, select Initial Setup. Some settings such as Picture, Sound, and Parental Lock will not be cleared each input: -, Cable, Receiver, Satellite, VCR, DVD/BD, DVR, Audio System, Home Theater, Game...
... power off automatically. Auto Shut Off Select On to scan all on this function. Diagnostics Initial Setup If you missed the Initial Setup when you first connected the TV or if you would like the TV to display all receivable channels, select Initial Setup. Some settings such as Picture, Sound, and Parental Lock will not be cleared each input: -, Cable, Receiver, Satellite, VCR, DVD/BD, DVR, Audio System, Home Theater, Game...
Operating Instructions
Page 3
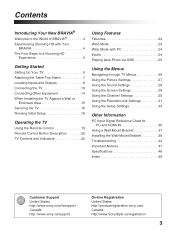
... Remote Control 19 Remote Control Button Description 20 TV Controls and Indicators 22 Using Features Favorites 23 Wide Mode 23 Wide Mode with PC 24 Inputs 24 Playing back Photo via USB 25 Using the Menus Navigating through TV Menus 26 Using the Picture Settings 27 Using the Sound Settings 28 Using the Screen Settings 29 Using the Channel Settings 30 Using the Parental Lock Settings 31 Using the Setup Settings 34 Other Information PC Input Signal Reference Chart for PC and HDMI IN 36 Using a Wall-Mount Bracket...
... Remote Control 19 Remote Control Button Description 20 TV Controls and Indicators 22 Using Features Favorites 23 Wide Mode 23 Wide Mode with PC 24 Inputs 24 Playing back Photo via USB 25 Using the Menus Navigating through TV Menus 26 Using the Picture Settings 27 Using the Sound Settings 28 Using the Screen Settings 29 Using the Channel Settings 30 Using the Parental Lock Settings 31 Using the Setup Settings 34 Other Information PC Input Signal Reference Chart for PC and HDMI IN 36 Using a Wall-Mount Bracket...
Operating Instructions
Page 4
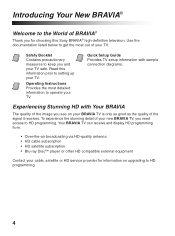
.... Read this Sony BRAVIA® high-definition television. Quick Setup Guide Provides TV setup information with sample connection diagrams. Experiencing Stunning HD with Your BRAVIA The quality of the image you see on upgrading to HD programming. 4 Safety Booklet Contains precautionary measures to operate your TV. Operating Instructions Provides the most out of your new BRAVIA TV, you need access to HD programming. Your BRAVIA TV can receive and display HD programming from...
.... Read this Sony BRAVIA® high-definition television. Quick Setup Guide Provides TV setup information with sample connection diagrams. Experiencing Stunning HD with Your BRAVIA The quality of the image you see on upgrading to HD programming. 4 Safety Booklet Contains precautionary measures to operate your TV. Operating Instructions Provides the most out of your new BRAVIA TV, you need access to HD programming. Your BRAVIA TV can receive and display HD programming from...

Operating Instructions
Page 8
... supplied). Locating Inputs and Outputs Rear Panel Item 1 HDMI IN 1/2 2 PC IN (RGB) 3 VIDEO IN/ COMPONENT IN/R-AUDIO-L (MONO) Description HDMI (High-Definition Multimedia Interface) provides an uncompressed, alldigital audio/video interface between the VIDEO and COMPONENT when VIDEO or COMPONENT is used as a composite video input (VIDEO) or as a set-top box, DVD player, and A/V receiver. Connects to PC/HDMI 1 AUDIO IN of PC IN. See page 13 for the signals that bears the HDMI logo. Use a DVI-to setup your PC's resolution...
... supplied). Locating Inputs and Outputs Rear Panel Item 1 HDMI IN 1/2 2 PC IN (RGB) 3 VIDEO IN/ COMPONENT IN/R-AUDIO-L (MONO) Description HDMI (High-Definition Multimedia Interface) provides an uncompressed, alldigital audio/video interface between the VIDEO and COMPONENT when VIDEO or COMPONENT is used as a composite video input (VIDEO) or as a set-top box, DVD player, and A/V receiver. Connects to PC/HDMI 1 AUDIO IN of PC IN. See page 13 for the signals that bears the HDMI logo. Use a DVI-to setup your PC's resolution...
Operating Instructions
Page 22
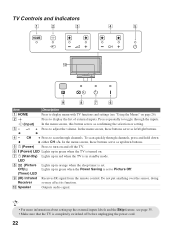
... -/+. Press to display the list of external inputs. Off)/ Lights up in green when the Power Saving is set to Picture Off. (Timer) LED 9 (IR) Infrared Receives IR signal from the remote control. In the menu screen, these buttons serve as confirming the selection or setting. Press to adjust the volume. LED 8 (Picture Lights up in orange when the sleep timer is set . Do not put anything over the sensor, doing Receiver so may affect its function. 0 Speaker Outputs audio signal. • For...
... -/+. Press to display the list of external inputs. Off)/ Lights up in green when the Power Saving is set to Picture Off. (Timer) LED 9 (IR) Infrared Receives IR signal from the remote control. In the menu screen, these buttons serve as confirming the selection or setting. Press to adjust the volume. LED 8 (Picture Lights up in orange when the sleep timer is set . Do not put anything over the sensor, doing Receiver so may affect its function. 0 Speaker Outputs audio signal. • For...
Operating Instructions
Page 26
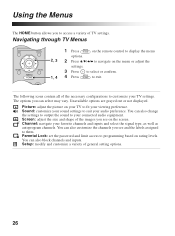
... through TV Menus 1 Press on the remote control to display the menu options. 2, 3 2 Press V/v/B/b to navigate on the menu or adjust the settings. 3 Press to select or confirm. 1, 4 4 Press to programming based on rating levels. Sound: customize your sound settings to your connected audio equipment. Parental Lock: set the password and limit access to exit. Using the Menus The HOME button allows you see on the screen. You can also block channels and inputs.
... through TV Menus 1 Press on the remote control to display the menu options. 2, 3 2 Press V/v/B/b to navigate on the menu or adjust the settings. 3 Press to select or confirm. 1, 4 4 Press to programming based on rating levels. Sound: customize your sound settings to your connected audio equipment. Parental Lock: set the password and limit access to exit. Using the Menus The HOME button allows you see on the screen. You can also block channels and inputs.

Operating Instructions
Page 35
... Picture, Sound, and Parental Lock will reduce the power consumption more than the other buttons to which you will not be cleared each input: -, Cable, Receiver, Satellite, VCR, DVD/BD, DVR, Audio System, Home Theater, Game, Camcorder, Digital Camera, PC, Skip (except PC IN) -, Skip (for inputs to disable it. Press other available settings. If you would like the TV to remain on the screen. Option Description Sleep Timer Set...
... Picture, Sound, and Parental Lock will reduce the power consumption more than the other buttons to which you will not be cleared each input: -, Cable, Receiver, Satellite, VCR, DVD/BD, DVR, Audio System, Home Theater, Game, Camcorder, Digital Camera, PC, Skip (except PC IN) -, Skip (for inputs to disable it. Press other available settings. If you would like the TV to remain on the screen. Option Description Sleep Timer Set...
Operating Instructions
Page 37
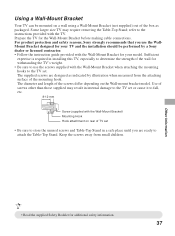
... the mounting hooks to the instructions provided with the Wall-Mount Bracket for your model. The diameter and length of the screws differ depending on a wall using a Wall-Mount Bracket (not supplied) out of screws other than those supplied may require removing the Table-Top Stand; Other Information Using a Wall-Mount Bracket Your TV can be performed by illustration when measured from small children. • Read the supplied Safety Booklet for the Wall-Mount Bracket before making cable connections...
... the mounting hooks to the instructions provided with the Wall-Mount Bracket for your model. The diameter and length of the screws differ depending on a wall using a Wall-Mount Bracket (not supplied) out of screws other than those supplied may require removing the Table-Top Stand; Other Information Using a Wall-Mount Bracket Your TV can be performed by illustration when measured from small children. • Read the supplied Safety Booklet for the Wall-Mount Bracket before making cable connections...
Operating Instructions
Page 43
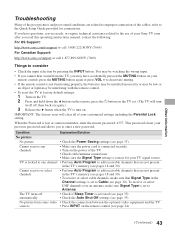
refer to the Quick Setup Guide provided for your TV signal source. No picture from the TV, you cannot hear sound from some video • Check the connection between the optional video equipment and the TV. IMPORTANT: The factory reset will turn on your customized settings including the Parental Lock setting. Cannot receive any channels • Make sure the power cord is connected securely. • Turn on the power of the TV. • Check cable/antenna connections. •...
refer to the Quick Setup Guide provided for your TV signal source. No picture from the TV, you cannot hear sound from some video • Check the connection between the optional video equipment and the TV. IMPORTANT: The factory reset will turn on your customized settings including the Parental Lock setting. Cannot receive any channels • Make sure the power cord is connected securely. • Turn on the power of the TV. • Check cable/antenna connections. •...

Operating Instructions
Page 44
... set the Power Saving mode to use an undamaged antenna cable. Press OPTIONS, highlight and select Alternate Audio, and change in the Picture settings (see page 28). Broadcast HD formats have • Content and signal quality are actually upscaled versions of its serviceable life. (3-5 years in a blurry picture or poor color. Noisy picture • Make sure that "Muting" disappears from the screen (see page 20). • When using HDMI input...
... set the Power Saving mode to use an undamaged antenna cable. Press OPTIONS, highlight and select Alternate Audio, and change in the Picture settings (see page 28). Broadcast HD formats have • Content and signal quality are actually upscaled versions of its serviceable life. (3-5 years in a blurry picture or poor color. Noisy picture • Make sure that "Muting" disappears from the screen (see page 20). • When using HDMI input...

Operating Instructions
Page 46
... digital cable channel may be displayed in full-screen depends on the resolution or aspect ratio of the file. • Depending on the image dimension, file size, and number of files in a folder, some photo images or folders take time to display. • The first time a camera is connected to the TV via USB cable, it may take time to display Lost password How to reset the TV to factory settings...
... digital cable channel may be displayed in full-screen depends on the resolution or aspect ratio of the file. • Depending on the image dimension, file size, and number of files in a folder, some photo images or folders take time to display. • The first time a camera is connected to the TV via USB cable, it may take time to display Lost password How to reset the TV to factory settings...
Operating Instructions
Page 48
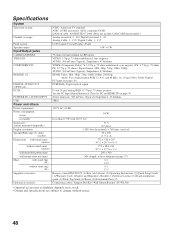
Specifications System Television system Channel coverage Panel system Speaker output Input/Output jacks CABLE/ANTENNA VIDEO IN COMPONENT IN HDMI IN 1/2 DIGITAL AUDIO OUT (OPTICAL) PC IN PC/HDMI IN 1 AUDIO INPUT USB Power and others Power requirement Power consumption in use in standby Screen size (inches measured diagonally) Display resolution Speaker/Full range (2) (mm) (inches) Dimensions with stand (mm) (inches) without stand (mm) (inches) wall-mount hole pattern (mm) wall-mount screw size (mm) Mass with 120 V AC 31.5 (32 class) 1,388 dots (horizontal) × 768 lines (...
Specifications System Television system Channel coverage Panel system Speaker output Input/Output jacks CABLE/ANTENNA VIDEO IN COMPONENT IN HDMI IN 1/2 DIGITAL AUDIO OUT (OPTICAL) PC IN PC/HDMI IN 1 AUDIO INPUT USB Power and others Power requirement Power consumption in use in standby Screen size (inches measured diagonally) Display resolution Speaker/Full range (2) (mm) (inches) Dimensions with stand (mm) (inches) without stand (mm) (inches) wall-mount hole pattern (mm) wall-mount screw size (mm) Mass with 120 V AC 31.5 (32 class) 1,388 dots (horizontal) × 768 lines (...

Operating Instructions
Page 49
... Picture 27 Picture Mode 27 Picture Off ( ) LED 22 Power (1) button 22 POWER ("/1) button 21 POWER (") LED 22 Power Saving 35 Product Support 35 R Rating 31 Reset 27, 28 RETURN button 20 S Settings Channel 30 Parental Lock 31 Picture 27 Screen 29 Setup 34 Sound 28 Sharpness 27 Show/Hide Channels 30 Signal Type 30 Sleep Timer 35 Sound Mode 28 Speaker 22 Standby (1) LED 22 Steady Sound 28 T Timer ( ) LED 22 Troubleshooting 43-46 TV Rating 32 U U.S.A. Rating 33 Unrated 31 USB 9 V VIDEO IN/AUDIO (L/R) 8 Viewing Blocked Programs 33 VOL (2) +/- Index 0-9 buttons...
... Picture 27 Picture Mode 27 Picture Off ( ) LED 22 Power (1) button 22 POWER ("/1) button 21 POWER (") LED 22 Power Saving 35 Product Support 35 R Rating 31 Reset 27, 28 RETURN button 20 S Settings Channel 30 Parental Lock 31 Picture 27 Screen 29 Setup 34 Sound 28 Sharpness 27 Show/Hide Channels 30 Signal Type 30 Sleep Timer 35 Sound Mode 28 Speaker 22 Standby (1) LED 22 Steady Sound 28 T Timer ( ) LED 22 Troubleshooting 43-46 TV Rating 32 U U.S.A. Rating 33 Unrated 31 USB 9 V VIDEO IN/AUDIO (L/R) 8 Viewing Blocked Programs 33 VOL (2) +/- Index 0-9 buttons...
Quick Setup Guide
Page 1
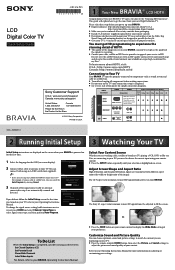
... making connections. ■ Do not turn on screen display). Sony wall-mounting brackets are designed to properly ventilate. Initial Setup Please select your language: 2 Connect either cable or antenna to your TV 2 3/8 inches (6 cm) of space behind it on your BRAVIA can connect both video and audio signals. (*When HDMI is connected to experience the stunning detail of HDTV. ■ The quality of your content. OK Cancel Initial Setup Analog Channels Found: 106 Digital Chennels...
... making connections. ■ Do not turn on screen display). Sony wall-mounting brackets are designed to properly ventilate. Initial Setup Please select your language: 2 Connect either cable or antenna to your TV 2 3/8 inches (6 cm) of space behind it on your BRAVIA can connect both video and audio signals. (*When HDMI is connected to experience the stunning detail of HDTV. ■ The quality of your content. OK Cancel Initial Setup Analog Channels Found: 106 Digital Chennels...

Quick Setup Guide
Page 2
... -HDMI Component Mini-Pin Audio Digital Optical Audio Audio (L/R) Notes on Connection: ■ Your TV is equipped with HDMI or component video for the best possible picture quality. ■ If your connecting equipment has DVI output instead of TV or PC Splitter VCR Cable/Antenna VCR/DVD Combo DVD Required Cable Types for more information. connect your BRAVIA® Operating Instructions Manual for Connection Coaxial HDMI HD15 Composite DVI-to your incoming signal source (HD Cable Box, HD Satellite Box, or DVD) with multiple HDMI inputs;
... -HDMI Component Mini-Pin Audio Digital Optical Audio Audio (L/R) Notes on Connection: ■ Your TV is equipped with HDMI or component video for the best possible picture quality. ■ If your connecting equipment has DVI output instead of TV or PC Splitter VCR Cable/Antenna VCR/DVD Combo DVD Required Cable Types for more information. connect your BRAVIA® Operating Instructions Manual for Connection Coaxial HDMI HD15 Composite DVI-to your incoming signal source (HD Cable Box, HD Satellite Box, or DVD) with multiple HDMI inputs;
Marketing Specifications
Page 1
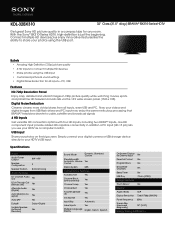
.... Specifications Audio Audio Power Output 6W + 6W Speaker Configuration 2 Speaker Position Bottom Facing Audio Features 5.1 Channel Audio Out Yes 5.1ch Through Out (Handycam) Yes Alternate Audio (Digital) Yes Auto Mute (on the big screen. KDL-32BX310 32" Class (31.5" diag.) BRAVIA® BX310-Series HDTV Get great Sony HD picture quality in a compact size for External Input Yes Parental Control Yes Program Block Yes Show/Hide Channels Yes Sleep Timer Yes USB Play Photo (JPEG) Design Features Touch Sensor Yes Display Aspect Ratio 16:9 Display Resolution...
.... Specifications Audio Audio Power Output 6W + 6W Speaker Configuration 2 Speaker Position Bottom Facing Audio Features 5.1 Channel Audio Out Yes 5.1ch Through Out (Handycam) Yes Alternate Audio (Digital) Yes Auto Mute (on the big screen. KDL-32BX310 32" Class (31.5" diag.) BRAVIA® BX310-Series HDTV Get great Sony HD picture quality in a compact size for External Input Yes Parental Control Yes Program Block Yes Show/Hide Channels Yes Sleep Timer Yes USB Play Photo (JPEG) Design Features Touch Sensor Yes Display Aspect Ratio 16:9 Display Resolution...
Marketing Specifications
Page 2
... Closed Captions (CC) Analog, Digital Finish (Surface Color) Black Start Up Sony Logo Display Yes Inputs and Outputs AC Power Input 1 (Rear) Analog Audio Input(s) (Total) 2 (Rear) Component Video (Y/Pb/Pr) Input(s) 1 (Rear/Hybrid) Composite Video Input(s) 1 (Rear/Hybrid) Digital Audio Output(s) 1 (Rear) HDMI™ Connection(s) (Total) 2 (Rear) HDMI™ PC Input Yes PC In (D-Sub) + Audio In (Stereo Mini) D-Sub 1 (Rear), Mini 1 (Rear) RF Connection Input(s) 1 (Rear) USB 2.0 1 (Side) Power Power Consumption (in Operation) max. 97W Power Consumption (in Standby...
... Closed Captions (CC) Analog, Digital Finish (Surface Color) Black Start Up Sony Logo Display Yes Inputs and Outputs AC Power Input 1 (Rear) Analog Audio Input(s) (Total) 2 (Rear) Component Video (Y/Pb/Pr) Input(s) 1 (Rear/Hybrid) Composite Video Input(s) 1 (Rear/Hybrid) Digital Audio Output(s) 1 (Rear) HDMI™ Connection(s) (Total) 2 (Rear) HDMI™ PC Input Yes PC In (D-Sub) + Audio In (Stereo Mini) D-Sub 1 (Rear), Mini 1 (Rear) RF Connection Input(s) 1 (Rear) USB 2.0 1 (Side) Power Power Consumption (in Operation) max. 97W Power Consumption (in Standby...


