Operating Instructions
Page 5
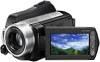
... plug in order to the connectors of the camcorder becomes extremely high or extremely low, you repeat recording/deleting images for help. The internal hard disk of FCC Rules. Handycam Handbook (PDF) • "Operating Guide" (This manual) (1) A B C D Using the camcorder • The camcorder is activated by dropping, the camcorder has drop sensor function*. Doing so may...
... plug in order to the connectors of the camcorder becomes extremely high or extremely low, you repeat recording/deleting images for help. The internal hard disk of FCC Rules. Handycam Handbook (PDF) • "Operating Guide" (This manual) (1) A B C D Using the camcorder • The camcorder is activated by dropping, the camcorder has drop sensor function*. Doing so may...
Operating Instructions
Page 6
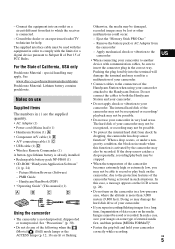
... or play back images recorded with HD (high definition) image quality on your recordings on other materials may be provided, even if recording or playback is not possible due to operate correctly with the AVCHD format Other AVCHD format compatible devices which are not compatible with this camcorder. • See page 11 for the recordable...
... or play back images recorded with HD (high definition) image quality on your recordings on other materials may be provided, even if recording or playback is not possible due to operate correctly with the AVCHD format Other AVCHD format compatible devices which are not compatible with this camcorder. • See page 11 for the recordable...
Operating Instructions
Page 7
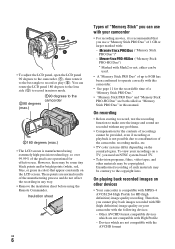
...a computer. When you destroy the actual body of the camcorder, it is recommended that you transfer the camcorder, it is connected to a computer • Do not try to "Handycam Handbook" (PDF) and "PMB Guide." When the camcorder is recommended that you can save the image data on...• The screenshots are from Windows Vista. Also, when you dispose of the camcorder. If you may vary depending on a TV 15 Name and functions of the camcorder using a VCR, or a DVD/HDD recorder*. IMPORTANT SAFEGUARDS .........2 Read this manual for illustration purposes are used in each part...
...a computer. When you destroy the actual body of the camcorder, it is recommended that you transfer the camcorder, it is connected to a computer • Do not try to "Handycam Handbook" (PDF) and "PMB Guide." When the camcorder is recommended that you can save the image data on...• The screenshots are from Windows Vista. Also, when you dispose of the camcorder. If you may vary depending on a TV 15 Name and functions of the camcorder using a VCR, or a DVD/HDD recorder*. IMPORTANT SAFEGUARDS .........2 Read this manual for illustration purposes are used in each part...
Operating Instructions
Page 8
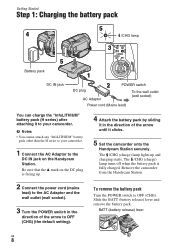
...Power cord (Mains lead) You can charge the "InfoLITHIUM" battery pack (H series) after attaching it clicks. 5 Set the camcorder onto the Handycam Station securely. Remove the camcorder from the Handycam Station. 2 Connect the power cord (mains lead) to the AC Adaptor and the wall outlet (wall socket). 3 Turn... the POWER switch in the direction of the arrow to OFF (CHG). Be sure that the v mark on the Handycam Station. The /CHG...
...Power cord (Mains lead) You can charge the "InfoLITHIUM" battery pack (H series) after attaching it clicks. 5 Set the camcorder onto the Handycam Station securely. Remove the camcorder from the Handycam Station. 2 Connect the power cord (mains lead) to the AC Adaptor and the wall outlet (wall socket). 3 Turn... the POWER switch in the direction of the arrow to OFF (CHG). Be sure that the v mark on the Handycam Station. The /CHG...
Operating Instructions
Page 9
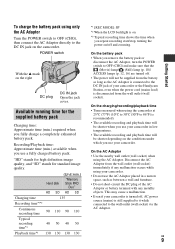
...; Do not short-circuit the DC plug of your camcorder or the Handycam Station, even when the power cord (mains lead) is disconnected from the wall outlet (wall socket) immediately if any metallic objects. "HD" stands for high definition image quality, and "SD" stands for the supplied ...battery pack Charging time: Approximate time (min.) required when you repeat recording start/stop, turning the power on the camcorder. On the AC Adaptor • Use the nearby wall...
...; Do not short-circuit the DC plug of your camcorder or the Handycam Station, even when the power cord (mains lead) is disconnected from the wall outlet (wall socket) immediately if any metallic objects. "HD" stands for high definition image quality, and "SD" stands for the supplied ...battery pack Charging time: Approximate time (min.) required when you repeat recording start/stop, turning the power on the camcorder. On the AC Adaptor • Use the nearby wall...
Operating Instructions
Page 10
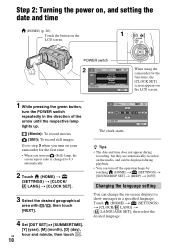
... starts. POWER switch 60min STBY AREA SET Chicago Mexico City New York Bogota Santiago JAN 1 2008 CLOCK SET 12:00:00AM NEXT When using the camcorder for the first time, the [CLOCK SET] screen appears on the LCD screen. 1 While pressing the green button, turn the POWER switch repeatedly in a specified... the arrow until the respective lamp lights up. (Movie): To record movies (Still): To record still images Go to step 3 when you turn on your camcorder for the first time. • When you turn off the operation beeps by touching (HOME) t (SETTINGS) t [SOUND/DISP SET] t [BEEP] t [OFF...
... starts. POWER switch 60min STBY AREA SET Chicago Mexico City New York Bogota Santiago JAN 1 2008 CLOCK SET 12:00:00AM NEXT When using the camcorder for the first time, the [CLOCK SET] screen appears on the LCD screen. 1 While pressing the green button, turn the POWER switch repeatedly in a specified... the arrow until the respective lamp lights up. (Movie): To record movies (Still): To record still images Go to step 3 when you turn on your camcorder for the first time. • When you turn off the operation beeps by touching (HOME) t (SETTINGS) t [SOUND/DISP SET] t [BEEP] t [OFF...
Operating Instructions
Page 11
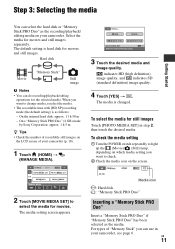
...high definition) image quality, and indicates SD (standard definition) image quality. 4 Touch [YES] t . To check the media setting 1 Turn the POWER switch repeatedly to light up the (Movie)/ (Still) lamp, depending on which media setting you want to select the media for still images Touch [PHOTO MEDIA SET] in your camcorder... selected as follows: - On a "Memory Stick PRO Duo" (4 GB) made by Sony Corporation: approx. 1 h 5 m z Tips • Check the number of recordable still images on your camcorder. The media setting screen appears. For types of "Memory Stick" you want to check....
...high definition) image quality, and indicates SD (standard definition) image quality. 4 Touch [YES] t . To check the media setting 1 Turn the POWER switch repeatedly to light up the (Movie)/ (Still) lamp, depending on which media setting you want to select the media for still images Touch [PHOTO MEDIA SET] in your camcorder... selected as follows: - On a "Memory Stick PRO Duo" (4 GB) made by Sony Corporation: approx. 1 h 5 m z Tips • Check the number of recordable still images on your camcorder. The media setting screen appears. For types of "Memory Stick" you want to check....
Operating Instructions
Page 14
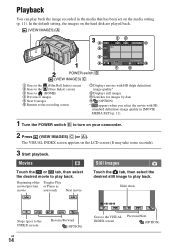
Beginning of the Toggles Play movie/previous or Pause as movie you select the movie with SD (standard definition) image quality in the media that has been set on your camcorder. 2 Press (VIEW IMAGES) C (or A). Slide show Stops (goes to the INDEX screen) US 14 Reverse/...to the (Face Index) screen 3 Goes to (HOME) 4 Previous 6 images 5 Next 6 images 6 Returns to the recording screen 7 Displays movies with HD (high definition) image quality* 8 Displays still images 9 Searches for images by date q; (OPTION) * appears when you touch Next movie Still Images Touch the tab, then select...
Beginning of the Toggles Play movie/previous or Pause as movie you select the movie with SD (standard definition) image quality in the media that has been set on your camcorder. 2 Press (VIEW IMAGES) C (or A). Slide show Stops (goes to the INDEX screen) US 14 Reverse/...to the (Face Index) screen 3 Goes to (HOME) 4 Previous 6 images 5 Next 6 images 6 Returns to the recording screen 7 Displays movies with HD (high definition) image quality* 8 Displays still images 9 Searches for images by date q; (OPTION) * appears when you touch Next movie Still Images Touch the tab, then select...
Operating Instructions
Page 15
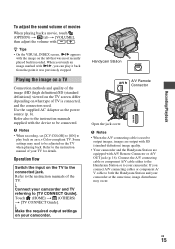
...you connect A/V connecting cables or component A/ V cable to both the Handycam Station and your camcorder at the same time, image disturbance may need to the instruction manual of the image (HD (high definition)/SD (standard definition)) viewed on the TV screen differ depending on the tab that was ...previously stopped. Playing the image on a TV Connection methods and quality of your camcorder. Refer to be connected. When you ...
...you connect A/V connecting cables or component A/ V cable to both the Handycam Station and your camcorder at the same time, image disturbance may need to the instruction manual of the image (HD (high definition)/SD (standard definition)) viewed on the TV screen differ depending on the tab that was ...previously stopped. Playing the image on a TV Connection methods and quality of your camcorder. Refer to be connected. When you ...
Operating Instructions
Page 16
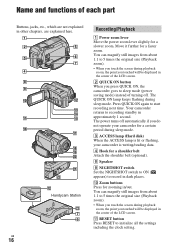
...turning off automatically if you touched will be displayed in the center of the LCD screen. 2 QUICK ON button When you press QUICK ON, the camcorder goes to sleep mode (power saving mode) instead of each part Buttons, jacks, etc., which are not explained in other chapters, are explained here.... images from about 1.1 to recording standby in /out. Press QUICK ON again to initialize all the settings including the clock setting. wa ws qs Handycam Station ws 7 6 Recording/Playback 1 Power zoom lever Move the power zoom lever slightly for a faster zoom. Move it further for a slower ...
...turning off automatically if you touched will be displayed in the center of the LCD screen. 2 QUICK ON button When you press QUICK ON, the camcorder goes to sleep mode (power saving mode) instead of each part Buttons, jacks, etc., which are not explained in other chapters, are explained here.... images from about 1.1 to recording standby in /out. Press QUICK ON again to initialize all the settings including the clock setting. wa ws qs Handycam Station ws 7 6 Recording/Playback 1 Power zoom lever Move the power zoom lever slightly for a faster zoom. Move it further for a slower ...
Operating Instructions
Page 17
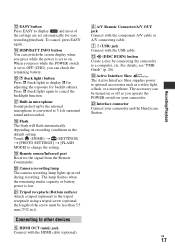
... . (back light) button Press . (back light) to change the setting. Camera recording lamp The camera recording lamp lights up by connecting the camcorder to a computer, etc. US 17 Recording/Playback qs (DISC BURN) button Create a disc by the internal microphone is set to on recording conditions...details, see "PMB Guide" (p. 26). qd EASY button Press EASY to display and most of the screw must be turned on your camcorder and the Handycam Station. wa Tripod receptacle (Bottom surface) Attach a tripod (optional) to 5.1ch surround sound and recorded. qf DISP/BATT INFO button ...
... . (back light) button Press . (back light) to change the setting. Camera recording lamp The camera recording lamp lights up by connecting the camcorder to a computer, etc. US 17 Recording/Playback qs (DISC BURN) button Create a disc by the internal microphone is set to on recording conditions...details, see "PMB Guide" (p. 26). qd EASY button Press EASY to display and most of the screw must be turned on your camcorder and the Handycam Station. wa Tripod receptacle (Bottom surface) Attach a tripod (optional) to 5.1ch surround sound and recorded. qf DISP/BATT INFO button ...
Operating Instructions
Page 19
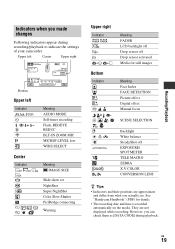
...They are approximate and differ from what you can check them as [DATA CODE] during recording/playback to indicate the settings of your camcorder. However, you actually see. n Meaning FADER LCD backlight off Drop sensor off EXPOSURE/ SPOT METER TELE MACRO ZEBRA X.V.COLOR CONVERSION LENS... z Tips • Indicators and their positions are not displayed while recording. US 19 See "Handycam Handbook" (PDF) for still images Meaning Face Index FACE DETECTION Picture effect Digital effect Manual focus SCENE SELECTION Backlight White balance SteadyShot...
...They are approximate and differ from what you can check them as [DATA CODE] during recording/playback to indicate the settings of your camcorder. However, you actually see. n Meaning FADER LCD backlight off Drop sensor off EXPOSURE/ SPOT METER TELE MACRO ZEBRA X.V.COLOR CONVERSION LENS... z Tips • Indicators and their positions are not displayed while recording. US 19 See "Handycam Handbook" (PDF) for still images Meaning Face Index FACE DETECTION Picture effect Digital effect Manual focus SCENE SELECTION Backlight White balance SteadyShot...
Operating Instructions
Page 22
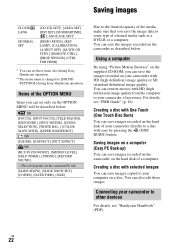
You can rewrite movies with HD (high definition) image quality from the computer to your camcorder to your computer on the hard disk of a computer. Creating a disc with selected images You can save images copied to other devices For details, see... [A.SHUT OFF], [QUICK ON STBY], [REMOTE CTRL], [DROP SENSOR], [CTRL FOR HDMI] * You can set only on your camcorder directly to [SOUND SETTINGS] during Easy Handycam operation. ** The menu name is changed to a disc with ease by pressing the (DISC BURN) button. Items of your camcorder with HD (high definition) image quality or SD (standard...
You can rewrite movies with HD (high definition) image quality from the computer to your camcorder to your computer on the hard disk of a computer. Creating a disc with selected images You can save images copied to other devices For details, see... [A.SHUT OFF], [QUICK ON STBY], [REMOTE CTRL], [DROP SENSOR], [CTRL FOR HDMI] * You can set only on your camcorder directly to [SOUND SETTINGS] during Easy Handycam operation. ** The menu name is changed to a disc with ease by pressing the (DISC BURN) button. Items of your camcorder with HD (high definition) image quality or SD (standard...
Operating Instructions
Page 24
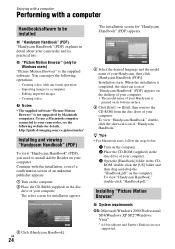
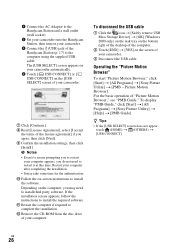
...software. http://guide.d-imaging.sony.co.jp/mac/ms/us/ Installing and viewing "Handycam Handbook" (PDF) To view "Handycam Handbook" (PDF), you need to your camcorder, see the following operations. - US 24 The installation screen for installation appears. 3 Click [Handycam Handbook]. Installing "Picture Motion...and-drop the "Handbook.pdf" on the computer. To view "Handycam Handbook," double-click "Handbook.pdf." Importing images to be installed x "Handycam Handbook" (PDF) "Handycam Handbook" (PDF) explains in detail about your camcorder and its bottom surface. 5 Click [Exit] t [Exit], ...
...software. http://guide.d-imaging.sony.co.jp/mac/ms/us/ Installing and viewing "Handycam Handbook" (PDF) To view "Handycam Handbook" (PDF), you need to your camcorder, see the following operations. - US 24 The installation screen for installation appears. 3 Click [Handycam Handbook]. Installing "Picture Motion...and-drop the "Handbook.pdf" on the computer. To view "Handycam Handbook," double-click "Handbook.pdf." Importing images to be installed x "Handycam Handbook" (PDF) "Handycam Handbook" (PDF) explains in detail about your camcorder and its bottom surface. 5 Click [Exit] t [Exit], ...
Operating Instructions
Page 25
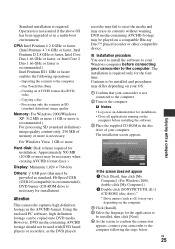
Using the enclosed PC software, high definition footage can be installed, then click [Next]. 6 As the screen to confirm the connection appears, connect your camcorder is required. However, DVD media containing AVCHD footage should not be provided as an Administrator for the first time. Standard installation is not connected to the computer. CPU: Intel Pentium...
Using the enclosed PC software, high definition footage can be installed, then click [Next]. 6 As the screen to confirm the connection appears, connect your camcorder is required. However, DVD media containing AVCHD footage should not be provided as an Administrator for the first time. Standard installation is not connected to the computer. CPU: Intel Pentium...
Operating Instructions
Page 26
.... • It may need to install the required software. Picture Motion Browser]. To display "PMB Guide," click [Start] t [All Programs] t [Sony Picture Utility] t [Help] t [PMB Guide]. b Notes • Even if a screen prompting you to restart your computer appears, you do not ... the on-screen instructions to install third party software. 1 Connect the AC Adaptor to the Handycam Station and a wall outlet (wall socket). 2 Set your camcorder onto the Handycam Station, then turn on your camcorder. 3 Connect the (USB) jack of the Handycam Station (p. 17) to complete the installation.
.... • It may need to install the required software. Picture Motion Browser]. To display "PMB Guide," click [Start] t [All Programs] t [Sony Picture Utility] t [Help] t [PMB Guide]. b Notes • Even if a screen prompting you to restart your computer appears, you do not ... the on-screen instructions to install third party software. 1 Connect the AC Adaptor to the Handycam Station and a wall outlet (wall socket). 2 Set your camcorder onto the Handycam Station, then turn on your camcorder. 3 Connect the (USB) jack of the Handycam Station (p. 17) to complete the installation.
Operating Instructions
Page 27
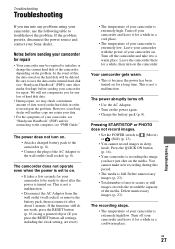
... the power source and contact your camcorder to be required to the wall outlet (wall socket) (p. 8). However, your Sony dealer will neither copy nor retain your camcorder, see "Handycam Handbook" (PDF) and for a while in sleep mode. The camcorder does not operate even when the ...button, all settings, including the clock setting, are reset). • The temperature of your camcorder on the camcorder. This is extremely high. The recording stops. • The temperature of your camcorder is not a malfunction. • Disconnect the AC Adaptor from the wall outlet (wall socket...
... the power source and contact your camcorder to be required to the wall outlet (wall socket) (p. 8). However, your Sony dealer will neither copy nor retain your camcorder, see "Handycam Handbook" (PDF) and for a while in sleep mode. The camcorder does not operate even when the ...button, all settings, including the clock setting, are reset). • The temperature of your camcorder on the camcorder. This is extremely high. The recording stops. • The temperature of your camcorder is not a malfunction. • Disconnect the AC Adaptor from the wall outlet (wall socket...
Operating Instructions
Page 28
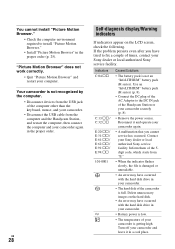
"Picture Motion Browser" does not work correctly. • Quit "Picture Motion Browser" and restart your Sony dealer or local authorized Sony service facility. Contact your computer. If the problem persists even after you cannot service has occurred. US 28 ...an "InfoLITHIUM" battery pack (H series). Turn off your camcorder and leave it and operate your camcorder. • The hard disk of the Handycam Station or your camcorder. • Disconnect the USB cable from "E." • When the indicator flashes slowly, the file is getting high. Indicators C:04:ss C:13:ss / C:32:ss...
"Picture Motion Browser" does not work correctly. • Quit "Picture Motion Browser" and restart your Sony dealer or local authorized Sony service facility. Contact your computer. If the problem persists even after you cannot service has occurred. US 28 ...an "InfoLITHIUM" battery pack (H series). Turn off your camcorder and leave it and operate your camcorder. • The hard disk of the Handycam Station or your camcorder. • Disconnect the USB cable from "E." • When the indicator flashes slowly, the file is getting high. Indicators C:04:ss C:13:ss / C:32:ss...
Operating Instructions
Page 29
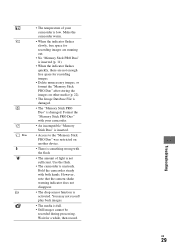
... • When the indicator flashes quickly, there are not enough free space for a while, then record. Hold the camcorder steady with the flash. • The amount of your camcorder. • An incompatible "Memory Stick Duo" is inserted. - • Access to the "Memory Stick PRO Duo" ...storing the images on another device. • There is something wrong with both hands. Format the "Memory Stick PRO Duo" with your camcorder is activated. • The temperature of light is damaged. However, note that the camera-shake warning indicator does not disappear. •...
... • When the indicator flashes quickly, there are not enough free space for a while, then record. Hold the camcorder steady with the flash. • The amount of your camcorder. • An incompatible "Memory Stick Duo" is inserted. - • Access to the "Memory Stick PRO Duo" ...storing the images on another device. • There is something wrong with both hands. Format the "Memory Stick PRO Duo" with your camcorder is activated. • The temperature of light is damaged. However, note that the camera-shake warning indicator does not disappear. •...
Operating Instructions
Page 30
...Wash off any further. • Avoid rough handling, disassembling, modifying, physical shock, or impact such as by a Sony dealer before storing it . Handling the camcorder with above 60°C (140°F), such as under direct sunlight, near heaters or in a car parked in the...may cause damage. • If your local authorized Sony service facility. - Be particularly careful of the LCD screen. • Operate your camcorder with a dry soft cloth. • Avoid the following locations: - This is soiled, clean the camcorder body with a soft cloth lightly moistened with water,...
...Wash off any further. • Avoid rough handling, disassembling, modifying, physical shock, or impact such as by a Sony dealer before storing it . Handling the camcorder with above 60°C (140°F), such as under direct sunlight, near heaters or in a car parked in the...may cause damage. • If your local authorized Sony service facility. - Be particularly careful of the LCD screen. • Operate your camcorder with a dry soft cloth. • Avoid the following locations: - This is soiled, clean the camcorder body with a soft cloth lightly moistened with water,...


