Operating Instructions
Page 5
... recorded. Handycam Handbook (PDF) • "Operating Guide" (This manual) (1) A B C D Using the camcorder • The camcorder is more than 3,000 meters (9,800 feet). For the State of your camcorder in such situations. Remove the battery pack or AC Adaptor from shock by the camcorder may be stopped. • When the temperature of the camcorder becomes extremely high or...
... recorded. Handycam Handbook (PDF) • "Operating Guide" (This manual) (1) A B C D Using the camcorder • The camcorder is more than 3,000 meters (9,800 feet). For the State of your camcorder in such situations. Remove the battery pack or AC Adaptor from shock by the camcorder may be stopped. • When the temperature of the camcorder becomes extremely high or...
Operating Instructions
Page 6
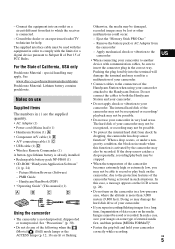
...the LCD panel, open the LCD panel 90 degrees to the camcorder (1), then rotate it is recommended that appear constantly on other materials may be copyrighted. You can use with your camcorder with the AVCHD format Other AVCHD format compatible devices which are operational for effective use a "Memory...cannot be provided, even if recording or playback is not possible due to record or play back images recorded with HD (high definition) image quality on your camcorder • For recording movies, it to the best angle to a malfunction of the pixels are not compatible with the ...
...the LCD panel, open the LCD panel 90 degrees to the camcorder (1), then rotate it is recommended that appear constantly on other materials may be copyrighted. You can use with your camcorder with the AVCHD format Other AVCHD format compatible devices which are operational for effective use a "Memory...cannot be provided, even if recording or playback is not possible due to record or play back images recorded with HD (high definition) image quality on your camcorder • For recording movies, it to the best angle to a malfunction of the pixels are not compatible with the ...
Operating Instructions
Page 7
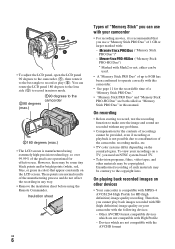
... may vary depending on the operating system of the computer. * Refer also to "Handycam Handbook" (PDF) and "PMB Guide." IMPORTANT SAFEGUARDS .........2 Read this Operating Guide, the hard disk of your camcorder and "Memory Stick PRO Duo" are called "media." • The screenshots are from Windows Vista. ...that you save your data. Change the screen language before using a VCR, or a DVD/HDD recorder*. When the camcorder is recommended that you perform [ EMPTY]* to format the hard disk of the camcorder using a computer. If you can save the image data on -screen displays in this ...
... may vary depending on the operating system of the computer. * Refer also to "Handycam Handbook" (PDF) and "PMB Guide." IMPORTANT SAFEGUARDS .........2 Read this Operating Guide, the hard disk of your camcorder and "Memory Stick PRO Duo" are called "media." • The screenshots are from Windows Vista. ...that you save your data. Change the screen language before using a VCR, or a DVD/HDD recorder*. When the camcorder is recommended that you perform [ EMPTY]* to format the hard disk of the camcorder using a computer. If you can save the image data on -screen displays in this ...
Operating Instructions
Page 8
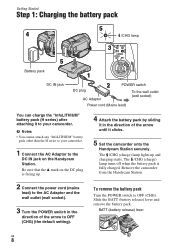
...by sliding it in the direction of the arrow until it clicks. 5 Set the camcorder onto the Handycam Station securely. Slide the BATT (battery release) lever and remove the battery pack. Remove the camcorder from the Handycam Station. 2 Connect the power cord (mains lead) to the AC Adaptor and ... series) after attaching it to OFF (CHG). b Notes • You cannot attach any "InfoLITHIUM" battery pack other than the H series to your camcorder. Be sure that the v mark on the Handycam Station. The /CHG (charge) lamp turns off when the battery pack is facing up and charging starts.
...by sliding it in the direction of the arrow until it clicks. 5 Set the camcorder onto the Handycam Station securely. Slide the BATT (battery release) lever and remove the battery pack. Remove the camcorder from the Handycam Station. 2 Connect the power cord (mains lead) to the AC Adaptor and ... series) after attaching it to OFF (CHG). b Notes • You cannot attach any "InfoLITHIUM" battery pack other than the H series to your camcorder. Be sure that the v mark on the Handycam Station. The /CHG (charge) lamp turns off when the battery pack is facing up and charging starts.
Operating Instructions
Page 9
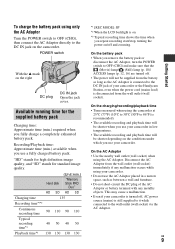
... metallic objects. POWER switch With the v mark on the camcorder. "HD" stands for high definition image quality, and "SD" stands for the supplied battery pack Charging time: Approximate time (min.) required when you use your camcorder or the Handycam Station, even when the power cord (mains lead) is ...disconnected from the battery as long as between a wall and furniture. • Do not short-circuit the DC plug of your camcorder. US 9 Getting Started On the ...
... metallic objects. POWER switch With the v mark on the camcorder. "HD" stands for high definition image quality, and "SD" stands for the supplied battery pack Charging time: Approximate time (min.) required when you use your camcorder or the Handycam Station, even when the power cord (mains lead) is ...disconnected from the battery as long as between a wall and furniture. • Do not short-circuit the DC plug of your camcorder. US 9 Getting Started On the ...
Operating Instructions
Page 10
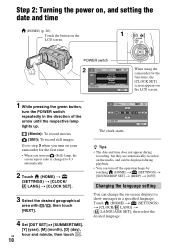
... screen. Changing the language setting You can change the on (Still) lamp, the screen aspect ratio is changed to step 3 when you turn on your camcorder for the first time. • When you turn off the operation beeps by touching (HOME) t (SETTINGS) t [SOUND/DISP SET] t [BEEP] t [OFF]. POWER... switch 60min STBY AREA SET Chicago Mexico City New York Bogota Santiago JAN 1 2008 CLOCK SET 12:00:00AM NEXT When using the camcorder for the first time, the [CLOCK SET] screen appears on the LCD screen. 1 While pressing the green button, turn the POWER switch repeatedly in...
... screen. Changing the language setting You can change the on (Still) lamp, the screen aspect ratio is changed to step 3 when you turn on your camcorder for the first time. • When you turn off the operation beeps by touching (HOME) t (SETTINGS) t [SOUND/DISP SET] t [BEEP] t [OFF]. POWER... switch 60min STBY AREA SET Chicago Mexico City New York Bogota Santiago JAN 1 2008 CLOCK SET 12:00:00AM NEXT When using the camcorder for the first time, the [CLOCK SET] screen appears on the LCD screen. 1 While pressing the green button, turn the POWER switch repeatedly in...
Operating Instructions
Page 11
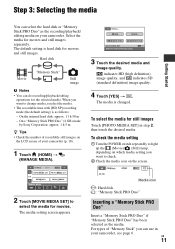
...(the default setting) is as the media. For types of your camcorder, see page 6. indicates HD (high definition) image quality, and indicates SD (standard definition) image quality. 4 Touch [YES] t . The media setting ... Touch [PHOTO MEDIA SET] in your camcorder (p. 18). 1 Touch (HOME) t (MANAGE MEDIA). Select the media for the selected media. HDD HDD MEMORY STICK MEMORY STICK MOVIE MEDIA SET Select... to select the media for movies. On a "Memory Stick PRO Duo" (4 GB) made by Sony Corporation: approx. 1 h 5 m z Tips • Check the number of recordable still images on...
...(the default setting) is as the media. For types of your camcorder, see page 6. indicates HD (high definition) image quality, and indicates SD (standard definition) image quality. 4 Touch [YES] t . The media setting ... Touch [PHOTO MEDIA SET] in your camcorder (p. 18). 1 Touch (HOME) t (MANAGE MEDIA). Select the media for the selected media. HDD HDD MEMORY STICK MEMORY STICK MOVIE MEDIA SET Select... to select the media for movies. On a "Memory Stick PRO Duo" (4 GB) made by Sony Corporation: approx. 1 h 5 m z Tips • Check the number of recordable still images on...
Operating Instructions
Page 14
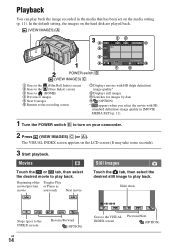
Beginning of the Toggles Play movie/previous or Pause as movie you select the movie with HD (high definition) image quality* 8 Displays still images 9 Searches for images by date q; (OPTION) * appears when you touch Next movie Still Images Touch the tab, then select the ... VISUAL Previous/Next INDEX screen (OPTION) Playback You can play back. Movies Touch the or tab, then select the desired movie to turn on your camcorder. 2 Press (VIEW IMAGES) C (or A). The VISUAL INDEX screen appears on the media setting (p. 11). In the default setting, the images on the hard disk are...
Beginning of the Toggles Play movie/previous or Pause as movie you select the movie with HD (high definition) image quality* 8 Displays still images 9 Searches for images by date q; (OPTION) * appears when you touch Next movie Still Images Touch the tab, then select the ... VISUAL Previous/Next INDEX screen (OPTION) Playback You can play back. Movies Touch the or tab, then select the desired movie to turn on your camcorder. 2 Press (VIEW IMAGES) C (or A). The VISUAL INDEX screen appears on the media setting (p. 11). In the default setting, the images on the hard disk are...
Operating Instructions
Page 15
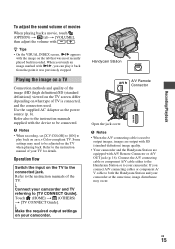
... for details. Handycam Station A/V Remote Connector Open the jack cover. When you touch an image marked with / . b Notes • When recording, set [X.V.COLOR] to [ON] to [TV CONNECT Guide]. Refer to the instruction manual of the image (HD (high definition)/SD (standard definition)) viewed on the TV screen differ depending on your camcorder. Touch (HOME...
... for details. Handycam Station A/V Remote Connector Open the jack cover. When you touch an image marked with / . b Notes • When recording, set [X.V.COLOR] to [ON] to [TV CONNECT Guide]. Refer to the instruction manual of the image (HD (high definition)/SD (standard definition)) viewed on the TV screen differ depending on your camcorder. Touch (HOME...
Operating Instructions
Page 16
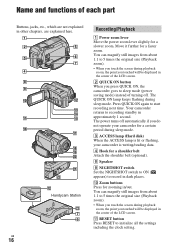
... 2 QUICK ON button When you touch the screen during sleep mode. 3 ACCESS lamp (Hard disk) When the ACCESS lamp is lit or flashing, your camcorder is writing/reading data. 4 Hook for a shoulder belt Attach the shoulder belt (optional). 8 Speaker 9 NIGHTSHOT switch Set the NIGHTSHOT switch to ON (... to initialize all the settings including the clock setting. You can magnify still images from about 1.1 to start recording next time. wa ws qs Handycam Station ws 7 6 Recording/Playback 1 Power zoom lever Move the power zoom lever slightly for a faster zoom. The power turns off . Move ...
... 2 QUICK ON button When you touch the screen during sleep mode. 3 ACCESS lamp (Hard disk) When the ACCESS lamp is lit or flashing, your camcorder is writing/reading data. 4 Hook for a shoulder belt Attach the shoulder belt (optional). 8 Speaker 9 NIGHTSHOT switch Set the NIGHTSHOT switch to ON (... to initialize all the settings including the clock setting. You can magnify still images from about 1.1 to start recording next time. wa ws qs Handycam Station ws 7 6 Recording/Playback 1 Power zoom lever Move the power zoom lever slightly for a faster zoom. The power turns off . Move ...
Operating Instructions
Page 17
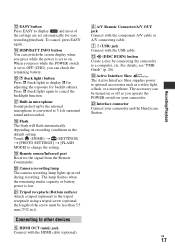
... lamp flashes when the remaining media capacity or battery power is set to OFF (CHG), you operate the POWER switch on your camcorder and the Handycam Station. qj Built-in microphone Sound picked up in red during recording. Camera recording lamp The camera recording lamp lights up by connecting... the camcorder to a computer, etc. qs (DISC BURN) button Create a disc by the internal microphone is set to on. qd EASY button Press ...
... lamp flashes when the remaining media capacity or battery power is set to OFF (CHG), you operate the POWER switch on your camcorder and the Handycam Station. qj Built-in microphone Sound picked up in red during recording. Camera recording lamp The camera recording lamp lights up by connecting... the camcorder to a computer, etc. qs (DISC BURN) button Create a disc by the internal microphone is set to on. qd EASY button Press ...
Operating Instructions
Page 19
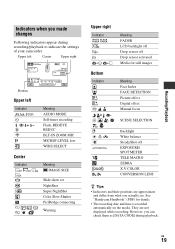
... 19 However, you can check them as [DATA CODE] during recording/playback to indicate the settings of your camcorder. Recording/Playback Indicators when you made changes Following indicators appear during playback. See "Handycam Handbook" (PDF) for still images Meaning Face Index FACE DETECTION Picture effect Digital effect Manual focus SCENE SELECTION Backlight...
... 19 However, you can check them as [DATA CODE] during recording/playback to indicate the settings of your camcorder. Recording/Playback Indicators when you made changes Following indicators appear during playback. See "Handycam Handbook" (PDF) for still images Meaning Face Index FACE DETECTION Picture effect Digital effect Manual focus SCENE SELECTION Backlight...
Operating Instructions
Page 22
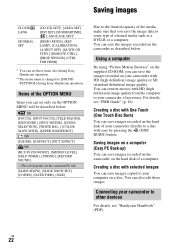
... during Easy Handycam operation. You can rewrite movies with HD (high definition) image quality from the computer to a disc with One Touch (One Touch Disc Burn) You can save the images recorded on the camcorder as a DVD-R or a computer. For details, see "Handycam Handbook" (...Motion Browser" on the supplied CD-ROM, you save images recorded on the camcorder on the hard disk of your camcorder directly to your camcorder, if necessary. Creating a disc with HD (high definition) image quality or SD (standard definition) image quality. tab [FOCUS], [SPOT FOCUS], [TELE MACRO], [EXPOSURE],...
... during Easy Handycam operation. You can rewrite movies with HD (high definition) image quality from the computer to a disc with One Touch (One Touch Disc Burn) You can save the images recorded on the camcorder as a DVD-R or a computer. For details, see "Handycam Handbook" (...Motion Browser" on the supplied CD-ROM, you save images recorded on the camcorder on the hard disk of your camcorder directly to your camcorder, if necessary. Creating a disc with HD (high definition) image quality or SD (standard definition) image quality. tab [FOCUS], [SPOT FOCUS], [TELE MACRO], [EXPOSURE],...
Operating Instructions
Page 24
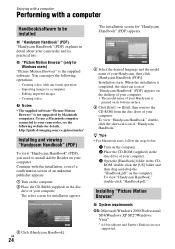
... users, follow the steps below. 1 Turn on its practical use a Macintosh computer connected to your camcorder, see the following operations. - http://guide.d-imaging.sony.co.jp/mac/ms/us/ Installing and viewing "Handycam Handbook" (PDF) To view "Handycam Handbook" (PDF), you need to install Adobe Reader on the desktop of your computer. • The...
... users, follow the steps below. 1 Turn on its practical use a Macintosh computer connected to your camcorder, see the following operations. - http://guide.d-imaging.sony.co.jp/mac/ms/us/ Installing and viewing "Handycam Handbook" (PDF) To view "Handycam Handbook" (PDF), you need to install Adobe Reader on the desktop of your computer. • The...
Operating Instructions
Page 25
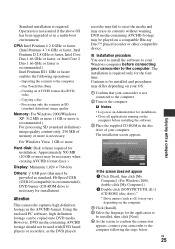
... DVD player/ recorder may fail to be copied onto DVD media. Creating an AVCHD format disc/DVDvideo - Using the enclosed PC software, high definition footage can be installed, then click [Next]. 6 As the screen to confirm the connection appears, connect your camcorder is not connected to the computer. 2 Turn on as standard, Hi-Speed...
... DVD player/ recorder may fail to be copied onto DVD media. Creating an AVCHD format disc/DVDvideo - Using the enclosed PC software, high definition footage can be installed, then click [Next]. 6 As the screen to confirm the connection appears, connect your camcorder is not connected to the computer. 2 Turn on as standard, Hi-Speed...
Operating Instructions
Page 26
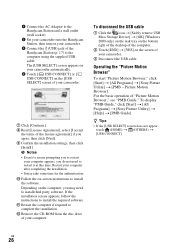
... Browser" To start "Picture Motion Browser," click [Start] t [All Programs] t [Sony Picture Utility] t [PMB - 1 Connect the AC Adaptor to the Handycam Station and a wall outlet (wall socket). 2 Set your camcorder onto the Handycam Station, then turn on your camcorder. 3 Connect the (USB) jack of the Handycam Station (p. 17) to restart it at this time. z Tips •...
... Browser" To start "Picture Motion Browser," click [Start] t [All Programs] t [Sony Picture Utility] t [PMB - 1 Connect the AC Adaptor to the Handycam Station and a wall outlet (wall socket). 2 Set your camcorder onto the Handycam Station, then turn on your camcorder. 3 Connect the (USB) jack of the Handycam Station (p. 17) to restart it at this time. z Tips •...
Operating Instructions
Page 27
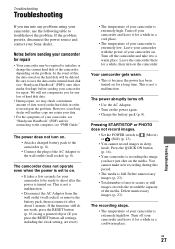
... power is set to on. • It takes a few seconds for your camcorder, see "Handycam Handbook" (PDF) and for connecting to the computer, see "Handycam Handbook" (PDF)) onto other media (backup) before sending your camcorder and leave it for a while, then turn on the problem. This is not...• Charge the battery pack (p. 8). If the functions still do not work, press the RESET button (p. 16) using your Sony dealer. In the event of your camcorder is extremely high. Be sure to (Movie) or (Still) (p. 13). • You cannot record images in a cool/warm place. This is...
... power is set to on. • It takes a few seconds for your camcorder, see "Handycam Handbook" (PDF) and for connecting to the computer, see "Handycam Handbook" (PDF)) onto other media (backup) before sending your camcorder and leave it for a while, then turn on the problem. This is not...• Charge the battery pack (p. 8). If the functions still do not work, press the RESET button (p. 16) using your Sony dealer. In the event of your camcorder is extremely high. Be sure to (Movie) or (Still) (p. 13). • You cannot record images in a cool/warm place. This is...
Operating Instructions
Page 28
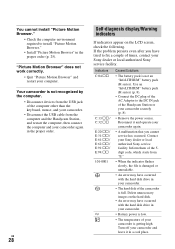
... not recognized by the computer. • Disconnect devices from the USB jack of the camcorder is getting high. Delete unnecessary images on the LCD screen, check the following. US 28 Self-diagnosis display/Warning indicators If indicators appear on the hard ... • An error may have tried to fix a couple of the Handycam Station or your Sony dealer or local authorized Sony service facility. Contact your camcorder again. • A malfunction that you have occurred with the hard disk drive in your camcorder. • The hard disk of the computer other than the keyboard, ...
... not recognized by the computer. • Disconnect devices from the USB jack of the camcorder is getting high. Delete unnecessary images on the LCD screen, check the following. US 28 Self-diagnosis display/Warning indicators If indicators appear on the hard ... • An error may have tried to fix a couple of the Handycam Station or your Sony dealer or local authorized Sony service facility. Contact your camcorder again. • A malfunction that you have occurred with the hard disk drive in your camcorder. • The hard disk of the computer other than the keyboard, ...
Operating Instructions
Page 29
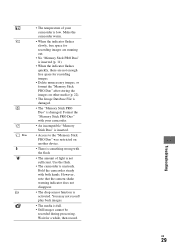
... File is damaged. • The "Memory Stick PRO Duo" is full. • Still images cannot be recorded during processing. Hold the camcorder steady with your camcorder is low. However, note that the camera-shake warning indicator does not disappear. • The drop sensor function is unsteady. Make the... camcorder warm. • When the indicator flashes slowly, free space for recording images are running out. • No "Memory Stick PRO Duo" is ...
... File is damaged. • The "Memory Stick PRO Duo" is full. • Still images cannot be recorded during processing. Hold the camcorder steady with your camcorder is low. However, note that the camera-shake warning indicator does not disappear. • The drop sensor function is unsteady. Make the... camcorder warm. • When the indicator flashes slowly, free space for recording images are running out. • No "Memory Stick PRO Duo" is ...
Operating Instructions
Page 30
...may be able to temperatures above substances on the LCD screen. This damages the inside the casing, unplug your camcorder and have contacted your local authorized Sony service facility. - Additional Information Precautions On use and care • Do not use the accessories recommended in... these operating instructions. • Do not let your camcorder get wet, for example, from rain or sea water. Never leave ...
...may be able to temperatures above substances on the LCD screen. This damages the inside the casing, unplug your camcorder and have contacted your local authorized Sony service facility. - Additional Information Precautions On use and care • Do not use the accessories recommended in... these operating instructions. • Do not let your camcorder get wet, for example, from rain or sea water. Never leave ...


