
Operating Guide
Page 1
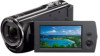
4-447-514-12(1) Digital HD Video Camera Recorder Operating Guide Please also refer to : http://www.sony.net/SonyInfo/Support/ Table of contents Getting started Recording/Playback Saving movies and photos with a computer Saving images on an external media device Customizing your camcorder Others/Index HDR-CX220/CX220E/CX230/CX230E/CX280/CX280E/CX290/CX290E/ PJ220/PJ220E/PJ230/PJ230E
4-447-514-12(1) Digital HD Video Camera Recorder Operating Guide Please also refer to : http://www.sony.net/SonyInfo/Support/ Table of contents Getting started Recording/Playback Saving movies and photos with a computer Saving images on an external media device Customizing your camcorder Others/Index HDR-CX220/CX220E/CX230/CX230E/CX280/CX280E/CX290/CX290E/ PJ220/PJ220E/PJ230/PJ230E
Operating Guide
Page 6
... Part 15 of the FCC Rules. Observe the following two conditions: (1) This device may not cause harmful interference, and (2) this camcorder only, and should not be used with other electrical equipment. AC Adaptor Do not use with this device must accept any interference received, ... recyclable. Replace the battery with the same or equivalent type recommended by returning your camcorder is turned off, AC power source (mains) is mishandled, the battery pack can help preserve our environment by Sony. Dispose of rechargeable batteries, call toll free 1-800-822- 8837,...
... Part 15 of the FCC Rules. Observe the following two conditions: (1) This device may not cause harmful interference, and (2) this camcorder only, and should not be used with other electrical equipment. AC Adaptor Do not use with this device must accept any interference received, ... recyclable. Replace the battery with the same or equivalent type recommended by returning your camcorder is turned off, AC power source (mains) is mishandled, the battery pack can help preserve our environment by Sony. Dispose of rechargeable batteries, call toll free 1-800-822- 8837,...
Operating Guide
Page 10
...in this manual" (p. 12). Television programs, films, video tapes, and other devices through a USB connection and the power of the camcorder is not possible due to a malfunction of the following. To view your recordings on , do not close the LCD panel. Unauthorized recording of ... or flashing GB 10 removing the battery pack or AC Adaptor (models with local regulations. These points are captured using the camcorder if necessary. If any problems. Compensation for illustration purposes are normal results of the manufacturing process and do any way. For...
...in this manual" (p. 12). Television programs, films, video tapes, and other devices through a USB connection and the power of the camcorder is not possible due to a malfunction of the following. To view your recordings on , do not close the LCD panel. Unauthorized recording of ... or flashing GB 10 removing the battery pack or AC Adaptor (models with local regulations. These points are captured using the camcorder if necessary. If any problems. Compensation for illustration purposes are normal results of the manufacturing process and do any way. For...
Operating Guide
Page 11
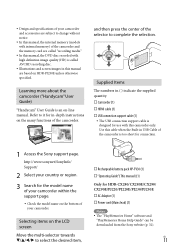
... and screen images in USB Cable of the camcorder is designed for HDR-CX280/CX280E/CX290/ CX290E/PJ220/PJ220E/PJ230/PJ230E AC Adaptor (1) Power cord (Mains lead) (1) Notes The "PlayMemories Home" software and "PlayMemories Home Help Guide" can be downloaded from the Sony website (p. 32). Selecting items on the bottom of...
... and screen images in USB Cable of the camcorder is designed for HDR-CX280/CX280E/CX290/ CX290E/PJ220/PJ220E/PJ230/PJ230E AC Adaptor (1) Power cord (Mains lead) (1) Notes The "PlayMemories Home" software and "PlayMemories Home Help Guide" can be downloaded from the Sony website (p. 32). Selecting items on the bottom of...
Operating Guide
Page 12
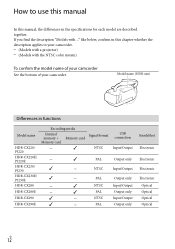
like below, confirm in functions Model name HDR-CX220/ PJ220 HDR-CX220E/ PJ220E HDR-CX230/ PJ230 HDR-CX230E/ PJ230E HDR-CX280 HDR-CX280E HDR-CX290 HDR-CX290E Recording media Internal memory + Memory card Memory card Signal format NTSC PAL NTSC... "Models with the NTSC color system) To confirm the model name of your camcorder See the bottom of your camcorder. (Models with a projector) (Models with ..." Model name (HDR-xxx) Differences in this manual, the differences in the specifications for each model are...
like below, confirm in functions Model name HDR-CX220/ PJ220 HDR-CX220E/ PJ220E HDR-CX230/ PJ230 HDR-CX230E/ PJ230E HDR-CX280 HDR-CX280E HDR-CX290 HDR-CX290E Recording media Internal memory + Memory card Memory card Signal format NTSC PAL NTSC... "Models with the NTSC color system) To confirm the model name of your camcorder See the bottom of your camcorder. (Models with a projector) (Models with ..." Model name (HDR-xxx) Differences in this manual, the differences in the specifications for each model are...
Operating Guide
Page 14
Table of contents Read this first 2 IMPORTANT SAFETY INSTRUCTIONS 3 Learning more about the camcorder ("Handycam" User Guide 11 Selecting items on the LCD screen 11 Supplied Items 11 How to use this manual 12 Differences in functions 12 Differences ... 18 Charging the battery using the AC Adaptor (Models with an AC Adaptor 19 Charging the battery using your computer 19 Setting 21 Preparing your camcorder 21 Changing the recording media (Models with internal memory 21 Inserting a memory card 22 Recording/Playback Recording 24 Zooming 25 Playback 26 Playing images on...
Table of contents Read this first 2 IMPORTANT SAFETY INSTRUCTIONS 3 Learning more about the camcorder ("Handycam" User Guide 11 Selecting items on the LCD screen 11 Supplied Items 11 How to use this manual 12 Differences in functions 12 Differences ... 18 Charging the battery using the AC Adaptor (Models with an AC Adaptor 19 Charging the battery using your computer 19 Setting 21 Preparing your camcorder 21 Changing the recording media (Models with internal memory 21 Inserting a memory card 22 Recording/Playback Recording 24 Zooming 25 Playback 26 Playing images on...
Operating Guide
Page 15
Table of contents Saving images on an external media device Creating a standard definition image quality (STD) disc with a recorder 34 Saving images on an external media device with high definition (HD) image quality (Models with an AC Adaptor 35 Customizing your camcorder Using menus 36 Menu lists 37 Others/Index Troubleshooting 40 Self-diagnosis display/Warning indicators 41 About handling of your camcorder 42 Specifications 46 Screen indicators 49 Index 51 GB 15
Table of contents Saving images on an external media device Creating a standard definition image quality (STD) disc with a recorder 34 Saving images on an external media device with high definition (HD) image quality (Models with an AC Adaptor 35 Customizing your camcorder Using menus 36 Menu lists 37 Others/Index Troubleshooting 40 Self-diagnosis display/Warning indicators 41 About handling of your camcorder 42 Specifications 46 Screen indicators 49 Index 51 GB 15
Operating Guide
Page 17
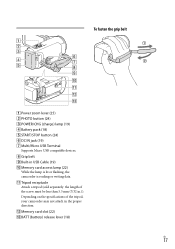
... compatible devices. Grip belt Built-in USB Cable (19) Memory card access lamp (22) While the lamp is lit or flashing, the camcorder is reading or writing data. Tripod receptacle Attach a tripod (sold separately: the length of the tripod, your...
... compatible devices. Grip belt Built-in USB Cable (19) Memory card access lamp (22) While the lamp is lit or flashing, the camcorder is reading or writing data. Tripod receptacle Attach a tripod (sold separately: the length of the tripod, your...

Operating Guide
Page 18
Battery pack GB 18 Getting started Charging the battery pack For information on your camcorder model, see the following page: Functions and equipment p.12 Supplied items p.13 Attaching/Removing the battery pack Close the LCD screen and attach the battery pack. Align the indentation on the camcorder and projection on the battery pack, then slide the battery pack upwards. To remove the battery pack, close the LCD screen, then slide the BATT (battery) release lever and remove the battery pack.
Battery pack GB 18 Getting started Charging the battery pack For information on your camcorder model, see the following page: Functions and equipment p.12 Supplied items p.13 Attaching/Removing the battery pack Close the LCD screen and attach the battery pack. Align the indentation on the camcorder and projection on the battery pack, then slide the battery pack upwards. To remove the battery pack, close the LCD screen, then slide the BATT (battery) release lever and remove the battery pack.
Operating Guide
Page 19
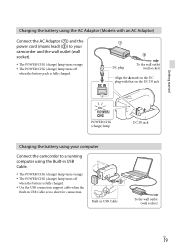
... the battery using the AC Adaptor (Models with an AC Adaptor) Connect the AC Adaptor () and the power cord (mains lead) () to your camcorder and the wall outlet (wall socket). The POWER/CHG (charge) lamp turns orange. The POWER/CHG (charge) lamp turns off when the ... plug with that on the DC IN jack Getting started POWER/CHG (charge) lamp DC IN jack Charging the battery using your computer Connect the camcorder to a running computer using the Built-in USB Cable. The POWER/CHG (charge) lamp turns orange. The POWER/CHG (charge) lamp turns ...
... the battery using the AC Adaptor (Models with an AC Adaptor) Connect the AC Adaptor () and the power cord (mains lead) () to your camcorder and the wall outlet (wall socket). The POWER/CHG (charge) lamp turns orange. The POWER/CHG (charge) lamp turns off when the ... plug with that on the DC IN jack Getting started POWER/CHG (charge) lamp DC IN jack Charging the battery using your computer Connect the camcorder to a running computer using the Built-in USB Cable. The POWER/CHG (charge) lamp turns orange. The POWER/CHG (charge) lamp turns ...
Operating Guide
Page 20
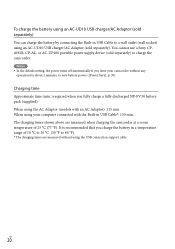
... to 30 °C (50 °F to 86 °F). * The charging times are measured when charging the camcorder at a room temperature of 25 °C (77 °F). GB 20 You cannot use a Sony CPAH2R, CP-AL, or AC-UP100 portable power supply device (sold separately). Notes In the default setting... p. 39). Charging time Approximate time (min.) required when you leave your computer connected with an AC Adaptor): 115 min. When using your camcorder without using the USB connection support cable. To charge the battery using an AC-UD10 USB charger/AC Adaptor (sold separately) You can charge ...
... to 30 °C (50 °F to 86 °F). * The charging times are measured when charging the camcorder at a room temperature of 25 °C (77 °F). GB 20 You cannot use a Sony CPAH2R, CP-AL, or AC-UP100 portable power supply device (sold separately). Notes In the default setting... p. 39). Charging time Approximate time (min.) required when you leave your computer connected with an AC Adaptor): 115 min. When using your camcorder without using the USB connection support cable. To charge the battery using an AC-UD10 USB charger/AC Adaptor (sold separately) You can charge ...
Operating Guide
Page 21
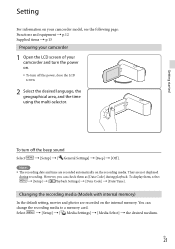
... [Setup] [ General Settings] [Beep] [Off]. Setting For information on your camcorder model, see the following page: Functions and equipment p.12 Supplied items p.13 Preparing your camcorder 1 Open the LCD screen of your camcorder and turn the power on. To turn off the power, close the LCD...
... [Setup] [ General Settings] [Beep] [Off]. Setting For information on your camcorder model, see the following page: Functions and equipment p.12 Supplied items p.13 Preparing your camcorder 1 Open the LCD screen of your camcorder and turn the power on. To turn off the power, close the LCD...
Operating Guide
Page 22
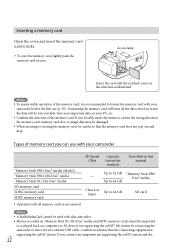
...this manual - Inserting a memory card Open the cover, and insert the memory card until it is recommended to format the memory card with your camcorder before the first use with the notched corner in the direction as illustrated. Up to 32 GB "Memory Stick PRO Duo" media Up to 64..., it clicks. To eject the memory card, lightly push the memory card in this camcorder. Movies recorded on computers or AV devices not supporting the exFAT* file system by connecting the camcorder to these devices with the USB cable. If you can use (p. 38). Access lamp Insert the...
...this manual - Inserting a memory card Open the cover, and insert the memory card until it is recommended to format the memory card with your camcorder before the first use with the notched corner in the direction as illustrated. Up to 32 GB "Memory Stick PRO Duo" media Up to 64..., it clicks. To eject the memory card, lightly push the memory card in this camcorder. Movies recorded on computers or AV devices not supporting the exFAT* file system by connecting the camcorder to these devices with the USB cable. If you can use (p. 38). Access lamp Insert the...
Operating Guide
Page 24
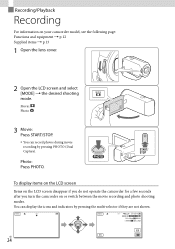
... shooting modes. To display items on the LCD screen Items on the LCD screen disappear if you do not operate the camcorder for a few seconds after you turn the camcorder on your camcorder model, see the following page: Functions and equipment p.12 Supplied items p.13 1 Open the lens cover. 2 Open the...
... shooting modes. To display items on the LCD screen Items on the LCD screen disappear if you do not operate the camcorder for a few seconds after you turn the camcorder on your camcorder model, see the following page: Functions and equipment p.12 Supplied items p.13 1 Open the lens cover. 2 Open the...
Operating Guide
Page 25
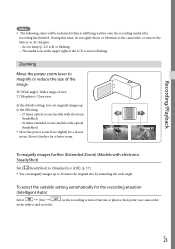
During this time, do not apply shock or vibration to the camcorder, or remove the battery or AC Adaptor. Access lamp (p. 22) is lit or flashing The media icon in the upper right of the ... be indicated if data is flashing Zooming Move the power zoom lever to magnify or reduce the size of movies or photos, then point your camcorder GB 25 Recording/Playback Notes The following : 27 times optical zoom (models with electronic SteadyShot) 50 times extended zoom (models with electronic...
During this time, do not apply shock or vibration to the camcorder, or remove the battery or AC Adaptor. Access lamp (p. 22) is lit or flashing The media icon in the upper right of the ... be indicated if data is flashing Zooming Move the power zoom lever to magnify or reduce the size of movies or photos, then point your camcorder GB 25 Recording/Playback Notes The following : 27 times optical zoom (models with electronic SteadyShot) 50 times extended zoom (models with electronic...
Operating Guide
Page 26
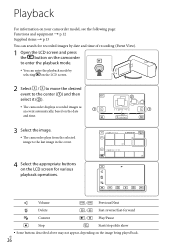
... on the LCD screen for recorded images by date and time of recording (Event View). 1 Open the LCD screen and press the button on the camcorder to enter the playback mode. You can enter the playback mode by selecting on the LCD screen. 2 Select / to move the desired ...the event. 1 1 2013 1 2 00:00:00 1 18 2013 1 19 4 Select the appropriate buttons on the image being played back. Playback For information on your camcorder model, see the following page: Functions and equipment p.12 Supplied items p.13 You can search for various playback operations. GB 26
... on the LCD screen for recorded images by date and time of recording (Event View). 1 Open the LCD screen and press the button on the camcorder to enter the playback mode. You can enter the playback mode by selecting on the LCD screen. 2 Select / to move the desired ...the event. 1 1 2013 1 2 00:00:00 1 18 2013 1 19 4 Select the appropriate buttons on the image being played back. Playback For information on your camcorder model, see the following page: Functions and equipment p.12 Supplied items p.13 You can search for various playback operations. GB 26
Operating Guide
Page 27
... times about 30 times about 60 times. Select / during pause to play back images recorded on other devices with your camcorder. Standard definition image quality (STD) movies recorded on SD memory cards cannot be played on external media periodically. (p. 35) In ...; You may not be able to play movies slowly. To repeat Slideshow, select [Slideshow Set] when is pre-recorded (HDR-PJ230/PJ230E). Recording/Playback As you may not be able to play back with other manufacturers. Notes To prevent your image data...
... times about 30 times about 60 times. Select / during pause to play back images recorded on other devices with your camcorder. Standard definition image quality (STD) movies recorded on SD memory cards cannot be played on external media periodically. (p. 35) In ...; You may not be able to play movies slowly. To repeat Slideshow, select [Slideshow Set] when is pre-recorded (HDR-PJ230/PJ230E). Recording/Playback As you may not be able to play back with other manufacturers. Notes To prevent your image data...
Operating Guide
Page 28
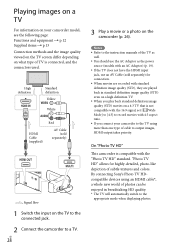
...-like depiction of photos can be enjoyed in standard definition image quality (STD) even on a high definition TV. When you connect your camcorder model, see the following page: Functions and equipment p.12 Supplied items p.13 Connection methods and the image quality viewed on the...differ depending on what type of TV is not compatible with the 16:9 signal, set [ Wide Mode] to [4:3] to a TV. By connecting Sony's Photo TV HDcompatible devices using more than one type of cable to output images, HDMI output takes priority. Notes Refer to the instruction...
...-like depiction of photos can be enjoyed in standard definition image quality (STD) even on a high definition TV. When you connect your camcorder model, see the following page: Functions and equipment p.12 Supplied items p.13 Connection methods and the image quality viewed on the...differ depending on what type of TV is not compatible with the 16:9 signal, set [ Wide Mode] to [4:3] to a TV. By connecting Sony's Photo TV HDcompatible devices using more than one type of cable to output images, HDMI output takes priority. Notes Refer to the instruction...
Operating Guide
Page 29
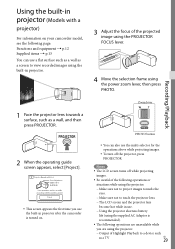
...lens become hot while in use. Using the projector shortens battery life (using the supplied AC Adaptor is turned on your camcorder model, see the following operations are unavailable while you are using the projector. Output of the projected image using the PROJECTOR.... 2 When the operating guide screen appears, select [Project]. This screen appears the first time you use the built-in projector after the camcorder is recommended). The following page: Functions and equipment p.12 Supplied items p.13 You can use a flat surface such...
...lens become hot while in use. Using the projector shortens battery life (using the supplied AC Adaptor is turned on your camcorder model, see the following operations are unavailable while you are using the projector. Output of the projected image using the PROJECTOR.... 2 When the operating guide screen appears, select [Project]. This screen appears the first time you use the built-in projector after the camcorder is recommended). The following page: Functions and equipment p.12 Supplied items p.13 You can use a flat surface such...

Operating Guide
Page 30
Operation of the camcorder with the LCD screen closed Several other functions When the projected images contain a lot of black, faint color unevenness may appear. GB 30 This is caused by light reflection in the projector lens and is not a malfunction.
Operation of the camcorder with the LCD screen closed Several other functions When the projected images contain a lot of black, faint color unevenness may appear. GB 30 This is caused by light reflection in the projector lens and is not a malfunction.


