Operating Guide
Page 2
... reduce fire or shock hazard, do not expose the unit to excessive heat such as sunshine, fire or the like. Do not expose the batteries to rain or moisture. Refer to constitute a risk of important operating and maintenance (servicing) instructions in the space provided below. HDRSerial No. ...presence of uninsulated "dangerous voltage" within the product's enclosure that may be of sufficient magnitude to these numbers whenever you call upon your Sony dealer regarding this product. Owner's Record The model and serial numbers are located on the bottom. Model No. Record the serial number in...
... reduce fire or shock hazard, do not expose the unit to excessive heat such as sunshine, fire or the like. Do not expose the batteries to rain or moisture. Refer to constitute a risk of important operating and maintenance (servicing) instructions in the space provided below. HDRSerial No. ...presence of uninsulated "dangerous voltage" within the product's enclosure that may be of sufficient magnitude to these numbers whenever you call upon your Sony dealer regarding this product. Owner's Record The model and serial numbers are located on the bottom. Model No. Record the serial number in...
Operating Guide
Page 6
... off, AC power source (mains) is designed specifically for future reference. and CANADA RECYCLING LITHIUM-ION BATTERIES Lithium-Ion batteries are recyclable. You can help preserve our environment by Sony. Dispose of small children. Keep the battery pack dry. Replace only with other electrical equipment. For more information regarding recycling of...
... off, AC power source (mains) is designed specifically for future reference. and CANADA RECYCLING LITHIUM-ION BATTERIES Lithium-Ion batteries are recyclable. You can help preserve our environment by Sony. Dispose of small children. Keep the battery pack dry. Replace only with other electrical equipment. For more information regarding recycling of...
Operating Guide
Page 7
...-942-2230 This device complies with Part 15 of the FCC Rules. Battery pack This device complies with Part 15 of Conformity Trade Name: SONY Model No.: HDR-CX200 Responsible Party: Sony Electronics Inc. Address: 16530 Via Esprillo, San Diego, CA 92127 ...may call: Sony Customer Information Center 1-800222-SONY (7669). Declaration of the FCC Rules. Regulatory Information Declaration of Conformity Trade Name: SONY Model No.: HDR-PJ200 Responsible Party: Sony Electronics Inc. Declaration of Conformity Trade Name: SONY Model No.: HDR-CX190 Responsible Party: Sony Electronics Inc. ...
...-942-2230 This device complies with Part 15 of the FCC Rules. Battery pack This device complies with Part 15 of Conformity Trade Name: SONY Model No.: HDR-CX200 Responsible Party: Sony Electronics Inc. Address: 16530 Via Esprillo, San Diego, CA 92127 ...may call: Sony Customer Information Center 1-800222-SONY (7669). Declaration of the FCC Rules. Regulatory Information Declaration of Conformity Trade Name: SONY Model No.: HDR-PJ200 Responsible Party: Sony Electronics Inc. Declaration of Conformity Trade Name: SONY Model No.: HDR-CX190 Responsible Party: Sony Electronics Inc. ...
Operating Guide
Page 8
... the LCD panel. If this manual could occur. ejecting the memory card when the access lamp (p. 24) is lit or flashing removing the battery pack or AC Adaptor from that any of the following measures: Reorient or relocate the receiving antenna. Increase the separation between the equipment...
... the LCD panel. If this manual could occur. ejecting the memory card when the access lamp (p. 24) is lit or flashing removing the battery pack or AC Adaptor from that any of the following measures: Reorient or relocate the receiving antenna. Increase the separation between the equipment...
Operating Guide
Page 11
...9 Selecting items on the LCD screen 10 Parts and controls 14 Getting started Supplied Items 17 Charging the battery pack 18 Charging the battery using your computer 19 Charging the battery pack abroad 21 Turning the power on, and setting the date and time 22 Changing the language setting... 23 Preparing the recording media 24 Selecting a recording medium (HDR-CX210 24 Inserting a memory card 24 Recording/Playback Recording 26 Recording movies 26...
...9 Selecting items on the LCD screen 10 Parts and controls 14 Getting started Supplied Items 17 Charging the battery pack 18 Charging the battery using your computer 19 Charging the battery pack abroad 21 Turning the power on, and setting the date and time 22 Changing the language setting... 23 Preparing the recording media 24 Selecting a recording medium (HDR-CX210 24 Inserting a memory card 24 Recording/Playback Recording 26 Recording movies 26...
Operating Guide
Page 13
Table of contents Customizing your camcorder Using menus 59 Menu lists 61 Others/Index Troubleshooting 64 Self-diagnosis display/Warning indicators 66 Recording time of movies/number of recordable photos 67 Expected time of recording and playback with each battery pack 67 Expected recording time of movies 67 Expected number of recordable photos 68 About handling of your camcorder 69 Specifications 73 Screen indicators 76 Index 78 US 13
Table of contents Customizing your camcorder Using menus 59 Menu lists 61 Others/Index Troubleshooting 64 Self-diagnosis display/Warning indicators 66 Recording time of movies/number of recordable photos 67 Expected time of recording and playback with each battery pack 67 Expected recording time of movies 67 Expected number of recordable photos 68 About handling of your camcorder 69 Specifications 73 Screen indicators 76 Index 78 US 13
Operating Guide
Page 16
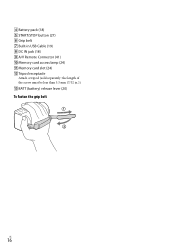
Battery pack (18) START/STOP button (27) Grip belt Built-in USB Cable (19) DC IN jack (18) A/V Remote Connector (41) Memory card access lamp (24) Memory card slot (24) Tripod receptacle Attach a tripod (sold separately: the length of the screw must be less than 5.5 mm (7/32 in.)). BATT (battery) release lever (20) To fasten the grip belt US 16
Battery pack (18) START/STOP button (27) Grip belt Built-in USB Cable (19) DC IN jack (18) A/V Remote Connector (41) Memory card access lamp (24) Memory card slot (24) Tripod receptacle Attach a tripod (sold separately: the length of the screw must be less than 5.5 mm (7/32 in.)). BATT (battery) release lever (20) To fasten the grip belt US 16

Operating Guide
Page 17
... this cable when the Built-in USB Cable of the camcorder (p. 19) is designed for connection. HDMI cable (1) (only for HDR-CX200/CX210/PJ200) A/V connecting cable (1) USB connection support cable (1) The USB connection support cable is too short for use...48, p 51). Getting started Getting started Supplied Items The numbers in this camcorder only. Camcorder (1) AC Adaptor (1) Power cord (Mains lead) (1) Rechargeable battery pack NP-FV30 (1) "Operating Guide" (This manual) (1) Notes The "PlayMemories Home" (Lite Version) software and "PlayMemories Home" Help Guide ...
... this cable when the Built-in USB Cable of the camcorder (p. 19) is designed for connection. HDMI cable (1) (only for HDR-CX200/CX210/PJ200) A/V connecting cable (1) USB connection support cable (1) The USB connection support cable is too short for use...48, p 51). Getting started Getting started Supplied Items The numbers in this camcorder only. Camcorder (1) AC Adaptor (1) Power cord (Mains lead) (1) Rechargeable battery pack NP-FV30 (1) "Operating Guide" (This manual) (1) Notes The "PlayMemories Home" (Lite Version) software and "PlayMemories Home" Help Guide ...
Operating Guide
Page 18
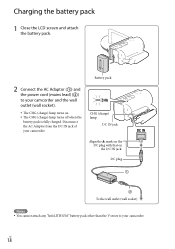
DC plug To the wall outlet (wall socket) Notes You cannot attach any "InfoLITHIUM" battery pack other than the V series to your camcorder and the wall outlet (wall socket). The CHG (charge) lamp turns on the DC IN jack. ... jack Align the mark on the DC plug with that on . The CHG (charge) lamp turns off when the battery pack is fully charged. Charging the battery pack 1 Close the LCD screen and attach the battery pack. US 18 Disconnect the AC Adaptor from the DC IN jack of your camcorder...
DC plug To the wall outlet (wall socket) Notes You cannot attach any "InfoLITHIUM" battery pack other than the V series to your camcorder and the wall outlet (wall socket). The CHG (charge) lamp turns on the DC IN jack. ... jack Align the mark on the DC plug with that on . The CHG (charge) lamp turns off when the battery pack is fully charged. Charging the battery pack 1 Close the LCD screen and attach the battery pack. US 18 Disconnect the AC Adaptor from the DC IN jack of your camcorder...
Operating Guide
Page 19
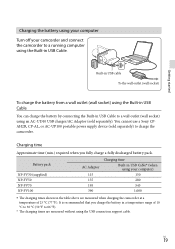
... socket) using the Built-in USB Cable You can charge the battery by connecting the Built-in USB Cable to a wall outlet (wall socket) using an AC-UD10 USB charger/AC Adaptor (sold separately) to charge the camcorder. You cannot use a Sony CPAH2R, CP-AL, or AC-UP100 portable power supply device... (sold separately). Battery pack NP-FV30 (supplied) NP-FV50 NP-FV70 NP-FV100 AC Adaptor 115 155 195 390 Charging time Built...
... socket) using the Built-in USB Cable You can charge the battery by connecting the Built-in USB Cable to a wall outlet (wall socket) using an AC-UD10 USB charger/AC Adaptor (sold separately) to charge the camcorder. You cannot use a Sony CPAH2R, CP-AL, or AC-UP100 portable power supply device... (sold separately). Battery pack NP-FV30 (supplied) NP-FV50 NP-FV70 NP-FV100 AC Adaptor 115 155 195 390 Charging time Built...
Operating Guide
Page 20
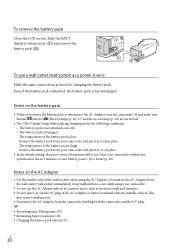
... p. 63). To use the AC Adaptor placed in a cool place. In the default setting, the power turns off automatically if you remove the battery pack or disconnect the AC Adaptor, turn the camcorder off and make sure that the (Movie)/ (Photo) lamps (p. 26, 27) and the access lamp ... socket) as a power source Make the same connections as between a wall and furniture. Do not short-circuit the DC plug of the battery pack is not discharged. This may cause a malfunction. Disconnect the AC Adaptor from your camcorder without any malfunction occurs while using the AC ...
... p. 63). To use the AC Adaptor placed in a cool place. In the default setting, the power turns off automatically if you remove the battery pack or disconnect the AC Adaptor, turn the camcorder off and make sure that the (Movie)/ (Photo) lamps (p. 26, 27) and the access lamp ... socket) as a power source Make the same connections as between a wall and furniture. Do not short-circuit the DC plug of the battery pack is not discharged. This may cause a malfunction. Disconnect the AC Adaptor from your camcorder without any malfunction occurs while using the AC ...
Operating Guide
Page 21
Do not use an electronic voltage transformer. Getting started Charging the battery pack abroad You can charge the battery pack in any countries/regions using the AC Adaptor supplied with your camcorder within the AC 100 V - 240 V, 50 Hz/60 Hz range. US 21
Do not use an electronic voltage transformer. Getting started Charging the battery pack abroad You can charge the battery pack in any countries/regions using the AC Adaptor supplied with your camcorder within the AC 100 V - 240 V, 50 Hz/60 Hz range. US 21
Operating Guide
Page 28
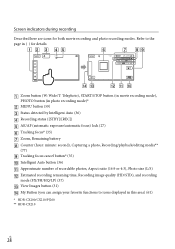
... by Intelligent Auto (36) Recording status ([STBY]/[REC]) AE/AF (automatic exposure/automatic focus) lock (27) Tracking focus* (35) Zoom, Remaining battery Counter (hour: minute: second), Capturing a photo, Recording/playback/editing media** (77) Tracking focus cancel button* (35) Intelligent Auto button (36) Approximate... can assign your favorite functions to icons displayed in ( ) for both movie recording and photo recording modes. Refer to the page in this area) (61) * HDR-CX200/CX210/PJ200 ** HDR-CX210 US 28
... by Intelligent Auto (36) Recording status ([STBY]/[REC]) AE/AF (automatic exposure/automatic focus) lock (27) Tracking focus* (35) Zoom, Remaining battery Counter (hour: minute: second), Capturing a photo, Recording/playback/editing media** (77) Tracking focus cancel button* (35) Intelligent Auto button (36) Approximate... can assign your favorite functions to icons displayed in ( ) for both movie recording and photo recording modes. Refer to the page in this area) (61) * HDR-CX200/CX210/PJ200 ** HDR-CX210 US 28
Operating Guide
Page 29
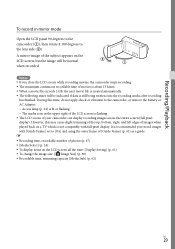
... record in mirror mode Open the LCD panel 90 degrees to the camcorder (), then rotate it 180 degrees to the camcorder, or remove the battery or AC Adaptor. Access lamp (p. 24) is lit or flashing The media icon in the upper right of the LCD screen is flashing...
... record in mirror mode Open the LCD panel 90 degrees to the camcorder (), then rotate it 180 degrees to the camcorder, or remove the battery or AC Adaptor. Access lamp (p. 24) is lit or flashing The media icon in the upper right of the LCD screen is flashing...
Operating Guide
Page 32
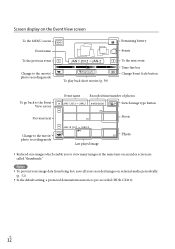
... the MENU screen Event name To the previous event Change to the movie/ photo recording mode To play back short movies (p. 39) Remaining battery Events To the next event Time-line bar Change Event Scale button To go back to the Event View screen Previous/next Event name Recorded... view many images at the same time on external media periodically. (p. 52) In the default setting, a protected demonstration movie is pre-recorded (HDR-CX210). Notes To prevent your image data from being lost, save all your recorded images on an index screen are called "thumbnails." US 32
... the MENU screen Event name To the previous event Change to the movie/ photo recording mode To play back short movies (p. 39) Remaining battery Events To the next event Time-line bar Change Event Scale button To go back to the Event View screen Previous/next Event name Recorded... view many images at the same time on external media periodically. (p. 52) In the default setting, a protected demonstration movie is pre-recorded (HDR-CX210). Notes To prevent your image data from being lost, save all your recorded images on an index screen are called "thumbnails." US 32
Operating Guide
Page 44
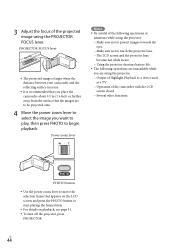
... sure not to touch the projector lens. The LCD screen and the projector lens become hot while in use. Using the projector shortens battery life. The following operations are unavailable while you are to be projected onto. 4 Move the power zoom lever to select the image you place...
... sure not to touch the projector lens. The LCD screen and the projector lens become hot while in use. Using the projector shortens battery life. The following operations are unavailable while you are to be projected onto. 4 Move the power zoom lever to select the image you place...
Operating Guide
Page 45
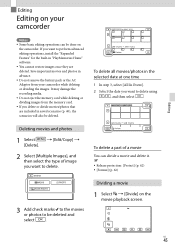
... all movies/photos in saved scenarios (p. 40), the scenarios will also be deleted. Save important movies and photos in advance. Do not remove the battery pack or the AC Adaptor from the memory card. If you want to be deleted and select . US 45 It may damage the recording...
... all movies/photos in saved scenarios (p. 40), the scenarios will also be deleted. Save important movies and photos in advance. Do not remove the battery pack or the AC Adaptor from the memory card. If you want to be deleted and select . US 45 It may damage the recording...
Operating Guide
Page 63
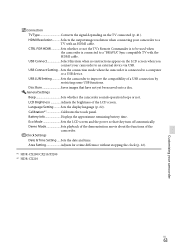
... the functions of the LCD screen. Area Setting Adjusts for a time difference without stopping the clock (p. 22). *1 HDR-CX200/CX210/PJ200 *2 HDR-CX210 US 63 HDMI Resolution Selects the output image resolution when connecting your camcorder to a "BRAVIA" Sync compatible TV with... an HDMI cable. Disc Burn Saves images that they turn off automatically. Language Setting.......... Battery Info Displays the approximate remaining battery time....
... the functions of the LCD screen. Area Setting Adjusts for a time difference without stopping the clock (p. 22). *1 HDR-CX200/CX210/PJ200 *2 HDR-CX210 US 63 HDMI Resolution Selects the output image resolution when connecting your camcorder to a "BRAVIA" Sync compatible TV with... an HDMI cable. Disc Burn Saves images that they turn off automatically. Language Setting.......... Battery Info Displays the approximate remaining battery time....
Operating Guide
Page 64
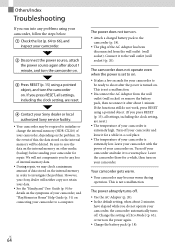
...setting, are reset.) The temperature of your camcorder is extremely high. Connect it to a warm place. Turn off your Sony dealer or local authorized Sony service facility. Your camcorder may become warm during operation. Your camcorder gets warm. Your camcorder may be ready...AC Adaptor has been disconnected from the wall outlet (wall socket) or remove the battery pack, then reconnect it for your camcorder to be required to initialize or change the internal memory (HDR-CX210) of your camcorder, depending on . Others/Index Troubleshooting If you run into...
...setting, are reset.) The temperature of your camcorder is extremely high. Connect it to a warm place. Turn off your Sony dealer or local authorized Sony service facility. Your camcorder may become warm during operation. Your camcorder gets warm. Your camcorder may be ready...AC Adaptor has been disconnected from the wall outlet (wall socket) or remove the battery pack, then reconnect it for your camcorder to be required to initialize or change the internal memory (HDR-CX210) of your camcorder, depending on . Others/Index Troubleshooting If you run into...
Operating Guide
Page 66
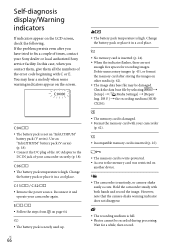
... record. Hold the camcorder steady with your Sony dealer or local authorized Sony service facility. You may be recorded during processing. DB F.] the recording medium (HDR- C:13: / C:32:...; Remove the power source. Reconnect it in a cool place. However, note that the camera-shake warning indicator does not disappear. The recording medium is high. Use an "InfoLITHIUM" battery...
... record. Hold the camcorder steady with your Sony dealer or local authorized Sony service facility. You may be recorded during processing. DB F.] the recording medium (HDR- C:13: / C:32:...; Remove the power source. Reconnect it in a cool place. However, note that the camera-shake warning indicator does not disappear. The recording medium is high. Use an "InfoLITHIUM" battery...


