Operating Guide
Page 6
... via the AC Adaptor. Use the nearby wall outlet (wall socket) when using your camcorder is turned off, AC power source (mains) is mishandled, the battery pack can help preserve our environment by Sony. Dispose of rechargeable batteries, call toll free 1-800-822- 8837, or ...fire or injury may result. and CANADA RECYCLING LITHIUM-ION BATTERIES Lithium-Ion batteries are recyclable. AC Adaptor Do not use with this camcorder only, and should not be used battery packs promptly as between a wall and furniture. For more information regarding recycling of used with...
... via the AC Adaptor. Use the nearby wall outlet (wall socket) when using your camcorder is turned off, AC power source (mains) is mishandled, the battery pack can help preserve our environment by Sony. Dispose of rechargeable batteries, call toll free 1-800-822- 8837, or ...fire or injury may result. and CANADA RECYCLING LITHIUM-ION BATTERIES Lithium-Ion batteries are recyclable. AC Adaptor Do not use with this camcorder only, and should not be used battery packs promptly as between a wall and furniture. For more information regarding recycling of used with...
Operating Guide
Page 8
... Consult the dealer or an experienced radio/ TV technician for illustrating the operating procedures. Change the screen language before using the camcorder if necessary (p. 23). These limits are designed to radio communications. This equipment generates, uses, and can be provided, even if ...a NTSC system-based TV. Television programs, films, video tapes, and other devices through a USB connection and the power of the camcorder is not possible due to Subpart B of Part 15 of FCC Rules. CAUTION You are cautioned that any changes or modifications not expressly approved ...
... Consult the dealer or an experienced radio/ TV technician for illustrating the operating procedures. Change the screen language before using the camcorder if necessary (p. 23). These limits are designed to radio communications. This equipment generates, uses, and can be provided, even if ...a NTSC system-based TV. Television programs, films, video tapes, and other devices through a USB connection and the power of the camcorder is not possible due to Subpart B of Part 15 of FCC Rules. CAUTION You are cautioned that any changes or modifications not expressly approved ...

Operating Guide
Page 9
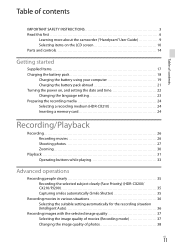
...HDR-CX190 Memory card only HDR-CX200 HDR-PJ200 HDR-CX210 Internal 8 GB memory + memory card Black points White, red, blue or green points About this manual, illustrations and on-screen displays The example images used in this manual when there is an on the bottom of your camcorder...the bottom of your camcorder. And, the illustrations of your camcorder and its screen indication are exaggerated or simplified for in-depth instructions on HDR-CX210 unless otherwise specified. http://www.sony.net/SonyInfo/ Support/...
...HDR-CX190 Memory card only HDR-CX200 HDR-PJ200 HDR-CX210 Internal 8 GB memory + memory card Black points White, red, blue or green points About this manual, illustrations and on-screen displays The example images used in this manual when there is an on the bottom of your camcorder...the bottom of your camcorder. And, the illustrations of your camcorder and its screen indication are exaggerated or simplified for in-depth instructions on HDR-CX210 unless otherwise specified. http://www.sony.net/SonyInfo/ Support/...
Operating Guide
Page 11
Table of contents Table of contents IMPORTANT SAFETY INSTRUCTIONS 3 Read this first 6 Learning more about the camcorder ("Handycam" User Guide 9 Selecting items on the LCD screen 10 Parts and controls 14 Getting started Supplied Items 17 Charging the ...27 Zooming 30 Playback 31 Operating buttons while playing 33 Advanced operations Recording people clearly 35 Recording the selected subject clearly (Face Priority) (HDR-CX200/ CX210/PJ200 35 Capturing smiles automatically (Smile Shutter 35 Recording movies in various situations 36 Selecting the suitable setting automatically for the ...
Table of contents Table of contents IMPORTANT SAFETY INSTRUCTIONS 3 Read this first 6 Learning more about the camcorder ("Handycam" User Guide 9 Selecting items on the LCD screen 10 Parts and controls 14 Getting started Supplied Items 17 Charging the ...27 Zooming 30 Playback 31 Operating buttons while playing 33 Advanced operations Recording people clearly 35 Recording the selected subject clearly (Face Priority) (HDR-CX200/ CX210/PJ200 35 Capturing smiles automatically (Smile Shutter 35 Recording movies in various situations 36 Selecting the suitable setting automatically for the ...

Operating Guide
Page 12
... the data format to STD image quality (Highlight Movie 40 Playing images on a TV 41 Using the built-in projector (HDR-PJ200 43 Editing Editing on your camcorder 45 Deleting movies and photos 45 Dividing a movie 45 Capturing a photo from a movie 46 Saving movies and photos with ...a computer Useful functions available when connecting the camcorder to your computer.. . . . 47 For Windows 47 For Mac 47 Preparing a computer (Windows 48 Step 1 Checking the computer system 48 Step 2...
... the data format to STD image quality (Highlight Movie 40 Playing images on a TV 41 Using the built-in projector (HDR-PJ200 43 Editing Editing on your camcorder 45 Deleting movies and photos 45 Dividing a movie 45 Capturing a photo from a movie 46 Saving movies and photos with ...a computer Useful functions available when connecting the camcorder to your computer.. . . . 47 For Windows 47 For Mac 47 Preparing a computer (Windows 48 Step 1 Checking the computer system 48 Step 2...
Operating Guide
Page 13
Table of contents Customizing your camcorder Using menus 59 Menu lists 61 Others/Index Troubleshooting 64 Self-diagnosis display/Warning indicators 66 Recording time of movies/number of recordable photos 67 Expected time of recording and playback with each battery pack 67 Expected recording time of movies 67 Expected number of recordable photos 68 About handling of your camcorder 69 Specifications 73 Screen indicators 76 Index 78 US 13
Table of contents Customizing your camcorder Using menus 59 Menu lists 61 Others/Index Troubleshooting 64 Self-diagnosis display/Warning indicators 66 Recording time of movies/number of recordable photos 67 Expected time of recording and playback with each battery pack 67 Expected recording time of movies 67 Expected number of recordable photos 68 About handling of your camcorder 69 Specifications 73 Screen indicators 76 Index 78 US 13

Operating Guide
Page 17
US 17 HDMI cable (1) (only for HDR-CX200/CX210/PJ200) A/V connecting cable (1) USB connection support cable (1) The USB connection support cable is too short for use with this camcorder only. Use this cable when the Built-in this camcorder (p 48, p 51). Camcorder (1) AC Adaptor (1) Power cord (Mains lead) (1) Rechargeable battery pack NP-FV30 (1) "Operating... "PlayMemories Home" Help Guide are the supplied quantity. Getting started Getting started Supplied Items The numbers in ( ) are pre-installed in USB Cable of the camcorder (p. 19) is designed for connection.
US 17 HDMI cable (1) (only for HDR-CX200/CX210/PJ200) A/V connecting cable (1) USB connection support cable (1) The USB connection support cable is too short for use with this camcorder only. Use this cable when the Built-in this camcorder (p 48, p 51). Camcorder (1) AC Adaptor (1) Power cord (Mains lead) (1) Rechargeable battery pack NP-FV30 (1) "Operating... "PlayMemories Home" Help Guide are the supplied quantity. Getting started Getting started Supplied Items The numbers in ( ) are pre-installed in USB Cable of the camcorder (p. 19) is designed for connection.
Operating Guide
Page 18
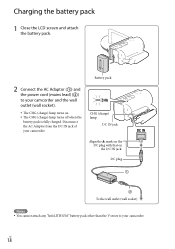
... DC plug To the wall outlet (wall socket) Notes You cannot attach any "InfoLITHIUM" battery pack other than the V series to your camcorder and the wall outlet (wall socket). The CHG (charge) lamp turns on the DC IN jack. Disconnect the AC Adaptor from the DC IN... jack of your camcorder. CHG (charge) lamp DC IN jack Align the mark on the DC plug with that on . The CHG (charge) lamp turns off when...
... DC plug To the wall outlet (wall socket) Notes You cannot attach any "InfoLITHIUM" battery pack other than the V series to your camcorder and the wall outlet (wall socket). The CHG (charge) lamp turns on the DC IN jack. Disconnect the AC Adaptor from the DC IN... jack of your camcorder. CHG (charge) lamp DC IN jack Align the mark on the DC plug with that on . The CHG (charge) lamp turns off when...
Operating Guide
Page 19
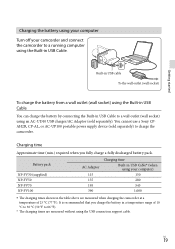
... 1,000 The charging times shown in the table above are measured when charging the camcorder at a temperature of 10 °C to 30 °C (50 °F to charge the camcorder. You cannot use a Sony CPAH2R, CP-AL, or AC-UP100 portable power supply device (sold separately) to 86 °...;F). * The charging times are measured without using your camcorder and connect the camcorder to a running computer using an AC-UD10 USB charger...
... 1,000 The charging times shown in the table above are measured when charging the camcorder at a temperature of 10 °C to 30 °C (50 °F to charge the camcorder. You cannot use a Sony CPAH2R, CP-AL, or AC-UP100 portable power supply device (sold separately) to 86 °...;F). * The charging times are measured without using your camcorder and connect the camcorder to a running computer using an AC-UD10 USB charger...
Operating Guide
Page 20
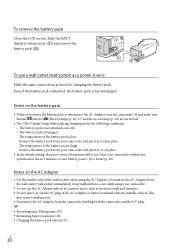
...the battery pack from the wall outlet (wall socket) immediately if any metallic objects. Notes on the battery pack When you leave your camcorder and put it in a cool place. In the default setting, the power turns off automatically if you remove the battery pack or.... The temperature of the AC Adaptor or battery terminal with any malfunction occurs while using the AC Adaptor. Disconnect the AC Adaptor from your camcorder. Do not use a wall outlet (wall socket) as a power source Make the same connections as between a wall and furniture. ...
...the battery pack from the wall outlet (wall socket) immediately if any metallic objects. Notes on the battery pack When you leave your camcorder and put it in a cool place. In the default setting, the power turns off automatically if you remove the battery pack or.... The temperature of the AC Adaptor or battery terminal with any malfunction occurs while using the AC Adaptor. Disconnect the AC Adaptor from your camcorder. Do not use a wall outlet (wall socket) as a power source Make the same connections as between a wall and furniture. ...
Operating Guide
Page 21
Getting started Charging the battery pack abroad You can charge the battery pack in any countries/regions using the AC Adaptor supplied with your camcorder within the AC 100 V - 240 V, 50 Hz/60 Hz range. Do not use an electronic voltage transformer. US 21
Getting started Charging the battery pack abroad You can charge the battery pack in any countries/regions using the AC Adaptor supplied with your camcorder within the AC 100 V - 240 V, 50 Hz/60 Hz range. Do not use an electronic voltage transformer. US 21
Operating Guide
Page 22
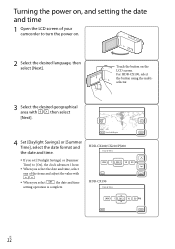
... [Next]. For HDR-CX190, select the button using the multiselector. 3 Select the desired geographical area with /. When you set [Daylight Savings] or [Summer Time] to turn the power on the LCD screen. Turning the power on, and setting the date and time 1 Open the LCD screen of your camcorder to [On], the...
... [Next]. For HDR-CX190, select the button using the multiselector. 3 Select the desired geographical area with /. When you set [Daylight Savings] or [Summer Time] to turn the power on the LCD screen. Turning the power on, and setting the date and time 1 Open the LCD screen of your camcorder to [On], the...
Operating Guide
Page 23
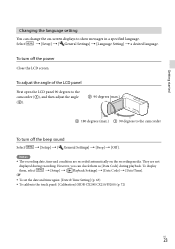
... [Language Setting] a desired language. To adjust the angle of the LCD panel First open the LCD panel 90 degrees to the camcorder (), and then adjust the angle (). 90 degrees (max.) 180 degrees (max.) 90 degrees to show ...and time again: [Date & Time Setting] (p. 63) To calibrate the touch panel: [Calibration] (HDR-CX200/CX210/PJ200) (p. 72) US 23 They are recorded automatically on -screen displays to the camcorder To turn off the beep sound Select [Setup] [ General Settings] [Beep] &#...
... [Language Setting] a desired language. To adjust the angle of the LCD panel First open the LCD panel 90 degrees to the camcorder (), and then adjust the angle (). 90 degrees (max.) 180 degrees (max.) 90 degrees to show ...and time again: [Date & Time Setting] (p. 63) To calibrate the touch panel: [Calibration] (HDR-CX200/CX210/PJ200) (p. 72) US 23 They are recorded automatically on -screen displays to the camcorder To turn off the beep sound Select [Setup] [ General Settings] [Beep] &#...
Operating Guide
Page 24
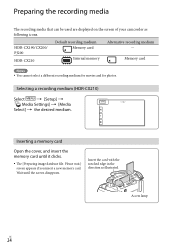
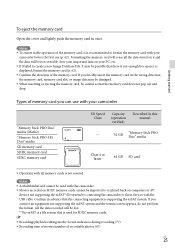
Preparing the recording media The recording media that can be used are displayed on the screen of your camcorder as illustrated. Selecting a recording medium (HDR-CX210) Select [Setup] [ Media Settings] [Media Select] the desired medium. Inserting a memory card Open the cover, and ...new memory card. Access lamp US 24 Memory card Notes You cannot select a different recording medium for movies and for photos. HDR-CX190/CX200/ PJ200 HDR-CX210 Default recording medium Memory card Internal memory Alternative recording medium -
Preparing the recording media The recording media that can be used are displayed on the screen of your camcorder as illustrated. Selecting a recording medium (HDR-CX210) Select [Setup] [ Media Settings] [Media Select] the desired medium. Inserting a memory card Open the cover, and ...new memory card. Access lamp US 24 Memory card Notes You cannot select a different recording medium for movies and for photos. HDR-CX190/CX200/ PJ200 HDR-CX210 Default recording medium Memory card Internal memory Alternative recording medium -
Operating Guide
Page 25
..., memory card slot, or image data may be imported to or played back on it is not assured. Save your important data on your camcorder "Memory Stick PRO Duo" media (Mark2) "Memory Stick PRO-HG Duo" media SD memory card SDHC memory card SDXC memory card SD Speed... Notes A MultiMediaCard cannot be irrecoverable. Getting started To eject the memory card Open the cover and lightly push the memory card in this camcorder. Movies recorded on SDXC memory cards cannot be possible that the memory card does not pop out and drop. Formatting the memory card will...
..., memory card slot, or image data may be imported to or played back on it is not assured. Save your important data on your camcorder "Memory Stick PRO Duo" media (Mark2) "Memory Stick PRO-HG Duo" media SD memory card SDHC memory card SDXC memory card SD Speed... Notes A MultiMediaCard cannot be irrecoverable. Getting started To eject the memory card Open the cover and lightly push the memory card in this camcorder. Movies recorded on SDXC memory cards cannot be possible that the memory card does not pop out and drop. Formatting the memory card will...

Operating Guide
Page 27
... the LCD screen disappear if you turn on the (Photo) lamp. 2 Press PHOTO lightly to turn the camcorder on or switch between the movie recording and photo shooting modes. HDR-CX190: Move the multi-selector. HDR-CX200/CX210/PJ200: Touch anywhere except the buttons on the LCD screen. US 27 Recording/Playback Shooting photos...
... the LCD screen disappear if you turn on the (Photo) lamp. 2 Press PHOTO lightly to turn the camcorder on or switch between the movie recording and photo shooting modes. HDR-CX190: Move the multi-selector. HDR-CX200/CX210/PJ200: Touch anywhere except the buttons on the LCD screen. US 27 Recording/Playback Shooting photos...
Operating Guide
Page 29
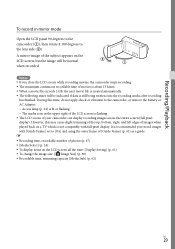
...38) Recordable time, remaining capacity [Media Info] (p. 62) US 29 It is recommended you close the LCD screen while recording movies, the camcorder stops recording. The maximum continuous recordable time of movies is about 13 hours. When a movie file exceeds 2 GB, the next ... after recording has finished. Recording/Playback To record in the upper right of the LCD screen is flashing The LCD screen of your camcorder can display recording images across the entire screen (full pixel display). A mirror-image of photos (p. 67) [Media Select] (p. ...
...38) Recordable time, remaining capacity [Media Info] (p. 62) US 29 It is recommended you close the LCD screen while recording movies, the camcorder stops recording. The maximum continuous recordable time of movies is about 13 hours. When a movie file exceeds 2 GB, the next ... after recording has finished. Recording/Playback To record in the upper right of the LCD screen is flashing The LCD screen of your camcorder can display recording images across the entire screen (full pixel display). A mirror-image of photos (p. 67) [Media Select] (p. ...
Operating Guide
Page 30
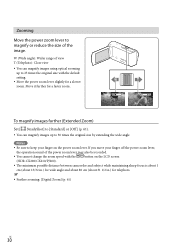
Move it further for a slower zoom. If you move your finger on the LCD screen (HDR-CX200/CX210/PJ200). The minimum possible distance between camcorder and subject while maintaining sharp focus is about 1 cm (about 13/32 in.) for wide angle and about 80 cm (about 31 1/2 in.) for telephoto. &#...
Move it further for a slower zoom. If you move your finger on the LCD screen (HDR-CX200/CX210/PJ200). The minimum possible distance between camcorder and subject while maintaining sharp focus is about 1 cm (about 13/32 in.) for wide angle and about 80 cm (about 31 1/2 in.) for telephoto. &#...

Operating Guide
Page 31
US 31 HDR-CX200/CX210/PJ200 HDR-CX190 2 Select / to move the desired event to the last image in the event. Recording/Playback Playback You can search for recorded images by date and time of recording (Event view). 1 Open the LCD screen and press the button on the camcorder to enter... can enter the playback mode by selecting on the date and time. 3 Select the image. The camcorder plays from the selected image to the center () and then select it (). The camcorder displays recorded images as an event automatically, based on the LCD screen (p. 28).
US 31 HDR-CX200/CX210/PJ200 HDR-CX190 2 Select / to move the desired event to the last image in the event. Recording/Playback Playback You can search for recorded images by date and time of recording (Event view). 1 Open the LCD screen and press the button on the camcorder to enter... can enter the playback mode by selecting on the date and time. 3 Select the image. The camcorder plays from the selected image to the center () and then select it (). The camcorder displays recorded images as an event automatically, based on the LCD screen (p. 28).
Operating Guide
Page 33
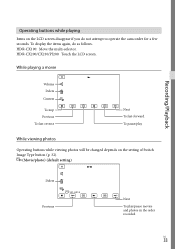
..., do not attempt to operate the camcorder for a few seconds. Recording/Playback Operating buttons while playing Items on the setting of Switch Image Type button (p. 32). (Movie/photo) (default setting) Delete Previous Next To play/pause movies and photos in the order recorded US 33 HDR-CX200/CX210/PJ200: Touch the LCD... To pause/play While viewing photos Operating buttons while viewing photos will be changed depends on the LCD screen disappear if you do as follows. HDR-CX190: Move the multi-selector.
..., do not attempt to operate the camcorder for a few seconds. Recording/Playback Operating buttons while playing Items on the setting of Switch Image Type button (p. 32). (Movie/photo) (default setting) Delete Previous Next To play/pause movies and photos in the order recorded US 33 HDR-CX200/CX210/PJ200: Touch the LCD... To pause/play While viewing photos Operating buttons while viewing photos will be changed depends on the LCD screen disappear if you do as follows. HDR-CX190: Move the multi-selector.


