
Camera Operations Guide
Page 3
... LCD screen and the viewfinder. However, there may be some tiny black points and/ or bright points (white, red, blue, or green in your Sony dealer regarding this equipment does cause harmful interference to radio or television reception, which can use only mini DV cassettes in low light conditions, such as you need an NTSC system-based TV. • Television programs, films, video tapes...
... LCD screen and the viewfinder. However, there may be some tiny black points and/ or bright points (white, red, blue, or green in your Sony dealer regarding this equipment does cause harmful interference to radio or television reception, which can use only mini DV cassettes in low light conditions, such as you need an NTSC system-based TV. • Television programs, films, video tapes...

Camera Operations Guide
Page 7
... 72 Using the (STANDARD SET) menu - Advanced operations Using the Menu Selecting menu items 54 Using the AUTO LOCK switch ...........55 Using the (CAMERA SET) menu - BURST/QUALITY/IMAGE SIZE/ ALL ERASE/NEW FOLDER, etc 63 Using the (PICT. REC-STL, etc 67 Using the (EDIT/PLAY) menu - Image protection/ Print mark 101 Printing recorded images (PictBridge compliant printer 103 Troubleshooting Troubleshooting 106 Warning indicators and messages 114 Additional Information Using your camcorder abroad ..........119 Usable cassette tapes 120 About the "Memory Stick 121...
... 72 Using the (STANDARD SET) menu - Advanced operations Using the Menu Selecting menu items 54 Using the AUTO LOCK switch ...........55 Using the (CAMERA SET) menu - BURST/QUALITY/IMAGE SIZE/ ALL ERASE/NEW FOLDER, etc 63 Using the (PICT. REC-STL, etc 67 Using the (EDIT/PLAY) menu - Image protection/ Print mark 101 Printing recorded images (PictBridge compliant printer 103 Troubleshooting Troubleshooting 106 Warning indicators and messages 114 Additional Information Using your camcorder abroad ..........119 Usable cassette tapes 120 About the "Memory Stick 121...

Camera Operations Guide
Page 14
... remove the battery pack Battery release tab POWER switch OPEN POWER switch You can check the battery's current charge level and its current remaining recording time both during charging or when the power is fully charged. Battery pack 1 Set the POWER switch to view it . B Approximate possible recording time using the viewfinder. 14 Getting started 7 Slide the POWER switch up to (CHG) OFF. 2 Press OPEN and open the LCD panel. 3 Press DISPLAY/BATT INFO. Keep the button pressed to (CHG) OFF. 2 Open the battery...
... remove the battery pack Battery release tab POWER switch OPEN POWER switch You can check the battery's current charge level and its current remaining recording time both during charging or when the power is fully charged. Battery pack 1 Set the POWER switch to view it . B Approximate possible recording time using the viewfinder. 14 Getting started 7 Slide the POWER switch up to (CHG) OFF. 2 Press OPEN and open the LCD panel. 3 Press DISPLAY/BATT INFO. Keep the button pressed to (CHG) OFF. 2 Open the battery...
Camera Operations Guide
Page 15
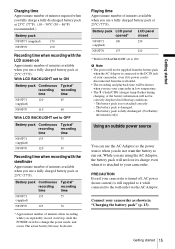
... attached correctly. - Connect your camcorder in low temperature. • The (flash)/CHG (charge) lamp flashes during charging, or the battery information will not be shorter. Battery pack LCD panel opened* NP-FF71 190 (supplied) NP-FF70 175 LCD panel closed 230 210 * With LCD BACKLIGHT set to change the power mode, and zoom. Getting started 15 b Note • The power will not be correctly displayed in "Charging the battery pack" (p. 13...
... attached correctly. - Connect your camcorder in low temperature. • The (flash)/CHG (charge) lamp flashes during charging, or the battery information will not be shorter. Battery pack LCD panel opened* NP-FF71 190 (supplied) NP-FF70 175 LCD panel closed 230 210 * With LCD BACKLIGHT set to change the power mode, and zoom. Getting started 15 b Note • The power will not be correctly displayed in "Charging the battery pack" (p. 13...

Camera Operations Guide
Page 22
... a "Memory Stick Duo." Camera recording lamp POWER switch 3 Select the recording mode. Slide the POWER switch while pressing the green button. To check the most recently recorded MPEG movie - To delete the movie, touch after playback is set to the grip belt. 4 Press REC START/STOP. Slide the POWER switch while pressing the green button. OPEN REC START/STOP 1 Remove the lens cap. To turn the power off Slide the POWER switch up . Recording Recording movies You can record movies on a tape, movies will be recorded along with monaural sound. Before recording...
... a "Memory Stick Duo." Camera recording lamp POWER switch 3 Select the recording mode. Slide the POWER switch while pressing the green button. To check the most recently recorded MPEG movie - To delete the movie, touch after playback is set to the grip belt. 4 Press REC START/STOP. Slide the POWER switch while pressing the green button. OPEN REC START/STOP 1 Remove the lens cap. To turn the power off Slide the POWER switch up . Recording Recording movies You can record movies on a tape, movies will be recorded along with monaural sound. Before recording...

Camera Operations Guide
Page 23
... to display the correct remaining battery time. C Recording status ([REC] (recording)) D Movie size E Recorded time (hour: minute: second) F Recording capacity of the "Memory Stick Duo" G "Memory Stick Duo" recording start indicator (appears for about 5 seconds) H Personal Menu button (p. 54) I Review button (p. 22) b Note • Before changing the battery pack, slide the POWER switch up to (CHG) OFF. • In the default setting, when you opened or closed the LCD panel, it takes about 5 minutes, the power will automatically turn...
... to display the correct remaining battery time. C Recording status ([REC] (recording)) D Movie size E Recorded time (hour: minute: second) F Recording capacity of the "Memory Stick Duo" G "Memory Stick Duo" recording start indicator (appears for about 5 seconds) H Personal Menu button (p. 54) I Review button (p. 22) b Note • Before changing the battery pack, slide the POWER switch up to (CHG) OFF. • In the default setting, when you opened or closed the LCD panel, it takes about 5 minutes, the power will automatically turn...

Camera Operations Guide
Page 24
... the SP mode. Do not remove the cassette. (The picture will be played back only on this information during playback by selecting [DATA CODE] in SP mode and LP mode on the same tape. - Recording for a longer time To record for a longer time on a "Memory Stick Duo" In the (MEMORY SET) menu, select [MOVIE SET], [ IMAGE SIZE], then [160 × 112] (p. 64). z Tip • If you do not use your camcorder for a long time, remove the cassette and store...
... the SP mode. Do not remove the cassette. (The picture will be played back only on this information during playback by selecting [DATA CODE] in SP mode and LP mode on the same tape. - Recording for a longer time To record for a longer time on a "Memory Stick Duo" In the (MEMORY SET) menu, select [MOVIE SET], [ IMAGE SIZE], then [160 × 112] (p. 64). z Tip • If you do not use your camcorder for a long time, remove the cassette and store...

Camera Operations Guide
Page 31
... displayed cyclically in the following operations: - b Note • Remove the dust from flashing. • The red-eye reduction may be automatically activated when you press PHOTO. Burst - When the red eye reduction feature is turned off No indicator displayed: Automatically flashes when there is complete. (In the CAMERA-TAPE mode, it . When the red eye reduction feature is turned on (Auto red-eye reduction): Pre-flashes to 8 feet). Shutter speed...
... displayed cyclically in the following operations: - b Note • Remove the dust from flashing. • The red-eye reduction may be automatically activated when you press PHOTO. Burst - When the red eye reduction feature is turned off No indicator displayed: Automatically flashes when there is complete. (In the CAMERA-TAPE mode, it . When the red eye reduction feature is turned on (Auto red-eye reduction): Pre-flashes to 8 feet). Shutter speed...

Camera Operations Guide
Page 36
... CAMERA-MEMORY lamp is dark and hard to AUTO. To record a subject behind a window covered with little contrast between the subject and its original size. Tips for when it is on, set [EXP. When the focus mode is easier to AUTO. FOCUS] in the background. 1 Set the FOCUS/ZOOM switch to MANUAL. 9 appears. 2 Rotate the focus ring and adjust the focus. 9 changes to when the focus cannot be displayed correctly if you are using...
... CAMERA-MEMORY lamp is dark and hard to AUTO. To record a subject behind a window covered with little contrast between the subject and its original size. Tips for when it is on, set [EXP. When the focus mode is easier to AUTO. FOCUS] in the background. 1 Set the FOCUS/ZOOM switch to MANUAL. 9 appears. 2 Rotate the focus ring and adjust the focus. 9 changes to when the focus cannot be displayed correctly if you are using...

Camera Operations Guide
Page 55
... power mode of the setting required for more than 5 minutes. You can select automatic adjustment or manual adjustment of your camcorder for recording. Touch to return to the previous screen. • It is selected, touch on the screen displayed after step 2 (p. 54) to the default setting if you adjust the flexible spot meter, exposure, PROGRAM AE, white balance, or shutter speed. Setting the AUTO LOCK switch ON Your camcorder automatically adjusts the settings needed...
... power mode of the setting required for more than 5 minutes. You can select automatic adjustment or manual adjustment of your camcorder for recording. Touch to return to the previous screen. • It is selected, touch on the screen displayed after step 2 (p. 54) to the default setting if you adjust the flexible spot meter, exposure, PROGRAM AE, white balance, or shutter speed. Setting the AUTO LOCK switch ON Your camcorder automatically adjusts the settings needed...

Camera Operations Guide
Page 63
... settings you can adjust vary depending on the "Memory Stick Duo" you are using. 1 Select [NORMAL] or [EXP. The screen shows the items you can currently operate. Select to record from 4 (1152 × 864 image size) to see "Selecting menu items" (p. 54). In the [NORMAL] setting, the maximum number of pictures recordable on the power mode of your TV or a computer. ,continued Using the Menu 63 b Note • The flash...
... settings you can adjust vary depending on the "Memory Stick Duo" you are using. 1 Select [NORMAL] or [EXP. The screen shows the items you can currently operate. Select to record from 4 (1152 × 864 image size) to see "Selecting menu items" (p. 54). In the [NORMAL] setting, the maximum number of pictures recordable on the power mode of your TV or a computer. ,continued Using the Menu 63 b Note • The flash...

Camera Operations Guide
Page 109
... not operate your camcorder, the camcorder is stuck to the drum due to [ON] in the (STANDARD SET) menu is set to AUTO or AUTO/ZOOM. (p. 132) cThe recording conditions are using a cassette without Cassette Memory. (p. 120) • The cassette is switched off . cSet the write-protect tab to REC or insert a new cassette. (p. 120) cThe tape is automatically turned off . cPress LCD BACKLIGHT. (p. 16) The shutter sound is not turned on the screen. Cancel...
... not operate your camcorder, the camcorder is stuck to the drum due to [ON] in the (STANDARD SET) menu is set to AUTO or AUTO/ZOOM. (p. 132) cThe recording conditions are using a cassette without Cassette Memory. (p. 120) • The cassette is switched off . cSet the write-protect tab to REC or insert a new cassette. (p. 120) cThe tape is automatically turned off . cPress LCD BACKLIGHT. (p. 16) The shutter sound is not turned on the screen. Cancel...

Camera Operations Guide
Page 110
... displayed • The tape was recorded without Cassette Memory. (p. 120) • The cassette is heard. cSet [MULTI-SOUND] to [ON] in the (EDIT/PLAY) menu. (p. 73) • There is a blank section in the REC function is being played. • The data code on the screen. END SEARCH does not work. • The cassette was ejected after recording when using the cleaning cassette (optional). (p. 127) Cannot perform the Date search with the recording date displayed on the picture. Playback...
... displayed • The tape was recorded without Cassette Memory. (p. 120) • The cassette is heard. cSet [MULTI-SOUND] to [ON] in the (EDIT/PLAY) menu. (p. 73) • There is a blank section in the REC function is being played. • The data code on the screen. END SEARCH does not work. • The cassette was ejected after recording when using the cleaning cassette (optional). (p. 127) Cannot perform the Date search with the recording date displayed on the picture. Playback...

Camera Operations Guide
Page 122
... improper use or keep "Memory Stick Duo" media out of the reach of the write-protect tab* may damage the device. • Do not insert a Memory Stick Duo adaptor without a "Memory Stick Duo" attached. Places under direct sunlight. - Doing so may cause a malfunction. The position or the shape of small children. Compensation for replacement while your camcorder, or remove the battery pack for damaged image data...
... improper use or keep "Memory Stick Duo" media out of the reach of the write-protect tab* may damage the device. • Do not insert a Memory Stick Duo adaptor without a "Memory Stick Duo" attached. Places under direct sunlight. - Doing so may cause a malfunction. The position or the shape of small children. Compensation for replacement while your camcorder, or remove the battery pack for damaged image data...

Camera Operations Guide
Page 127
... screen during the operation. 1 Slide the POWER switch up to (CHG) OFF. 2 Eject the cassette and "Memory Stick Duo" from your camcorder, then disconnect any connecting cables except the AC Adaptor from your camcorder. 3 Slide the POWER switch repeatedly to the wall outlet using the supplied AC Adaptor during recording. • The video head suffers from wear after using your camcorder, the back of the supplied "Memory Stick Duo." When you use the LCD Cleaning...
... screen during the operation. 1 Slide the POWER switch up to (CHG) OFF. 2 Eject the cassette and "Memory Stick Duo" from your camcorder, then disconnect any connecting cables except the AC Adaptor from your camcorder. 3 Slide the POWER switch repeatedly to the wall outlet using the supplied AC Adaptor during recording. • The video head suffers from wear after using your camcorder, the back of the supplied "Memory Stick Duo." When you use the LCD Cleaning...

Camera Operations Guide
Page 129
...) Video signal NTSC color, EIA standards Usable cassette Mini DV cassette with DC 2.5 to a 35 mm still camera In CAMERA-TAPE: 49 - 588 mm (1 15/16 - 23 1/4 in.) In CAMERA-MEMORY: 41 - 492 mm (1 5/8 - 19 3/8 in this format can have additional information such as your camcorder's setting information at the time of recording. Files in .) Color temperature [AUTO], [ONE PUSH], [INDOOR] (3 200 K), [OUTDOOR] (5 800 K) Minimum illumination 5 1x (lux) (F 1.6) Input/Output connectors Audio/Video input/output...
...) Video signal NTSC color, EIA standards Usable cassette Mini DV cassette with DC 2.5 to a 35 mm still camera In CAMERA-TAPE: 49 - 588 mm (1 15/16 - 23 1/4 in.) In CAMERA-MEMORY: 41 - 492 mm (1 5/8 - 19 3/8 in this format can have additional information such as your camcorder's setting information at the time of recording. Files in .) Color temperature [AUTO], [ONE PUSH], [INDOOR] (3 200 K), [OUTDOOR] (5 800 K) Minimum illumination 5 1x (lux) (F 1.6) Input/Output connectors Audio/Video input/output...

Camera Operations Guide
Page 132
...) F Microphone (p. 98) G DISPLAY/BATT INFO button (p. 14) H FOCUS/ZOOM switch (p. 25, 35) AUTO/ZOOM Select to suppress unwanted reflection and faithfully reproduce colors. I BACK LIGHT button (p. 33) J AUTO LOCK switch (p. 55) K Camera recording lamp (p. 22) 132 Quick Reference MTF stands for video cameras and offers a quality as fine as a Carl Zeiss lens. 1 6 2 3 4 5 A Multi-Angle Grip (p. 4) B Flash (p. 31) C Zoom ring (p. 25)/Focus ring (p. 36) D Lens (Carl Zeiss Lens) Your camcorder is adjusted automatically. MANUAL Select to adjust the focus automatically...
...) F Microphone (p. 98) G DISPLAY/BATT INFO button (p. 14) H FOCUS/ZOOM switch (p. 25, 35) AUTO/ZOOM Select to suppress unwanted reflection and faithfully reproduce colors. I BACK LIGHT button (p. 33) J AUTO LOCK switch (p. 55) K Camera recording lamp (p. 22) 132 Quick Reference MTF stands for video cameras and offers a quality as fine as a Carl Zeiss lens. 1 6 2 3 4 5 A Multi-Angle Grip (p. 4) B Flash (p. 31) C Zoom ring (p. 25)/Focus ring (p. 36) D Lens (Carl Zeiss Lens) Your camcorder is adjusted automatically. MANUAL Select to adjust the focus automatically...

Camera Operations Guide
Page 138
... Charging the battery Battery pack 13 Pre-installed button-type battery 128 Clock set (CLOCK SET) ......18, 82 COLOR BAR 79 Color intensity (CAMERA COLOR 59 Customizing Personal Menu 83 D Data code (DATA CODE) .....50, 79 Date search 53 Date/time 50 Delete Deleting pictures .......100 DEMO MODE 71 Digital convert function (A/V c DV OUT) .......78 Digital effect (D.EFFECT)..........38, 45 Digital program editing (PROG.EDIT 91 DIGITAL ZOOM 61 Direct Access to "Click to DVD" See BURN DVD Direct Access to Video CD Burn See BURN VCD Display DISPLAY 80 Display indicators...
... Charging the battery Battery pack 13 Pre-installed button-type battery 128 Clock set (CLOCK SET) ......18, 82 COLOR BAR 79 Color intensity (CAMERA COLOR 59 Customizing Personal Menu 83 D Data code (DATA CODE) .....50, 79 Date search 53 Date/time 50 Delete Deleting pictures .......100 DEMO MODE 71 Digital convert function (A/V c DV OUT) .......78 Digital effect (D.EFFECT)..........38, 45 Digital program editing (PROG.EDIT 91 DIGITAL ZOOM 61 Direct Access to "Click to DVD" See BURN DVD Direct Access to Video CD Burn See BURN VCD Display DISPLAY 80 Display indicators...

Camera Operations Guide
Page 139
... Menu (P-MENU 54 PictBridge 103 Picture effect (PICT. REC-STL) .........70 Interval recording (INTERVAL REC) .....69 J JPEG 121 L LANC 133 Language LANGUAGE.........21, 82 LCD back light (LCD BL LEVEL) ......78 LCD BACKLIGHT button 16, 131 LCD brightness (LCD BRIGHT) ..........16 LCD COLOR 78 LCD screen 3 LCD/VF SET 77 LP (Long Play) See Recording mode (REC MODE) Luminance key (LUMI. EFFECT)......... 67 Picture search 45 Playback (VAR.SPD PB) Double speed 45 Frame 45 Reverse 45 Slow 45 Playback Zoom (PB ZOOM 49 Playing time...
... Menu (P-MENU 54 PictBridge 103 Picture effect (PICT. REC-STL) .........70 Interval recording (INTERVAL REC) .....69 J JPEG 121 L LANC 133 Language LANGUAGE.........21, 82 LCD back light (LCD BL LEVEL) ......78 LCD BACKLIGHT button 16, 131 LCD brightness (LCD BRIGHT) ..........16 LCD COLOR 78 LCD screen 3 LCD/VF SET 77 LP (Long Play) See Recording mode (REC MODE) Luminance key (LUMI. EFFECT)......... 67 Picture search 45 Playback (VAR.SPD PB) Double speed 45 Frame 45 Reverse 45 Slow 45 Playback Zoom (PB ZOOM 49 Playing time...

Camera Operations Guide
Page 140
... sound See MULTI-SOUND T Tape counter 23 Telephoto See Zoom Time code 23 Title (Cassette Memory) TAPE TITLE 75 TITL ERASE 74 TITLE 73 TITLE DISP 75 Title search 52 TRAIL 39 TV color systems 119 U USB jack 133 USB Streaming USB-CAMERA .......... 79 USB-PLY/EDT........... 79 Using abroad 119 V Video head 127 VIDEO INPUT 78 Viewfinder 16 Brightness (VF B.LIGHT)......78 Volume (VOLUME)....44, 47 W Warning indicators...........114 Warning messages ...........115 White balance (WHITE BAL 57 WHITE...
... sound See MULTI-SOUND T Tape counter 23 Telephoto See Zoom Time code 23 Title (Cassette Memory) TAPE TITLE 75 TITL ERASE 74 TITLE 73 TITLE DISP 75 Title search 52 TRAIL 39 TV color systems 119 U USB jack 133 USB Streaming USB-CAMERA .......... 79 USB-PLY/EDT........... 79 Using abroad 119 V Video head 127 VIDEO INPUT 78 Viewfinder 16 Brightness (VF B.LIGHT)......78 Volume (VOLUME)....44, 47 W Warning indicators...........114 Warning messages ...........115 White balance (WHITE BAL 57 WHITE...


