
Operating Instructions
Page 42
... not installed and used in the spaces provided below. NL The socket-outlet should be installed near the equipment and be determined by BBE Sound, Inc. To reduce the risk of BBE Sound, Inc. Record the model and serial numbers in accordance with Canadian ICES-003. Manufactured under one or more of Conformity Trade Name: SONY Model: FWD-40LX2F/FWD- 40LX2X/FWD-32LX2F/ FWD-32LX2X...
... not installed and used in the spaces provided below. NL The socket-outlet should be installed near the equipment and be determined by BBE Sound, Inc. To reduce the risk of BBE Sound, Inc. Record the model and serial numbers in accordance with Canadian ICES-003. Manufactured under one or more of Conformity Trade Name: SONY Model: FWD-40LX2F/FWD- 40LX2X/FWD-32LX2F/ FWD-32LX2X...
Operating Instructions
Page 43
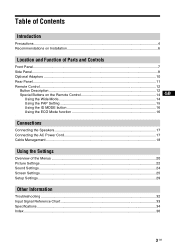
... Installation 6 Location and Function of Parts and Controls Front Panel...7 Side Panel...8 Optional Adaptors ...10 Rear Panel ...11 Remote Control ...12 Button Description...12 Special Buttons on the Remote Control 14 GB Using the Wide Mode...14 Using the PAP Setting 15 Using the ID MODE button 16 Using the ECO Mode function 16 x Connections Connecting the Speakers...17 Connecting the AC Power Cord 17 Cable Management...18 Using the Settings Overview of the Menus ...20 Picture Settings ...22 Sound Settings...24 Screen Settings...25 Setup Settings...29 Other Information Troubleshooting...
... Installation 6 Location and Function of Parts and Controls Front Panel...7 Side Panel...8 Optional Adaptors ...10 Rear Panel ...11 Remote Control ...12 Button Description...12 Special Buttons on the Remote Control 14 GB Using the Wide Mode...14 Using the PAP Setting 15 Using the ID MODE button 16 Using the ECO Mode function 16 x Connections Connecting the Speakers...17 Connecting the AC Power Cord 17 Cable Management...18 Using the Settings Overview of the Menus ...20 Picture Settings ...22 Sound Settings...24 Screen Settings...25 Setup Settings...29 Other Information Troubleshooting...
Operating Instructions
Page 44
... alcohol, benzine or thinner for a long period of red, blue or green, or dark spots appearing on it , use the optional display stand. Avoid touching the LCD screen. They may occur. On repacking Do not throw away the carton and packing materials. Never pull the cord itself. • When you display a still image continuously, a ghosting may damage the finish...
... alcohol, benzine or thinner for a long period of red, blue or green, or dark spots appearing on it , use the optional display stand. Avoid touching the LCD screen. They may occur. On repacking Do not throw away the carton and packing materials. Never pull the cord itself. • When you display a still image continuously, a ghosting may damage the finish...
Operating Instructions
Page 47
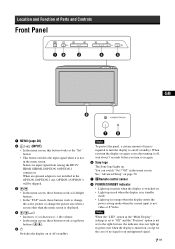
... "Position" option is not in the menu screen. Selects an input signal from among the HD15/ HDMI 1/HDMI 2/OPTION 1/OPTION 2 connectors. Note To protect the panel, a certain amount of time is not video or S Video. Location and Function of Parts and Controls Front Panel GB 1 MENU (page 20) 2 / (INPUT) • In the menu screen, this button works as the "Set" button. • This button switches the input signal when it on again. 6 Sony logo The Sony logo lights up.
... "Position" option is not in the menu screen. Selects an input signal from among the HD15/ HDMI 1/HDMI 2/OPTION 1/OPTION 2 connectors. Note To protect the panel, a certain amount of time is not video or S Video. Location and Function of Parts and Controls Front Panel GB 1 MENU (page 20) 2 / (INPUT) • In the menu screen, this button works as the "Set" button. • This button switches the input signal when it on again. 6 Sony logo The Sony logo lights up.
Operating Instructions
Page 48
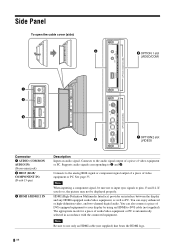
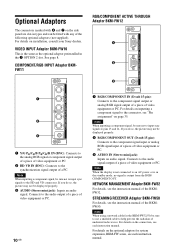
... connected equipment. Connects to use only an HDMI cable (not supplied) that bears the HDMI logo. 8 GB Note When inputting a component signal, be displayed properly. Supports audio signals corresponding to pins 13 and 14. You can enjoy enhanced or high-definition video, and two-channel digital audio. Side Panel To open the cable cover (side) 4 IN 5 OPTION 1 slot (VIDEO/COM) OPTION 1(VIDEO/COM) MONITOR CONTROL ADAPTOR CONTROL S OUT REMOTE RGB/COMPONENT IN AUDIO IN COM MON AUDIO HD 15 1 2 3 S VIDEO...
... connected equipment. Connects to use only an HDMI cable (not supplied) that bears the HDMI logo. 8 GB Note When inputting a component signal, be displayed properly. Supports audio signals corresponding to pins 13 and 14. You can enjoy enhanced or high-definition video, and two-channel digital audio. Side Panel To open the cable cover (side) 4 IN 5 OPTION 1 slot (VIDEO/COM) OPTION 1(VIDEO/COM) MONITOR CONTROL ADAPTOR CONTROL S OUT REMOTE RGB/COMPONENT IN AUDIO IN COM MON AUDIO HD 15 1 2 3 S VIDEO...
Operating Instructions
Page 49
... or the S Video connector. The video signal or the S Video signal is preinstalled.) 7 OPTION 2 slot (VIDEO port) Note This adaptor won't work when installed in 5 OPTION 1 slot. Connector 4 MONITOR CONTROL ADAPTOR (The BKM-FW20 is preinstalled.) Description CONTROL S IN/OUT (Mini jack): You can install an optional adaptor with video signal input/output function into this slot. REMOTE (D-sub 9-pin): This connector allows remote control of the video equipment or another display.
... or the S Video connector. The video signal or the S Video signal is preinstalled.) 7 OPTION 2 slot (VIDEO port) Note This adaptor won't work when installed in 5 OPTION 1 slot. Connector 4 MONITOR CONTROL ADAPTOR (The BKM-FW20 is preinstalled.) Description CONTROL S IN/OUT (Mini jack): You can install an optional adaptor with video signal input/output function into this slot. REMOTE (D-sub 9-pin): This connector allows remote control of the video equipment or another display.
Operating Instructions
Page 50
... connected to the component signal input or analog RGB signal input of a piece of video equipment or PC. 3 AUDIO IN (Stereo mini jack): Inputs an audio signal. Note When using a network cable for system expansion, BKM-FW series, see each instruction manual. If you do so, the picture may not be displayed properly. 2 RGB/COMPONENT OUT (D-sub 15-pin): Connects to an AC power or is in the standby mode, no signal is output from the RGB/ COMPONENT...
... connected to the component signal input or analog RGB signal input of a piece of video equipment or PC. 3 AUDIO IN (Stereo mini jack): Inputs an audio signal. Note When using a network cable for system expansion, BKM-FW series, see each instruction manual. If you do so, the picture may not be displayed properly. 2 RGB/COMPONENT OUT (D-sub 15-pin): Connects to an AC power or is in the standby mode, no signal is output from the RGB/ COMPONENT...

Operating Instructions
Page 51
... For more details on the screen and enjoy viewing with the speakers. Once you can output the audio matching the signal displayed on connecting the speakers, see page 19. Rear Panel GB R L SPEAKER Parts 1 AC IN socket 2 SPEAKER socket 3 Stand installation hooks Description Connect the supplied AC power cord to this socket and to this socket, you connect the AC power cord, the POWER/STANDBY indicator lights up in red and the display goes into the standby mode. See page 17.
... For more details on the screen and enjoy viewing with the speakers. Once you can output the audio matching the signal displayed on connecting the speakers, see page 19. Rear Panel GB R L SPEAKER Parts 1 AC IN socket 2 SPEAKER socket 3 Stand installation hooks Description Connect the supplied AC power cord to this socket and to this socket, you connect the AC power cord, the POWER/STANDBY indicator lights up in red and the display goes into the standby mode. See page 17.
Operating Instructions
Page 53
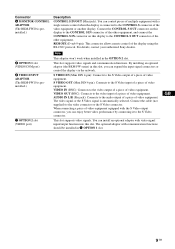
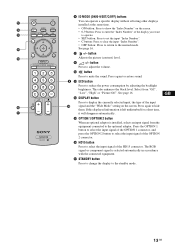
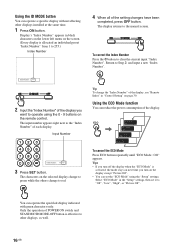
... OPTION2 DISPLAY HDMI2 PICTURE ECO SOUND ON ID MODE OFF SET RM-FW001 9 ID MODE (ON/0-9/SET/C/OFF) buttons You can operate a specific display without affecting other displays installed at the same time. • ON button: Press to show the "Index Number" on the screen. Press again to reduce the power consumption by adjusting the backlight brightness. Press again to the standby mode. qj STANDBY button Press to change the display to hide them. button Press...
... OPTION2 DISPLAY HDMI2 PICTURE ECO SOUND ON ID MODE OFF SET RM-FW001 9 ID MODE (ON/0-9/SET/C/OFF) buttons You can operate a specific display without affecting other displays installed at the same time. • ON button: Press to show the "Index Number" on the screen. Press again to reduce the power consumption by adjusting the backlight brightness. Press again to the standby mode. qj STANDBY button Press to change the display to hide them. button Press...
Operating Instructions
Page 56
... setting changes have been completed, press OFF button. Only the operation of POWER ON switch and STANDBY/ID MODE-OFF button is allocated an individual preset "Index Number" from 1 to 255.) Index Number 4 When all of the display, see "Remote Index" in black characters on the lower left menu on the display except "Picture Off". • You can operate a specific display without affecting other displays, as well. 16 GB Using the ID MODE button...
... setting changes have been completed, press OFF button. Only the operation of POWER ON switch and STANDBY/ID MODE-OFF button is allocated an individual preset "Index Number" from 1 to 255.) Index Number 4 When all of the display, see "Remote Index" in black characters on the lower left menu on the display except "Picture Off". • You can operate a specific display without affecting other displays, as well. 16 GB Using the ID MODE button...
Operating Instructions
Page 63
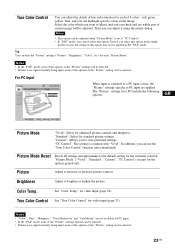
... alter the "Picture" settings ("Picture", "Brightness", "Color", etc.) for each of 4 colors : red, green, yellow, blue, and you can use the "True Color Control" function (after-mentioned). "Standard": Select for video input (page 22). Brightness Adjust to increase or decrease picture contrast. for standard picture settings. picture screen, the setting of the "Picture" setting can be selected. 23 GB "TC Control": The setting is switched to a PC input source, the "Picture" settings specific to store preferred settings. Notes • "Color", "Hue...
... alter the "Picture" settings ("Picture", "Brightness", "Color", etc.) for each of 4 colors : red, green, yellow, blue, and you can use the "True Color Control" function (after-mentioned). "Standard": Select for video input (page 22). Brightness Adjust to increase or decrease picture contrast. for standard picture settings. picture screen, the setting of the "Picture" setting can be selected. 23 GB "TC Control": The setting is switched to a PC input source, the "Picture" settings specific to store preferred settings. Notes • "Color", "Hue...
Operating Instructions
Page 64
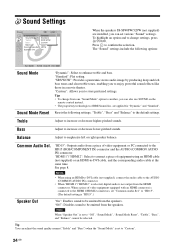
... remote control instead. • The proprietary technologies of equipment using an HDMI-to-DVI cable (not supplied), connect the audio cable to the AUDIO (COMMON AUDIO IN) connector. • When "HDMI 1"/"HDMI 2" is selected, digital audio is "HD15".) Speaker Out "On": Enables sound to "Custom". 24 GB When a piece of video equipment or PC connected to increase or decrease lower-pitched sounds. Common Audio Sel. "HDMI 1"/"HDMI 2": Select to connect a piece of BBE Sound, Inc. Sound Settings Sound HDMI 1 Sound Mode...
... remote control instead. • The proprietary technologies of equipment using an HDMI-to-DVI cable (not supplied), connect the audio cable to the AUDIO (COMMON AUDIO IN) connector. • When "HDMI 1"/"HDMI 2" is selected, digital audio is "HD15".) Speaker Out "On": Enables sound to "Custom". 24 GB When a piece of video equipment or PC connected to increase or decrease lower-pitched sounds. Common Audio Sel. "HDMI 1"/"HDMI 2": Select to connect a piece of BBE Sound, Inc. Sound Settings Sound HDMI 1 Sound Mode...
Operating Instructions
Page 67
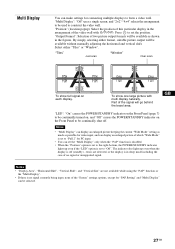
... is disabled. • When the "Position" option is set to the right-bottom, the POWER/STANDBY indicator lights up even when the display is set to form a video wall. Select either format, suitable picture output will go behind the bezel area. By simply selecting either "Tiles" or "Window". To show full signal on the Front Panel to be used to set to be continually shut off (standby) , errors...
... is disabled. • When the "Position" option is set to the right-bottom, the POWER/STANDBY indicator lights up even when the display is set to form a video wall. Select either format, suitable picture output will go behind the bezel area. By simply selecting either "Tiles" or "Window". To show full signal on the Front Panel to be used to set to be continually shut off (standby) , errors...

Operating Instructions
Page 68
... Wide Mode : Auto Wide : 4:3 Default : Display Area : Auto Adjustment Phase : Pitch : Horizontal Shift : Vertical Shift : Vertical Size : Reset PAP Setting Multi Display Sel: Set: Normal 0 0 0 0 Back: Exit: MENU When input is switched to PC input source, the "Screen" settings specific for PC input are not available for PC input. 28 GB Note that "Auto Adjustment" may not work well with certain input signals. Pitch Select to choose a correction. Press G/g and press to adjust the pitch when the picture...
... Wide Mode : Auto Wide : 4:3 Default : Display Area : Auto Adjustment Phase : Pitch : Horizontal Shift : Vertical Shift : Vertical Size : Reset PAP Setting Multi Display Sel: Set: Normal 0 0 0 0 Back: Exit: MENU When input is switched to PC input source, the "Screen" settings specific for PC input are not available for PC input. 28 GB Note that "Auto Adjustment" may not work well with certain input signals. Pitch Select to choose a correction. Press G/g and press to adjust the pitch when the picture...
Operating Instructions
Page 69
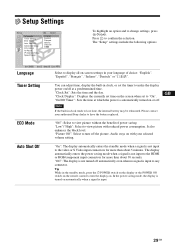
... also enhances the black level. Audio stays on /off at which the power is input. 29 GB In the power saving mode, the display is turned on automatically when a signal is automatically turned on the remote control to the HDMI or RGB/component input connectors for more than about 30 seconds. The "Setup" settings include the following options: Sel: Set: Back: Exit: MENU Language Select to view picture without the benefit...
... also enhances the black level. Audio stays on /off at which the power is input. 29 GB In the power saving mode, the display is turned on automatically when a signal is automatically turned on the remote control to the HDMI or RGB/component input connectors for more than about 30 seconds. The "Setup" settings include the following options: Sel: Set: Back: Exit: MENU Language Select to view picture without the benefit...
Operating Instructions
Page 70
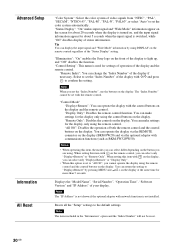
... "Setup" settings to light up, and "Off" disables the function. Advanced Setup Information All Reset "Color System": Select the color system of video signals from "NTSC", "PAL", "SECAM", "NTSC4.43", "PAL-M", "PAL-N", "PAL60", or select "Auto" to set the "Index Number" of the display with F/f and press to confirm the setting. "Display Only": Disables the remote control function. "All Off": Disables the operation of your display. Notes • When operating this item with network...
... "Setup" settings to light up, and "Off" disables the function. Advanced Setup Information All Reset "Color System": Select the color system of video signals from "NTSC", "PAL", "SECAM", "NTSC4.43", "PAL-M", "PAL-N", "PAL60", or select "Auto" to set the "Index Number" of the display with F/f and press to confirm the setting. "Display Only": Disables the remote control function. "All Off": Disables the operation of your display. Notes • When operating this item with network...
Operating Instructions
Page 72
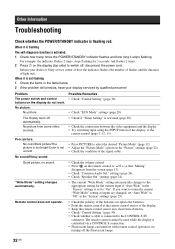
... of light out). No picture. The display turns off the fluorescent lamps. 32 GB No picture from the screen (page 13). • Check "Common Audio Sel." The remote control cannot be used while the display is flashing red. Inform your display serviced by qualified personnel Problem The power switch and control buttons on the display do not work. Good picture, no sound. For example, the indicator flashes 2 times, stops flashing for the current input if "Auto Wide" in the "Picture" settings...
... of light out). No picture. The display turns off the fluorescent lamps. 32 GB No picture from the screen (page 13). • Check "Common Audio Sel." The remote control cannot be used while the display is flashing red. Inform your display serviced by qualified personnel Problem The power switch and control buttons on the display do not work. Good picture, no sound. For example, the indicator flashes 2 times, stops flashing for the current input if "Auto Wide" in the "Picture" settings...
Operating Instructions
Page 74
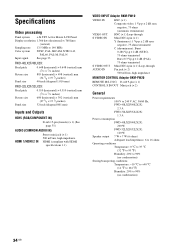
... Picture size Panel size 0.510 (horizontal) × 0.510 (vertical) mm (1/32 × 1/32 inches) 698 (horizontal) × 392 (vertical) mm (27 1/2 × 15 1/2 inches) 32-inch (diagonal 801 mm) Inputs and Outputs HD15 (RGB/COMPONENT IN) D-sub 15-pin (female) (× 1) (See page 35.) AUDIO (COMMON AUDIO IN) HDMI 1/HDMI 2 IN Stereo mini jack (× 1) 500 mVrms, high impedance HDMI (compliant with HDMI specifications 1.1) VIDEO INPUT Adaptor BKM-FW10 VIDEO...
... Picture size Panel size 0.510 (horizontal) × 0.510 (vertical) mm (1/32 × 1/32 inches) 698 (horizontal) × 392 (vertical) mm (27 1/2 × 15 1/2 inches) 32-inch (diagonal 801 mm) Inputs and Outputs HD15 (RGB/COMPONENT IN) D-sub 15-pin (female) (× 1) (See page 35.) AUDIO (COMMON AUDIO IN) HDMI 1/HDMI 2 IN Stereo mini jack (× 1) 500 mVrms, high impedance HDMI (compliant with HDMI specifications 1.1) VIDEO INPUT Adaptor BKM-FW10 VIDEO...
Operating Instructions
Page 75
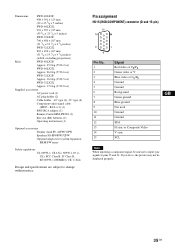
... Red ground Green ground Blue ground Not used Ground Ground SDA H sync or Composite Video V sync SCL GB Note When inputting a component signal, be displayed properly. 35 GB If you do so, the picture may not be sure not to input sync signals to change without notice. RCA × 3) (1) BNC-RCA adaptor (1) Remote Control RM-FW001 (1) Size AA (R6) batteries (2) Operating instructions (1) Optional accessories Display stand SU-42FW/32FW Speakers...
... Red ground Green ground Blue ground Not used Ground Ground SDA H sync or Composite Video V sync SCL GB Note When inputting a component signal, be displayed properly. 35 GB If you do so, the picture may not be sure not to input sync signals to change without notice. RCA × 3) (1) BNC-RCA adaptor (1) Remote Control RM-FW001 (1) Size AA (R6) batteries (2) Operating instructions (1) Optional accessories Display stand SU-42FW/32FW Speakers...
Operating Instructions
Page 255
... 32 Sony 标志 7, 29 SOUND 键 12 Sound Mode 19, 23 Sound Mode Reset 设) 19, 23 Sound 设定 19, 23 SPEAKER 插座 11 Speaker Out 19, 23 Speed Setup 20, 30 SRS WOW 23 Standard 21, 22, 23 STANDBY 键 13 Status Display 29 Swap 25 T TC Control 21, 22 Tiles 26 Timer Setting 20, 28 Treble 19, 23 True Color Control 19...
... 32 Sony 标志 7, 29 SOUND 键 12 Sound Mode 19, 23 Sound Mode Reset 设) 19, 23 Sound 设定 19, 23 SPEAKER 插座 11 Speaker Out 19, 23 Speed Setup 20, 30 SRS WOW 23 Standard 21, 22, 23 STANDBY 键 13 Status Display 29 Swap 25 T TC Control 21, 22 Tiles 26 Timer Setting 20, 28 Treble 19, 23 True Color Control 19...


