
Operating Instructions
Page 2
... the disc's label, dry the label before playing. 2US As the laser beam used in the U.S.A Owner's Record The model and serial numbers are cautioned that may cause harmful interference to rain or moisture. Record the serial number in this CD/DVD player is intended to alert the user to the presence of important operating and maintenance (servicing) instructions in this product. These limits are designed to direct...
... the disc's label, dry the label before playing. 2US As the laser beam used in the U.S.A Owner's Record The model and serial numbers are cautioned that may cause harmful interference to rain or moisture. Record the serial number in this CD/DVD player is intended to alert the user to the presence of important operating and maintenance (servicing) instructions in this product. These limits are designed to direct...
Operating Instructions
Page 4
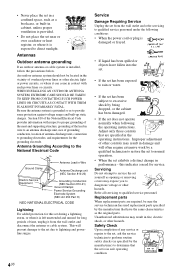
... Clamps Power Service Grounding Electrode System (NEC Art 250 Part H) NEC-NATIONAL ELECTRICAL CODE Lightning For added protection for this indicates a need for service. Be sure the antenna system is grounded so as opening or removing covers may result in safe operating condition. 4US Adjust only those controls that the set is installed, follow the precautions below. Servicing Do not attempt to service the set yourself...
... Clamps Power Service Grounding Electrode System (NEC Art 250 Part H) NEC-NATIONAL ELECTRICAL CODE Lightning For added protection for this indicates a need for service. Be sure the antenna system is grounded so as opening or removing covers may result in safe operating condition. 4US Adjust only those controls that the set is installed, follow the precautions below. Servicing Do not attempt to service the set yourself...

Operating Instructions
Page 6
... Control Menu Display 14 Hookups 17 Hooking Up the Player 17 Step 1: Unpacking 17 Step 2: Inserting Batteries Into the Remote 17 Step 3: Connecting the Video Cords 18 Step 4: Connecting the Audio Cords 21 Step 5: Connecting the Power Cord 23 Step 6: Quick Setup 23 Playing Discs 25 Playing Discs 25 Resuming Playback From the Point Where You Stopped the Disc (Multi-disc Resume 27 Using the DVD's Menu 28 Selecting "ORIGINAL" or "PLAY LIST" on a DVD-RW/DVD-R 28 Playing VIDEO CDs With PBC Functions (PBC Playback 29 Various Play Mode Functions (Program Play...
... Control Menu Display 14 Hookups 17 Hooking Up the Player 17 Step 1: Unpacking 17 Step 2: Inserting Batteries Into the Remote 17 Step 3: Connecting the Video Cords 18 Step 4: Connecting the Audio Cords 21 Step 5: Connecting the Power Cord 23 Step 6: Quick Setup 23 Playing Discs 25 Playing Discs 25 Resuming Playback From the Point Where You Stopped the Disc (Multi-disc Resume 27 Using the DVD's Menu 28 Selecting "ORIGINAL" or "PLAY LIST" on a DVD-RW/DVD-R 28 Playing VIDEO CDs With PBC Functions (PBC Playback 29 Various Play Mode Functions (Program Play...

Operating Instructions
Page 10
... protection technologies are some playback features may not work with some record companies. patents and other limited viewing uses only unless otherwise authorized by normal playback. The disc will not play if it has not been correctly finalized. Since this case, view the disc by Macrovision. However, since the audio material side does not conform to the operating instructions for home and other intellectual...
... protection technologies are some playback features may not work with some record companies. patents and other limited viewing uses only unless otherwise authorized by normal playback. The disc will not play if it has not been correctly finalized. Since this case, view the disc by Macrovision. However, since the audio material side does not conform to the operating instructions for home and other intellectual...

Operating Instructions
Page 15
... repeatedly. RESET Returns the settings in the order you are displayed on -screen display, the aspect ratio of the TV and the audio output signal. REPEAT (page 33) Plays the entire disc (all titles/all tracks/all albums) repeatedly or one , or an edited PLAY LIST. CUSTOM PICTURE MODE (page 53) Adjusts the video signal from the player. You can adjust various other settings. PARENTAL CONTROL (page 62) Set to choose the desired language of the on the screen. CUSTOM Setup...
... repeatedly. RESET Returns the settings in the order you are displayed on -screen display, the aspect ratio of the TV and the audio output signal. REPEAT (page 33) Plays the entire disc (all titles/all tracks/all albums) repeatedly or one , or an edited PLAY LIST. CUSTOM PICTURE MODE (page 53) Adjusts the video signal from the player. You can adjust various other settings. PARENTAL CONTROL (page 62) Set to choose the desired language of the on the screen. CUSTOM Setup...
Operating Instructions
Page 18
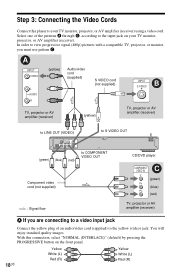
... standard quality images. With this player to your TV monitor, projector, or AV amplifier (receiver). Select one of an audio/video cord (supplied) to view progressive signal (480p) pictures with a compatible TV, projector, or monitor, you must use pattern C. Step 3: Connecting the Video Cords Connect this connection, select "NORMAL (INTERLACE)" (default) by pressing the PROGRESSIVE button on your TV monitor, projector, or AV amplifier (receiver) using a video cord. A INPUT VIDEO L AUDIO R (yellow) Audio/video cord (supplied) S VIDEO cord (not supplied) TV, projector or...
... standard quality images. With this player to your TV monitor, projector, or AV amplifier (receiver). Select one of an audio/video cord (supplied) to view progressive signal (480p) pictures with a compatible TV, projector, or monitor, you must use pattern C. Step 3: Connecting the Video Cords Connect this connection, select "NORMAL (INTERLACE)" (default) by pressing the PROGRESSIVE button on your TV monitor, projector, or AV amplifier (receiver) using a video cord. A INPUT VIDEO L AUDIO R (yellow) Audio/video cord (supplied) S VIDEO cord (not supplied) TV, projector or...
Operating Instructions
Page 19
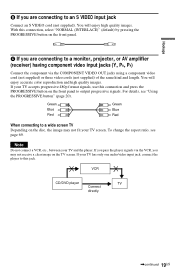
... change the aspect ratio, see "Using the PROGRESSIVE button" (page 20). C If you may not fit your TV screen. Green Blue Red Green Blue Red When connecting to an S VIDEO input jack Connect an S VIDEO cord (not supplied). If your TV has only one audio/video input jack, connect the player to this connection and press the PROGRESSIVE button on the front panel to a monitor, projector, or AV amplifier (receiver) having component video input jacks (Y, PB, PR) Connect the component...
... change the aspect ratio, see "Using the PROGRESSIVE button" (page 20). C If you may not fit your TV screen. Green Blue Red Green Blue Red When connecting to an S VIDEO input jack Connect an S VIDEO cord (not supplied). If your TV has only one audio/video input jack, connect the player to this connection and press the PROGRESSIVE button on the front panel to a monitor, projector, or AV amplifier (receiver) having component video input jacks (Y, PB, PR) Connect the component...

Operating Instructions
Page 22
... connection, make the appropriate settings in Quick Setup (page 23). 22US DTS sound tracks are trademarks of this player cannot be used with this connection. • In order to listen to DTS sound tracks, you set "DTS" to a digital audio input jack If your AV amplifier (receiver) has a Dolby Digital*1 or DTS*2 decoder and a digital input jack, use your speakers. • The TVS effects of Digital Theater Systems, Inc. Connect using the audio/video cord...
... connection, make the appropriate settings in Quick Setup (page 23). 22US DTS sound tracks are trademarks of this player cannot be used with this connection. • In order to listen to DTS sound tracks, you set "DTS" to a digital audio input jack If your AV amplifier (receiver) has a Dolby Digital*1 or DTS*2 decoder and a digital input jack, use your speakers. • The TVS effects of Digital Theater Systems, Inc. Connect using the audio/video cord...

Operating Instructions
Page 25
... the player turn off automatically whenever you play ). To turn this function on DVD recorders must be played. Note Discs created on or off, set "DTS" to "ON" in stop mode for more information about finalizing, refer to "ON" or "OFF" (page 70). To turn off the player Press [/1. Notes on playing DTS sound tracks on the TV or the amplifier (receiver). Adjust the volume on a DVD VIDEO • DTS audio signals are output...
... the player turn off automatically whenever you play ). To turn this function on DVD recorders must be played. Note Discs created on or off, set "DTS" to "ON" in stop mode for more information about finalizing, refer to "ON" or "OFF" (page 70). To turn off the player Press [/1. Notes on playing DTS sound tracks on the TV or the amplifier (receiver). Adjust the volume on a DVD VIDEO • DTS audio signals are output...
Operating Instructions
Page 26
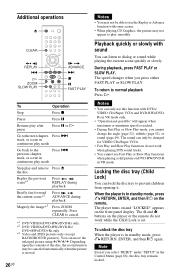
... the picture is in standby mode, press O RETURN, ENTER, and then [/1 on the front panel display. The speed changes when you select "RESET" under "SETUP" in the Control Menu (page 68), the disc tray remains locked. Locking the disc tray (Child Lock) You can listen to cancel. *1 DVD VIDEOs/DVD-RWs/DVD-Rs only. *2 DVD VIDEOs/DVD-RWs/DVD-Rs/ DVD+RWs/DVD+Rs only. *3 Video and JPEG pictures only (except BACKGROUND pictures). Additional operations CLEAR REPLAY ZOOM SLOW PLAY ADVANCE FAST PLAY To Operation Stop Press...
... the picture is in standby mode, press O RETURN, ENTER, and then [/1 on the front panel display. The speed changes when you select "RESET" under "SETUP" in the Control Menu (page 68), the disc tray remains locked. Locking the disc tray (Child Lock) You can listen to cancel. *1 DVD VIDEOs/DVD-RWs/DVD-Rs only. *2 DVD VIDEOs/DVD-RWs/DVD-Rs/ DVD+RWs/DVD+Rs only. *3 Video and JPEG pictures only (except BACKGROUND pictures). Additional operations CLEAR REPLAY ZOOM SLOW PLAY ADVANCE FAST PLAY To Operation Stop Press...
Operating Instructions
Page 28
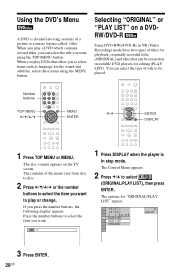
... to play or change. The disc's menu appears on a DVDRW/DVD-R Some DVD-RWs/DVD-Rs in stop mode. Using the DVD's Menu A DVD is in VR (Video Recording) mode have two types of titles for playback: originally recorded titles (ORIGINAL) and titles that allow you want . 1 1 Press DISPLAY when the player is divided into long sections of the menu vary from disc to disc. 2 Press C/X/x/c or the number buttons to select (ORIGINAL/PLAY LIST), then press ENTER. The Control Menu...
... to play or change. The disc's menu appears on a DVDRW/DVD-R Some DVD-RWs/DVD-Rs in stop mode. Using the DVD's Menu A DVD is in VR (Video Recording) mode have two types of titles for playback: originally recorded titles (ORIGINAL) and titles that allow you want . 1 1 Press DISPLAY when the player is divided into long sections of the menu vary from disc to disc. 2 Press C/X/x/c or the number buttons to select (ORIGINAL/PLAY LIST), then press ENTER. The Control Menu...
Operating Instructions
Page 30
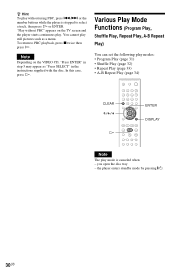
... number buttons while the player is canceled when: - the player enters standby mode by pressing [/1. 30US "Play without PBC" appears on the VIDEO CD, "Press ENTER" in the instructions supplied with the disc. In this case, press H. To return to select a track, then press H or ENTER. You cannot play mode is stopped to PBC playback, press x twice then press H. you open the disc tray. - Various Play Mode Functions (Program Play, Shuffle Play, Repeat Play, A-B Repeat Play) You can set...
... number buttons while the player is canceled when: - the player enters standby mode by pressing [/1. 30US "Play without PBC" appears on the VIDEO CD, "Press ENTER" in the instructions supplied with the disc. In this case, press H. To return to select a track, then press H or ENTER. You cannot play mode is stopped to PBC playback, press x twice then press H. you open the disc tray. - Various Play Mode Functions (Program Play, Shuffle Play, Repeat Play, A-B Repeat Play) You can set...
Operating Instructions
Page 49
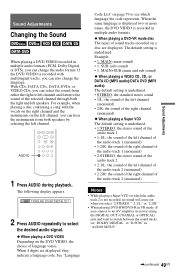
... recorded on page 79 to "D-PCM" in "AUDIO SETUP." ,continued 49US Sound Adjustments If the DVD VIDEO is underlined. With CDs, DATA CDs, DATA DVDs, or VIDEO CDs, you can select the sound from both the right and left channel. Sound Adjustments Changing the Sound When playing a DVD VIDEO recorded in multiple audio formats (PCM, Dolby Digital, or DTS), you can change the language. The default setting is recorded with the vocals on the right channel and the instruments on which language the code...
... recorded on page 79 to "D-PCM" in "AUDIO SETUP." ,continued 49US Sound Adjustments If the DVD VIDEO is underlined. With CDs, DATA CDs, DATA DVDs, or VIDEO CDs, you can select the sound from both the right and left channel. Sound Adjustments Changing the Sound When playing a DVD VIDEO recorded in multiple audio formats (PCM, Dolby Digital, or DTS), you can change the language. The default setting is recorded with the vocals on the right channel and the instruments on which language the code...
Operating Instructions
Page 65
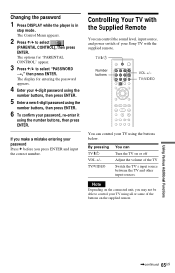
... Number buttons VOL +/- Note Depending on the supplied remote. The Control Menu appears. 2 Press X/x to select "PASSWORD t," then press ENTER. Controlling Your TV with the supplied remote. TV/VIDEO You can control your password, re-enter it using all or some of the TV Switch the TV's input source between the TV and other input sources. Using Various Additional Functions ,continued 65US Changing the password 1 Press DISPLAY while the player is in stop mode...
... Number buttons VOL +/- Note Depending on the supplied remote. The Control Menu appears. 2 Press X/x to select "PASSWORD t," then press ENTER. Controlling Your TV with the supplied remote. TV/VIDEO You can control your password, re-enter it using all or some of the TV Switch the TV's input source between the TV and other input sources. Using Various Additional Functions ,continued 65US Changing the password 1 Press DISPLAY while the player is in stop mode...
Operating Instructions
Page 69
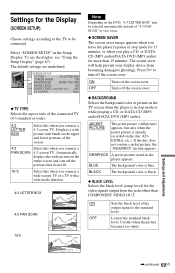
... picture on the TV screen when the player is already recorded on the disc (CDEXTRA, etc.). GRAPHICS A preset picture stored in stop mode for 15 minutes, or when you play a CD, or DATA CD (MP3 audio)/DATA DVD (MP3 audio) for more than COMPONENT VIDEO OUT. BLUE The background color is black. ◆ BLACK LEVEL Selects the black level (setup level) for the video signals output from becoming damaged (ghosting). BLACK The background color is blue. The default settings...
... picture on the TV screen when the player is already recorded on the disc (CDEXTRA, etc.). GRAPHICS A preset picture stored in stop mode for 15 minutes, or when you play a CD, or DATA CD (MP3 audio)/DATA DVD (MP3 audio) for more than COMPONENT VIDEO OUT. BLUE The background color is black. ◆ BLACK LEVEL Selects the black level (setup level) for the video signals output from becoming damaged (ghosting). BLACK The background color is blue. The default settings...
Operating Instructions
Page 71
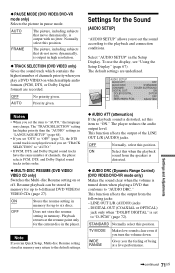
... DTS sound track is output with no jitter. To use the display, see "Using the Setup Display" (page 67). This function affects the output of channels priority when you set this order. ◆ MULTI-DISC RESUME (DVD VIDEO/ VIDEO CD only) Switches the Multi-disc Resume setting on which multiple audio formats (PCM, DTS, or Dolby Digital format) are underlined. TV MODE WIDE RANGE Makes low sounds clear even if you to set "DTS" to the playback and connection conditions. AUTO The picture, including...
... DTS sound track is output with no jitter. To use the display, see "Using the Setup Display" (page 67). This function affects the output of channels priority when you set this order. ◆ MULTI-DISC RESUME (DVD VIDEO/ VIDEO CD only) Switches the Multi-disc Resume setting on which multiple audio formats (PCM, DTS, or Dolby Digital format) are underlined. TV MODE WIDE RANGE Makes low sounds clear even if you to set "DTS" to the playback and connection conditions. AUTO The picture, including...
Operating Instructions
Page 72
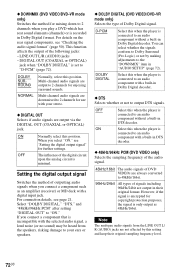
... is recorded in their original sampling frequency level. 72US For details on the rear signal components, see "Checking the audio signal format" (page 50). Multi-channel audio signals are output in Dolby Digital format. Select "DOLBY DIGITAL," "DTS," and "48kHz/96kHz PCM" after setting "DIGITAL OUT" to 2 channels for enjoying surround sounds. ◆ DOWNMIX (DVD VIDEO/DVD-VR mode only) Switches the method for mixing down to 2 channels when you connect a component that is incompatible with a digital input jack. DOLBY SURROUND Normally, select this when the player is connected...
... is recorded in their original sampling frequency level. 72US For details on the rear signal components, see "Checking the audio signal format" (page 50). Multi-channel audio signals are output in Dolby Digital format. Select "DOLBY DIGITAL," "DTS," and "48kHz/96kHz PCM" after setting "DIGITAL OUT" to 2 channels for enjoying surround sounds. ◆ DOWNMIX (DVD VIDEO/DVD-VR mode only) Switches the method for mixing down to 2 channels when you connect a component that is incompatible with a digital input jack. DOLBY SURROUND Normally, select this when the player is connected...

Operating Instructions
Page 73
... you connect your player directly to your TV, try connecting your player to help remedy the problem before requesting repairs. The picture does not fill the screen, even though the aspect ratio is set in "TV TYPE" under "SCREEN SETUP." , The aspect ratio of the following difficulties while using the PROGRESSIVE button on the front panel so that the power cord is connected securely. In this troubleshooting guide to your TV's S VIDEO input (page 18). , You have selected "PROGRESSIVE AUTO" or "PROGRESSIVE VIDEO" using the PROGRESSIVE button...
... you connect your player directly to your TV, try connecting your player to help remedy the problem before requesting repairs. The picture does not fill the screen, even though the aspect ratio is set in "TV TYPE" under "SCREEN SETUP." , The aspect ratio of the following difficulties while using the PROGRESSIVE button on the front panel so that the power cord is connected securely. In this troubleshooting guide to your TV's S VIDEO input (page 18). , You have selected "PROGRESSIVE AUTO" or "PROGRESSIVE VIDEO" using the PROGRESSIVE button...
Operating Instructions
Page 74
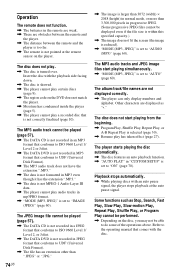
.... , The DATA DVD is not recorded in MP3 format that comes with an auto pause signal, the player stops playback at the remote sensor on the disc, you may not be displayed even if the file size is within this specified capacity.) , The image does not fit the screen (the image is reduced). , "MODE (MP3, JPEG)" is set to UDF (Universal Disk Format). , The MP3 audio track does not...
.... , The DATA DVD is not recorded in MP3 format that comes with an auto pause signal, the player stops playback at the remote sensor on the disc, you may not be displayed even if the file size is within this specified capacity.) , The image does not fit the screen (the image is reduced). , "MODE (MP3, JPEG)" is set to UDF (Universal Disk Format). , The MP3 audio track does not...

Operating Instructions
Page 80
... audio signal format 50 Child Lock 26 Connecting 18 Continuous play CD/VIDEO CD 25 DVD 25 Control Menu 14 CUSTOM 67 CUSTOM PARENTAL CONTROL 62 CUSTOM PICTURE MODE 53 CUSTOM SETUP 70 D DATA CD 8, 56 DATA DVD 8, 56 DATE 59 DIGITAL OUT 72 Digital output 72 DIMMER 70 Display Control Menu Display 14 80US Front panel display 12 Setup Display 67 DOLBY DIGITAL 49, 72, 76 DOWNMIX 72 DTS 49, 72, 76 DVD 8, 25, 77 DVD+RW 8, 26, 77 DVD's menu 28 DVD...
... audio signal format 50 Child Lock 26 Connecting 18 Continuous play CD/VIDEO CD 25 DVD 25 Control Menu 14 CUSTOM 67 CUSTOM PARENTAL CONTROL 62 CUSTOM PICTURE MODE 53 CUSTOM SETUP 70 D DATA CD 8, 56 DATA DVD 8, 56 DATE 59 DIGITAL OUT 72 Digital output 72 DIMMER 70 Display Control Menu Display 14 80US Front panel display 12 Setup Display 67 DOLBY DIGITAL 49, 72, 76 DOWNMIX 72 DTS 49, 72, 76 DVD 8, 25, 77 DVD+RW 8, 26, 77 DVD's menu 28 DVD...


