
Operating Instructions
Page 3
... camcorder. Your Digital camcorder is for help preserve our environment by returning your local authorities or the Electronics Industries Alliance (http://www.eiae.org). 3 For disposal or recycling information, please contact your used rechargeable batteries to the collection and recycling ...contains mercury. Connect the equipment into an outlet on your authority to the presence of Conformity Trade Name: SONY Model No.: DSR-PD170 Responsible Party: Sony Electronics Inc. This symbol is intended to alert the user to the presence of the following two conditions...
... camcorder. Your Digital camcorder is for help preserve our environment by returning your local authorities or the Electronics Industries Alliance (http://www.eiae.org). 3 For disposal or recycling information, please contact your used rechargeable batteries to the collection and recycling ...contains mercury. Connect the equipment into an outlet on your authority to the presence of Conformity Trade Name: SONY Model No.: DSR-PD170 Responsible Party: Sony Electronics Inc. This symbol is intended to alert the user to the presence of the following two conditions...
Operating Instructions
Page 4
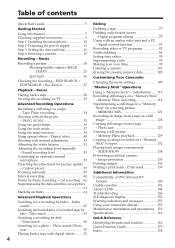
... About i.LINK 144 Troubleshooting 146 Self-diagnosis display 152 Warning indicators and messages 153 Using your own titles 99 Labeling a cassette 101 Erasing the cassette memory data 103 Customizing Your Camcorder Changing the menu settings 105 "Memory Stick" Operations Using a "Memory Stick" - Tape Photo recording 34 Shooting with an analog video unit and...
... About i.LINK 144 Troubleshooting 146 Self-diagnosis display 152 Warning indicators and messages 153 Using your own titles 99 Labeling a cassette 101 Erasing the cassette memory data 103 Customizing Your Camcorder Changing the menu settings 105 "Memory Stick" Operations Using a "Memory Stick" - Tape Photo recording 34 Shooting with an analog video unit and...
Operating Instructions
Page 5
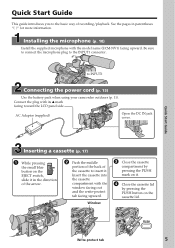
... facing out and the write-protect tab facing upward. Be sure to connect the microphone plug to INPUT1 Connecting the power cord (p. 15) Use the battery pack when using your camcorder outdoors (p. 11). Insert the cassette into the cassette compartment with its v mark facing toward the LCD panel side. to the INPUT1 connector...
... facing out and the write-protect tab facing upward. Be sure to connect the microphone plug to INPUT1 Connecting the power cord (p. 15) Use the battery pack when using your camcorder outdoors (p. 11). Insert the cassette into the cassette compartment with its v mark facing toward the LCD panel side. to the INPUT1 connector...
Operating Instructions
Page 6
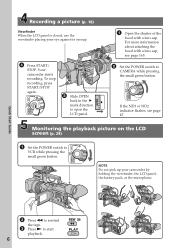
... playback. POWER If the ND1 or ND2 indicator flashes, see page 165. 2 Set the POWER switch to VCR while pressing the small green button. Your camcorder starts recording. Quick Start Guide 2 Press m to rewind REW the tape. 3 Press N to open the LCD panel. Recording a picture (p. 18) ...Viewfinder When the LCD panel is closed, use the viewfinder placing your camcorder by holding the viewfinder, the LCD panel, the battery pack, or the microphone. MEMORY OFF CAMERA (CHG) VCR 4 Press START/ STOP. OPEN ...
... playback. POWER If the ND1 or ND2 indicator flashes, see page 165. 2 Set the POWER switch to VCR while pressing the small green button. Your camcorder starts recording. Quick Start Guide 2 Press m to rewind REW the tape. 3 Press N to open the LCD panel. Recording a picture (p. 18) ...Viewfinder When the LCD panel is closed, use the viewfinder placing your camcorder by holding the viewfinder, the LCD panel, the battery pack, or the microphone. MEMORY OFF CAMERA (CHG) VCR 4 Press START/ STOP. OPEN ...
Operating Instructions
Page 7
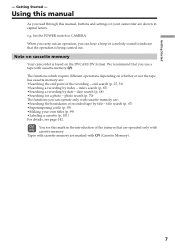
...operation, you can operate only with cassette memory are marked with cassette memory. The functions which require different operations depending on cassette memory Your camcorder is being carried out. Getting Started - index search (p. 65) •Searching a recording by index - photo search (p. 70) The ...functions you read through this manual, buttons and settings on the DVCAM/DV format. Using this mark in capital letters. Set the POWER switch to indicate that you use a tape with cassette memory are : •Searching the boundaries of recorded tape by title - ...
...operation, you can operate only with cassette memory are marked with cassette memory. The functions which require different operations depending on cassette memory Your camcorder is being carried out. Getting Started - index search (p. 65) •Searching a recording by index - photo search (p. 70) The ...functions you read through this manual, buttons and settings on the DVCAM/DV format. Using this mark in capital letters. Set the POWER switch to indicate that you use a tape with cassette memory are : •Searching the boundaries of recorded tape by title - ...

Operating Instructions
Page 8
... points are operational for long periods may be contrary to malfunction. Letting your camcorder to the provision of the copyright laws. Doing so might cause your camcorder exposed to malfunction. Using this malfunction cannot be some tiny black points and/or bright points (white, red, blue or green ...in color) that constantly appear on camcorder care Lens and LCD screen/finder •The LCD screen and the finder are manufactured using extremely high-precision technology, so over 99.99% of the pixels are normal in the ...
... points are operational for long periods may be contrary to malfunction. Letting your camcorder to the provision of the copyright laws. Doing so might cause your camcorder exposed to malfunction. Using this malfunction cannot be some tiny black points and/or bright points (white, red, blue or green ...in color) that constantly appear on camcorder care Lens and LCD screen/finder •The LCD screen and the finder are manufactured using extremely high-precision technology, so over 99.99% of the pixels are normal in the ...
Operating Instructions
Page 10
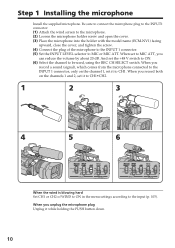
... or MIC ATT. And set the +48 V switch to ON. (6) Select the channel to MIC ATT, you record both on the channel 1, set to be used, using the REC CH SELECT switch. When set it while holding the PUSH button down. 10 When you record a sound (signal), which comes from the microphone...
... or MIC ATT. And set the +48 V switch to ON. (6) Select the channel to MIC ATT, you record both on the channel 1, set to be used, using the REC CH SELECT switch. When set it while holding the PUSH button down. 10 When you record a sound (signal), which comes from the microphone...
Operating Instructions
Page 11
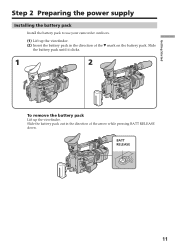
Slide the battery pack out in the direction of the arrow while pressing BATT RELEASE down. Slide the battery pack until it clicks. 1 2 To remove the battery pack Lift up the viewfinder. (2) Insert the battery pack in the direction of the V mark on the battery pack. BATT RELEASE 11 Getting Started Step 2 Preparing the power supply Installing the battery pack Install the battery pack to use your camcorder outdoors. (1) Lift up the viewfinder.
Slide the battery pack out in the direction of the arrow while pressing BATT RELEASE down. Slide the battery pack until it clicks. 1 2 To remove the battery pack Lift up the viewfinder. (2) Insert the battery pack in the direction of the V mark on the battery pack. BATT RELEASE 11 Getting Started Step 2 Preparing the power supply Installing the battery pack Install the battery pack to use your camcorder outdoors. (1) Lift up the viewfinder.

Operating Instructions
Page 12
...MEMORY OFF CAMERA (CHG) After charging the battery pack Disconnect the AC Adaptor from the DC IN jack on your camcorder to the DC IN jack with your camcorder. Charging begins. The remaining battery time is completed. The indicator may not be displayed. 12 Fully charging the battery... allows you to be correct, depending on the conditions in the viewfinder indicates the recording time using the viewfinder. When you are recording. Your camcorder operates only with the "InfoLITHIUM" battery pack (L series). (1) Open the DC IN jack cover and connect the AC...
...MEMORY OFF CAMERA (CHG) After charging the battery pack Disconnect the AC Adaptor from the DC IN jack on your camcorder to the DC IN jack with your camcorder. Charging begins. The remaining battery time is completed. The indicator may not be displayed. 12 Fully charging the battery... allows you to be correct, depending on the conditions in the viewfinder indicates the recording time using the viewfinder. When you are recording. Your camcorder operates only with the "InfoLITHIUM" battery pack (L series). (1) Open the DC IN jack cover and connect the AC...

Operating Instructions
Page 13
... parentheses "( )" indicate the time using the AC Adaptor Be sure to be shorter. 13 Until your camcorder. * Approximate minutes when recording while you use it until it near the wall outlet. When using a normally charged battery. This may be used for a long time, charge the... battery pack once fully, and then use a fully charged battery Numbers in...
... parentheses "( )" indicate the time using the AC Adaptor Be sure to be shorter. 13 Until your camcorder. * Approximate minutes when recording while you use it until it near the wall outlet. When using a normally charged battery. This may be used for a long time, charge the... battery pack once fully, and then use a fully charged battery Numbers in...

Operating Instructions
Page 14
... the battery pack fully again. "InfoLITHIUM" is a trademark of battery packs may not be shorter if you use your camcorder. If the camcorder is immediately turned off Even if the remaining battery time is displayed. 14 Step 2 Preparing the power supply Playing...pack which can exchange data such as battery consumption with the "InfoLITHIUM" battery. Your camcorder operates only with compatible video equipment. The "InfoLITHIUM" is charged a little. •Some types of Sony Corporation. What is compatible with the "InfoLITHIUM" battery pack (L series). This unit is...
... the battery pack fully again. "InfoLITHIUM" is a trademark of battery packs may not be shorter if you use your camcorder. If the camcorder is immediately turned off Even if the remaining battery time is displayed. 14 Step 2 Preparing the power supply Playing...pack which can exchange data such as battery consumption with the "InfoLITHIUM" battery. Your camcorder operates only with compatible video equipment. The "InfoLITHIUM" is charged a little. •Some types of Sony Corporation. What is compatible with the "InfoLITHIUM" battery pack (L series). This unit is...

Operating Instructions
Page 15
...;Do not use your camcorder for a long time, we recommend that the battery pack cannot supply any power if the power cord is connected to the DC IN jack, even when the power cord is not plugged into a wall outlet. Using a car battery Use the Sony DC Adaptor/Charger (optional). 15 Notes &#...8226;The power cord must only be changed at an authorized service shop. •AC Adaptor can supply power even if the battery pack is attached to your camcorder with the plug's v mark facing ...
...;Do not use your camcorder for a long time, we recommend that the battery pack cannot supply any power if the power cord is connected to the DC IN jack, even when the power cord is not plugged into a wall outlet. Using a car battery Use the Sony DC Adaptor/Charger (optional). 15 Notes &#...8226;The power cord must only be changed at an authorized service shop. •AC Adaptor can supply power even if the battery pack is attached to your camcorder with the plug's v mark facing ...
Operating Instructions
Page 16
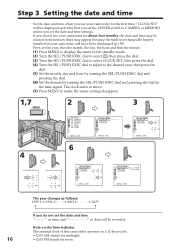
Note on the time indicator The internal clock of this camcorder operates on a 12-hour cycle. •12:00 AM stands for midnight. 16 ...the year, then the month, the day, the hour and then the minute. (1) Press MENU to display the menu in your camcorder for the first time. The clock starts to move. (7) Press MENU to make the menu settings disappear. 1,7 2 3 MENU ...POWER switch to CAMERA or MEMORY unless you do not use your camcorder will be recorded. Step 3 Setting the date and time Set the date and time when you use your camcorder for about four months, the date and time may...
Note on the time indicator The internal clock of this camcorder operates on a 12-hour cycle. •12:00 AM stands for midnight. 16 ...the year, then the month, the day, the hour and then the minute. (1) Press MENU to display the menu in your camcorder for the first time. The clock starts to move. (7) Press MENU to make the menu settings disappear. 1,7 2 3 MENU ...POWER switch to CAMERA or MEMORY unless you do not use your camcorder will be recorded. Step 3 Setting the date and time Set the date and time when you use your camcorder for about four months, the date and time may...

Operating Instructions
Page 17
... cassette compartment automatically opens. (3) Push the middle portion of the back of the arrow. Note The cassette lid will not be closed when you use cassettes with the window facing out and the write-protect tab facing upward. (4) Close the cassette compartment by pressing the PUSH mark on it. ... 5 PUSH Write-protect tab PUSH To eject a cassette Follow the procedure above, and take out the cassette in the direction of the cassette to use this function properly (p. 142). If the grip strap prevents the cassette lid from opening fully Adjust the length of the lid other than the PUSH...
... cassette compartment automatically opens. (3) Push the middle portion of the back of the arrow. Note The cassette lid will not be closed when you use cassettes with the window facing out and the write-protect tab facing upward. (4) Close the cassette compartment by pressing the PUSH mark on it. ... 5 PUSH Write-protect tab PUSH To eject a cassette Follow the procedure above, and take out the cassette in the direction of the cassette to use this function properly (p. 142). If the grip strap prevents the cassette lid from opening fully Adjust the length of the lid other than the PUSH...

Operating Instructions
Page 18
...you change the position during recording, the brightness of the ND FILTER selector before shooting. See "Using the ND filter" on the rear. To stop recording, press START/STOP again. You can use REC START/STOP located on the handle or front instead of the B mark to open the ... a lens cap, see page 165. (2) Install the power source and insert a cassette. Basics - This is set to CAMERA while pressing the small green button. Your camcorder is not a malfunction. Recording - See "Step 2" to "Step 4" (p.11 to 1 or 2. Note Fasten the grip strap firmly. 18 - Set the ND FILTER ...
...you change the position during recording, the brightness of the ND FILTER selector before shooting. See "Using the ND filter" on the rear. To stop recording, press START/STOP again. You can use REC START/STOP located on the handle or front instead of the B mark to open the ... a lens cap, see page 165. (2) Install the power source and insert a cassette. Basics - This is set to CAMERA while pressing the small green button. Your camcorder is not a malfunction. Recording - See "Step 2" to "Step 4" (p.11 to 1 or 2. Note Fasten the grip strap firmly. 18 - Set the ND FILTER ...

Operating Instructions
Page 19
... on the cassette. The playback picture may be distorted or the time code may not be played back with cassette memory, however, you use a tape with your camcorder. If you can record on a cassette. Cassettes that can be smooth. The LOCK switch is 2/3 time that indicated on your PC ...the DVCAM format and the DV format on a tape in LP mode in the menu settings before shooting (p. 105). Note on mini DV cassettes using your camcorder You can no longer be written properly between the last scene you record on a tape 1.5 times longer than the DVCAM format. The picture ...
... on the cassette. The playback picture may be distorted or the time code may not be played back with cassette memory, however, you use a tape with your camcorder. If you can record on a cassette. Cassettes that can be smooth. The LOCK switch is 2/3 time that indicated on your PC ...the DVCAM format and the DV format on a tape in LP mode in the menu settings before shooting (p. 105). Note on mini DV cassettes using your camcorder You can no longer be written properly between the last scene you record on a tape 1.5 times longer than the DVCAM format. The picture ...
Operating Instructions
Page 20
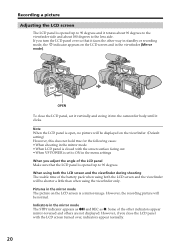
... When you turn the LCD panel over , indicators appear normally. 20 Some of the battery pack when using the viewfinder only. If you adjust the angle of the LCD panel Make sure that it faces the other... indicators appear mirror-reversed and others are not displayed. When using both the LCD screen and the viewfinder during shooting The usable time of the other way in standby ...When VF POWER is set it vertically and swing it into the camcorder body until it rotates about 90 degrees to the viewfinder side and about 180 degrees to the lens side.
... When you turn the LCD panel over , indicators appear normally. 20 Some of the battery pack when using the viewfinder only. If you adjust the angle of the LCD panel Make sure that it faces the other... indicators appear mirror-reversed and others are not displayed. When using both the LCD screen and the viewfinder during shooting The usable time of the other way in standby ...When VF POWER is set it vertically and swing it into the camcorder body until it rotates about 90 degrees to the viewfinder side and about 180 degrees to the lens side.
Operating Instructions
Page 21
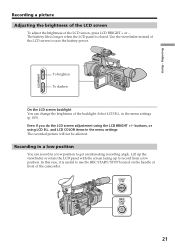
... B.L. The battery life is longer when the LCD panel is useful to save the battery power. Use the viewfinder instead of the LCD screen to use the REC START/STOP located on the handle or front of the camcorder. Select LCD B.L. and LCD COLOR items in the menu settings (p. 105). In this ...case, it is closed. buttons, or using the LCD BRIGHT +/- Recording in a low position You can change the brightness of the LCD screen, press LCD BRIGHT...
... B.L. The battery life is longer when the LCD panel is useful to save the battery power. Use the viewfinder instead of the LCD screen to use the REC START/STOP located on the handle or front of the camcorder. Select LCD B.L. and LCD COLOR items in the menu settings (p. 105). In this ...case, it is closed. buttons, or using the LCD BRIGHT +/- Recording in a low position You can change the brightness of the LCD screen, press LCD BRIGHT...
Operating Instructions
Page 22
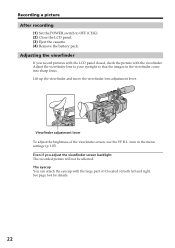
.... (4) Remove the battery pack. Even if you record pictures with the LCD panel closed, check the picture with the large part of the viewfinder screen, use the VF B.L. Viewfinder adjustment lever To adjust the brightness of it located on both left and right. Adjusting the viewfinder If you adjust the viewfinder...
.... (4) Remove the battery pack. Even if you record pictures with the LCD panel closed, check the picture with the large part of the viewfinder screen, use the VF B.L. Viewfinder adjustment lever To adjust the brightness of it located on both left and right. Adjusting the viewfinder If you adjust the viewfinder...

Operating Instructions
Page 23
...subject appears closer) "W" side: for wide-angle (subject appears farther away) When using the handle zoom lever, you cannot get a sharp focus, press the "W" side of the camcorder. You can change the zooming speed using the zoom lever/handle zoom lever Press the power zoom lever a little for ...a faster zoom. Basics Recording a picture Using the zoom feature To zoom using the handle zoom switch. When you shoot ...
...subject appears closer) "W" side: for wide-angle (subject appears farther away) When using the handle zoom lever, you cannot get a sharp focus, press the "W" side of the camcorder. You can change the zooming speed using the zoom lever/handle zoom lever Press the power zoom lever a little for ...a faster zoom. Basics Recording a picture Using the zoom feature To zoom using the handle zoom switch. When you shoot ...


